การแนะนำ
This manual provides comprehensive instructions for the installation, operation, and maintenance of your Lorex Solar Panel, designed exclusively for U471AA 2K Wire-Free cameras. This solar panel offers an environmentally-friendly solution to continuously power your camera, extending battery life and ensuring uninterrupted surveillance.
ข้อมูลด้านความปลอดภัย
- Ensure all connections are secure and waterproof to prevent damage from moisture.
- Do not attempt to disassemble or modify the solar panel. This may void the warranty and cause damage.
- Install the solar panel in a location where it is not easily accessible to unauthorized individuals.
- Avoid placing the solar panel near flammable materials or in areas with extreme temperatures outside its operating range.
- Use only the provided mounting hardware to ensure secure installation.
เนื้อหาแพ็คเกจ
ตรวจสอบว่ามีรายการทั้งหมดอยู่ในแพ็คเกจของคุณ:
- Lorex Solar Panel (Model: ACSOL2B)
- ตัวยึด
- สกรูยึดและปลั๊กผนัง
- USB Charging Cable (integrated with solar panel)
สินค้าเกินview
The Lorex Solar Panel is designed to provide continuous power to your compatible Lorex U471AA 2K Wire-Free cameras. It features a durable, weather-resistant design suitable for outdoor use.

รูปที่ 1: ด้านหน้า view of the Lorex Solar Panel, showing the photovoltaic cells and the integrated mounting base.

รูปที่ 2: มุม view of the Lorex Solar Panel, highlighting the adjustable mounting bracket for versatile positioning.
- Photovoltaic Cells: Convert sunlight into electrical energy.
- ตัวยึด: Allows for flexible positioning and angle adjustment.
- สายชาร์จ USB: Connects the solar panel to the camera.
- ไฟแสดงสถานะ LED: Provides status information (e.g., charging status).
- ระดับ IP66: Ensures the panel is weather-resistant against dust and powerful water jets.
การตั้งค่า
1. การเลือกตำแหน่งการติดตั้ง
Optimal performance of the solar panel depends on its placement. Select a location that receives direct sunlight for the majority of the day, ideally 4-6 hours of direct sunlight. Avoid areas with significant shade from trees, buildings, or other obstructions.
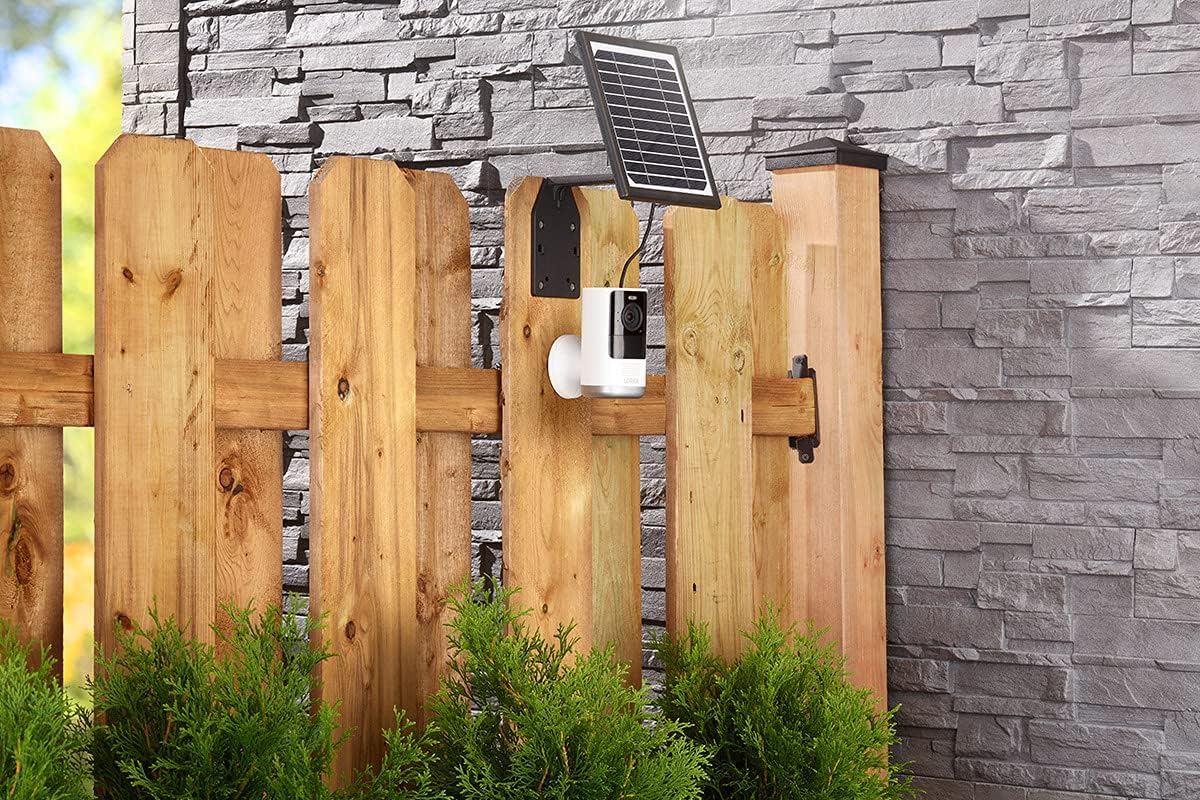
รูปที่ 3: Example installation on a wooden fence, demonstrating outdoor placement.

รูปที่ 4: Example installation on a stone wall, showing a common mounting surface.
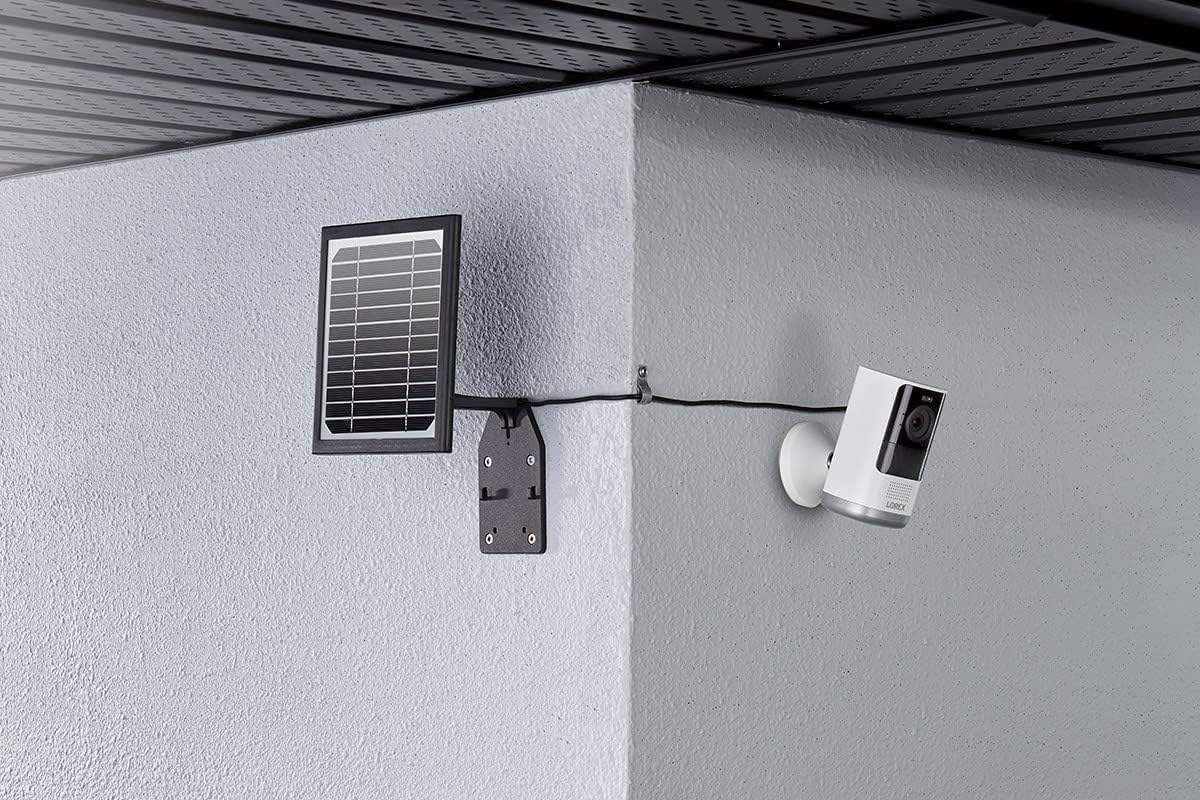
รูปที่ 5: Example installation in a corner, illustrating flexible mounting options.
2. การติดตั้งแผงโซล่าเซลล์
- Position the mounting bracket against the chosen surface. Use a pencil to mark the drill holes.
- Drill pilot holes at the marked locations. If mounting on masonry or stucco, insert the wall plugs.
- ยึดขายึดเข้ากับพื้นผิวโดยใช้สกรูที่ให้มา
- Attach the solar panel to the mounting bracket. Adjust the angle of the solar panel to maximize sun exposure. The panel should face the direction that receives the most direct sunlight throughout the day.
3. การเชื่อมต่อกับกล้อง
The solar panel comes with an integrated USB charging cable. Connect this cable to the charging port on your Lorex U471AA 2K Wire-Free camera.

รูปที่ 6: ด้านข้าง view illustrating the connection of the solar panel to the camera via the charging cable.
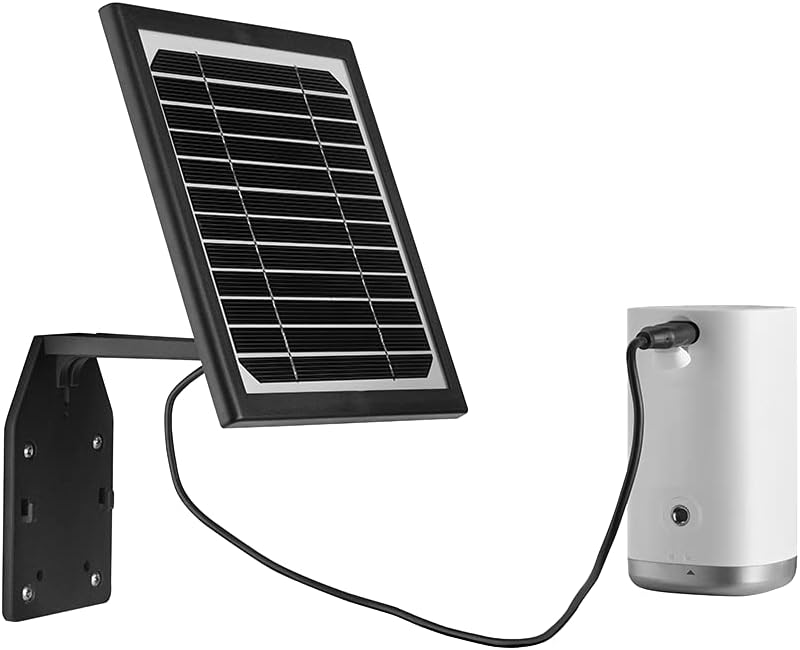
รูปที่ 7: ด้านหน้า view of the solar panel connected to the camera, showing the cable routing.
Ensure the connection is snug to maintain weather resistance. Once connected, the solar panel will begin charging the camera's battery when exposed to sufficient sunlight. The LED indicator on the solar panel will illuminate to confirm charging status.
การดำเนินงาน
The Lorex Solar Panel operates automatically. When exposed to sunlight, it converts solar energy into electrical energy, which is then used to charge the connected U471AA 2K Wire-Free camera's internal battery. The panel is designed to provide a trickle charge, maintaining the camera's battery level and reducing the need for manual recharging.
- ไฟแสดงสถานะการชาร์จ: Refer to your camera's user manual for specific battery status indicators. The solar panel itself may have an LED that indicates charging activity.
- ประสิทธิภาพการใช้พลังงาน: The panel is designed for high efficiency, even in less than ideal sunlight conditions, though direct sunlight is always preferred for optimal performance.
การซ่อมบำรุง
Regular maintenance ensures the longevity and efficiency of your solar panel.
- การทำความสะอาด: ทำความสะอาดพื้นผิวแผงโซล่าเซลล์เป็นระยะด้วยผ้านุ่มๆamp cloth to remove dust, dirt, or debris that may accumulate and reduce efficiency. Do not use abrasive cleaners or harsh chemicals.
- การตรวจสอบสิ่งกีดขวาง: Regularly check for any new obstructions (e.g., growing tree branches, new constructions) that might cast shadows on the panel and reduce its sun exposure.
- การตรวจสอบสายเคเบิล: Inspect the charging cable and connections for any signs of wear, damage, or corrosion. Ensure the connection to the camera remains secure and waterproof.
- ความปลอดภัยในการติดตั้ง: Periodically check that the mounting screws and bracket are still securely fastened, especially after strong winds or storms.
การแก้ไขปัญหา
| ปัญหา | สาเหตุที่เป็นไปได้ | สารละลาย |
|---|---|---|
| Camera battery not charging. | แสงแดดไม่เพียงพอ Panel surface is dirty. Cable connection is loose or damaged. Camera battery issue. | Relocate panel to an area with more direct sunlight. Clean the panel surface. Check and secure the USB cable connection. Inspect for damage. Test camera with a standard USB charger to rule out camera battery issues. |
| Solar panel LED not illuminating. | No sunlight. Panel is faulty. Cable not connected. | Ensure panel is exposed to direct sunlight. Contact Lorex support if problem persists after ensuring sunlight and connection. Verify the USB cable is securely connected to the camera. |
| แผงควบคุมดูเหมือนจะได้รับความเสียหายหลังการติดตั้ง | การติดตั้งที่ไม่เหมาะสม Environmental factors (e.g., severe weather). | Review installation steps to ensure correct mounting. Contact Lorex support for assistance if damage is significant. |
ข้อมูลจำเพาะ
- ยี่ห้อ: Lorex
- หมายเลขรุ่น: เอซีโซล2บี
- วัสดุ: ซิลิคอน
- ประสิทธิภาพ: ประสิทธิภาพสูง
- ประเภทตัวเชื่อมต่อ: ยูเอสบี
- กำลังสูงสุด: 3 วัตต์
- น้ำหนักสินค้า: 1.45 ปอนด์
- ขนาดแพ็คเกจ: 8.78 x 7.32 x 3.82 นิ้ว
- ระดับการป้องกันน้ำและฝุ่น: IP66 (ทนทานต่อสภาพอากาศ)
- ความเข้ากันได้: Lorex U471AA 2K Wire-Free Cameras
การรับประกันและการสนับสนุน
สำหรับข้อมูลการรับประกันและการสนับสนุนทางเทคนิค โปรดดูที่ Lorex อย่างเป็นทางการ webเยี่ยมชมเว็บไซต์หรือติดต่อฝ่ายบริการลูกค้าของ Lorex โดยตรง เก็บใบเสร็จรับเงินไว้เป็นหลักฐานการซื้อเพื่อใช้ในการเคลมประกัน
การสนับสนุน Lorex: www.lorex.com/support


