การแนะนำ
This manual provides detailed instructions for the installation, operation, and maintenance of your Venstar T1900 Residential Slimline Platinum Thermostat. Please read this manual thoroughly before attempting to install or operate the thermostat to ensure proper function and to avoid potential damage.
ข้อมูลด้านความปลอดภัยที่สำคัญ
- Always turn off power to the heating/cooling system at the main circuit breaker or fuse box before installing or servicing the thermostat.
- This thermostat operates on 24 Volts AC. Do not connect to line voltagอี (120V หรือ 240V)
- หากคุณไม่คุ้นเคยกับการเดินสายไฟ ควรให้ช่างผู้ชำนาญการดำเนินการติดตั้ง
- Do not short circuit the terminals on the gas valve or at the system control to test the thermostat. This will damage the thermostat and void the warranty.
- Ensure all wiring connections are secure and insulated to prevent short circuits.
เนื้อหาแพ็คเกจ
ตรวจสอบว่าแพ็คเกจของคุณมีรายการต่อไปนี้:
- ชุดควบคุมอุณหภูมิ Venstar T1900
- ฮาร์ดแวร์สำหรับติดตั้ง (สกรูและพุกยึดผนัง)
- คู่มือการใช้งาน (เอกสารนี้)
สินค้าเกินview
The Venstar T1900 is a 7-day programmable digital thermostat designed for residential use. It offers precise temperature control and energy-saving scheduling capabilities. This thermostat is compatible with heat/cool, heat pump, and dual-fuel systems, controlling up to three heat stages และสองเย็น stagใช่
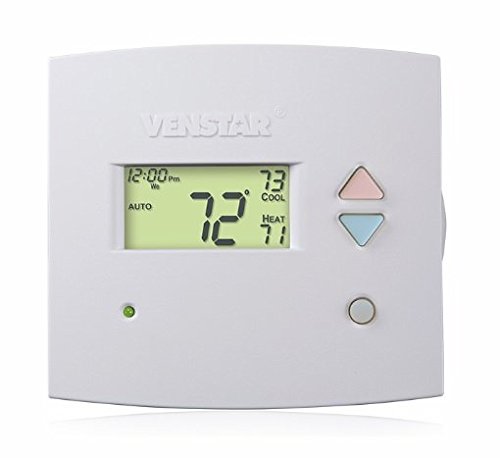
รูปที่ 1: ด้านหน้า view of the Venstar T1900 Thermostat. This image displays the thermostat's LCD screen and control buttons, indicating its slimline design.
คุณสมบัติหลัก:
- สามารถตั้งโปรแกรมได้ 7 วัน: Allows for customized heating and cooling schedules for each day of the week.
- ความเข้ากันได้ของระบบ: Works with heat/cool, dual-fuel, and heat pump systems.
- มัลติเอสtagอี การควบคุม: Manages up to three heat stages และสองเย็น stagใช่
- ความสามารถในการควบคุมระยะไกล: Controllable by phone using an optional add-on (sold separately).
- Automatic or Manual Operation: Provides flexibility for scheduled or on-demand temperature adjustments.
คู่มือการติดตั้ง
เครื่องมือที่จำเป็น:
- ไขควงปากแฉกและ/หรือปากแบน
- Drill with appropriate drill bit (if installing new wall anchors)
- ระบำลวด
- ดินสอ
- ระดับ (ตัวเลือก)
1. ปิดเครื่อง
Locate the circuit breaker or fuse box that controls your heating and cooling system. Turn off the power completely before proceeding with any wiring.
2. Remove Old Thermostat (if applicable)
- ถอดฝาครอบของเทอร์โมสตัทตัวเก่าออกอย่างระมัดระวัง
- Take a picture of the existing wiring connections for reference.
- Label each wire with the terminal designation it was connected to (e.g., R, G, Y, W).
- Disconnect the wires and remove the old thermostat's mounting plate from the wall.
3. ติดตั้งฐานเทอร์โมสตัทใหม่
- Separate the front cover of the T1900 thermostat from its base plate.
- Position the base plate on the wall where you want to install the thermostat. Ensure it is level.
- ทำเครื่องหมายรูยึดด้วยดินสอ
- หากจำเป็น ให้เจาะรูนำร่องก่อน แล้วจึงใส่พุกยึดผนัง
- ยึดแผ่นฐานของเทอร์โมสตัทเข้ากับผนังโดยใช้สกรูที่ให้มา
4. การเดินสาย
Connect the wires from your HVAC system to the corresponding terminals on the T1900 thermostat base. Refer to the wiring diagram provided with your specific HVAC system for precise connections. Ensure wires are stripped approximately 3/8 inch and securely fastened under the terminal screws.
การกำหนดสถานีปลายทางทั่วไป:
- R/Rc/Rh: 24V Power (Heating/Cooling)
- C: Common (24V return)
- G: พัดลม
- Y/Y1: คอมเพรสเซอร์ Stagอี 1 (คูลลิ่ง)
- Y2: คอมเพรสเซอร์ Stagอี 2 (คูลลิ่ง)
- W/W1: ความร้อน Stagอี 1 (ความร้อน)
- ส 2: ความร้อน Stagอี 2 (ความร้อน)
- O / B: Reversing Valve (Heat Pumps)
Note: The T1900 supports various system types. Consult the detailed wiring diagrams in the full installation manual for specific configurations (e.g., heat pump with auxiliary heat, conventional multi-stagระบบอี)
5. ติดตั้งเทอร์โมสตัทเข้ากับฐาน
Once wiring is complete and verified, carefully align the thermostat front cover with the mounted base plate and snap it into place.
6. ฟื้นฟูพลัง
Return to your circuit breaker or fuse box and restore power to your heating and cooling system.
การตั้งค่าเริ่มต้น
Upon initial power-up, the thermostat may prompt you to configure basic settings. Follow the on-screen instructions to set the current date, time, and system type (e.g., Conventional, Heat Pump).
System Type Configuration:
It is crucial to correctly configure the thermostat for your specific HVAC system. Incorrect settings can lead to improper operation or damage. Access the installer settings menu (refer to the full installation guide for specific button sequences) to select:
- ประเภทระบบ: Heat/Cool, Heat Pump, Dual Fuel
- จำนวนฮีตเอสtages
- จำนวนคูลเอสtages
- Reversing Valve Operation: O (ความเย็น) หรือ B (ความร้อน)
คำแนะนำการใช้งาน
ทำความเข้าใจกับจอแสดงผล:
The LCD screen displays the current temperature, set temperature, system mode, fan mode, time, and programming status. Refer to the icons and indicators on the screen for current operational status.
Setting System Mode:
กดปุ่ม โหมด button to cycle through available system modes:
- ความร้อน: The system will operate to maintain the heating setpoint.
- เย็น: The system will operate to maintain the cooling setpoint.
- อัตโนมัติ: เทอร์โมสตัทจะสลับระหว่างโหมดทำความร้อนและทำความเย็นโดยอัตโนมัติตามความจำเป็น เพื่อรักษาระดับอุณหภูมิที่ตั้งไว้
- ปิด: ระบบทำความร้อนและความเย็นถูกปิด
Setting Fan Mode:
กดปุ่ม FAN button to cycle through fan modes:
- อัตโนมัติ: พัดลมจะทำงานเฉพาะเมื่อระบบทำความร้อนหรือทำความเย็นกำลังทำงานอยู่เท่านั้น
- บน: พัดลมจะทำงานอย่างต่อเนื่อง โดยไม่คำนึงถึงคำสั่งทำความร้อนหรือทำความเย็น
ปรับอุณหภูมิ:
ใช้ UP และ ลง arrow buttons to adjust the desired temperature setpoint. In programmable modes, this will temporarily override the schedule until the next scheduled change.
Programming Schedules (7-Day):
The T1900 allows for 7-day programming, enabling different schedules for each day of the week. This feature helps save energy by adjusting temperatures when you are away or asleep.
- กดปุ่ม โปรแกรม ปุ่มเพื่อเข้าสู่โหมดการเขียนโปรแกรม
- ใช้ วัน button to select the day or group of days you wish to program (e.g., Mon-Fri, Sat-Sun, or individual days).
- ใช้ เวลา button to cycle through the four available periods: Wake, Leave, Return, Sleep.
- ใช้ UP และ ลง arrow buttons to set the desired temperature for each period.
- ใช้ ถือ button to exit programming mode or save changes.
Refer to the detailed programming section in the full user guide for advanced options and specific button sequences.
Remote Control (Optional Add-on):
The Venstar T1900 thermostat can be controlled remotely via a phone using an optional add-on module (sold separately). This module connects to the thermostat and allows for remote access and control through a dedicated application. Installation and setup instructions for the remote control module are provided with the module itself.
การซ่อมบำรุง
การทำความสะอาดเทอร์โมสตัท:
เพื่อรักษารูปลักษณ์และการทำงานของเทอร์โมสตัทของคุณ ให้เช็ดภายนอกด้วยผ้านุ่มๆ เป็นระยะamp ใช้ผ้าเช็ดทำความสะอาดเท่านั้น ห้ามใช้สารทำความสะอาดที่มีฤทธิ์กัดกร่อน สารละลาย หรือสเปรย์เคมี เพราะอาจทำให้ชิ้นส่วนพลาสติกและชิ้นส่วนอิเล็กทรอนิกส์เสียหายได้
การเปลี่ยนแบตเตอรี่:
The Venstar T1900 thermostat does not require batteries for operation as it is powered by the 24V AC system.
การแก้ไขปัญหา
If you experience issues with your Venstar T1900 thermostat, consult the following common problems and solutions:
| ปัญหา | สาเหตุที่เป็นไปได้ | สารละลาย |
|---|---|---|
| หน้าจอเทอร์โมสตัทว่างเปล่า | ไม่มีไฟเข้าเทอร์โมสตัท | ตรวจสอบเบรกเกอร์สำหรับระบบ HVAC ของคุณ ตรวจสอบให้แน่ใจว่าการเชื่อมต่อสายไฟทั้งหมดแน่นหนาดี |
| Heating/Cooling system does not respond | เลือกโหมดระบบไม่ถูกต้อง; ปัญหาการเดินสายไฟ; ระบบถูกล็อก | Verify the system mode (HEAT/COOL/AUTO). Check wiring connections. Wait 5 minutes for system lockout to reset. |
| การอ่านอุณหภูมิดูเหมือนจะไม่แม่นยำ | ตำแหน่งของเทอร์โมสตัท; สิ่งกีดขวางเซ็นเซอร์ | Ensure the thermostat is not exposed to direct sunlight, drafts, or heat sources. Clean any dust from the thermostat vents. |
| Programming schedule is not working | Program not saved; temporary override active; incorrect time/day setting. | Ensure programs are saved. Check if a temporary override is active and cancel it. Verify current time and day settings. |
| พัดลมทำงานต่อเนื่องในโหมด AUTO | Fan mode set to ON; wiring issue. | Press the FAN button to ensure it is set to AUTO. Check fan wiring. |
If these solutions do not resolve the issue, please contact customer support or a qualified HVAC technician.
ข้อมูลจำเพาะ
| คุณสมบัติ | ข้อมูลจำเพาะ |
|---|---|
| ยี่ห้อ | Venstar |
| ชื่อรุ่น | เวนสตาร์ T1900 |
| ประเภทตัวควบคุม | ปุ่มกด |
| คุณสมบัติพิเศษ | สามารถตั้งโปรแกรมได้ |
| สี | สีขาว |
| การใช้งานเฉพาะของผลิตภัณฑ์ | Heat Pump, Heater |
| ประเภทการควบคุมอุณหภูมิ | Programmable, Smart/Remote (with add-on) |
| เล่มที่tage | AC 24 โวลต์ |
| ประเภทจอภาพ | LCD หรือ LED |
| วิธีการควบคุม | Remote (with add-on) |
| แสงไฟแบ็คไลท์ | ใช่ |
| ขนาดสินค้า | 5.3 x 2 x 2 นิ้ว |
| น้ำหนักสินค้า | 0.01 ออนซ์ |
| จำเป็นต้องใช้แบตเตอรี่หรือไม่? | เลขที่ |
ข้อมูลการรับประกัน
Venstar products are manufactured to high-quality standards. This product is covered by a limited warranty against defects in materials and workmanship. The specific terms and duration of the warranty may vary. Please refer to the warranty card included with your product or visit the official Venstar webเว็บไซต์สำหรับข้อมูลการรับประกันและขั้นตอนการลงทะเบียนโดยละเอียด
การสนับสนุนลูกค้า
For technical assistance, troubleshooting, or warranty inquiries, please contact Venstar customer support. You can typically find contact information, including phone numbers and email addresses, on the official Venstar webงาน (www.venstar.comหรือบนบรรจุภัณฑ์ของผลิตภัณฑ์
When contacting support, please have your thermostat model number (T1900) and any relevant purchase information ready.


