1. บทนำ
This manual provides essential information for setting up, operating, and maintaining your Prechen 15.6 Inch Portable Touchscreen Monitor. Featuring a 10-point multi-touch IPS FHD 1080P display with a 60Hz refresh rate, this monitor is designed for versatility and clear visuals. It includes built-in stereo speakers and supports various connectivity options, making it suitable for diverse environments and applications.
2. อะไรอยู่ในกล่อง
ตรวจสอบว่ามีรายการทั้งหมดต่อไปนี้รวมอยู่ในแพ็คเกจของคุณ:
- Prechen 15.6 Inch Portable Touchscreen Monitor
- สาย HDMI เป็น HDMI
- สาย USB-A ถึง USB-C
- สาย USB-C ถึง USB-C
- อะแดปเตอร์แปลงไฟ
- Protective Carry Sleeve
- คู่มือผู้ใช้และคู่มือเริ่มต้นอย่างรวดเร็ว

3. สินค้าหมดview
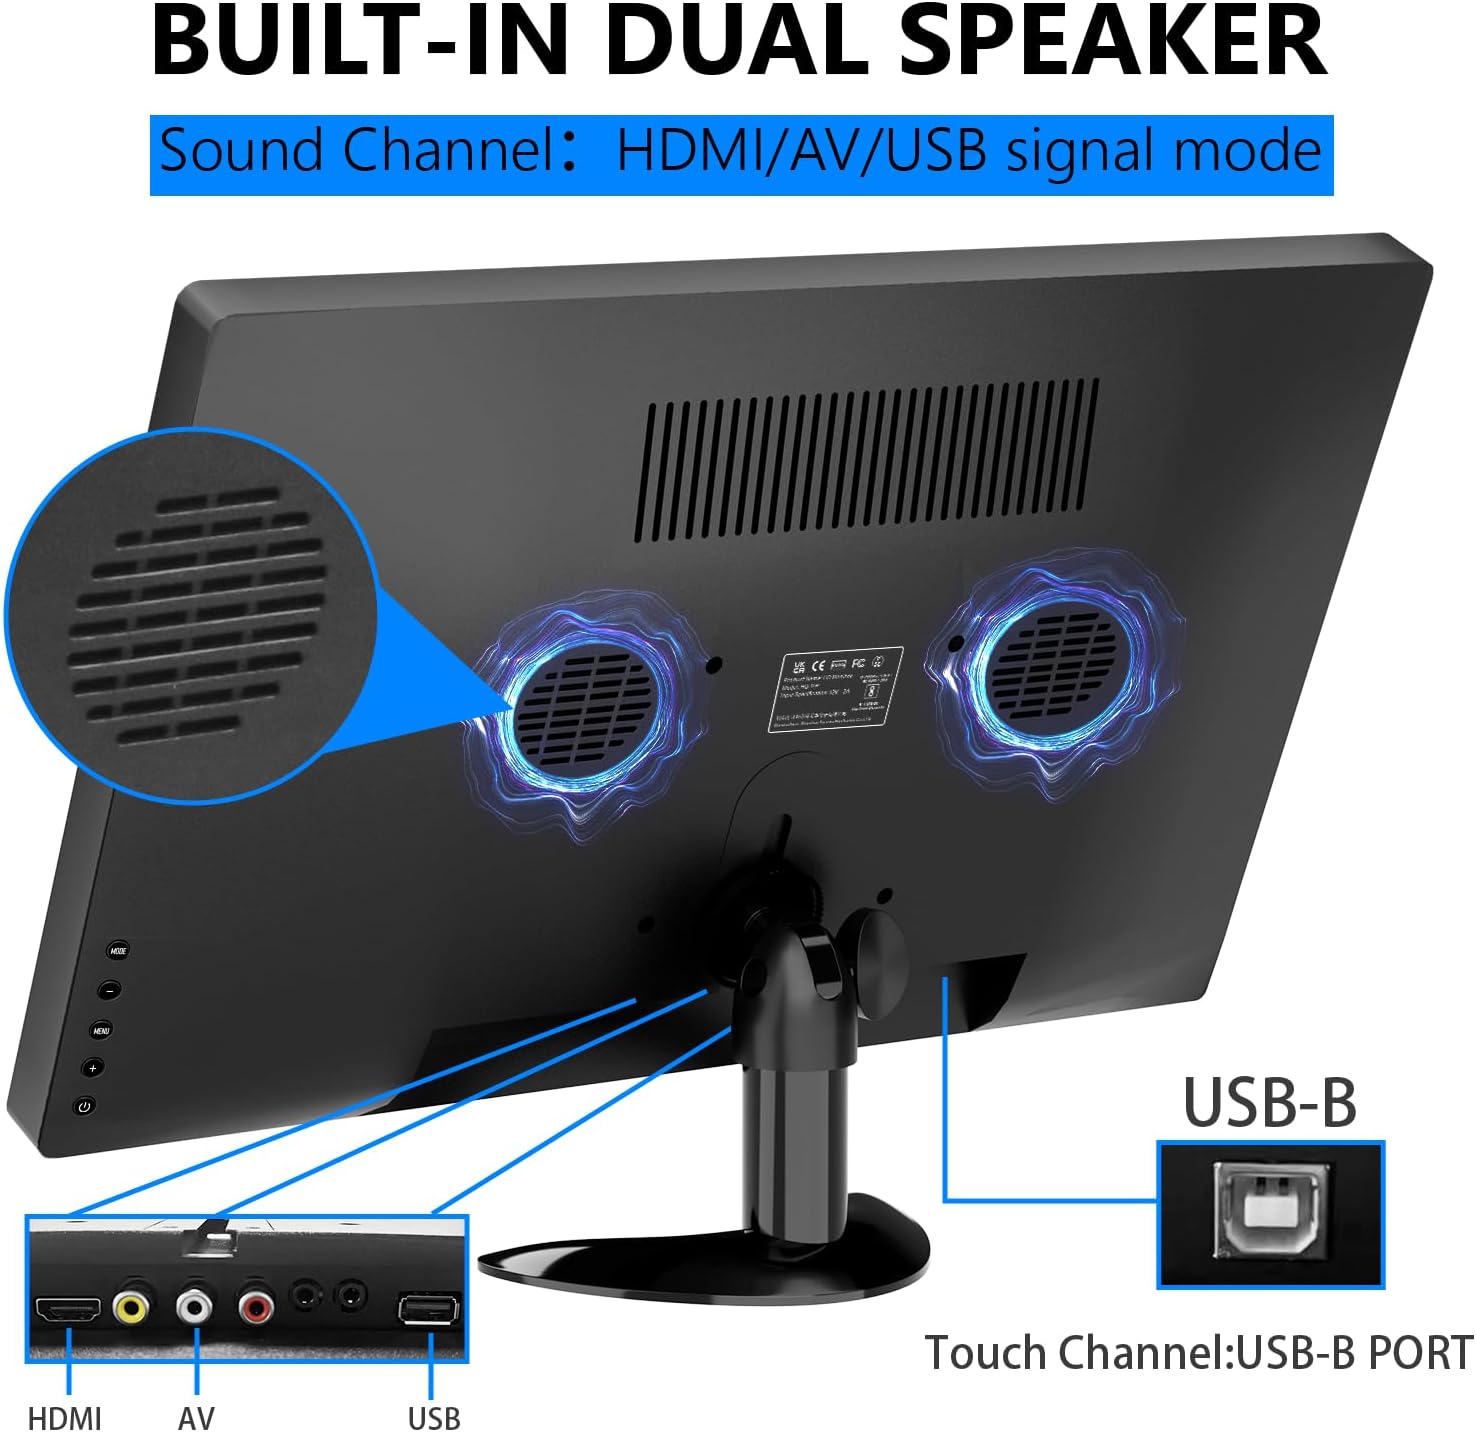
3.1 พอร์ตและปุ่มควบคุม
The monitor features various ports and control buttons for connectivity and settings adjustment:
- อินพุตไฟ DC: สำหรับแหล่งจ่ายไฟภายนอก
- อินพุต VGA: For connecting to devices with VGA output.
- อินพุต HDMI: สำหรับการรับสัญญาณวิดีโอและเสียงความละเอียดสูง
- อินพุต AV: For analog video and audio input.
- อินพุตไมโครโฟน: For microphone connection.
- แจ็คหูฟัง: สำหรับการเชื่อมต่อหูฟังหรือลำโพงภายนอก
- พอร์ต USB: สำหรับเชื่อมต่ออุปกรณ์ USB
- พอร์ต USB-B: Essential for enabling touch functionality when connected to a compatible device.
- ปุ่มควบคุม: For navigating the On-Screen Display (OSD) menu, adjusting brightness, volume, and other settings.

3.2 ขาตั้งแบบปรับได้
The monitor features an integrated adjustable stand that allows for up to 180° rotation, providing versatile viewing angles for various uses.

4. การตั้งค่า
4.1 การเชื่อมต่อสายไฟ
Connect the power adapter to the DC power input on the monitor and plug it into a power outlet. Alternatively, if using a USB-C connection that supports power delivery, the monitor can draw power directly from the connected device.
4.2 Video and Touch Connection
The monitor supports multiple connection methods. For touch functionality, a USB-B connection is required in addition to the video input.
- การเชื่อมต่อ HDMI: Connect one end of the HDMI cable to your device and the other end to the HDMI input on the monitor. For touch functionality, also connect the USB-B cable from your device to the USB-B port on the monitor.
- การเชื่อมต่อ USB-C: If your device has a full-featured USB-C port (supporting video, audio, and power delivery), connect the USB-C to USB-C cable directly from your device to one of the USB-C ports on the monitor. This single cable can provide video, audio, power, and touch functionality.
- VGA/AV Connection: Connect the appropriate VGA or AV cable from your device to the monitor. For touch functionality, a separate USB-B connection from your device to the monitor is required.

4.3 Compatibility Notes for Touch Function
The touch function is compatible with Windows and Chromebook systems. However, it is ไม่เข้ากัน โดยมีอุปกรณ์ดังต่อไปนี้:
- PS3/4/5
- นินเทนโดสวิตช์
- คอนโซล Xbox
- ดาดฟ้าไอน้ำ
- ไฟร์ทีวีสติ๊ก
- ไฟร์ทีวีคิวบ์
- Some Apple products

5. การใช้งานจอภาพ
5.1 เปิด/ปิดเครื่อง
Press the power button located on the side of the monitor to turn it on or off. The power indicator light will illuminate when the monitor is active.
5.2 เมนูการแสดงผลบนหน้าจอ (OSD)
Use the control buttons to navigate the OSD menu. Here you can adjust various settings:
- ความสว่างและคอนทราสต์: Adjust display luminosity and contrast levels.
- ปริมาณ: Control the output level of the built-in stereo speakers.
- แหล่งสัญญาณเข้า: Select between HDMI, USB-C, VGA, or AV inputs.
- เอฟเฟกต์สี: Choose from various color modes to optimize your viewการสร้างประสบการณ์
- ภาษา: Select your preferred language for the OSD menu.
- การตั้งค่าระบบ: Access advanced display and power management options.
5.3 ท่าทางสัมผัสบนหน้าจอสัมผัส
The 10-point multi-touch display supports intuitive gestures for navigation and interaction:
- แตะ: Single tap to select items or activate functions.
- แตะสองครั้ง: Double tap to open files หรือแอปพลิเคชัน
- ลาก: Touch and drag to move items or scroll through content.
- ซูมเข้า/ออก: ใช้ท่าทางบีบสองนิ้วเพื่อซูมเข้าหรือออก
- หมุน: Use a two-finger twist gesture to rotate images or objects.
- ปัด: Swipe across the screen to navigate between pages or applications.

5.4 ลำโพงในตัว
The monitor is equipped with integrated dual stereo speakers, providing audio output without the need for external devices. Volume can be adjusted via the control buttons or the OSD menu.
6. ตัวเลือกการติดตั้ง
In addition to the adjustable stand, the monitor supports VESA 75x75mm wall mounting for fixed installations in offices, homes, or kiosks.

7. ข้อมูลจำเพาะ
| คุณสมบัติ | รายละเอียด |
|---|---|
| ขนาดสินค้า | 14.17 x 1.18 x 9.05 นิ้ว |
| น้ำหนักสินค้า | 4.2 ปอนด์ |
| ขนาดหน้าจอ | 15.6 นิ้ว |
| ปณิธาน | 1920 x 1080 พิกเซล (FHD 1080p) |
| อัตราส่วนภาพ | 16:9 น. |
| ความสว่างของภาพ | 300 แคนเดลา |
| คำอธิบายพื้นผิวหน้าจอ | มันเงา |
| พอร์ต USB รวม | 1 (USB-B for touch) |
| ผู้ผลิต | Shenzhen Kenowa Electronics Co., LTD |
8 การแก้ไขปัญหา
- ไม่มีจอแสดงผล: Ensure the monitor is powered on and all video cables (HDMI, USB-C, VGA, AV) are securely connected to both the monitor and your source device. Try different cables or ports if available.
- ฟังก์ชันสัมผัสไม่ทำงาน: Verify that the USB-B cable is correctly connected from your device to the monitor. Confirm your device's operating system (Windows/Chromebook) is compatible with the touch function. Note that gaming consoles and some Apple products do not support touch.
- ไม่มีเสียง: Check the monitor's volume settings via the OSD menu. Ensure your audio source is correctly selected and that any external headphones/speakers are properly connected to the earphone jack.
- Touch Screen Effect Displayed on Main Screen (Windows): If the touch effect is incorrectly displayed on your main laptop screen instead of the portable monitor, you may need to calibrate the touch screen. Access the 'Control Panel' -> 'Hardware and Sound' -> 'Tablet PC Settings'. In the 'Display Options', select 'InnoView' (or the corresponding name for your portable monitor) and then click 'Setup'. Follow the on-screen prompts to tap the portable monitor to identify it as the touchscreen.
9. การบำรุงรักษา
- การทำความสะอาดหน้าจอ: ใช้ผ้านุ่มไม่เป็นขุยเช็ดหน้าจอเบาๆ สำหรับรอยเปื้อนฝังแน่น ให้เช็ดเบาๆampen the cloth with water or a screen-cleaning solution. Avoid using harsh chemicals, abrasive cleaners, or alcohol-based solutions.
- การทำความสะอาดทั่วไป: Wipe the exterior of the monitor with a soft, dry cloth. Keep vents clear of dust and debris to ensure proper airflow.
- พื้นที่จัดเก็บ: When not in use or during travel, store the monitor in its protective carry sleeve to prevent scratches and damage.
10. การรับประกันและการสนับสนุน
For warranty information, technical support, or service inquiries, please refer to the documentation included in your product package or contact Prechen customer service directly. Keep your purchase receipt for warranty claims.


