1. คำแนะนำด้านความปลอดภัยที่สำคัญ
Please read all instructions before using this sewing machine. This machine is intended for household use only.
DANGER - To reduce the risk of electric shock:
- ไม่ควรทิ้งเครื่องใช้ไฟฟ้าไว้โดยไม่มีใครดูแลเมื่อเสียบปลั๊กอยู่
- ถอดปลั๊กเครื่องนี้ออกจากเต้ารับไฟฟ้าทุกครั้งหลังใช้งานและก่อนทำความสะอาด
- ถอดปลั๊กทุกครั้งก่อนเปลี่ยนใหม่ampเปลี่ยนหลอดไฟเป็นชนิดเดียวกันที่มีอัตรา 15 วัตต์ (พื้นที่ 110-120V) หรือ 15 วัตต์ (พื้นที่ 220-240V)
WARNING - To reduce the risk of burns, fire, electric shock, or injury to persons:
- ไม่อนุญาตให้ใช้เป็นของเล่น จำาเป็นต้องให้ความสนใจอย่างใกล้ชิดเมื่อใช้งานเครื่องนี้โดยหรือใกล้กับเด็ก
- ใช้อุปกรณ์นี้ตามวัตถุประสงค์การใช้งานตามที่อธิบายไว้ในคู่มือนี้เท่านั้น ใช้เฉพาะไฟล์แนบที่แนะนำโดยผู้ผลิตตามที่ระบุไว้ในคู่มือนี้
- ห้ามใช้งานเครื่องนี้หากมีสายไฟหรือปลั๊กชำรุด หากใช้งานไม่ได้ หากทำหล่นหรือเสียหาย หรือตกน้ำ ส่งคืนอุปกรณ์ไปยังตัวแทนจำหน่ายหรือศูนย์บริการที่ได้รับอนุญาตที่ใกล้ที่สุดเพื่อทำการตรวจสอบ ซ่อมแซม ปรับไฟฟ้าหรือกลไก
- ห้ามใช้งานเครื่องโดยที่ช่องระบายอากาศถูกปิดกั้น รักษาช่องระบายอากาศของจักรเย็บผ้าและตัวควบคุมเท้าให้ปราศจากการสะสมของเศษผ้า ฝุ่น และผ้าหลวม
- วางนิ้วให้ห่างจากชิ้นส่วนที่เคลื่อนไหวทั้งหมด ต้องใช้ความระมัดระวังเป็นพิเศษรอบ ๆ เข็มจักรเย็บผ้า
- ควรใช้แผ่นยึดเข็มให้เหมาะสมเสมอ หากใช้แผ่นยึดเข็มที่ไม่ถูกต้อง เข็มอาจหักได้
- ห้ามใช้เข็มที่งอ
- ห้ามดึงหรือดันผ้าขณะเย็บ เพราะอาจทำให้เข็มหักได้
- Always unplug sewing machine off ("O") when making any adjustments in the needle area, such as threading needle, changing needle, threading bobbin, or changing presser foot, and the like.
- ถอดปลั๊กจักรเย็บผ้าออกจากเต้ารับไฟฟ้าทุกครั้งเมื่อถอดฝาปิดหล่อลื่นหรือเมื่อทำการปรับเปลี่ยนการบริการอื่น ๆ ของผู้ใช้ที่ระบุไว้ในคู่มือการใช้งาน
- ห้ามทำตกหรือเสียบวัตถุใดๆ ลงในช่องเปิดใดๆ
- ห้ามใช้กลางแจ้ง
- ห้ามใช้งานในที่ที่มีการใช้ผลิตภัณฑ์สเปรย์ละอองลอยหรือในสถานที่ที่มีการให้ออกซิเจน
- To disconnect, turn all controls to the off ("O") position, then remove plug from outlet.
- ห้ามถอดปลั๊กโดยดึงสายไฟ หากต้องการถอด ให้จับที่ปลั๊ก ไม่ใช่ที่สายไฟ
- ระดับความดังของเสียงภายใต้สภาวะการทำงานปกติคือ 75dB(A)
- Always turn off the machine or unplug when the machine is not operating properly.
- อย่าวางสิ่งใดบนตัวควบคุมที่เท้า
- If the supply cord to the foot controller is damaged, it must be replaced by the manufacturer or its service agent or a similar qualified person in order to avoid a hazard.
- เครื่องใช้ไฟฟ้าตัวนี้ไม่ได้มีวัตถุประสงค์เพื่อให้บุคคล (รวมทั้งเด็ก) ที่มีความบกพร่องทางร่างกาย ทางประสาทสัมผัส หรือทางจิตใจ หรือขาดประสบการณ์และความรู้ ใช้งาน เว้นแต่จะมีการดูแลหรือคำแนะนำเกี่ยวกับการใช้เครื่องใช้ไฟฟ้าโดยบุคคลที่รับผิดชอบด้านความปลอดภัยของบุคคลดังกล่าว
- ควรมีผู้ดูแลเด็กเพื่อให้แน่ใจว่าไม่ได้เล่นกับเครื่องใช้ไฟฟ้าดังกล่าว
บันทึกคำแนะนำเหล่านี้
Image: Important Safety Instructions page from the Singer 2250 manual, detailing electrical and general safety warnings.
2. การตั้งค่า
อุปกรณ์เสริม 2.1 ชิ้น
The Singer 2250 sewing machine comes with a set of standard accessories and supports various optional accessories for different sewing tasks.
- อุปกรณ์มาตรฐาน: All purpose foot, Button sewing foot, Zipper foot, Screwdriver, Seam ripper/brush, Pack of needles, Bobbin (3), Darning plate, Spool holder.
- Optional Accessories (not supplied with machine, available from SINGER® retailers): Edge/quilting guide, Zipper foot, Straight stitch foot, Overcasting foot, Hemmer foot, Blind hem foot, Satin stitch foot, Cording/embroidery foot, Second spool pin, Spool pin felt.
2.2 การพันด้ายเข้ากระสวย
- Place thread and corresponding spool holder onto the spool pin.
- Snap the thread into the thread guide.
- Wind the thread counterclockwise around the bobbin winder tension disc.
- Thread the bobbin as illustrated and place it on the spindle.
- Push the bobbin spindle to the right.
- Hold the thread end.
- Step on the foot control pedal to begin winding.
- Cut the thread once the bobbin is full.
- Push the bobbin spindle to the left and remove the wound bobbin.
หมายเหตุ: When the bobbin winder spindle is in the "bobbin winding" position, the machine will not sew and the hand wheel will not turn. To start sewing, push the bobbin winder spindle to the left (sewing position).

Image: Manual page illustrating standard and optional accessories, and a step-by-step guide for winding the bobbin.
2.3 การเชื่อมต่อกับแหล่งจ่ายไฟ
Ensure the machine's power switch is in the "O" (off) position. Insert the machine plug into the electrical outlet. Always use a grounded outlet.
2.4 Raising the Presser Foot Lifter
The presser foot lifter is located at the back of the needle bar area. Lift it to raise the presser foot for placing fabric, and lower it to hold the fabric in place for sewing.
3. การดำเนินการ
3.1 Choosing Your Pattern
The Singer 2250 features a Pattern Selector Dial to choose various stitch patterns.
- Stitches indicated in black on the diagram correspond to the Pattern Selector Dial.
- For patterns indicated with the "S" color, turn the Pattern Selector Dial to "S", then use the Stitch Length Dial to adjust the desired stitch length.
- The Pattern Selector Dial can be turned in either direction.
3.2 Stitch Length Dial
The Stitch Length Dial controls the length of straight stitches and the density of zig-zag stitches.
- For Straight Stitching: Turn the Pattern Selector Dial to the straight stitch symbol. The stitch length increases as the dial approaches "4". Use longer stitches for heavier fabrics and thicker needles, shorter stitches for lighter fabrics and finer needles.
- For Zig-Zag Stitching: Turn the Pattern Selector Dial to "~~~ ". The density of zig-zag stitches increases as the setting of the stitch length dial approaches "0". Dense zig-zag stitches are known as satin stitches.

Image: Manual page detailing how to choose stitch patterns and adjust stitch length for various sewing applications.
3.3 การร้อยด้ายเครื่องจักร
Proper threading is crucial for smooth sewing. Follow these general steps:
- วางแกนหลอดด้ายไว้บนแกนหลอดด้าย
- นำเส้นด้ายผ่านตัวนำเส้นด้ายด้านบน
- Pass the thread through the tension discs.
- Bring the thread up through the take-up lever.
- นำด้ายลงผ่านตัวนำด้ายของก้านเข็ม
- ร้อยเข็มจากด้านหน้าไปด้านหลัง
- Raise the bobbin thread by turning the handwheel towards you, catching the bobbin thread with the needle thread.
- Pull both threads under the presser foot and towards the back.
3.4 Sewing on Buttons
To sew buttons using your Singer 2250:
- ติดตั้งแผ่นดาม.
- Change the all-purpose foot to the button sewing tool.
- Position the fabric and button under the foot.
- Lower the button to the desired position and lower the foot.
- Set the Pattern Selector Dial on "---" and sew a few securing stitches.
- Select one of the two narrow zig-zag patterns (between 0.5 and 1.5) and sew through both holes of the button. Turn the handwheel to check needle clearance.
- Slowly sew the button with about 10 stitches.
- Select pattern "---" again and sew a few securing stitches.
- If a shank is required, place a darning needle on top of the button and sew.
- For buttons with 4 holes, sew through the front two holes first, then sew backwards and then sew through the back two holes.
3.5 Installing the Removable Extension Table
The removable extension table provides a larger work surface and also serves as an accessory box.
- การติดตั้ง: Hold the removable extension table horizontally and push it in the direction of the arrow until it clicks into place.
- การลบออก: Pull the extension table towards the left.
- The inside of the removable extension table can be used as an accessory box. To open, flip the cover down.
4. การบำรุงรักษา
4.1 Darning Plate
The darning plate is used for specific tasks like darning or free-hand embroidery.
- การติดตั้ง: Install the darning plate as illustrated in the manual.
- การถอดออก: สำหรับการเย็บตามปกติ ให้ถอดแผ่นรองรีดออก
- For free-motion sewing, a darning/embroidery foot (optional accessory) is recommended.
4.2 Inserting & Changing Needles
Regularly change your needle, especially if sewing problems occur. Use SINGER® Brand Needles for best results.
- Turn the power switch to off ("O").
- คลายเข็ม clamp สกรู
- Insert the new needle with the flat side of the shaft facing the back, pushing it up as far as it will go.
- ขันเข็มให้แน่นamp สกรู
ความสนใจ: Needles must be in perfect condition. Problems can occur with bent needles, damaged points, or blunt needles.
4.3 Changing the Bulb
To change the light bulb, ensure the machine is unplugged. Replace the bulb with the same type rated 15 watts (110-120V area) or 15 watts (220-240V area).
4.4 การทำความสะอาด
Regularly clean the lint and dust from the bobbin case area and feed dogs using the provided brush. Ensure the machine is unplugged before cleaning.
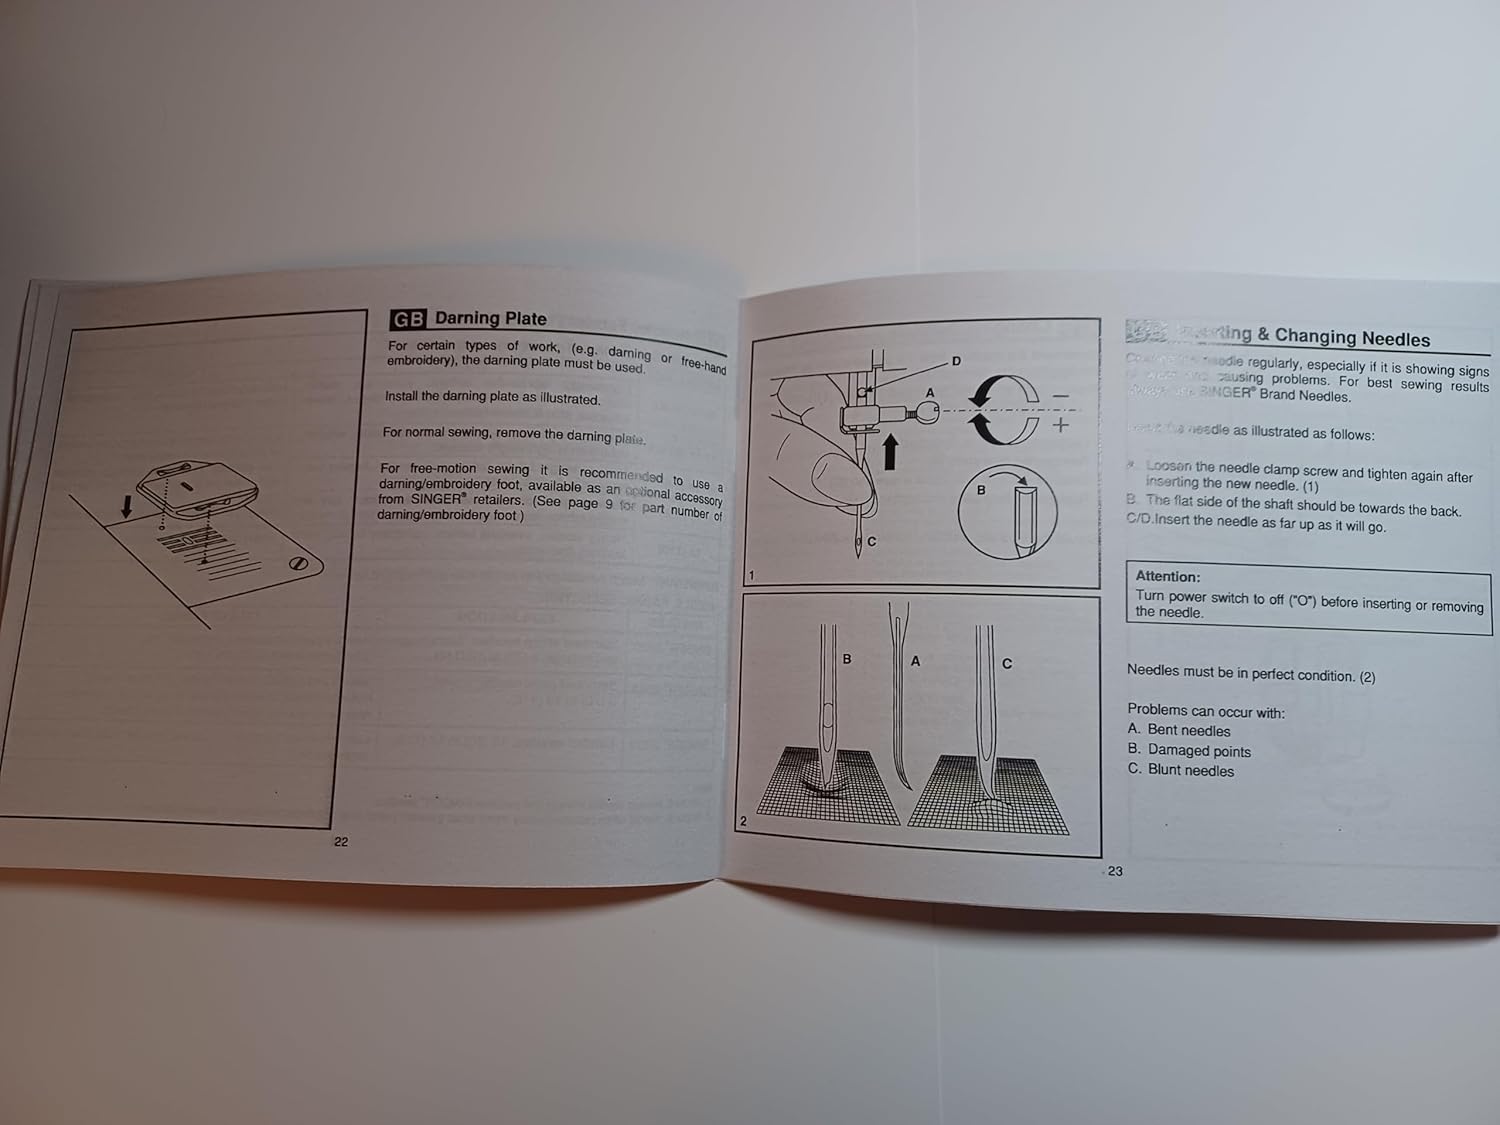
Image: Manual page illustrating procedures for sewing on buttons, installing the extension table, using the darning plate, and changing needles.
5 การแก้ไขปัญหา
If you encounter issues with your Singer 2250, refer to the following common problems and solutions:
- ข้ามตะเข็บ: Ensure the needle is inserted correctly, not bent, and is the appropriate size for the fabric and thread. Re-thread the machine.
- การทำลายเธรด: Check for correct threading, proper tension, a bent or blunt needle, or burrs on the needle plate or bobbin case.
- รอยย่นของผ้า: Adjust tension settings, use the correct needle size, or ensure the presser foot pressure is appropriate for the fabric.
- Machine Not Feeding Fabric: Check if the feed dogs are raised. Ensure the presser foot is lowered.
- การทำงานที่มีเสียงดัง: Clean and lubricate the machine as per maintenance instructions. Check for loose parts or a bent needle.
For persistent problems, contact an authorized Singer service center.
6. ข้อมูลจำเพาะ
| ขนาดสินค้า | 8.5 x 5.5 x 0.1 นิ้ว |
| น้ำหนักสินค้า | 3 ออนซ์ |
| หมายเลขรุ่น | SINGER 2250 Manual |
| ผู้ผลิต | TabSynth Design (for reproduction manual) |
| ASIN | B0G19M5M63 |
7. การรับประกันและการสนับสนุน
This instruction manual is a reproduction for the Singer 2250 Sewing Machine. For warranty information regarding your Singer 2250 sewing machine, please refer to the original documentation provided with your machine or contact Singer customer support directly.
For support related to the operation or maintenance of your Singer 2250, please consult this manual. If further assistance is needed, contact an authorized Singer service center or your local Singer dealer.


