1. บทนำ
This manual provides essential information for the safe and efficient use of your artfone G6 Pro 4G LTE Flip Phone. Please read it thoroughly before operating the device to ensure proper functionality and to understand all features.
2. เนื้อหาบรรจุภัณฑ์
ตรวจสอบว่ารายการทั้งหมดที่ระบุไว้ด้านล่างมีอยู่ในแพ็คเกจผลิตภัณฑ์ของคุณ:
- 1x artfone G6 Pro Mobile Phone (Battery not installed)
- แบตเตอรี่ 1x 1300mAh
- สายชาร์จ USB 1 เส้น
- 1x คู่มือผู้ใช้
- 1x ฐานชาร์จ/ขาตั้ง

Image: Package contents of the artfone G6 Pro, showing the phone, battery, USB cable, user manual, and charging dock.
3. การตั้งค่า
3.1. การติดตั้งซิมการ์ดและแบตเตอรี่
- ถอดฝาครอบด้านหลังออก: ค่อยๆ งัดฝาหลังของโทรศัพท์ออกอย่างเบามือ
- ใส่ซิมการ์ด: Locate the Nano SIM card slot. Insert your Nano SIM card with the gold contacts facing down, ensuring it clicks into place.
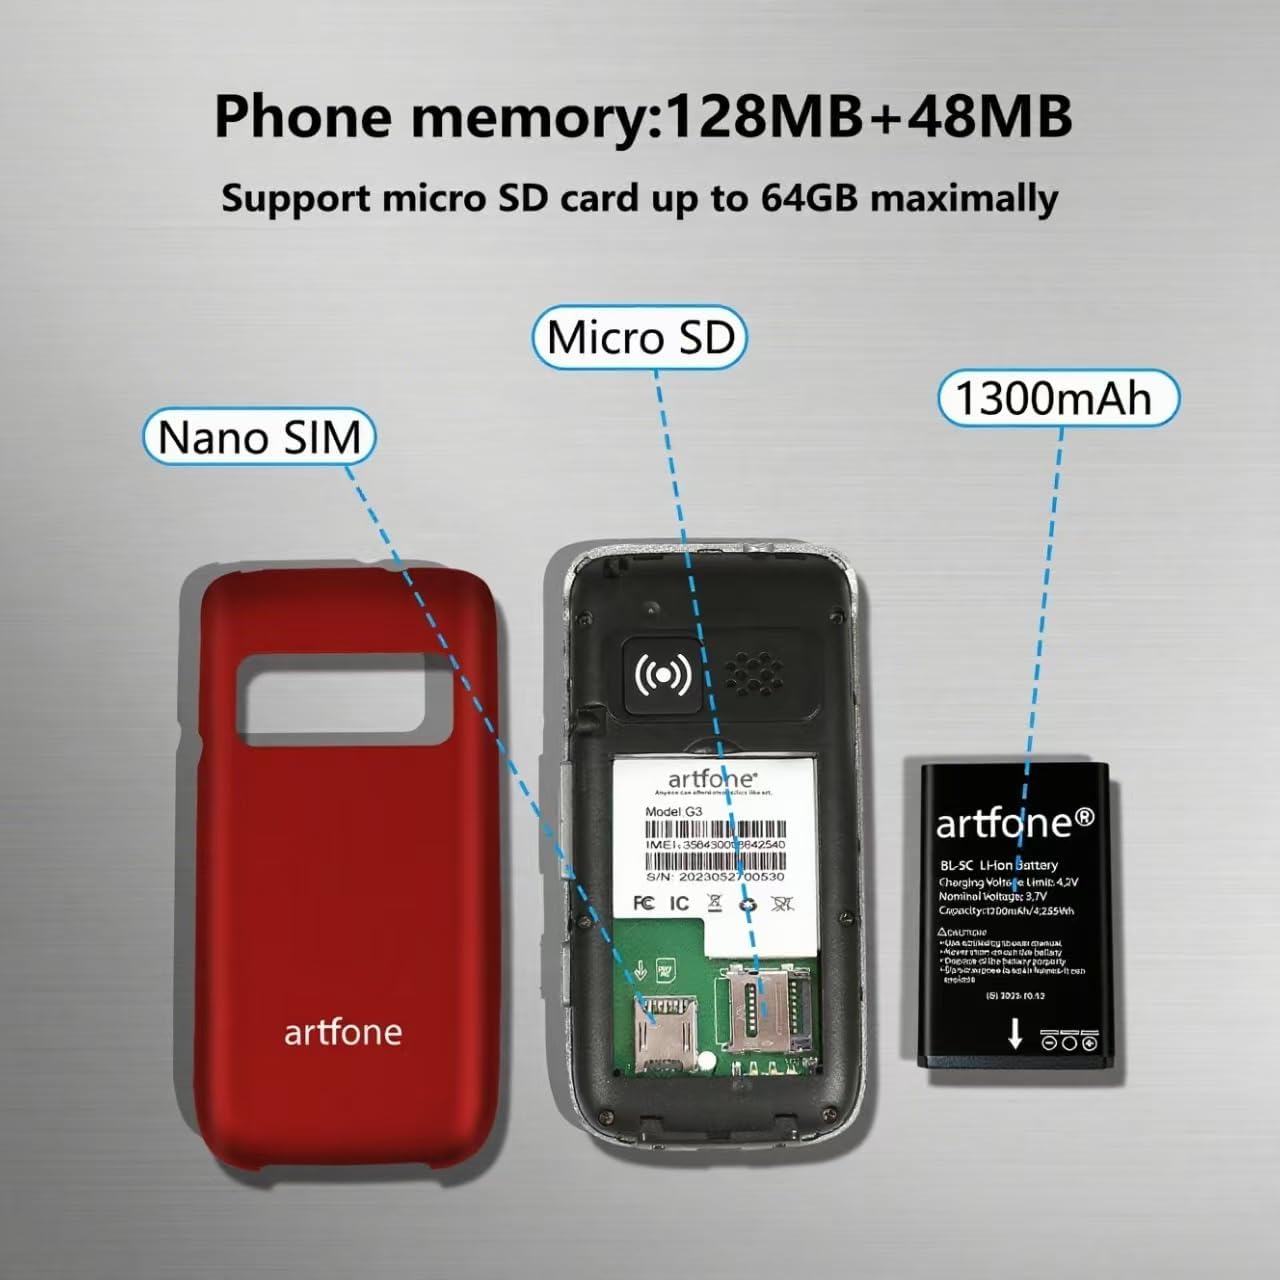
- ใส่การ์ด Micro SD (ไม่จำเป็น): If desired, insert a Micro SD card (up to 64GB) into the designated slot for expanded storage.
- ติดตั้งแบตเตอรี่: Place the 1300mAh battery into the battery compartment, aligning the gold contacts with the phone's terminals.
- เปลี่ยนฝาหลัง: Securely reattach the back cover.
ภาพ: ภายใน view of the artfone G6 Pro, illustrating the Nano SIM slot, Micro SD card slot, and battery placement.
3.2. การชาร์จโทรศัพท์
Your artfone G6 Pro can be charged using the included USB-C cable or the charging dock.
- การใช้แท่นชาร์จ: Place the phone into the charging dock. Ensure the charging indicator appears on the screen.
- การใช้สาย USB-C: Connect the USB-C cable directly to the phone's charging port and to a power adapter.

Image: Charging the artfone G6 Pro using either the USB-C cable or the charging dock.
3.3. เปิด/ปิดเครื่อง
To power on or off, press and hold the red 'End Call' button until the phone vibrates or the screen lights up/shuts down.
4. คู่มือการใช้งาน
4.1. ฟังก์ชันการโทรพื้นฐาน
- การโทร: Dial the number using the keypad and press the green 'Call' button.
- รับสาย: Open the flip to answer, or press the green 'Call' button.
- การวางสาย: Close the flip to hang up, or press the red 'End Call' button.
Video: Demonstrates basic call functions, including answering by flipping open the phone and ending calls by closing it.
4.2. การส่งข้อความ
Navigate to the 'Message' menu, select 'New Message', enter the recipient's number or select from contacts, type your message using the keypad, and send.
4.3. การนำทางส่วนติดต่อผู้ใช้
The phone features an intuitive UI with large icons and clear text. Use the navigation keys to scroll through menu options like Contacts, Tools, Message, SOS, Calendar, Settings, Internet, Multimedia, and Call logs.

ภาพ: เหนือview of the artfone G6 Pro's user-friendly menu interface.
5. คุณสมบัติมากกว่าview
5.1. Dual LCD Screens
The phone features a 2.4-inch inner screen and a 1.8-inch outer display. The outer display shows time, caller ID, and notifications without needing to open the phone.

Image: artfone G6 Pro displaying its dual screens, one on the exterior when closed and one on the interior when open.
5.2. ฟังก์ชันฉุกเฉิน SOS
The dedicated SOS button on the back of the phone allows you to quickly contact up to five pre-set emergency contacts. Press and hold the button for 3 seconds to activate the SOS function, which will automatically dial and send distress messages until someone answers.

ภาพ: ด้านหลัง view of the artfone G6 Pro highlighting the SOS emergency button.
5.3. Speed Dial and Photo Contacts
Assign frequently called numbers to dedicated A/B keys and numbers 2-9 for quick dialing. You can also assign photos to contacts for easier identification of callers.
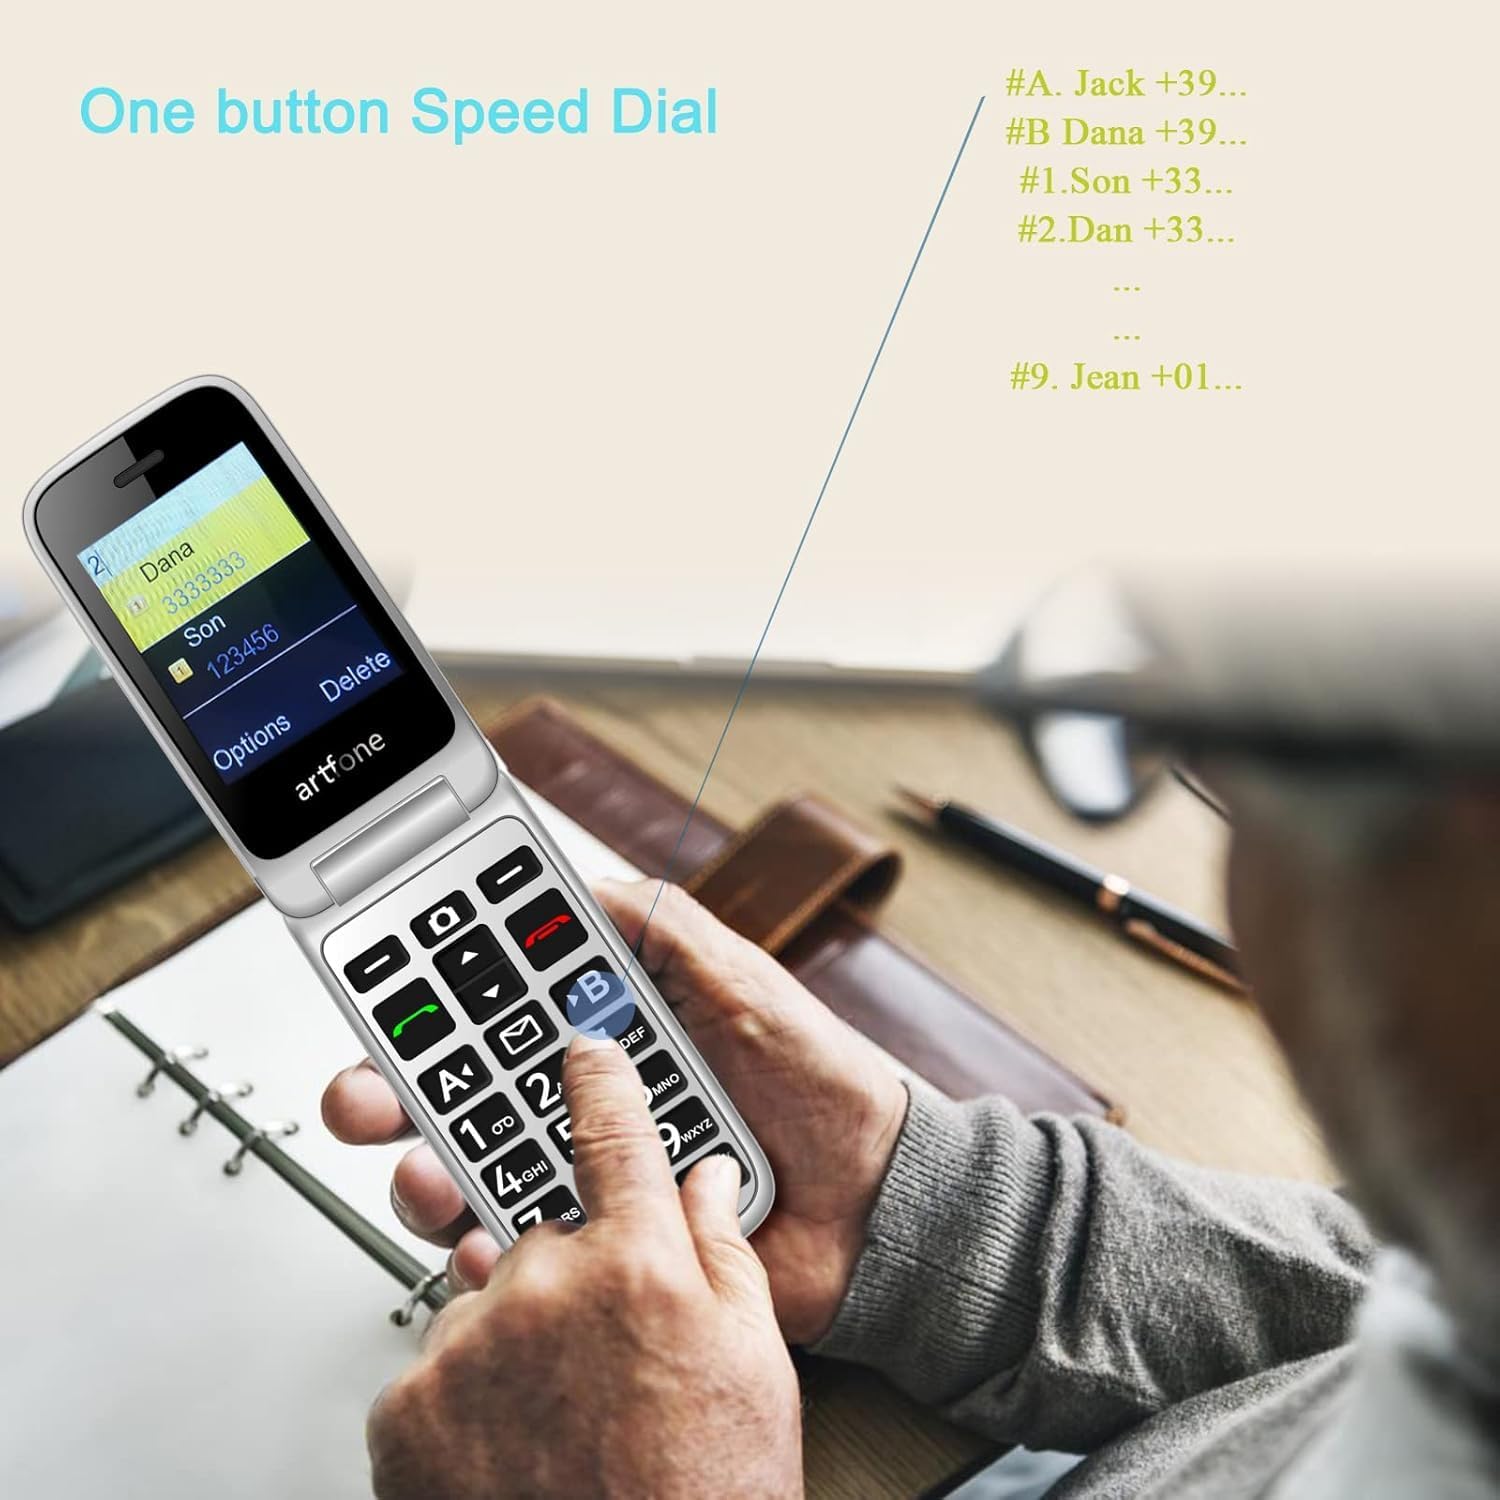
Image: Demonstrating the one-button speed dial feature on the artfone G6 Pro.
5.4. Talking Clock (Time Reporting)
Hold the volume + key for 3 seconds, and the phone will audibly announce the current time.
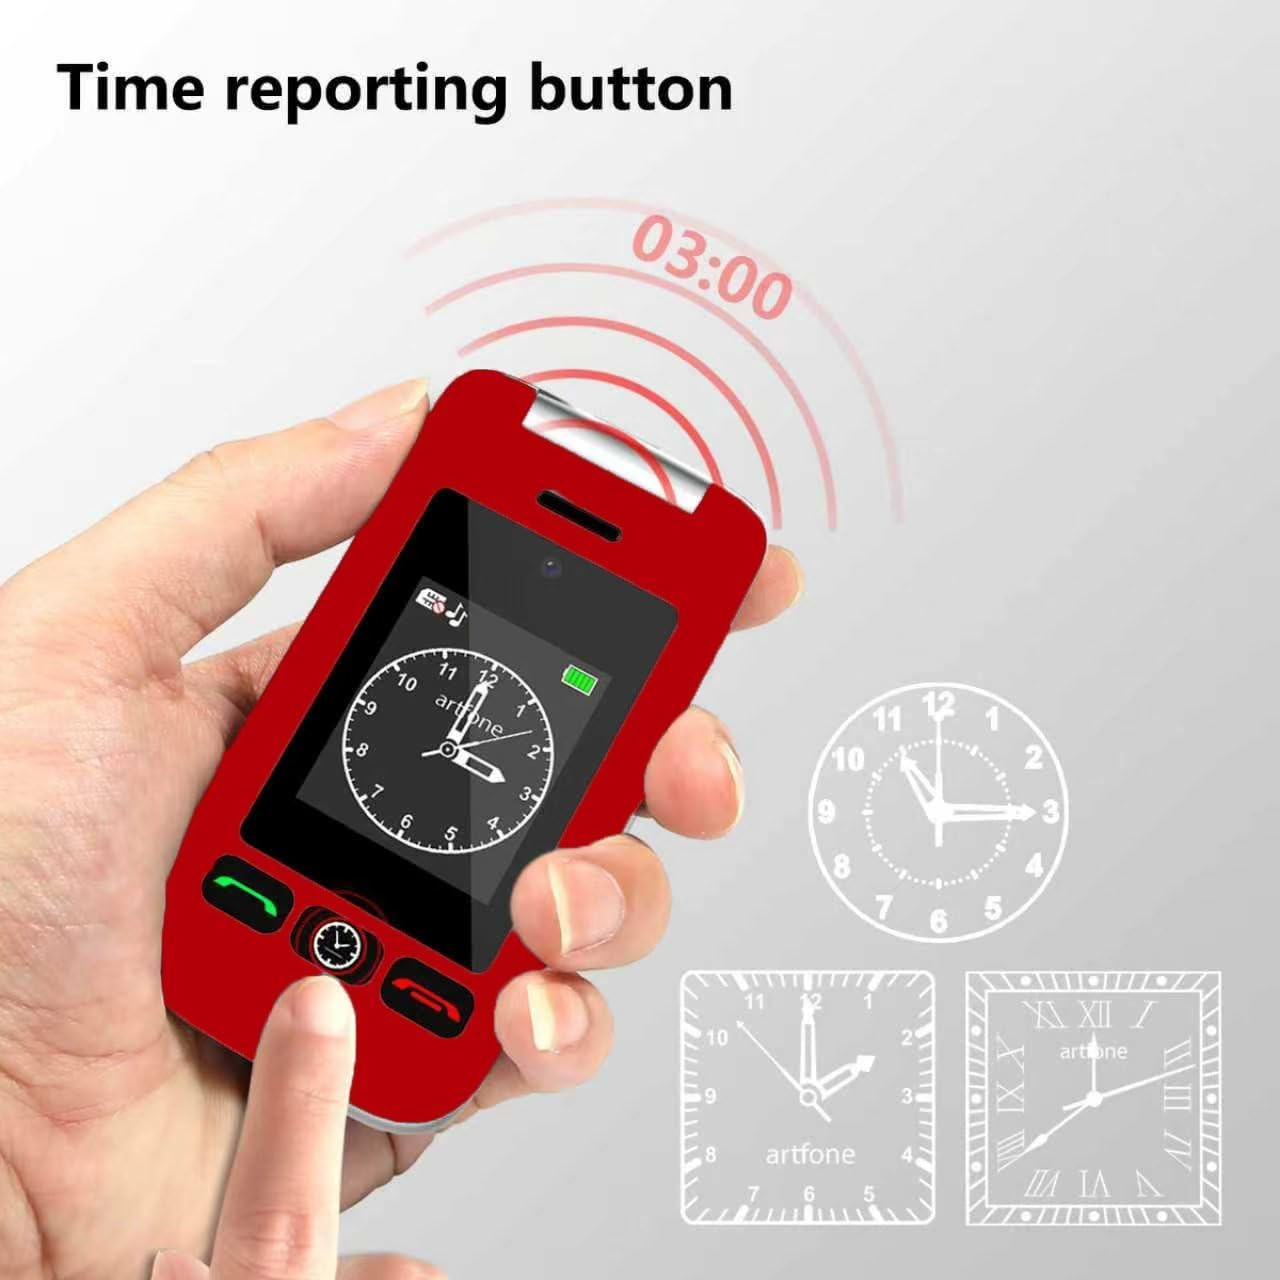
Image: The time reporting button on the artfone G6 Pro, which announces the current time audibly.
5.5.ไฟฉาย
A dedicated flashlight button on the side of the phone allows for quick activation. Slide up/down to toggle the flashlight on or off.

Image: The artfone G6 Pro featuring a flashlight, FM radio, and a 3.5mm headphone jack.
5.6. คุณสมบัติอื่น ๆ
- กล้อง: A basic 0.3MP camera is included for capturing simple moments.
- วิทยุ FM: Enjoy FM radio on the go.
- บลูทูธ: เชื่อมต่อกับอุปกรณ์บลูทูธที่รองรับ
- เครื่องมือ: Includes a calculator, alarm clock, and calendar. Multiple alarm settings are available for reminders.
- เสียงดัง: AAC speakers and receivers provide clear and loud audio for calls.
6. การบำรุงรักษา
- การทำความสะอาด: Use a soft, dry cloth to clean the phone's exterior. Avoid liquid cleaners.
- การดูแลแบตเตอรี่ To prolong battery life, avoid extreme temperatures and do not leave the phone fully discharged for extended periods.
- พื้นที่จัดเก็บ: เก็บโทรศัพท์ไว้ในที่แห้งและเย็นเมื่อไม่ได้ใช้งาน
- ความต้านทานน้ำ: โทรศัพท์รุ่นนี้ไม่กันน้ำ โปรดหลีกเลี่ยงการสัมผัสกับของเหลว
7 การแก้ไขปัญหา
7.1. No Service / Network Issues
- ตรวจสอบซิมการ์ด: Ensure the Nano SIM card is correctly inserted and activated with a compatible carrier (T-Mobile and its virtual operators ONLY; not compatible with AT&T or Verizon).
- รีสตาร์ทโทรศัพท์: Power off and then power on the phone.
- พื้นที่ครอบคลุมเครือข่าย: Verify you are in an area with adequate 2G, 3G, or 4G LTE network coverage.
7.2. Phone Not Charging
- ตรวจสอบการเชื่อมต่อ: Ensure the USB-C cable and/or charging dock are securely connected to the phone and power source.
- ตรวจสอบแหล่งพลังงาน: ลองใช้เต้ารับไฟฟ้าหรือพอร์ต USB อื่น
- Inspect Cable/Dock: Check for any visible damage to the charging cable or dock.
7.3. ปัญหาด้านเสียง
- การปรับระดับเสียง: Adjust the call volume during a conversation.
- Speaker/Receiver Obstruction: Ensure the speaker and receiver are not blocked by debris.
- Silent/Vibration Mode: Long-press the # key to toggle silent/vibration modes. Ensure the phone is not in silent mode if you expect audible alerts.
7.4. MMS Not Downloading
- การตั้งค่าเครือข่าย: Ensure your carrier's MMS settings are correctly configured.
- พื้นที่จัดเก็บ: Check if there is sufficient storage space on the phone or Micro SD card.
- Secure Inbox: Some MMS messages may require access through a 'secure inbox'. The default PIN is often 1234, but it is recommended to change this for security.
8. ข้อมูลจำเพาะ
| คุณสมบัติ | ข้อมูลจำเพาะ |
|---|---|
| ชื่อรุ่น | G6Pro |
| ยี่ห้อ | อาร์ทโฟน |
| เทคโนโลยีเซลลูล่าร์ | 4G (Compatible with T-Mobile and virtual operators ONLY) |
| ผู้ให้บริการไร้สาย | ปลดล็อคแล้ว |
| ระบบปฏิบัติการ | artfone Mocor RTOS |
| ขนาดหน้าจอ | 2.4 Inches (Inner), 1.8 Inches (Outer) |
| ปณิธาน | 180x240, 240x180 น. |
| ขนาดหน่วยความจำ RAM ที่ติดตั้ง | 48MB |
| ความจุของหน่วยความจำ | 0.3 GB (Expandable up to 64GB with Micro SD) |
| ความจุของแบตเตอรี่ | 1300 มิลลิวินาทีamp ชั่วโมง |
| เวลาสนทนาทางโทรศัพท์ | 8 ชั่วโมง |
| น้ำหนักสินค้า | 8.1 ออนซ์ |
| เทคโนโลยีการเชื่อมต่อ | บลูทูธ, ยูเอสบี |
| คุณสมบัติพิเศษ | Basic Phone, Expandable Memory, Time Reporting, SOS Button, Charging Dock, Loud Speaker, Camera, Talking Clock, Speed Dial, Hands-free, Caller-ID, Large Fonts |
| ฟอร์มแฟกเตอร์ | พลิก |
| แจ็คเสียง | 3.5 มม. |
9. การรับประกันและการสนับสนุน
For warranty information or technical support, please contact artfone customer service. Refer to the contact details provided in your product packaging or visit the official artfone website. Please have your product model (G6 Pro) and purchase details available when contacting support.


