1. บทนำ
This manual provides detailed instructions for the installation, operation, and maintenance of the OOYCYOO 60A MPPT Solar Charge Controller, Model EC60A. This device is designed to efficiently manage power flow from solar panels to various battery types, including 12V, 24V, 36V, and 48V systems.
โปรดอ่านคู่มือนี้อย่างละเอียดก่อนการติดตั้งและใช้งานเพื่อให้มั่นใจถึงการทำงานที่ถูกต้องและความปลอดภัย
2. คุณสมบัติหลัก
- 60A MPPT Charging: Utilizes Maximum Power Point Tracking technology for efficient solar energy conversion.
- มัลติเอสtagอี การชาร์จ: มีคุณลักษณะ 4-stage battery charging algorithm (Bulk Charge, Boost Charge, Float Charge, Equalization) for optimal battery health.
- ฉบับกว้างtagอีสนับสนุน: Automatically detects and supports 12V, 24V, 36V, and 48V battery systems.
- อินพุต PV สูง: Supports solar panel open circuit voltage up to 160VDC and input power up to 2800W (for 48V systems).
- ความเข้ากันได้ของแบตเตอรี่: Compatible with various battery types including AGM, Gel, Flooded, and Lithium (LFP), with pre-set and user-defined charging parameters.
- ประสิทธิภาพสูง: Tracking efficiency not less than 98.1% and peak conversion efficiency up to 98%.
- การป้องกันขั้นสูง: Includes PV over current/power, PV short circuit, PV reverse polarity, night reverse charging, battery reverse polarity, over voltage, over discharge, overheating, lithium battery low temperature, load short circuit, load overload, and TVS high voltagอีชั่วคราว
- จอแสดงผล LCD: Integrated blacklight LCD for monitoring system status, including KWH charge amount.
- การระบายความร้อนที่มีประสิทธิภาพ: Die-cast aluminum construction with built-in cooling fan for effective heat dissipation.
3. คำแนะนำด้านความปลอดภัย
โปรดปฏิบัติตามข้อควรระวังด้านความปลอดภัยต่อไปนี้ในระหว่างการติดตั้งและการใช้งาน:
- ตรวจสอบให้แน่ใจว่าการเชื่อมต่อทั้งหมดถูกต้องและแน่นหนาดีแล้วก่อนที่จะจ่ายไฟ
- ควรต่อแบตเตอรี่ก่อนเสมอ จากนั้นจึงต่อแผงโซลาร์เซลล์ และสุดท้ายจึงต่ออุปกรณ์ไฟฟ้าที่ต้องการใช้งาน และควรถอดออกในลำดับย้อนกลับ
- ห้ามถอดประกอบหรือพยายามซ่อมแซมตัวควบคุมด้วยตนเอง โปรดติดต่อช่างผู้ชำนาญการเพื่อขอรับบริการ
- ติดตั้งตัวควบคุมในบริเวณที่มีอากาศถ่ายเทสะดวก ห่างจากวัสดุไวไฟและแสงแดดโดยตรง
- ควรสวมอุปกรณ์ป้องกันส่วนบุคคล (PPE) ที่เหมาะสมเมื่อทำงานกับระบบไฟฟ้า
- ตรวจสอบให้แน่ใจว่าระบบมีปริมาตรtage does not exceed the controller's maximum input voltagอี (160VDC)
4. สินค้าหมดview
The OOYCYOO 60A MPPT Solar Charge Controller features a robust design with an intuitive LCD display and clearly labeled terminals for easy connection.

รูปที่ 4.1 : ด้านหน้า view of the OOYCYOO 60A MPPT Solar Charge Controller, showing the LCD display, control buttons, and terminal connections.

รูปที่ 4.2: รายละเอียด view of the controller highlighting the LCD display, control buttons (SET, A, B, C, D), 5-second reset function, and clearly marked Solar Panel, Battery, and Load terminals.
4.1. ส่วนประกอบและอินเทอร์เฟซ
- จอแสดงผล LCD: Shows real-time system parameters such as PV input voltage, ปริมาณแบตเตอรี่tage, load output, and charging status.
- Control Buttons (A, B, C, D, SET): Used for navigating menus, adjusting settings, and confirming selections.
- ขั้วต่อแผงโซลาร์เซลล์: Connect positive and negative leads from the solar array.
- ขั้วแบตเตอรี่: Connect positive and negative leads to the battery bank.
- สถานีชาร์จ: Connect positive and negative leads to DC loads.
5. การติดตั้งและการตั้งค่า
5.1 การติดตั้งตัวควบคุม
Mount the controller vertically on a wall or a stable surface in a dry, well-ventilated indoor location. Ensure adequate clearance around the unit for proper airflow and heat dissipation. Avoid direct sunlight, high temperatures, and humid environments.
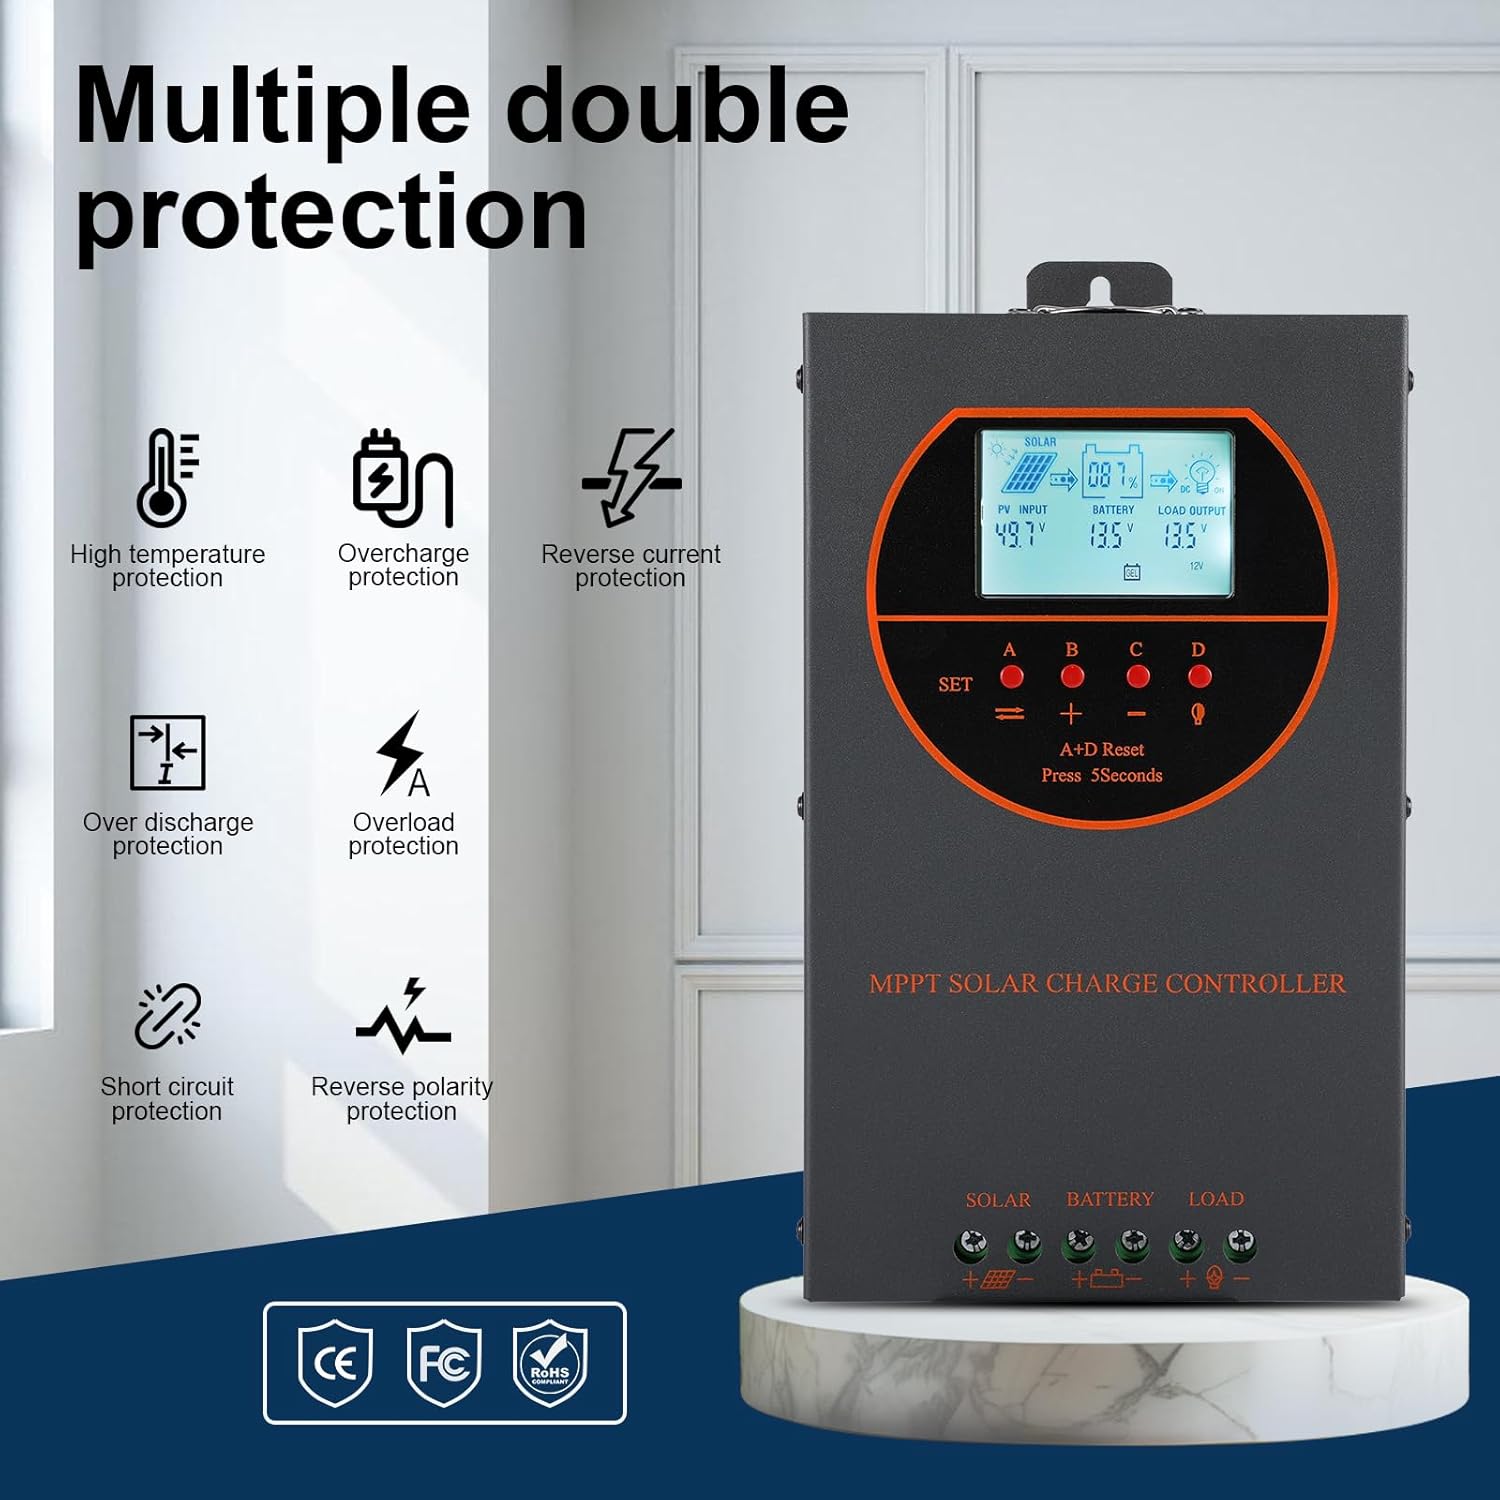
Figure 5.1: Dimensions of the OOYCYOO 60A MPPT Solar Charge Controller, showing approximate measurements of 14cm (5.5in) width, 5.5cm (2.2in) depth, and 23cm (9.1in) length.
5.2. ลำดับการเดินสายไฟ
Follow this wiring sequence carefully to prevent damage to the controller or other components:
- เชื่อมต่อแบตเตอรี่: Connect the positive and negative terminals of the battery to the corresponding battery terminals on the controller. Ensure correct polarity. The controller will automatically detect the battery voltage (12V/24V/36V/48V)
- เชื่อมต่อแผงโซล่าเซลล์: Connect the positive and negative leads from the solar panel array to the corresponding PV input terminals on the controller. Ensure correct polarity.
- เชื่อมต่อโหลด DC (ไม่จำเป็น): Connect the positive and negative leads of your DC load to the corresponding load terminals on the controller.
สำคัญ: Always connect the battery first and disconnect the solar panel first when disassembling the system.

Figure 5.2: Illustrative wiring diagram showing connections from solar panels to the controller, then to the battery, and finally to DC and AC loads via an inverter. This diagram also shows the possibility of connecting two 60A controllers in parallel for increased capacity.
5.3. ฉบับระบบtage and Power Configuration
The controller automatically identifies the battery system voltage. Ensure your solar panel array's open circuit voltage (Voc) and maximum input power are within the specified limits for your battery system:
| ระบบแบตเตอรี่ | แม็กซ์ PV Open Circuit Voltagอี (Voc) | กำลังไฟฟ้าเข้า PV สูงสุด |
|---|---|---|
| 12โวลต์ | ≤72โวลต์ | 720วัตต์ |
| 24โวลต์ | ≤108โวลต์ | 1440วัตต์ |
| 36โวลต์ | ≤144โวลต์ | 2100วัตต์ |
| 48โวลต์ | ≤160โวลต์ | 2800วัตต์ |

Figure 5.3: Diagram illustrating the connection of multiple PV modules in series to the controller, with a table detailing recommended system parameters for 12V, 24V, and 48V systems, including battery float voltage ภายใต้ voltagการป้องกัน การกู้คืนข้อมูลtage, and maximum input power.
6. การดำเนินการ
6.1. จอแสดงผล LCD และไฟแสดงสถานะ
The LCD display provides real-time information about the solar charging system. Key indicators include:
- อินพุต PV: แสดงฉบับปัจจุบันtage and power from the solar panels.
- แบตเตอรี่: แสดงระดับแบตเตอรี่ปัจจุบันtage และสถานะการชาร์จ
- โหลดเอาต์พุต: Indicates the status of the DC load output.
- KWH: Displays the total accumulated charge in kilowatt-hours.
6.2. การเลือกประเภทแบตเตอรี่
The controller is compatible with various battery types. You can select the appropriate battery type through the controller's settings menu to ensure optimal charging. Supported types include:
- เจล
- ประชุมสามัญประจำปี
- USER (user-defined parameters)
- SEL (ปิดผนึก)
- FLD (น้ำท่วม)
- LI (ลิเธียม)
- ลิเธียมไอออนฟอสเฟต

Figure 6.1: Diagram illustrating the controller's strong adaptability to various battery types (GEL, AGM, USER, SEL, FLD, LI, LiFePO4) and a graph showing the 4-stage charging process: Bulk Charge, Constant Charging (Boost), and Float Charge.
6.3. อัลกอริทึมการคิดค่าบริการ
ตัวควบคุมใช้ 4 วินาทีtage charging algorithm to maximize battery life and performance:
- การเรียกเก็บเงินจำนวนมาก: Delivers maximum current to rapidly charge the battery to approximately 80% capacity.
- บูสต์ชาร์จ: Charges the battery at a higher voltage to ensure full charge and equalization.
- ค่าลอย: รักษาระดับแบตเตอรี่ให้อยู่ในระดับที่ปลอดภัยtagเพื่อป้องกันการคายประจุเองและการชาร์จไฟเกิน
- การปรับสมดุล: ชาร์จแบตเตอรี่แบบน้ำกรดเกินเป็นระยะๆ เพื่อปรับสมดุลปริมาตรเซลล์tages and prevent sulfation. (Applicable to flooded batteries only, if enabled).
7. การบำรุงรักษา
การบำรุงรักษาอย่างสม่ำเสมอจะช่วยให้ตัวควบคุมการชาร์จพลังงานแสงอาทิตย์ของคุณมีอายุการใช้งานยาวนานและทำงานได้อย่างมีประสิทธิภาพสูงสุด:
- ตรวจสอบการเชื่อมต่อ: ตรวจสอบการเชื่อมต่อสายไฟทั้งหมดเป็นระยะๆ เพื่อดูความแน่นหนาและการกัดกร่อน
- ตัวควบคุมที่สะอาด: Keep the controller clean and free from dust. Use a dry cloth to wipe the exterior. Ensure ventilation openings are not obstructed.
- ประสิทธิภาพการทำงานของจอภาพ: Regularly check the LCD display for normal operating parameters. Note any unusual readings.
- การตรวจสอบแบตเตอรี่: Inspect batteries for any signs of damage, leakage, or corrosion. Clean battery terminals as needed.
8 การแก้ไขปัญหา
This section addresses common issues you might encounter with the OOYCYOO 60A MPPT Solar Charge Controller.
8.1. ปัญหาทั่วไปและวิธีแก้ไข
| ปัญหา | สาเหตุที่เป็นไปได้ | สารละลาย |
|---|---|---|
| ไม่มีหน้าจอแสดงผล/ตัวควบคุมไม่เปิดใช้งาน | แบตเตอรี่ไม่ได้เชื่อมต่อหรือระดับเสียงต่ำtage; ขั้วกลับด้าน | ตรวจสอบการเชื่อมต่อแบตเตอรี่และปริมาตรtage. ตรวจสอบให้แน่ใจว่าขั้วถูกต้อง ชาร์จแบตเตอรี่หากระดับไฟต่ำtagอีต่ำเกินไป |
| ไม่มีการชาร์จพลังงานแสงอาทิตย์ | Solar panel not connected; reverse polarity; low sunlight; PV over-voltagอี/กระแส | Check solar panel connections and polarity. Ensure sufficient sunlight. Verify PV voltage and current are within limits. |
| โหลดไม่ทำงาน | Load not connected; load short circuit; overload; battery low voltage. | Check load connections. Inspect for short circuits or overloads. Ensure battery has sufficient charge. |
| ตัวควบคุมความร้อนสูงเกินไป | Poor ventilation; excessive load/PV input. | Ensure adequate airflow around the controller. Reduce load or PV input if consistently overheating. |
8.2. ฟังก์ชั่นการป้องกัน
The controller includes multiple protection features to safeguard the system:
- PV กระแสเกิน / กำลังไฟ
- PV ลัดวงจร
- PV ขั้วย้อนกลับ
- การชาร์จแบบย้อนกลับตอนกลางคืน
- การกลับขั้วของแบตเตอรี่
- แบตเตอรี่เกิน Voltage
- แบตหมดไว
- Battery Overheating, Controller Overheating
- แบตเตอรี่ลิเธียมอุณหภูมิต่ำ
- โหลดไฟฟ้าลัดวงจร
- โหลดเกินพิกัด
- TVS ฉบับสูงtage ชั่วคราว

Figure 8.3: Visual representation of the multiple protection features integrated into the controller, including low voltage, overheat, short circuit, reverse protection, overload, and overcurrent protection.

รูปที่ 8.4: ภายใน view of the controller, highlighting key components such as copper coil transformers and capacitors, which contribute to its robust performance and protection features.
9. ข้อมูลจำเพาะทางเทคนิค
| พารามิเตอร์ | ข้อมูลจำเพาะ |
|---|---|
| กระแสไฟชาร์จที่กำหนด | 60เอ |
| ปริมาตรที่กำหนดของระบบtage | 12V/24V/36V/48V DC Auto Identifying |
| ปริมาณแบตเตอรี่tagอี เรนจ์ | 9V~55V |
| แม็กซ์ PV Open Circuit Voltage | 160VDC |
| กำลังไฟฟ้าขาเข้าสูงสุดจากแผงโซลาร์เซลล์ (ระบบ 12V) | 720วัตต์ |
| กำลังไฟฟ้าขาเข้าสูงสุดจากแผงโซลาร์เซลล์ (ระบบ 24V) | 1440วัตต์ |
| กำลังไฟฟ้าขาเข้าสูงสุดจากแผงโซลาร์เซลล์ (ระบบ 36V) | 2100วัตต์ |
| กำลังไฟฟ้าขาเข้าสูงสุดจากแผงโซลาร์เซลล์ (ระบบ 48V) | 2800วัตต์ |
| เพาเวอร์เทอร์มินัล | 6-12 ส.ค |
| ขนาด (กว้าง*ยาว*สูง) | 11 x 6 x 2.5 นิ้ว (ประมาณ 27.9 x 15.2 x 6.3 ซม.) |
| น้ำหนัก | 4.07 ปอนด์ (ประมาณ 1.8 กก.) |
| ประสิทธิภาพการติดตาม | ≥98.1% |
| ประสิทธิภาพการแปลงสูงสุด | สูงสุดถึง 98% |
| การทำให้เย็น | Die-cast aluminum housing, built-in cooling fan |
| รองรับประเภทแบตเตอรี่ | AGM, Gel, Flooded, Lithium (LFP), Sealed, User-defined |
| วัสดุ | อลูมิเนียม |
| หมายเลขรุ่นสินค้า | อีซี60เอ |
| ยูพีซี | 750864834470 |
10. การสนับสนุนและการติดต่อ
For technical support, warranty claims, or further assistance, please contact OOYCYOO customer service through the retailer where the product was purchased or visit the official OOYCYOO store on Amazon:

