1. สินค้าหมดview
This manual provides essential information for the safe installation, operation, and maintenance of your VEVOR 2x2 FT LED Flat Panel Light. This LED panel light is designed for various indoor applications, offering adjustable color temperature and brightness levels.

Image 1.1: VEVOR 2x2 FT LED Flat Panel Light in an office setting, showcasing its flush-mount design and even illumination.
คุณสมบัติหลัก:
- แสงสว่างที่สบายตา: High-output LED chips deliver up to 5700 lumens with a high Color Rendering Index (CRI Ra≥80) for flicker-free, glare-free illumination.
- ปรับสีและความสว่าง: สามารถเลือกอุณหภูมิสีได้ (3000K/4000K/5000K) และน้ำtage levels (25W/30W/40W) via a built-in side switch.
- หรี่แสงได้: Compatible with 0-10V dimmers (dimmer not included).
- โครงสร้างทนทาน: Features an aluminum alloy frame and high-transparency PC lampshade for excellent heat dissipation and extended service life.
- ดีไซน์บางเฉียบ: Ultra-slim 1.4-inch thickness for seamless integration into ceilings.
- การใช้งานที่หลากหลาย: Suitable for workspaces, warehouses, garages, basements, retail stores, and residential kitchens.

Image 1.2: Illustration of the flicker-free operation, reducing eye strain during prolonged use.
2. คำแนะนำด้านความปลอดภัย
โปรดอ่านและทำความเข้าใจคำแนะนำด้านความปลอดภัยทั้งหมดก่อนการติดตั้งหรือใช้งานผลิตภัณฑ์นี้ การไม่ปฏิบัติตามคำแนะนำเหล่านี้อาจทำให้เกิดไฟฟ้าช็อต ไฟไหม้ หรืออันตรายอื่นๆ
- ความปลอดภัยทางไฟฟ้า: Always disconnect power at the circuit breaker or fuse box before installation, removal, or maintenance. Ensure the power supply voltage matches the product's requirements (AC 120V 60Hz).
- การติดตั้งที่ผ่านการรับรอง: ควรให้ช่างไฟฟ้าผู้มีคุณสมบัติเหมาะสมเป็นผู้ติดตั้ง โดยต้องปฏิบัติตามข้อกำหนดด้านไฟฟ้าทั้งในระดับประเทศและระดับท้องถิ่นที่เกี่ยวข้องทั้งหมด
- การต่อลงดิน: Ensure the fixture is properly grounded to prevent potential electric shock.
- การตรวจสอบความเสียหาย: Do not install or operate the fixture if it appears damaged. Contact customer support for assistance.
- สิ่งแวดล้อม: ผลิตภัณฑ์นี้ออกแบบมาสำหรับใช้ภายในอาคารเท่านั้น ห้ามวางในที่ที่มีน้ำหรือความชื้นสูง
- แหล่งกำเนิดแสง: Avoid prolonged direct eye exposure to the light source when the fixture is on.
- การปรับเปลี่ยน: ห้ามดัดแปลงหรือถอดชิ้นส่วนอุปกรณ์โดยเด็ดขาด การกระทำดังกล่าวจะทำให้การรับประกันเป็นโมฆะและอาจก่อให้เกิดอันตรายได้
3. เนื้อหาบรรจุภัณฑ์
Verify that all components are present and undamaged upon opening the package. If any items are missing or damaged, contact VEVOR customer service.
- 4 x VEVOR 2x2 FT LED Flat Panel Lights
- คู่มือการใช้งาน
4. ข้อมูลจำเพาะ
Refer to the following table for detailed product specifications:

Image 4.1: Visual representation of the LED panel light's dimensions and technical data.
| คุณลักษณะ | ค่า |
|---|---|
| ยี่ห้อ | เวเวอร์ |
| ชื่อรุ่น | 2x2 FT LED Flat Panel Light |
| หมายเลขรุ่นสินค้า | จีที-เอ็มบีดี22-4 |
| เล่มที่tagอี/ความถี่ | ไฟฟ้ากระแสสลับ 120V 60Hz |
| กำลังไฟที่กำหนด | 25W/30W/40W (Selectable) |
| วัสดุหลัก | Aluminum Frame + Iron Backplate |
| ความสว่าง | 3600 LM (25W) / 4400 LM (30W) / 5700 LM (40W) |
| อุณหภูมิสี | 3000K (Warm White) / 4000K (Neutral White) / 5000K (Daylight White) |
| ขนาดสินค้า | ยาว 24 นิ้ว x กว้าง 24 นิ้ว x สูง 1.32 นิ้ว (600 x 600 x 35 มม.) |
| น้ำหนักสินค้า | 14.29 ปอนด์ (6.44 กก.) |
| การใช้งานภายใน/ภายนอกอาคาร | ในร่ม |
5. การติดตั้ง
Before beginning installation, ensure the power supply is turned off at the circuit breaker. This fixture supports recessed mounting in T-bar ceilings and suspension mounting (hardware sold separately).
5.1 ขั้นตอนก่อนการติดตั้ง
- การตัดการเชื่อมต่อไฟฟ้า: ปิดสวิตช์ไฟหลักของบริเวณติดตั้งที่ตัวตัดวงจร
- แกะ: Carefully remove the LED panel light from its packaging. Inspect for any damage.
- เลือกการตั้งค่า: Before installation, use the switches on the side of the fixture to select your desired color temperature (3000K/4000K/5000K) and wattage (25W/30W/40W).
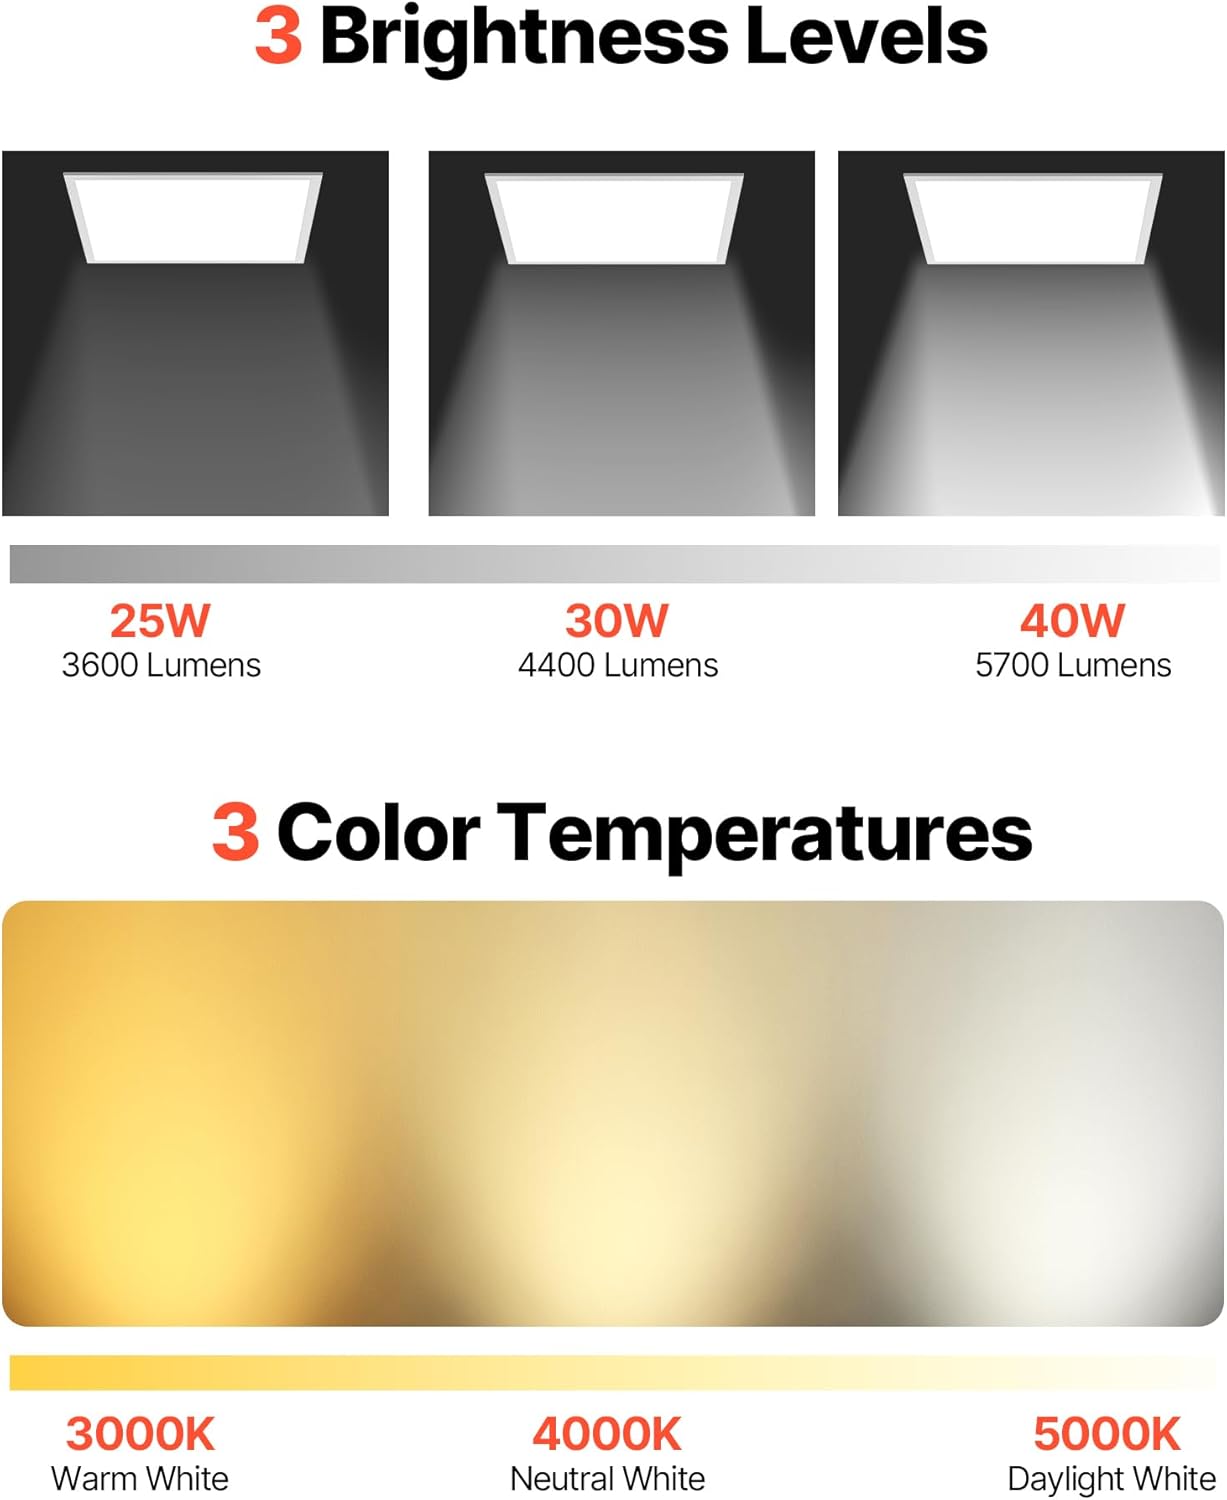
Image 5.1: Illustration of the selectable brightness and color temperature settings available on the fixture.
5.2 Recessed Mounting (T-Bar Ceiling)
This method is for standard drop ceilings with T-bar grids.
- เตรียมการเปิด: Ensure the ceiling grid opening is 2x2 feet (600x600mm).
- การเชื่อมต่อสายไฟ: Access the junction box on the back of the LED panel. Connect the AC input wires (Live, Neutral, Ground) from your building's electrical supply to the corresponding wires on the fixture. Ensure all connections are secure using wire nuts.
- การหรี่ไฟ 0-10V (ตัวเลือกเสริม): If using a 0-10V dimmer (not included), connect the dimmer's positive (+) and negative (-) control wires to the corresponding dimming wires on the fixture.
- Place Fixture: Carefully lift the LED panel into the ceiling grid opening. The panel should rest securely on the T-bars.

Image 5.2: A worker demonstrating the recessed installation of the LED panel light into a ceiling grid.
5.3 Suspension Mounting (Hardware Not Included)
For suspension mounting, a separate suspension kit (cables, anchors, etc.) is required. Follow the instructions provided with your suspension kit for proper installation.
- Install Suspension Kit: Securely attach the suspension cables to the ceiling structure and to the designated mounting points on the LED panel light.
- การเชื่อมต่อสายไฟ: As with recessed mounting, connect the AC input wires and optional 0-10V dimming wires to the fixture's junction box.
- ปรับความสูง: Adjust the suspension cables to achieve the desired hanging height and ensure the panel is level.
6. คู่มือการใช้งาน
Once installed and powered, your VEVOR LED Flat Panel Light is ready for operation.
6.1 เปิด/ปิดเครื่อง
Turn on the power supply at the circuit breaker or wall switch to illuminate the fixture. Turn off the power to switch off the light.
6.2 Adjusting Color Temperature and Wattage
อุณหภูมิสีและน้ำtage settings are selected via switches located on the side of the fixture. These settings should be chosen prior to final installation. If you need to change them after installation, you may need to temporarily remove the panel to access the switches.
- สวิตช์อุณหภูมิสี: Slide the switch to select between 3000K (Warm White), 4000K (Neutral White), or 5000K (Daylight White).
- วัดtagอี สวิตช์: Slide the switch to select between 25W, 30W, or 40W to adjust the brightness output.
6.3 0-10V Dimming Function
If a compatible 0-10V dimmer is connected, you can adjust the light output from 1% to 100% brightness using the dimmer control. Ensure the dimmer is rated for LED fixtures and properly wired according to its instructions.

ภาพที่ 6.1: อดีตample of a 0-10V dimmer switch used to control the brightness of the LED panel light.
7. การบำรุงรักษา
The VEVOR LED Flat Panel Light requires minimal maintenance. Regular cleaning will help maintain its performance and appearance.
- การทำความสะอาด: Before cleaning, ensure the power to the fixture is turned off. Use a soft, dry, or slightly damp ใช้ผ้าเช็ดทำความสะอาดพื้นผิวแผงควบคุม อย่าใช้สารทำความสะอาดที่มีฤทธิ์กัดกร่อน ตัวทำละลาย หรือสารเคมีรุนแรง เพราะอาจทำให้พื้นผิวหรือชิ้นส่วนอิเล็กทรอนิกส์เสียหายได้
- ไม่มีชิ้นส่วนที่ผู้ใช้สามารถซ่อมบำรุงได้: There are no user-serviceable parts inside the fixture. Do not attempt to open or repair the unit.
- การตรวจสอบ: ตรวจสอบอุปกรณ์เป็นระยะๆ เพื่อหาร่องรอยความเสียหายหรือการเชื่อมต่อที่หลวม หากพบปัญหาใดๆ ให้ตัดการเชื่อมต่อไฟฟ้าและปรึกษาช่างไฟฟ้าผู้เชี่ยวชาญ
8 การแก้ไขปัญหา
If you encounter issues with your LED panel light, refer to the following troubleshooting guide. Always ensure power is disconnected before performing any checks or adjustments.
| ปัญหา | สาเหตุที่เป็นไปได้ | สารละลาย |
|---|---|---|
| ไฟไม่เปิด | ไม่มีแหล่งจ่ายไฟ การเชื่อมต่อสายไฟหลวม อุปกรณ์ชำรุด | ตรวจสอบเบรกเกอร์/ฟิวส์ ตรวจสอบว่าการเชื่อมต่อสายไฟทั้งหมดมีความปลอดภัย หากตรวจสอบแล้วว่ามีไฟเข้าและระบบสายไฟถูกต้อง โปรดติดต่อฝ่ายบริการลูกค้า |
| ไฟกระพริบหรือหรี่ลงโดยไม่คาดคิด | สายไฟหลวม. ตัวหรี่ไฟไม่เข้ากัน ความผันผวนของพลังงาน | ตรวจสอบการเชื่อมต่อสายไฟทั้งหมด Ensure the dimmer is a compatible 0-10V LED dimmer. ควรปรึกษาช่างไฟฟ้าเพื่อตรวจสอบความเสถียรของระบบจ่ายไฟ |
| อุณหภูมิสีหรือความสว่างไม่ถูกต้อง | Switches on the fixture are set incorrectly. | Access the switches on the side of the fixture and adjust to the desired setting. |
| แสงสว่างน้อยเกินไปหรือมากเกินไป | วัดtagการตั้งค่า e ไม่ถูกต้อง Dimmer setting is too low/high. | ปรับน้ำtage switch on the fixture. ปรับตัวหรี่ไฟ 0-10V ให้ได้ระดับความสว่างที่ต้องการ |
9. การรับประกันและการสนับสนุน
การรับประกัน: The manufacturer's specifications indicate that there is no explicit warranty description provided for this product.
การสนับสนุนลูกค้า: For any questions, technical assistance, or issues not covered in this manual, please contact VEVOR customer support through their official website or the retailer where the product was purchased. Please have your model number (GT-MBD22-4) and purchase information ready when contacting support.


