1. บทนำ
Thank you for choosing the BONTEC GDM7505 Ergonomic Gas Spring Single Monitor Mount. This manual provides detailed instructions for the safe and efficient installation, operation, and maintenance of your monitor arm. Please read this manual thoroughly before assembly and retain it for future reference.
2. ข้อมูลด้านความปลอดภัย
โปรดปฏิบัติตามข้อควรระวังด้านความปลอดภัยต่อไปนี้ระหว่างการติดตั้งและใช้งาน:
- ตรวจสอบให้แน่ใจว่าชิ้นส่วนทั้งหมดครบถ้วนและไม่เสียหายก่อนประกอบ ห้ามใช้งานหากชิ้นส่วนใดขาดหายหรือชำรุด
- This monitor mount is designed for screens between 15 and 34 inches, with a maximum weight capacity of 26.5 lbs (12 kg). Do not exceed these limits.
- The gas spring mechanism is under high pressure. Do not attempt to disassemble the gas spring cylinder.
- Always use appropriate tools and follow the instructions carefully. Overtightening screws may cause damage.
- Ensure the desk surface is stable and thick enough to support the mount and monitor weight.
- เก็บให้ห่างจากเด็กและสัตว์เลี้ยงในระหว่างการติดตั้ง
3. เนื้อหาบรรจุภัณฑ์
โปรดตรวจสอบให้แน่ใจว่าชิ้นส่วนทั้งหมดที่ระบุไว้ด้านล่างนี้รวมอยู่ในบรรจุภัณฑ์ของคุณแล้ว:

Image: All components of the BONTEC Monitor Arm, including the main arm sections, base, C-clamp, grommet parts, various screws, and Allen keys, are displayed on a white surface.
- A: Upper Arm with VESA Plate
- ก1: Cable Cover for Upper Arm
- B: แขนท่อนล่าง
- C: ฐาน
- D: ซี-ซีแอลamp
- E: Brace for C-clamp
- F: Small Screws (for C-clamp/ห่วงโลหะ)
- G: Wingnut (for Grommet)
- H: Carriage Bolt (for Grommet)
- I, J, K: Allen Keys (various sizes)
- L: Small Screws (for VESA plate)
- M-A, M-B, M-C, M-D, M-E: Monitor Screws and Washers (various sizes for VESA mounting)
4. การตั้งค่าและการติดตั้ง
This section guides you through the assembly process. An assembly video is available for visual reference.
Video: Assembly Manual for BONTEC Upgraded Single Monitor Arm. This video demonstrates the complete installation process for the monitor arm, including both C-clamp and grommet mounting options, and attaching the monitor.
4.1. เลือกวิธีการติดตั้ง
The BONTEC GDM7505 supports two installation methods: C-clamp and Grommet Base. Select the method suitable for your desk.

Image: This image illustrates the two available installation methods: C-clamp mounting, suitable for desk thicknesses from 0.39 to 3.15 inches, and Grommet mounting, for desk thicknesses from 0.39 to 2.76 inches and hole diameters from 0.39 to 2.36 inches.
4.1.1. C-clamp การติดตั้ง
- Attach the Brace (E) to the Base (C) using the small screws (F).
- Fix the C-clamp (D) to the Brace (E) and tighten the screws securely.
- Place the assembled C-clamp onto your desk edge and tighten the clamp screw until the mount is stable. Use an Allen key for a more secure clamp.
4.1.2. Grommet Base Installation
- Remove the clip plate (D2) from the C-clamp (D) if it's attached.
- Tighten the Carriage Bolt (H) to the Base (C).
- Insert the bolt through the grommet hole in your desk.
- Secure the base from underneath the desk using the clip plate (D2) and Wingnut (G).
4.2. Install the Arm onto the Base
- Slide the Lower Arm (B) onto the pole of the installed Base (C).
- Tighten the set screw on the Lower Arm (B) using the appropriate Allen key (I or J) to secure it.
- Slide the Upper Arm (A) onto the Lower Arm (B).
- Tighten the set screw on the Upper Arm (A) using the appropriate Allen key (I or J) to secure it.
4.3. Attach VESA Plate to Monitor
- วางจอภาพคว่ำหน้าลงบนพื้นผิวที่นุ่มและสะอาดอย่างระมัดระวัง
- Align the VESA plate on the Upper Arm (A) with the mounting holes on the back of your monitor.
- Insert the appropriate screws (M-A/M-B or M-C/M-D/M-E) and washers loosely, leaving a 3-4mm gap. Avoid using power tools to prevent damage.
- Once all screws are in place, tighten them securely.
5. คู่มือการใช้งาน
The BONTEC GDM7505 monitor arm offers full motion adjustability for optimal viewความสะดวกสบาย
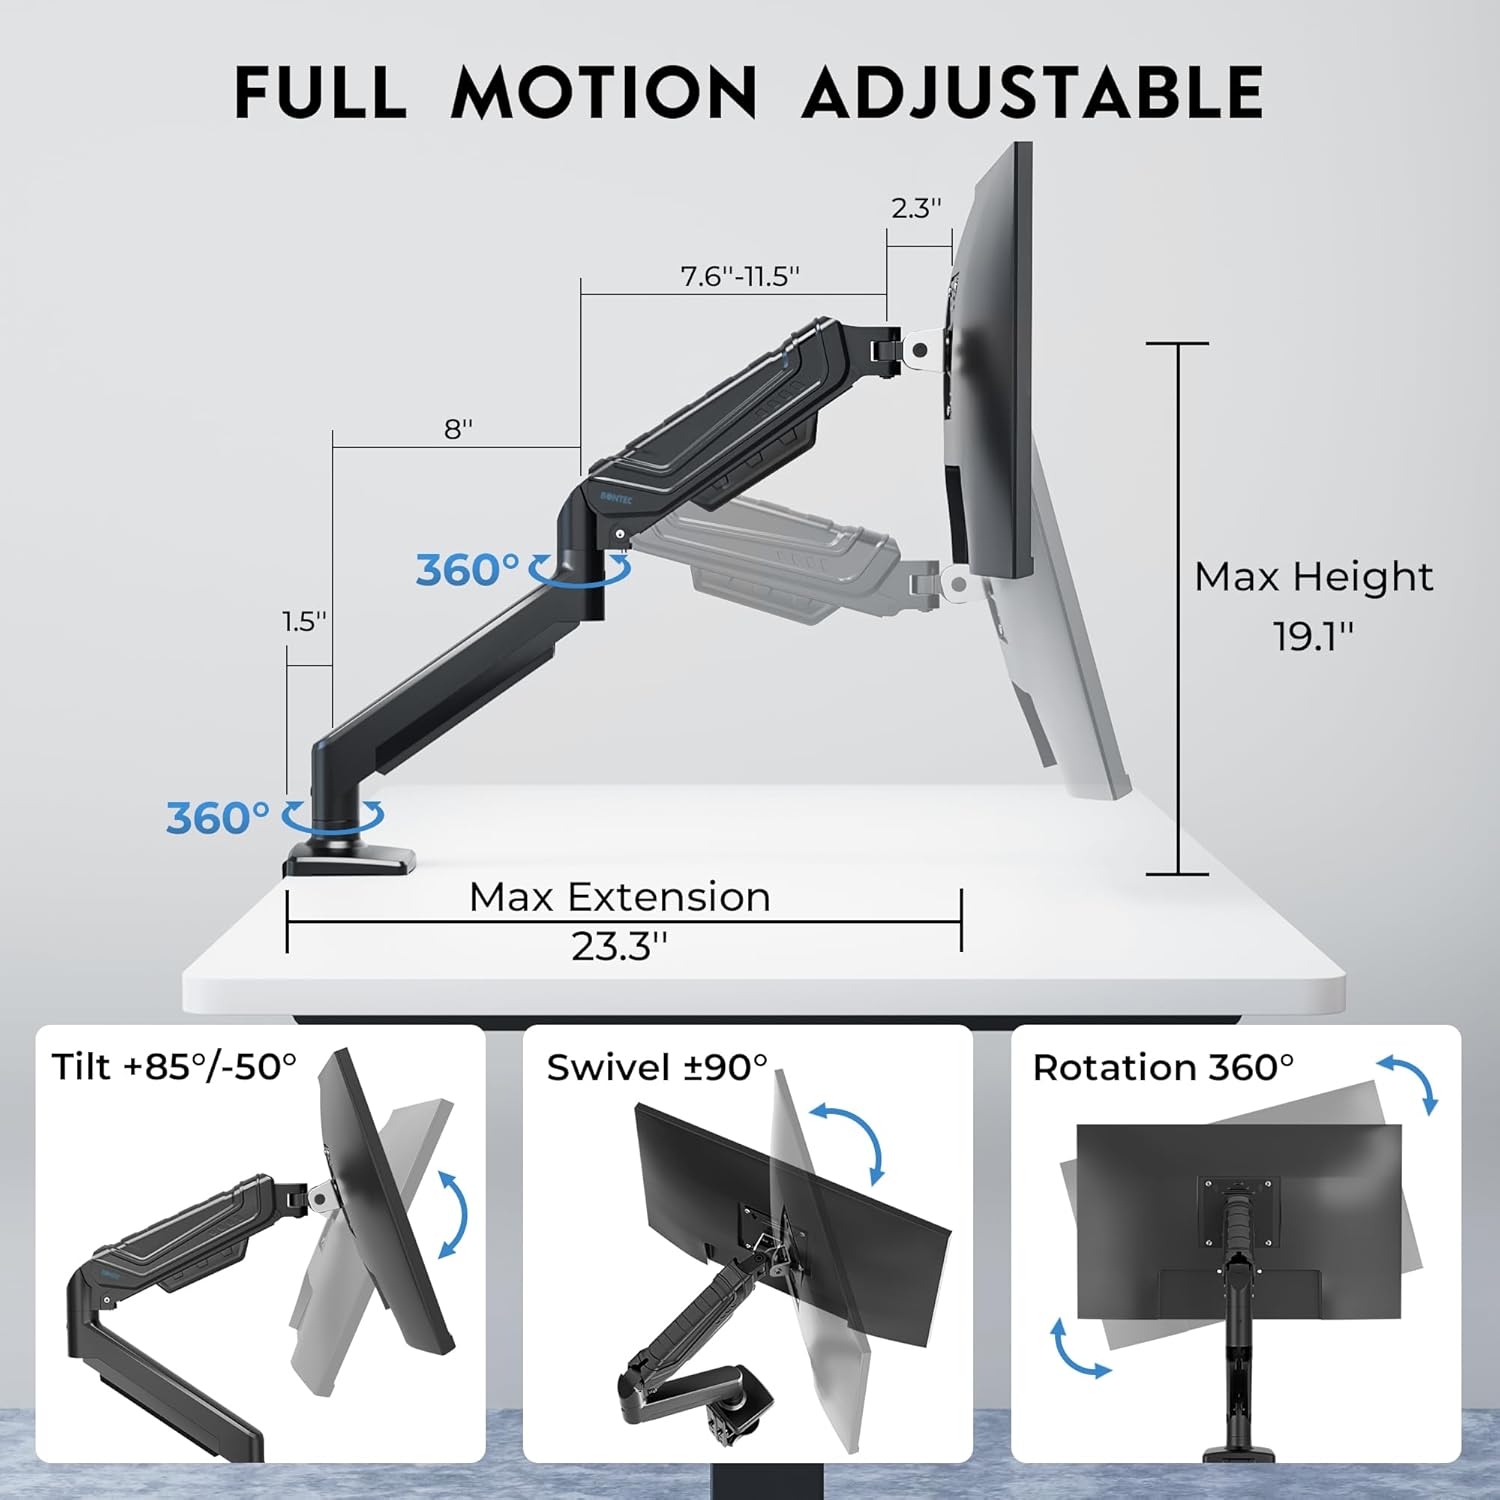
Image: This diagram illustrates the extensive adjustability of the monitor arm, featuring a maximum height of 19.1 inches, a maximum extension of 23.3 inches, tilt angles from +85 to -50 degrees, swivel of +/-90 degrees, and 360-degree rotation for flexible monitor positioning.
Video: Tips for Using BONTEC Upgraded Single Monitor Mount. This video provides guidance on adjusting the tilt, swivel, and gas spring tension of the monitor arm to ensure stable and smooth movement.
5.1. การปรับเอียง
If the monitor head is dropping down, you may need to tighten the tilt screw. Use the appropriate Allen key (I or J) to turn the screw clockwise until the tilt adjustment is effective and smooth.
5.2. การปรับหมุน
If the monitor swivels too easily or is too sensitive, tighten the swivel screw. Use the appropriate Allen key (I or J) to turn the screw clockwise until the swivel adjustment is smooth and controlled.
5.3. Tension Adjustment (Gas Spring)
The gas spring tension needs to be adjusted according to your monitor's weight to ensure the arm stays balanced and holds its position.
- Monitor Drooping? If your monitor is too heavy for the current tension and droops, turn the tension screw counterclockwise to increase tension.
- Monitor Rising? If your monitor is too light for the current tension and rises, turn the tension screw clockwise to reduce tension.
- Adjust gradually, with a maximum of 20 turns in either direction. Test the arm's balance after every few turns.
5.4. การจัดการสายเคเบิล
To maintain a clean and organized workspace, route your cables through the integrated cable management channels on the arm. Open the cable covers, place the cables inside, and snap the covers back into place.

Image: This image highlights the integrated cable management feature, demonstrating how power and data cables can be neatly routed through the arm's channels to keep the desk organized.
6. การบำรุงรักษา
การบำรุงรักษาอย่างสม่ำเสมอจะช่วยให้ขาตั้งจอภาพของคุณมีอายุการใช้งานยาวนานและทำงานได้อย่างมีประสิทธิภาพสูงสุด:
- ตรวจสอบสกรูและการเชื่อมต่อทั้งหมดเป็นระยะๆ เพื่อให้แน่ใจว่าแน่นหนาและปลอดภัย
- ทำความสะอาดพื้นผิวของขาตั้งจอภาพด้วยผ้าเนื้อนุ่มและแห้งamp ผ้า หลีกเลี่ยงน้ำยาทำความสะอาดหรือตัวทำละลายที่มีฤทธิ์กัดกร่อน
- If the arm's movement becomes stiff or loose over time, re-adjust the gas spring tension as described in Section 5.3.
7 การแก้ไขปัญหา
If you encounter issues with your monitor arm, refer to the following common solutions:
| ปัญหา | สาเหตุที่เป็นไปได้ | สารละลาย |
|---|---|---|
| Monitor droops or falls | แรงตึงของสปริงแก๊สต่ำเกินไปสำหรับน้ำหนักของจอภาพ | Increase gas spring tension by turning the adjustment screw counterclockwise (refer to Section 5.3). |
| Monitor floats up or is difficult to push down | แรงดันของสปริงแก๊สสูงเกินไปสำหรับน้ำหนักของจอภาพ | ลดความตึงของสปริงแก๊สโดยหมุนสกรูปรับตามเข็มนาฬิกา (ดูหัวข้อ 5.3) |
| Monitor tilts forward or backward too easily | Tilt mechanism screw is loose. | Tighten the tilt adjustment screw (refer to Section 5.1). |
| Monitor swivels too freely or is too stiff | Swivel mechanism screw is loose or too tight. | Adjust the swivel adjustment screw (refer to Section 5.2). |
| Arm is unstable or wobbles | Mounting base is not securely fastened to the desk. | ขัน C-cl ให้แน่นอีกครั้งamp or grommet base screws (refer to Section 4.1). |
8. ข้อมูลจำเพาะ
| คุณสมบัติ | ข้อมูลจำเพาะ |
|---|---|
| หมายเลขรุ่น | GDM7505 |
| ความเข้ากันได้ของขนาดหน้าจอ | 15-34 นิ้ว |
| ความจุน้ำหนัก | มากถึง 26.5 ปอนด์ (12 กก.) |
| ความเข้ากันได้ของ VESA | 75x75มม., 100x100มม. |
| มุมเอียง | +85° ถึง -50° |
| มุมหมุน | ±90° |
| การหมุน | 360° |
| ความสูงสูงสุด | 19.1 นิ้ว |
| ขยายสูงสุด | 23.3 นิ้ว |
| ความหนาของโต๊ะ (C-cl)amp) | 0.39-3.15 นิ้ว |
| ความหนาของโต๊ะ (รูร้อยสายไฟ) | 0.39-2.76 นิ้ว |
| Grommet Hole Diameter | 0.39-2.36 นิ้ว |
| วัสดุ | โลหะ |
| สี | สีดำ |
9. การรับประกันและการสนับสนุน
For warranty information or technical support, please refer to the product packaging or contact BONTEC customer service directly. Contact details can typically be found on the manufacturer's official webเว็บไซต์หรือผ่านแพลตฟอร์มการซื้อของคุณ


