1. ข้อมูลด้านความปลอดภัย
Read all instructions carefully before installation and use. Retain this manual for future reference.
- โปรดตรวจสอบให้แน่ใจว่าได้ตัดการเชื่อมต่อแหล่งจ่ายไฟหลักก่อนทำการติดตั้งหรือบำรุงรักษา
- การติดตั้งต้องดำเนินการโดยช่างไฟฟ้าที่มีคุณสมบัติเหมาะสม หรือเป็นไปตามข้อกำหนดด้านไฟฟ้าของท้องถิ่น
- Mount the fan securely to a ceiling joist or a suitable support structure capable of holding the fan's weight.
- Do not install any dimmer switch if you intend to use the remote control for dimming. Use a simple on/off wall switch.
- โปรดระวังอย่าให้มือหรือสิ่งของอยู่ใกล้ใบพัดลมขณะใช้งาน
2. เนื้อหาบรรจุภัณฑ์
ตรวจสอบว่าส่วนประกอบทั้งหมดอยู่ครบและไม่ได้รับความเสียหายก่อนเริ่มการติดตั้ง

ภาพที่ 2.1: เกินview of fan components including motor, blades, light kit, remote, and mounting hardware.
- ชุดมอเตอร์พัดลม
- Fan Blades (3 or 6, reversible brown/black)
- ชุดไฟ LED
- Light Shade (Plastic)
- Remote Control with Receiver
- ตัวยึด
- Downrod (Optional: 5-inch and 10-inch extensions may be included)
- กันสาด
- ชุดอุปกรณ์ฮาร์ดแวร์ (สกรู แหวนรอง ตัวเชื่อมสายไฟ)
- คู่มือการใช้งาน
3. การตั้งค่าและการติดตั้ง
Detailed instructions and installation videos are provided to assist with the setup process. Ensure power is off before starting.
3.1 การแกะกล่องและการระบุส่วนประกอบ
Carefully remove all components from the packaging. Identify each part using the 'Package Contents' section.

ภาพที่ 3.1: Reversible fan blades, showing both brown wood grain and black sides.

ภาพที่ 3.2: Detail of the fan's quiet DC motor and integrated LED light.
3.2 การติดตั้งขายึด
- Attach the mounting bracket to the ceiling electrical box. Ensure it is securely fastened to a structural support.
- Feed the electrical wires from the ceiling box through the center hole of the mounting bracket.
3.3 การประกอบพัดลม
- If using a downrod, thread the wires from the fan motor through the downrod. Secure the downrod to the motor.
- ยกชุดมอเตอร์พัดลมขึ้นอย่างระมัดระวัง แล้วแขวนไว้บนขายึด
- Connect the electrical wires (live, neutral, ground) from the ceiling to the fan's receiver unit, following the wiring diagram in the manual.
- Attach the fan blades to the motor housing. Ensure they are firmly screwed in. Choose your preferred blade finish (brown or black).
- Connect the LED light kit wires to the fan motor assembly.
- Attach the light shade by twisting it into place or securing it with screws, depending on the design.
3.4 วิดีโอการติดตั้ง
3.1 วิดีโอ: A detailed video demonstrating the unboxing and installation process of the Asyko Ceiling Fan. This video covers attaching the mounting bracket, assembling the fan motor and blades, wiring connections, and installing the light kit and shade.
4. คู่มือการใช้งาน
The Asyko Ceiling Fan is controlled via the included remote control, offering various settings for comfort and convenience.
4.1 ฟังก์ชั่นการควบคุมระยะไกล

ภาพที่ 4.1: The remote control allows adjustment of fan speed, light color temperature, dimming, and timing functions.
- เปิด/ปิดเครื่อง: เปิดหรือปิดพัดลมและไฟ
- ความเร็วพัดลม: Select from 6 adjustable fan speeds (Levels 1-2: Low, Levels 3-4: Medium, Levels 5-6: High).
- การควบคุมแสง:
- อุณหภูมิสี: Cycle through 3000K (warm white), 4000K (natural white), and 6000K (cold white).
- dimming: ปรับความสว่างของแสงได้ตั้งแต่ 10% ถึง 100%
- พัดลมและไฟสามารถใช้งานแยกกันได้
- ฟังก์ชั่นจับเวลา: ตั้งค่าพัดลมให้ปิดอัตโนมัติหลังจาก 1 หรือ 2 ชั่วโมง
- ฟังก์ชั่นหน่วยความจำ: The fan remembers the last used brightness, color temperature, and fan speed settings when turned off for at least 10 seconds.
4.2 ฟังก์ชันมอเตอร์แบบกลับทิศทาง
มอเตอร์ DC แบบกลับทิศทางได้ ช่วยให้ใช้งานได้ตลอดทั้งปี:
- Summer Mode (Forward Rotation): Blades rotate counter-clockwise to push cool air downwards, creating a cooling effect.
- Winter Mode (Reverse Rotation): Blades rotate clockwise to draw cool air up, circulating warm air trapped near the ceiling.

ภาพที่ 4.2: Visual representation of the reversible motor function for summer cooling and winter air circulation.
ภาพที่ 4.3: Explanation of the 6-speed adjustable fan settings.
4.3 การทำงานที่เงียบ
The fan features a quiet DC motor, ensuring a peaceful environment suitable for bedrooms, living rooms, and offices.
4.4 วิดีโอ: This video demonstrates the various operational features of the Asyko Ceiling Fan, including fan speed adjustments, light color temperature changes, dimming, and the reversible motor function for different seasons.
5. การบำรุงรักษา
การบำรุงรักษาตามปกติจะช่วยให้พัดลมเพดานของคุณมีประสิทธิภาพสูงสุดและมีอายุการใช้งานยาวนาน
- การทำความสะอาด: ใช้แบบนุ่มๆamp ผ้าสำหรับทำความสะอาดใบพัดลมและตัวเรือนมอเตอร์ ห้ามใช้น้ำยาทำความสะอาดที่มีฤทธิ์กัดกร่อนหรือตัวทำละลาย
- การตรวจสอบใบมีด: ตรวจสอบความแน่นของสกรูยึดใบพัดทุกตัวเป็นระยะ สกรูที่หลวมอาจทำให้ใบพัดโยกเยกและมีเสียงดังได้
- เฉดสีอ่อน: Clean the light shade gently with a soft cloth to maintain light output.
- การเชื่อมต่อไฟฟ้า: ตรวจสอบให้แน่ใจว่าการเชื่อมต่อทางไฟฟ้าทั้งหมดแน่นหนา หากพบสายไฟหลวม ให้ปรึกษาช่างไฟฟ้าที่มีคุณสมบัติเหมาะสม
6 การแก้ไขปัญหา
If you encounter issues with your Asyko Ceiling Fan, refer to the following common problems and solutions:
| ปัญหา | สาเหตุที่เป็นไปได้ | สารละลาย |
|---|---|---|
| พัดลมไม่ทำงาน | No power supply; Loose wiring; Remote control issue | Check circuit breaker; Verify all wire connections; Replace remote batteries or re-pair remote. |
| ไฟไม่ทำงาน | Loose wiring; LED module failure; Remote control issue | Check light kit connections; Contact customer support for LED module replacement; Verify remote functionality. |
| Fan wobbles or is noisy | น็อตยึดใบเลื่อยหลวม; ใบเลื่อยไม่สมดุล; การติดตั้งไม่ถูกต้อง | ขันสกรูใบพัดทั้งหมดให้แน่น ใช้ชุดปรับสมดุล (ไม่ได้รวมอยู่ในชุด) เพื่อปรับสมดุลใบพัด ตรวจสอบให้แน่ใจว่าขายึดติดตั้งแน่นหนาดีแล้ว |
| รีโมทคอนโทรลไม่ตอบสนอง | Dead batteries; Not paired correctly; Interference | Replace batteries; Follow pairing instructions in the manual; Reduce interference from other devices. |
| Light color temperature changes unexpectedly | Power cycle within 10 seconds | Allow at least 10 seconds after turning off the light for the memory function to save the setting. |
7. ข้อมูลจำเพาะ
| คุณสมบัติ | รายละเอียด |
|---|---|
| ยี่ห้อ | อาซิโก้ |
| ชื่อรุ่น | Ceiling Fans with Lights (Model 8511) |
| การออกแบบพัดลมไฟฟ้า | พัดลมเพดาน |
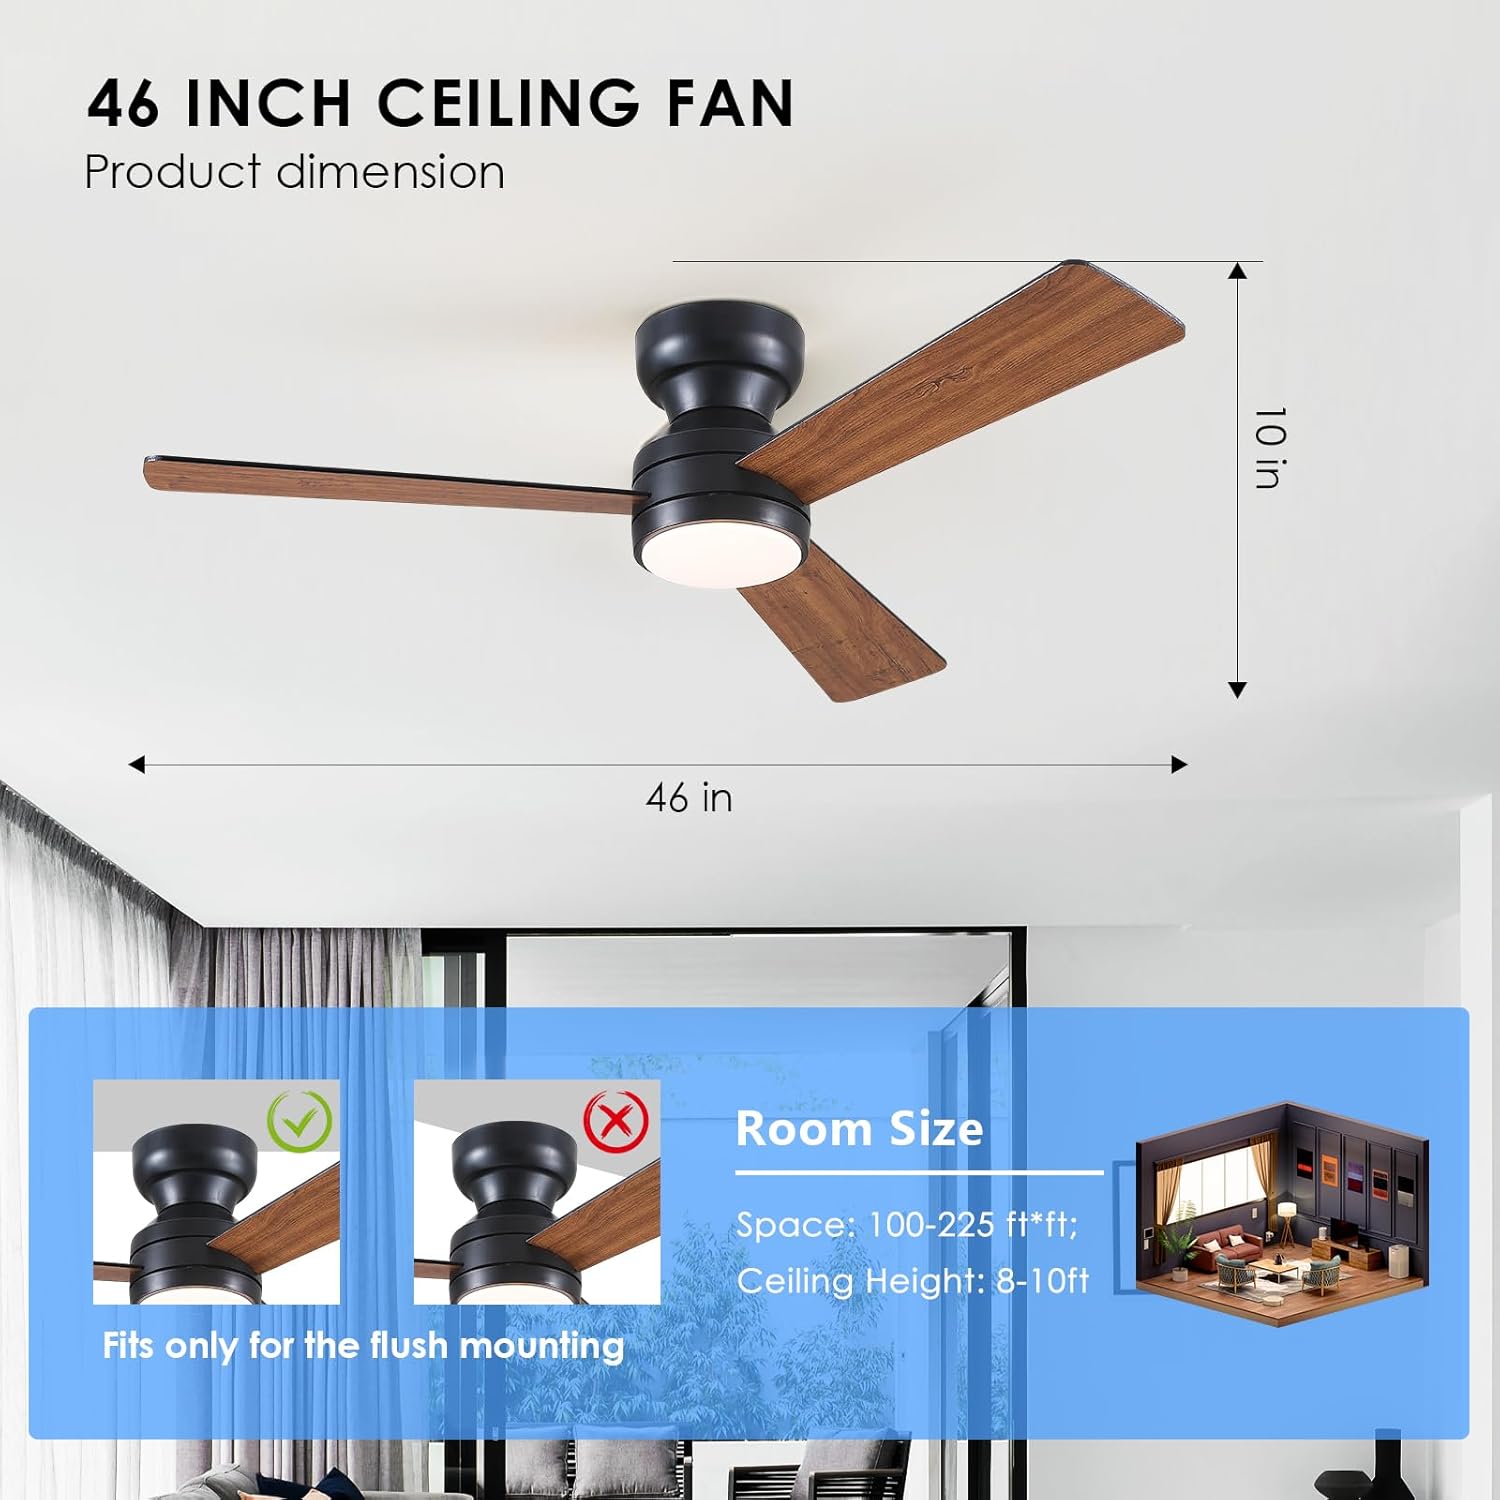
| ขนาด | 46 inches (3-Blade) |
| สี | Brown (reversible blades) |
| แหล่งพลังงาน | DC |
| ประเภทมอเตอร์ | Brushless DC (Quiet Operation) |
| วัดtage | 40 วัตต์ |
| ประเภทไฟ | LED หรี่แสงได้ |
| อุณหภูมิสี | 3000K (สีขาวอุ่น), 4000K (สีขาวธรรมชาติ), 6000K (สีขาวเย็น) |
| การปรับความสว่าง | 10%-100% |
| จำนวนความเร็วพัดลม | 6 |
| วิธีการควบคุม | รีโมทคอนโทรล |
| คุณสมบัติพิเศษ | Reversible Motor, Memory Function, Timer (1/2 hour) |
| ประเภทการติดตั้ง | Flush Mount (Self-install) |
| ขนาดสินค้า | 6"D x 6"W x 6"H (Note: This appears to be packaging dimensions, actual fan dimensions are 46" diameter) |
| น้ำหนักสินค้า | 7.13 ปอนด์ |
| การใช้งานภายใน/ภายนอกอาคาร | ในร่ม |
8. การรับประกันและการสนับสนุน
Asyko is committed to customer satisfaction. For any questions, concerns, or warranty claims, please contact our customer support team.
- การสนับสนุนลูกค้า: We offer prompt customer support with a 24-hour response time. Refer to your purchase documentation for specific contact details.
- การรับประกัน: Please refer to the warranty information provided with your purchase for details on coverage and terms.


