การแนะนำ
This manual provides detailed instructions for the safe installation, operation, and maintenance of your Asyko 46-inch Low Profile พัดลมเพดานพร้อมไฟและรีโมทคอนโทรล โปรดอ่านคำแนะนำทั้งหมดอย่างละเอียดก่อนเริ่มการติดตั้ง และเก็บคู่มือนี้ไว้เพื่อใช้อ้างอิงในอนาคต
ข้อมูลด้านความปลอดภัยที่สำคัญ
- ควรตัดกระแสไฟที่เบรกเกอร์หลักทุกครั้งก่อนทำการติดตั้งหรือซ่อมบำรุง
- สายไฟทั้งหมดจะต้องเป็นไปตามมาตรฐานไฟฟ้าระดับชาติและระดับท้องถิ่น
- ตรวจสอบให้แน่ใจว่าสถานที่ติดตั้งสามารถรับน้ำหนักของพัดลมได้ (ประมาณ 7.09 ปอนด์)
- Do not install the fan in a location where blades could strike objects or people.
- ควรเว้นระยะห่างจากพื้นถึงใบพัดลมอย่างน้อย 7 ฟุต
- Do not use a dimmer switch with this fan. Use the provided remote control for light dimming.
เนื้อหาแพ็คเกจ
Verify that all components listed below are included in your package.
- ชุดมอเตอร์พัดลม
- Fan Blades (3) - Reversible (Black/Wood Grain)
- รีโมทคอนโทรล
- รีโมตคอนโทรล
- ชุดไฟ LED
- Light Dome (Plastic)
- ตัวยึด
- Downrod (Short and Long options)
- Canopy/Shroud
- ชุดอุปกรณ์ฮาร์ดแวร์ (สกรู แหวนรอง ตัวเชื่อมสายไฟ ฯลฯ)
- คู่มือการใช้งาน

Image: All components of the Asyko 46-inch ceiling fan laid out, including the motor, three reversible blades, remote control, LED light, and mounting hardware.
การติดตั้งและการตั้งค่า
ก่อนที่คุณจะเริ่มต้น
- ปิดไฟที่เบรกเกอร์
- ตรวจสอบให้แน่ใจว่าคุณมีเครื่องมือที่จำเป็นทั้งหมด (ไขควง, คีมปอกสายไฟ, บันได ฯลฯ)
- แกะส่วนประกอบทั้งหมดออกและจัดวางให้เข้าถึงได้ง่าย
ขั้นตอนที่ 1: ติดตั้งขายึด
The mounting bracket secures the fan to your ceiling junction box.

Image: Close-up of the black metal mounting bracket with screw holes, designed to attach to a standard ceiling electrical box.
Attach the mounting bracket to the ceiling junction box using the screws provided. Ensure it is securely fastened and can support the fan's weight. If your ceiling box is not rated for fan support, consult a qualified electrician.
Step 2: Assemble Downrod and Canopy
Choose the appropriate downrod length for your installation. For low-profile installations, the shorter downrod is recommended.
Feed the fan's electrical wires through the chosen downrod.
Slide the canopy (shroud) over the downrod, ensuring it rests above the fan motor assembly.

Image: The fan motor assembly with the downrod and canopy attached, ready for ceiling installation.
Step 3: Hang the Fan Motor Assembly
Carefully lift the fan motor assembly and hook it onto the mounting bracket. This allows you to make electrical connections hands-free.
ขั้นตอนที่ 4: การเชื่อมต่อไฟฟ้า
Connect the fan's wiring to your household wiring according to the wiring diagram in the manual and local electrical codes. Typically, this involves connecting:
- Green/Yellow wire (Ground) to the household ground wire.
- White wire (Neutral) to the household neutral wire.
- Black wire (Live) to the household live wire.
ตรวจสอบให้แน่ใจว่าการเชื่อมต่อทั้งหมดแน่นหนาโดยใช้ตัวเชื่อมสายไฟแบบน็อต
ขั้นตอนที่ 5: ติดตั้งใบพัดลม
The fan blades are reversible, offering a black or wood grain finish. Choose your preferred side.
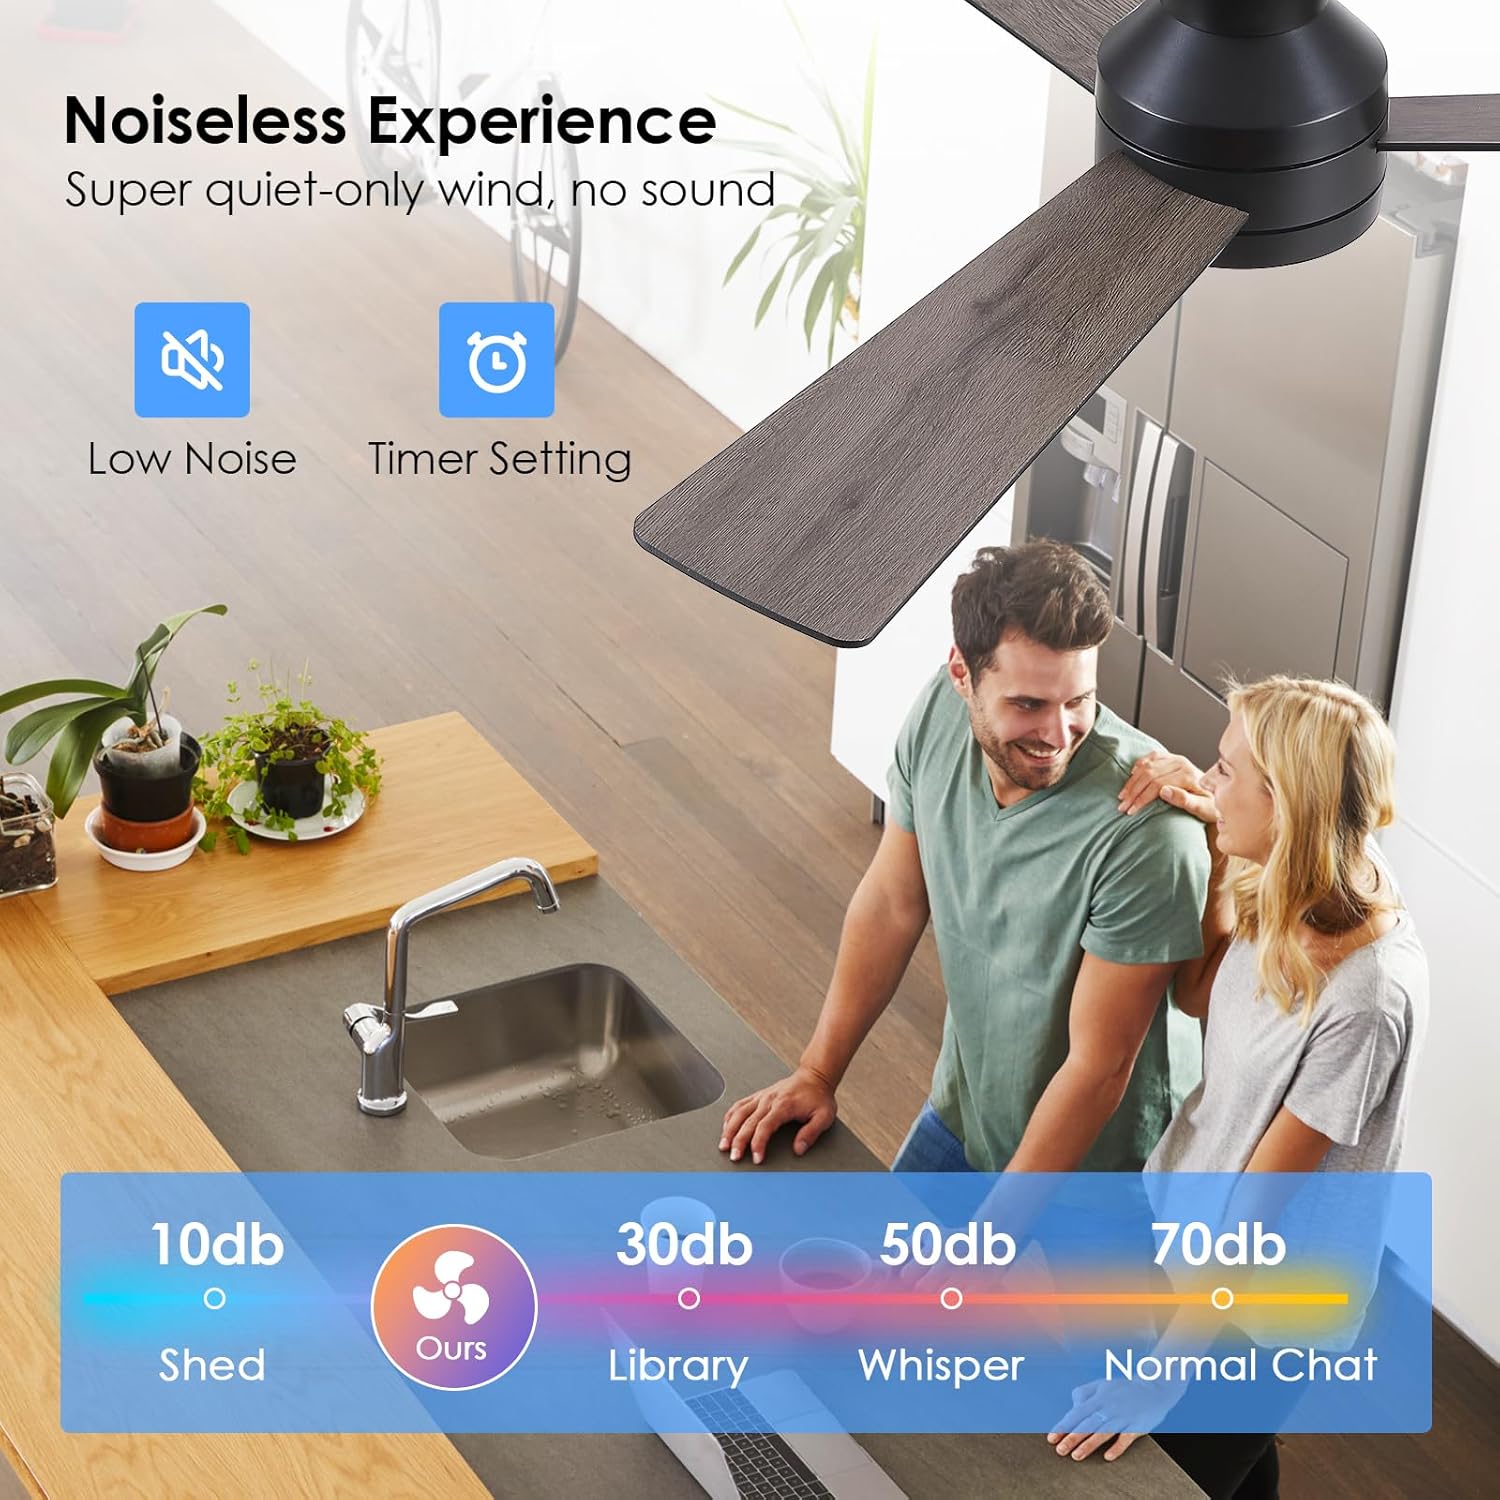
Image: Close-up of the fan blades, highlighting their reversible design with a black finish on one side and a wood grain finish on the other.
Slide each fan blade into the designated slots on the fan motor assembly. Secure them using the provided screws and washers.
Step 6: Install LED Light Kit and Light Dome
Connect the LED light kit wires to the corresponding wires from the fan motor assembly. The light kit is magnetic for easy attachment.
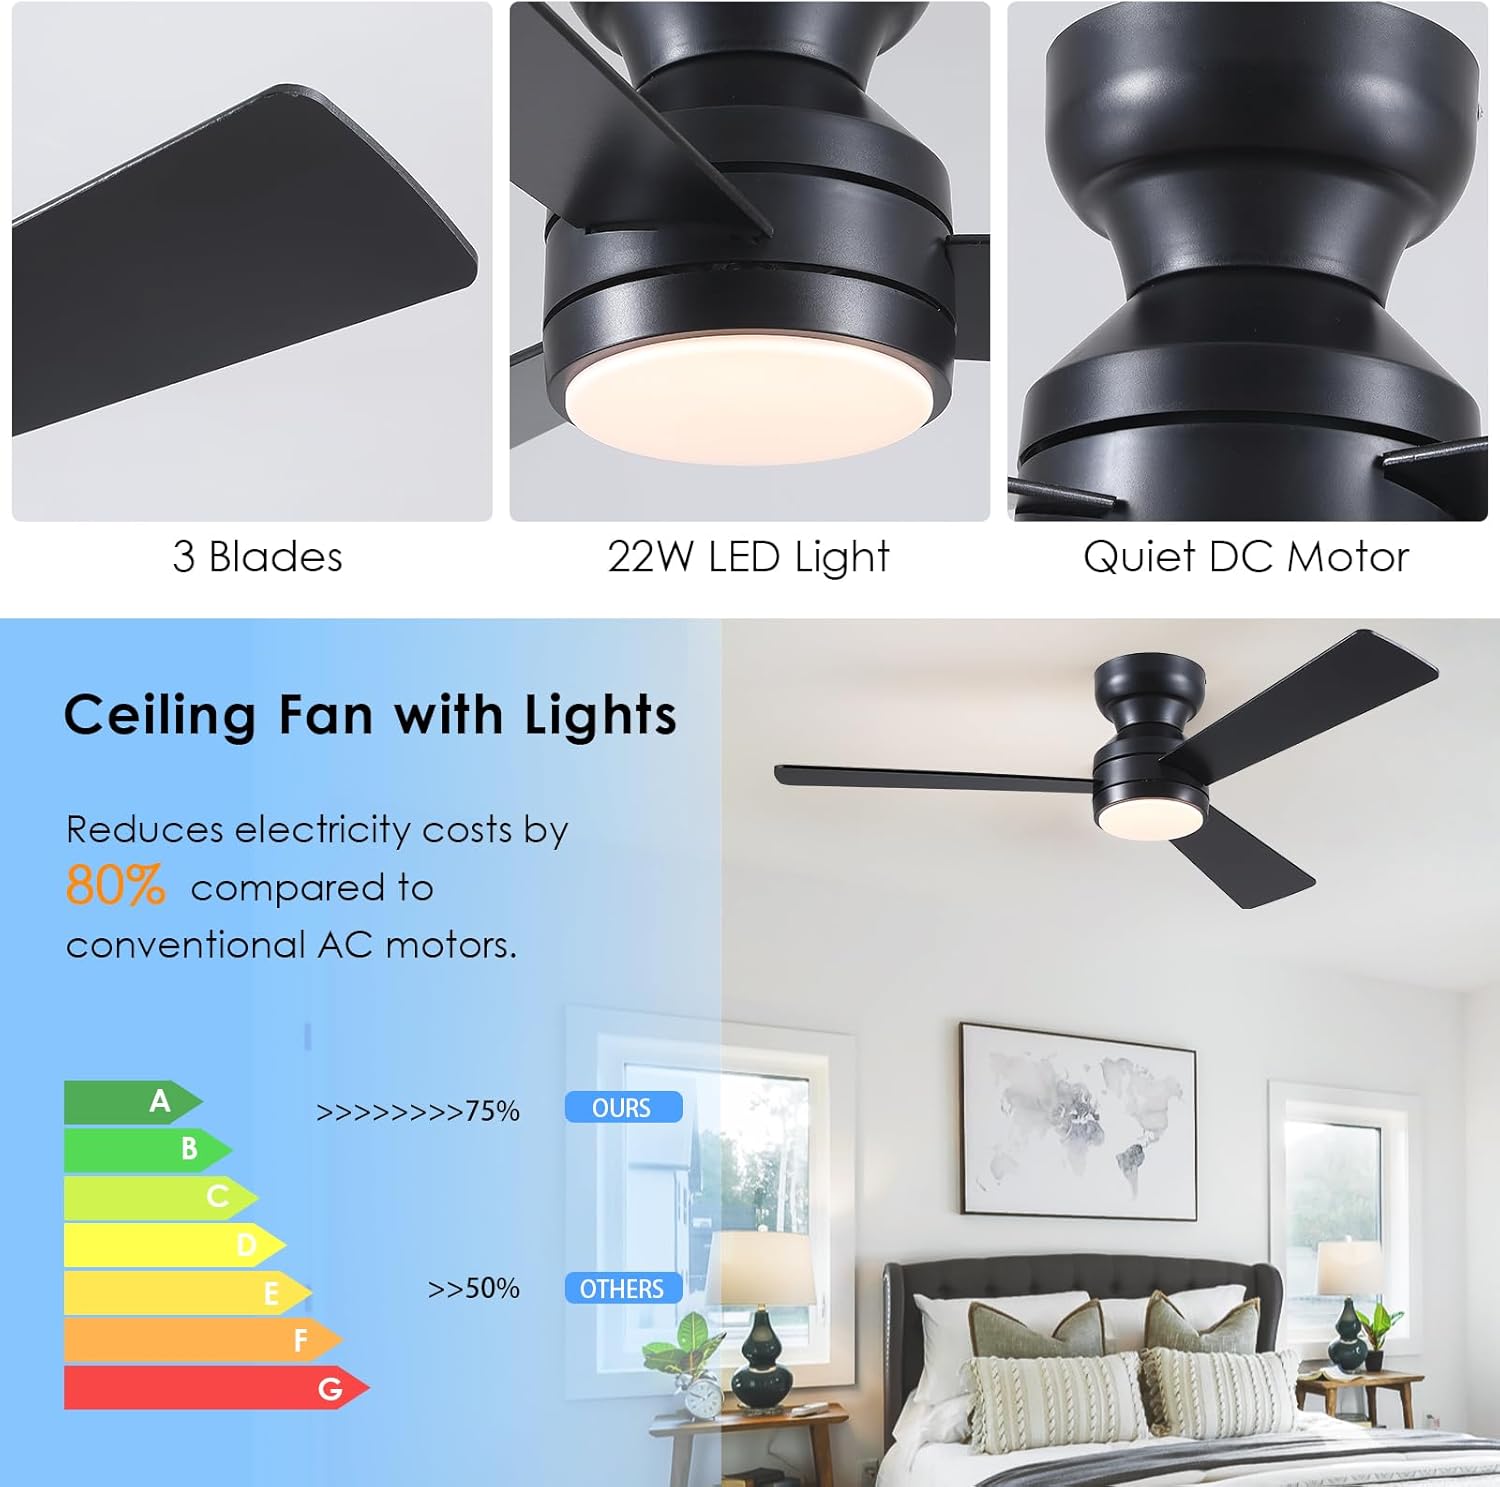
Image: Close-up of the fan's central hub showing the integrated LED light kit and its connection points.
Secure the plastic light dome by twisting it onto the fan motor assembly until it is snug.
ขั้นตอนที่ 7: เสร็จสิ้นการติดตั้ง
Push the canopy up against the ceiling and secure it with the provided screws.
เรียกคืนพลังงานที่เบรกเกอร์
คำแนะนำการใช้งาน
ฟังก์ชั่นการควบคุมระยะไกล
The included remote control allows full operation of your Asyko ceiling fan.

Image: The remote control for the Asyko ceiling fan, displaying buttons for fan speed, light control, and timing functions.
- เปิด/ปิด: เปิด/ปิดพัดลมและไฟ
- ความเร็วพัดลม (1-6): ปรับความเร็วพัดลมจากต่ำ (1) ถึงสูง (6)
- เปิด/ปิดไฟ: ควบคุมแสงได้อย่างอิสระ
- Light Color Temperature (K): Cycles through 3000K (warm white), 4000K (natural white), and 6000K (cold white).
- การปรับความสว่าง (+/-): ปรับความสว่างได้ตั้งแต่ 10% ถึง 100%
- ตัวจับเวลา (1 ชั่วโมง/2 ชั่วโมง): ตั้งค่าให้พัดลมปิดอัตโนมัติหลังจาก 1 หรือ 2 ชั่วโมง
- F/R (เดินหน้า/ถอยหลัง): Changes the fan's rotation direction for summer (downward airflow) or winter (upward airflow).
ฟังก์ชั่นหน่วยความจำ
The fan features a memory function. If the light is turned off for at least 10 seconds, it will retain the last brightness and color temperature settings when turned back on. The fan will also resume its last operating speed.
มอเตอร์ย้อนกลับ
The reversible DC motor allows for year-round comfort.
- โหมดฤดูร้อน (หมุนทวนเข็มนาฬิกา): สร้างกระแสลมพัดลงด้านล่าง ทำให้เกิดความรู้สึกเย็นสบาย
- โหมดฤดูหนาว (ตามเข็มนาฬิกา): สร้างกระแสลมขึ้นด้านบน ช่วยหมุนเวียนอากาศอุ่นที่ติดอยู่บริเวณเพดาน
Video: A demonstration of the fan's features, including speed settings, light color temperature, and brightness adjustment.
การซ่อมบำรุง
- การทำความสะอาด: ควรทำความสะอาดใบพัดและตัวมอเตอร์เป็นระยะด้วยผ้าเนื้อนุ่มและแห้งamp ผ้า ห้ามใช้สารทำความสะอาดที่มีฤทธิ์กัดกร่อนหรือตัวทำละลาย
- สกรูขันให้แน่น: ตรวจสอบสกรูและอุปกรณ์ยึดทั้งหมดเป็นประจำทุกปี เพื่อให้แน่ใจว่าแน่นหนาดีแล้ว
- แหล่งกำเนิดแสง: แหล่งกำเนิดแสง LED เป็นแบบติดตั้งภายในและผู้ใช้ไม่สามารถเปลี่ยนได้ โปรดติดต่อฝ่ายบริการลูกค้าหากไฟดับ
การแก้ไขปัญหา
| ปัญหา | สาเหตุที่เป็นไปได้ | สารละลาย |
|---|---|---|
| พัดลมไม่เริ่มทำงาน | No power to the fan; loose wiring; remote not paired. | Check circuit breaker; verify all wire connections; pair remote control (refer to remote instructions). |
| ไฟไม่ทำงาน | Loose wiring; LED light kit failure. | Check light kit wiring connections; contact customer support for LED replacement. |
| พัดลมสั่น | Loose fan blades; improper mounting. | Ensure all blade screws are tight; verify mounting bracket is securely installed. |
| รีโมทไม่ตอบสนอง | แบตเตอรี่หมด รีโมตไม่จับคู่ | Replace remote batteries (AAA); re-pair remote control. |
ข้อมูลจำเพาะ
- ยี่ห้อ: อาซิโก้
- ชื่อรุ่น : พัดลมเพดานพร้อมไฟ
- หมายเลขรุ่นสินค้า: 8511
- ขนาด: 46 inches (3-Blade)
- สี: Black (with reversible blades: Black/Wood Grain)
- การออกแบบพัดลมไฟฟ้า: พัดลมเพดาน
- แหล่งพลังงาน: DC
- สไตล์: ทันสมัย
- ขนาดสินค้า : 46" Diameter (Note: The provided 6"D x 6"W x 6"H dimensions appear to be packaging or internal component measurements, not the overall fan dimensions.)
- ประเภทห้อง: Bedroom, Living Room, Office, Study, Kitchen, Dining Area
- คุณสมบัติพิเศษ: Remote Controlled, Reversible Motor, Dimmable LED Light, Memory Function
- การใช้ที่แนะนำ: การระบายความร้อน การไหลเวียนของอากาศ
- ส่วนประกอบที่รวมอยู่: ชุดไฟ
- การใช้งานในร่ม/กลางแจ้ง: ในร่ม
- วิธีการควบคุม: ระยะไกล
- จำนวนระดับพลังงาน: 6
- ประเภทมอเตอร์: DC
- ประเภทการติดตั้ง: Flush Mount
- น้ำหนักสินค้า: 7.09 ปอนด์
- อุณหภูมิสีของแสง: 3000K (สีขาวอุ่น), 4000K (สีขาวธรรมชาติ), 6000K (สีขาวเย็น)
- Light Dimmability: 10%-100%
การรับประกันและการสนับสนุน
Asyko products are designed for quality and reliability. For any questions, technical support, or warranty claims, please refer to the contact information provided in your original product packaging or visit the official Asyko website. We offer prompt customer support with a 24-hour response time to ensure your satisfaction.
การสนับสนุนทางออนไลน์: สำหรับแหล่งข้อมูลเพิ่มเติมและคำถามที่พบบ่อย โปรดไปที่ Asyko Store on Amazon.
วิดีโอการติดตั้ง: You may also find helpful installation videos by searching for "Asyko Ceiling Fan Installation" on popular video platforms.


