1. บทนำ
ขอบคุณสำหรับการซื้อasing the Vangoa VMX8 Wireless MIDI Controller Mixer. This device is designed to enhance your music production workflow by providing intuitive control over your Digital Audio Workstation (DAW) software. Featuring 43 backlit buttons, 8 channel faders with LED indicators, and 8 assignable endless knobs, the VMX8 offers a portable and versatile solution for musicians and producers.
Please read this manual thoroughly to understand the features and operation of your new MIDI controller. Keep this manual for future reference.
2. สินค้าหมดview
2.1 คุณสมบัติหลัก
- 43 Backlit Buttons: Assignable for triggering beats, melodies, and effects with real-time feedback.
- 8 Channel Faders: Diamond-shaped faders with LED indicators for precise control over audio levels and parameters.
- ปุ่มหมุนปรับได้ไม่จำกัด 8 ปุ่ม: Customize parameters such as EQ settings, effects, and more.
- การออกแบบพกพา: Compact and lightweight for on-the-go music production.
- การเชื่อมต่อไร้สาย: Bluetooth for flexible setup.
- พอร์ต USB-C: Fast transmission and driver-free connection to Windows/Mac.
- แบตเตอรี่ในตัว: 780mAh battery provides up to 25 hours of play time after a 5-hour charge.
2.2 การระบุส่วนประกอบ
Familiarize yourself with the various components of your Vangoa VMX8 MIDI Controller.

รูปที่ 2.2.1: Vangoa VMX8 MIDI Controller showing its compact design and labeled components including faders, knobs, LED indicators, and track control buttons. Dimensions are 11.61" x 5.91" x 2.36" and it weighs 1.26 lbs.
- เฟเดอร์: Control channel volume or assigned parameters.
- ลูกบิด: Endless encoders for fine-tuning parameters.
- ปุ่มเรืองแสง: Multi-functional buttons for various controls (Mute, Solo, Record, Play, Stop, etc.).
- ไฟ LED แสดงสถานะ: Provide visual feedback for fader positions and button states.
- พอร์ต USB-C: สำหรับเชื่อมต่อพลังงานและข้อมูล
- สวิตช์ไฟ: เปิด/ปิดอุปกรณ์
- ปุ่ม BT: สำหรับการจับคู่ผ่านบลูทูธ
- ปุ่ม SHIFT: Accesses secondary functions of buttons/knobs.
3. การตั้งค่า
3.1 การเปิดเครื่องและการชาร์จ
- Locate the USB-C port on the rear of the VMX8 controller.
- Connect the provided USB-C cable to the controller and the other end to a USB power adapter (not included) or a computer's USB port.
- The device will begin charging. A full charge takes approximately 5 hours and provides up to 25 hours of operation.
- To power on, slide the power switch to the "ON" position.

รูปที่ 3.1.1: Connecting the Vangoa VMX8 MIDI Controller via its USB-C port for power and data.
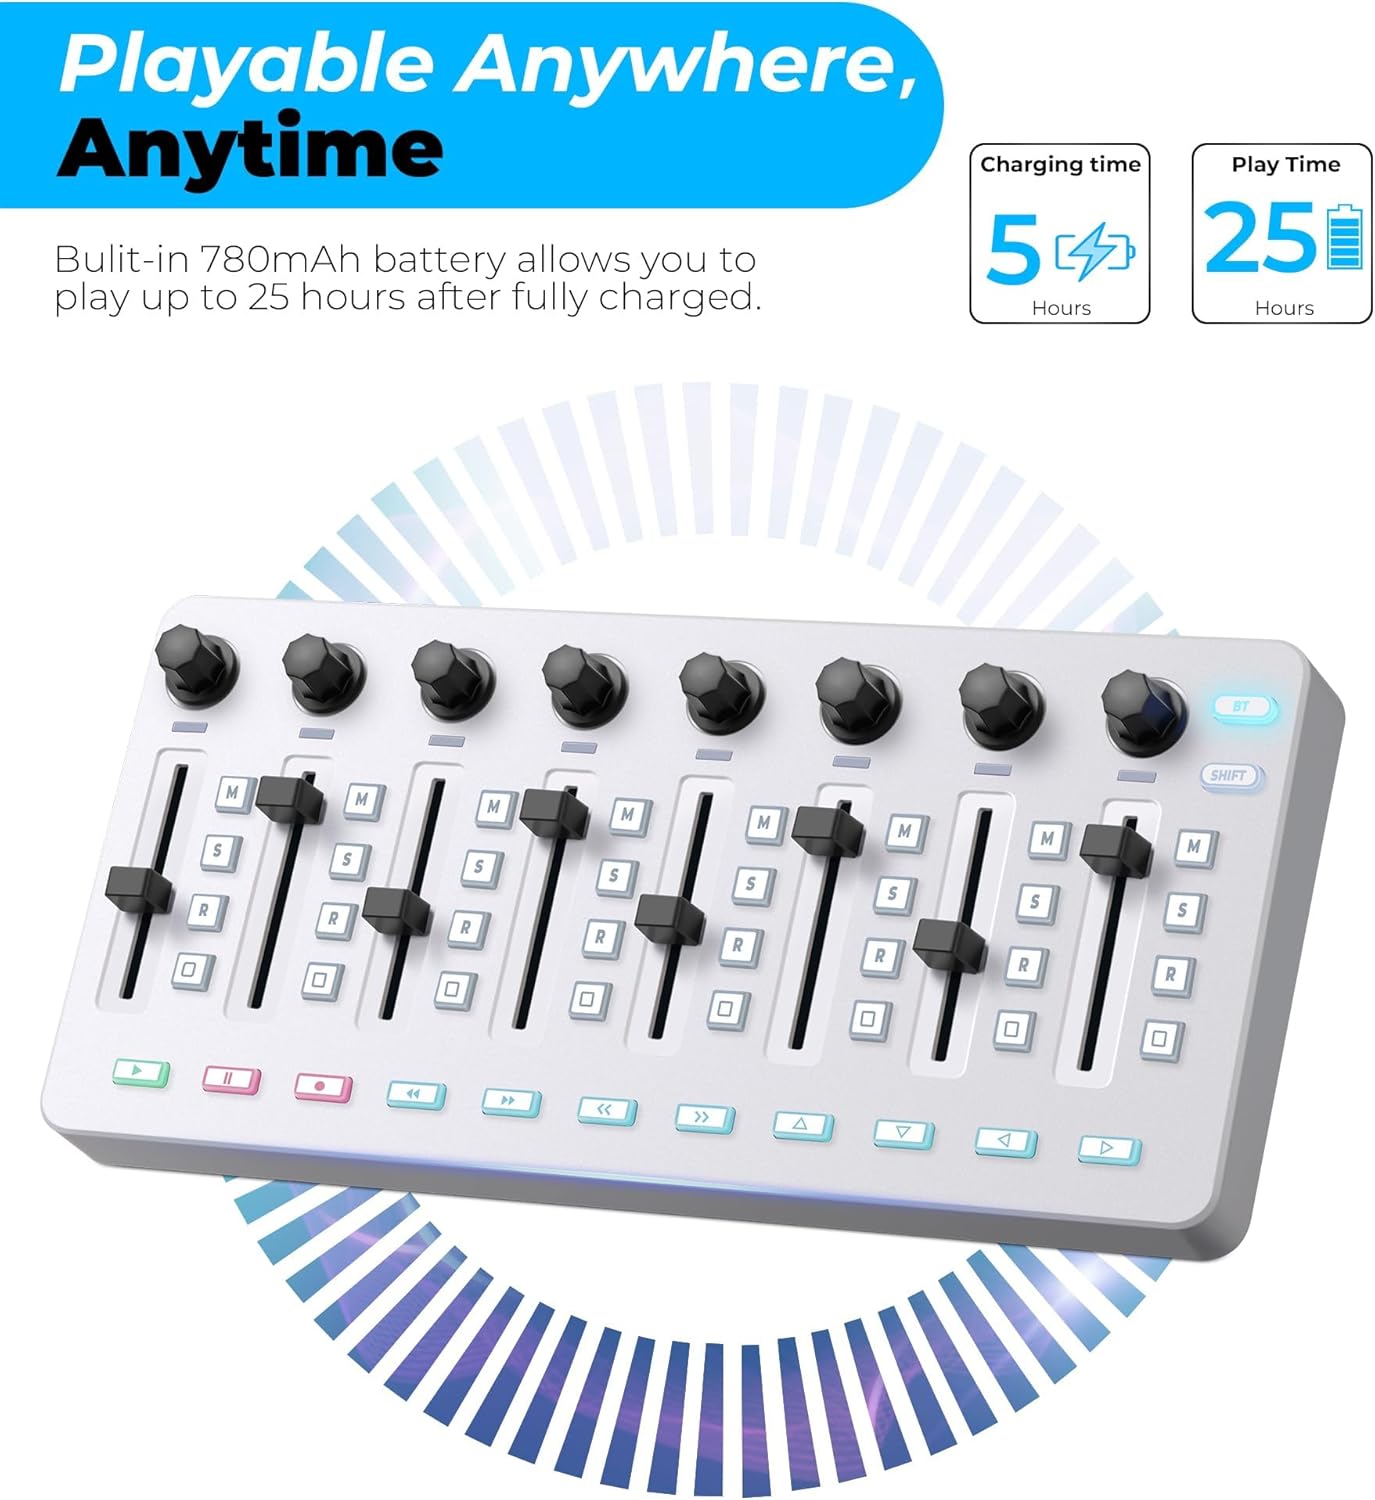
รูปที่ 3.1.2: Battery life indicators for the Vangoa VMX8, showing 5 hours charging time for 25 hours of play time.
3.2 การเชื่อมต่อกับคอมพิวเตอร์ (USB)
- Ensure the VMX8 is powered on.
- Connect the USB-C cable from the VMX8 to an available USB port on your Windows PC or Mac computer.
- The VMX8 is a class-compliant device and typically does not require additional drivers. Your operating system should recognize it automatically.
- Open your Digital Audio Workstation (DAW) software and configure the VMX8 as a MIDI input/output device in the software's preferences or settings.
3.3 การเชื่อมต่อแบบไร้สาย (บลูทูธ)
- Ensure the VMX8 is powered on.
- Press the "BT" button on the VMX8 to activate Bluetooth pairing mode. The Bluetooth indicator light will flash.
- On your computer or compatible device, open Bluetooth settings.
- ค้นหา available devices and select "Vangoa VMX8" (or similar) to pair.
- Once paired, the Bluetooth indicator light on the VMX8 will become solid.
- Configure the VMX8 as a MIDI input/output device in your DAW software's preferences.
Note: For detailed wireless connection tutorials, search for "BLE Drive Connection Tutorial" on YouTube.
4. การดำเนินการ
4.1 Basic DAW Control
The VMX8 is designed to integrate seamlessly with various DAWs. After connecting and configuring, you can use its controls to manage your projects.

รูปที่ 4.1.1: A hand interacting with the faders and buttons of the Vangoa VMX8, demonstrating simplified music creation.

รูปที่ 4.1.2: The Vangoa VMX8 in a studio setup, showing compatibility with DAWs like Ableton Live, Logic Pro X, FL Studio, Cubase, and Pro Tools. A QR code is present for software editor download.
Note: This MIDI controller requires scanning a QR code to download the software editor first for full customization. The QR code is typically found in the packaging or on the product page. A direct link is also available: http://www.cuvave.com/appdownload
4.2 Using the Backlit Buttons

รูปที่ 4.2.1: รายละเอียด view of the 43 assignable backlit buttons on the Vangoa VMX8, highlighting real-time feedback and quick recognition.
- The 43 backlit buttons can be assigned to various functions within your DAW, such as Mute, Solo, Record Arm, Play, Stop, Loop, and more.
- The backlighting provides visual feedback, indicating the status of each assigned function.
- Use the dedicated software editor to customize button assignments and colors.
4.3 Adjusting with Faders
- The 8 channel faders are primarily used for adjusting track volumes or other continuous parameters.
- The LED indicators next to each fader provide a visual representation of the current parameter value.
- In most DAWs, moving a fader on the VMX8 will correspond to the fader of an assigned track.
4.4 Using the Assignable Knobs

รูปที่ 4.4.1: The 8 assignable endless encoder knobs on the Vangoa VMX8, featuring a 360-degree rotation and anti-slip diamond-shaped design for parameter customization.
- The 8 endless knobs can be assigned to control various parameters such as EQ, effects sends, pan, or virtual instrument controls.
- These knobs offer 360-degree rotation, allowing for precise adjustments without limits.
- Use the software editor to assign specific MIDI CC messages to each knob for custom control.
4.5 SHIFT Function
กดปุ่มค้างไว้ กะ button to access secondary functions of certain buttons or knobs. Refer to the software editor or the device's overlay (if any) for specific SHIFT assignments.
5. การบำรุงรักษา
- การทำความสะอาด: Use a soft, dry cloth to clean the surface of the controller. Do not use abrasive cleaners, solvents, or waxes.
- พื้นที่จัดเก็บ: เก็บอุปกรณ์ไว้ในที่แห้งและเย็น หลีกเลี่ยงแสงแดดโดยตรงและอุณหภูมิที่สูงหรือต่ำเกินไป
- การจัดการ: หลีกเลี่ยงการทำอุปกรณ์หล่นหรือกระแทกอย่างรุนแรง
- การดูแลแบตเตอรี่ เพื่อให้แบตเตอรี่ใช้งานได้นานที่สุด ควรหลีกเลี่ยงการปล่อยให้แบตเตอรี่หมดจนเกลี้ยงบ่อยๆ ชาร์จอุปกรณ์เป็นประจำ แม้ว่าจะไม่ได้ใช้งานเป็นเวลานานก็ตาม
6 การแก้ไขปัญหา
| ปัญหา | สาเหตุที่เป็นไปได้ | สารละลาย |
|---|---|---|
| เครื่องเปิดไม่ติด | แบตเตอรี่เหลือน้อยหรือไฟดับ | Ensure the power switch is ON. Connect the USB-C cable to charge the device. |
| No MIDI signal in DAW (USB). | Incorrect USB connection, DAW not configured, or driver issue. | Check USB-C cable connection. Verify VMX8 is selected as a MIDI input device in your DAW's preferences. Restart DAW and computer. |
| No MIDI signal in DAW (Bluetooth). | Not paired, Bluetooth off, or DAW not configured. | Ensure Bluetooth is enabled on your computer/device. Press the BT button on VMX8 to enter pairing mode. Pair the device in Bluetooth settings. Configure VMX8 in DAW preferences. Refer to "BLE Drive Connection Tutorial" on YouTube if issues persist. |
| Buttons/knobs not responding as expected. | Incorrect MIDI mapping or software editor settings. | Check your DAW's MIDI mapping settings. Use the Vangoa software editor to customize assignments and ensure they match your intended functions. |
| Backlights not working. | Device not powered or specific setting. | Ensure the device is powered on. Check if there are any backlight settings in the software editor that might be off. |
7. ข้อมูลจำเพาะ
| คุณสมบัติ | รายละเอียด |
|---|---|
| ยี่ห้อ | วังโกอา |
| แบบอย่าง | วีเอ็มเอ็กซ์8 |
| จำนวนปุ่ม | 43 (Backlit, Assignable) |
| Number of Faders | 8 (with LED indicators) |
| จำนวนปุ่ม | 8 (Assignable, Endless Encoders) |
| การเชื่อมต่อ | บลูทูธ, USB-C |
| ความจุของแบตเตอรี่ | 780mAh |
| เวลาในการชาร์จ | ประมาณ 5 ชั่วโมง |
| เวลาเล่น | นานถึง 25 ชั่วโมง |
| สี | สีขาว |
| ขนาด (กว้าง x ยาว x สูง) | ขนาดโดยประมาณ 11.61" x 5.91" x 2.36" |
| น้ำหนัก | 1.26 ปอนด์ (ประมาณ) |
| ความเข้ากันได้ | Windows, Mac (DAW software dependent) |
8. การรับประกันและการสนับสนุน
Vangoa provides a one-year satisfactory service for this product. For warranty claims, technical support, or further assistance, please contact Vangoa customer service through the retailer where the product was purchased or visit the official Vangoa webเว็บไซต์.
For software editor downloads and additional resources, please visit: http://www.cuvave.com/appdownload


