1. บทนำ
The ASUS Prime AP202 ARGB White mATX case is designed for compact, high-performance PC builds. It features a fully curved tempered glass panel, supports graphics cards up to 420mm, 360mm radiators, and includes a patented slot vent, easy-detach rail system, and three pre-installed ARGB fans. This manual provides detailed instructions to help you set up, operate, and maintain your PC case.
2. คุณสมบัติหลัก
- Panoramic Curved Tempered Glass: A seamless curved tempered glass panel extends from the front to the side, offering an unobstructed view ของส่วนประกอบภายใน
- ระบบรางถอดง่าย: Panels can be removed and reattached safely and simply, facilitating easy access for building and maintenance.
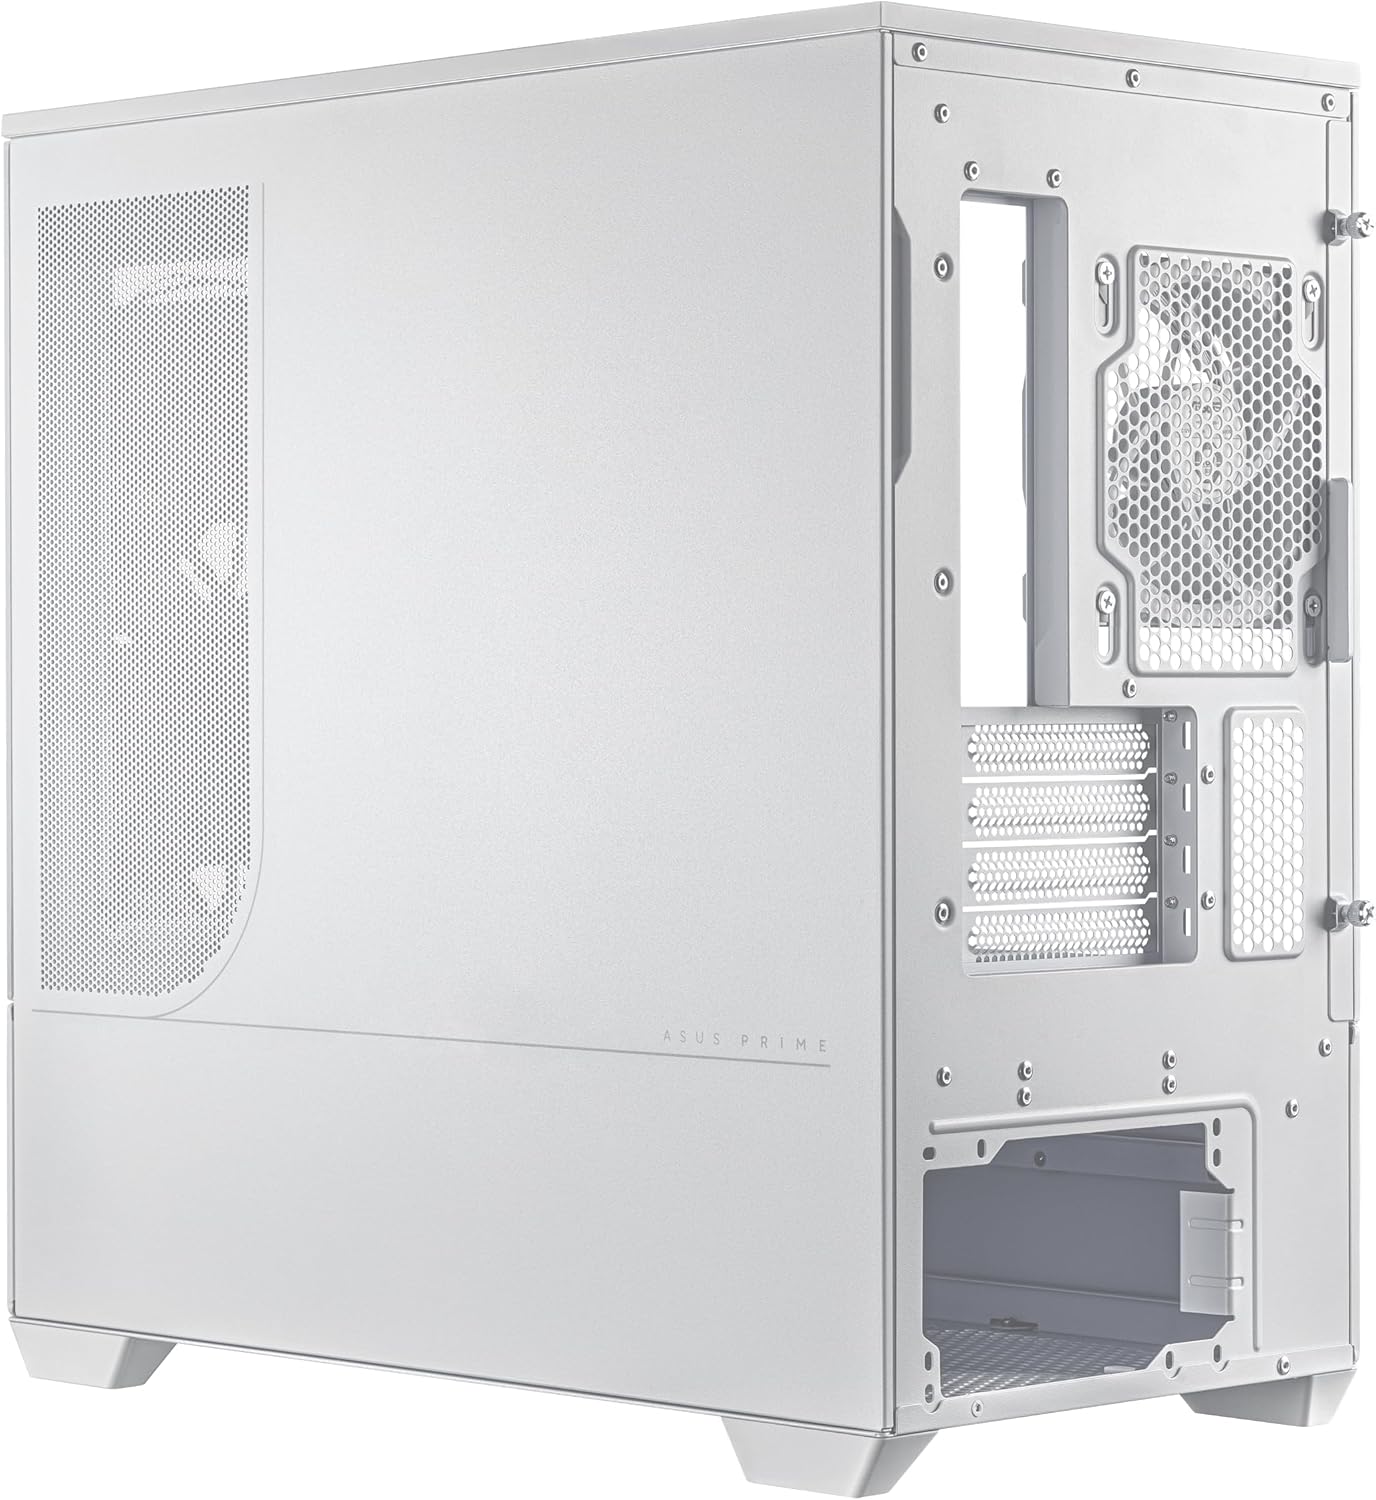
- ช่องระบายอากาศแบบร่องที่ได้รับสิทธิบัตร: An innovative design provides optimal cooling for graphics cards, enhancing thermal performance.
- แถบไฟ ARGB ในตัว: A light band near the bottom of the case offers spectacular lighting effects, compatible with Aura Sync for seamless adaptation to user scenarios.
- พัดลม ARGB ที่ติดตั้งมาแล้ว: Three 120mm ARGB fans with extra-thick 28mm frames are included, providing optimal airflow and integrated with 20 addressable RGB LEDs for dual lighting.
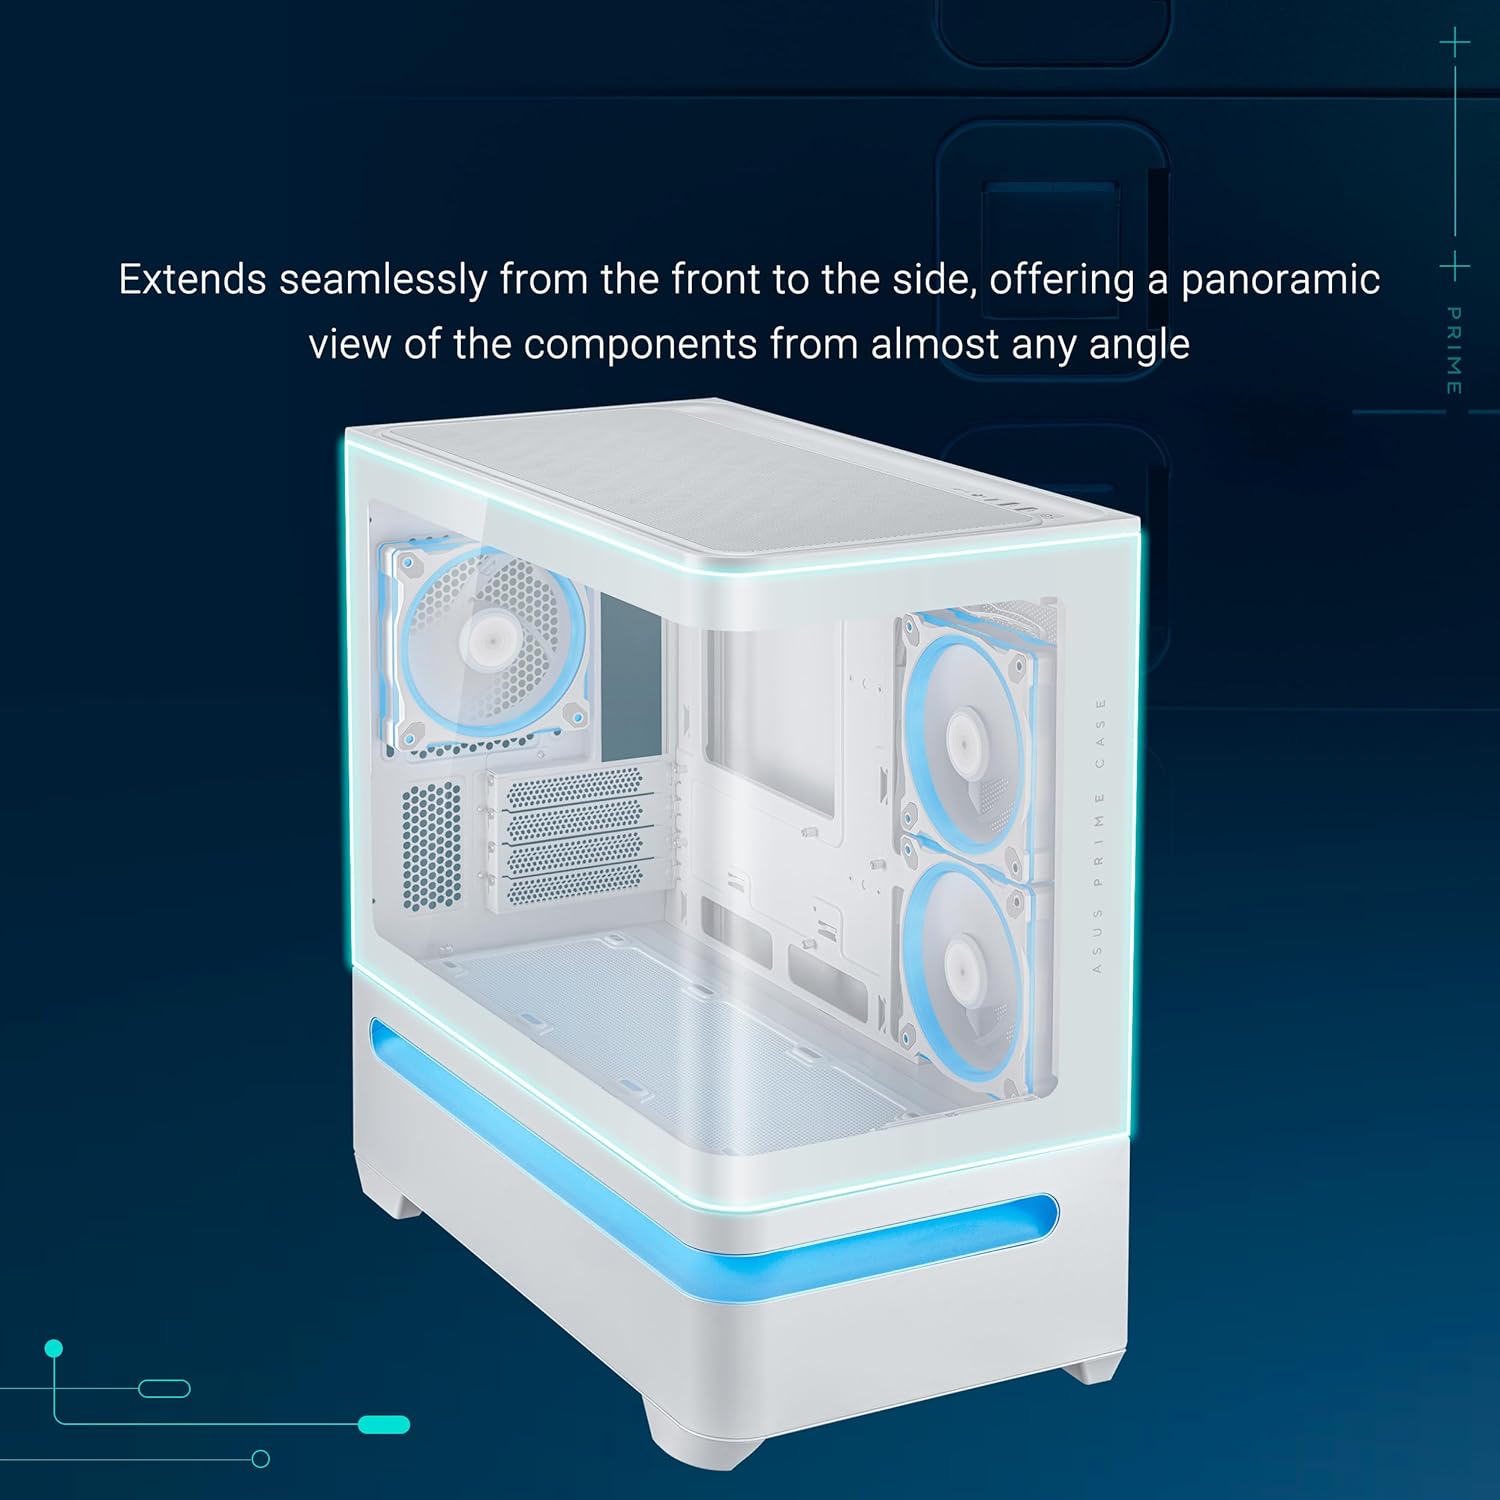
Figure 1: ASUS Prime AP202 ARGB White mATX PC Case with curved tempered glass and internal ARGB fans.
3. การตั้งค่าและการติดตั้ง
Follow these steps to assemble your PC components within the ASUS Prime AP202 ARGB White mATX PC case.
3.1. การถอดแผง
The case features an easy-detach rail system for safe and simple panel removal. Gently pull the panels to detach them, providing full access to the internal chassis for component installation.
รูปที่ 2: ระเบิด view illustrating detachable panels and components for easy assembly.
3.2. การติดตั้งเมนบอร์ด
The ASUS Prime AP202 supports Micro-ATX and Mini-ITX motherboards. Secure your motherboard to the pre-installed standoffs using the provided screws.
3.3. การติดตั้งพัดลมและหม้อน้ำ
The case supports radiators up to 360mm long. Three 120mm ARGB fans are pre-installed. Additional fans can be mounted for enhanced airflow. Ensure proper airflow direction (intake/exhaust) for optimal cooling.

Figure 3: Patented slot vent design for optimal graphics card cooling.
3.4. การติดตั้งกราฟิกการ์ด
The case accommodates graphics cards up to 420mm in length. Install your graphics card into the appropriate PCIe slot on your motherboard and secure it with screws.
3.5. การติดตั้งชุดจ่ายไฟ (PSU)
The case is compatible with PSUs up to 200mm in length. Install your PSU into its designated compartment, typically at the rear or bottom of the case, and secure it.
3.6. การจัดการสายเคเบิล
การใช้ประโยชน์จาก ample space behind the motherboard tray and the included cable ties to route and secure cables, ensuring clean aesthetics and unobstructed airflow.

Figure 4: Organized cable management for a clean build.
4. คู่มือการใช้งาน
4.1. เปิด/ปิดเครื่อง
Press the power button located on the front I/O panel to turn the system on or off. The power LED will illuminate when the system is active.
4.2. การควบคุมแสง ARGB
The integrated ARGB light band and pre-installed fans are compatible with ASUS Aura Sync. Use the motherboard's software to customize lighting effects and synchronize them with other compatible components.

Figure 5: Integrated ARGB light band for customizable lighting effects.
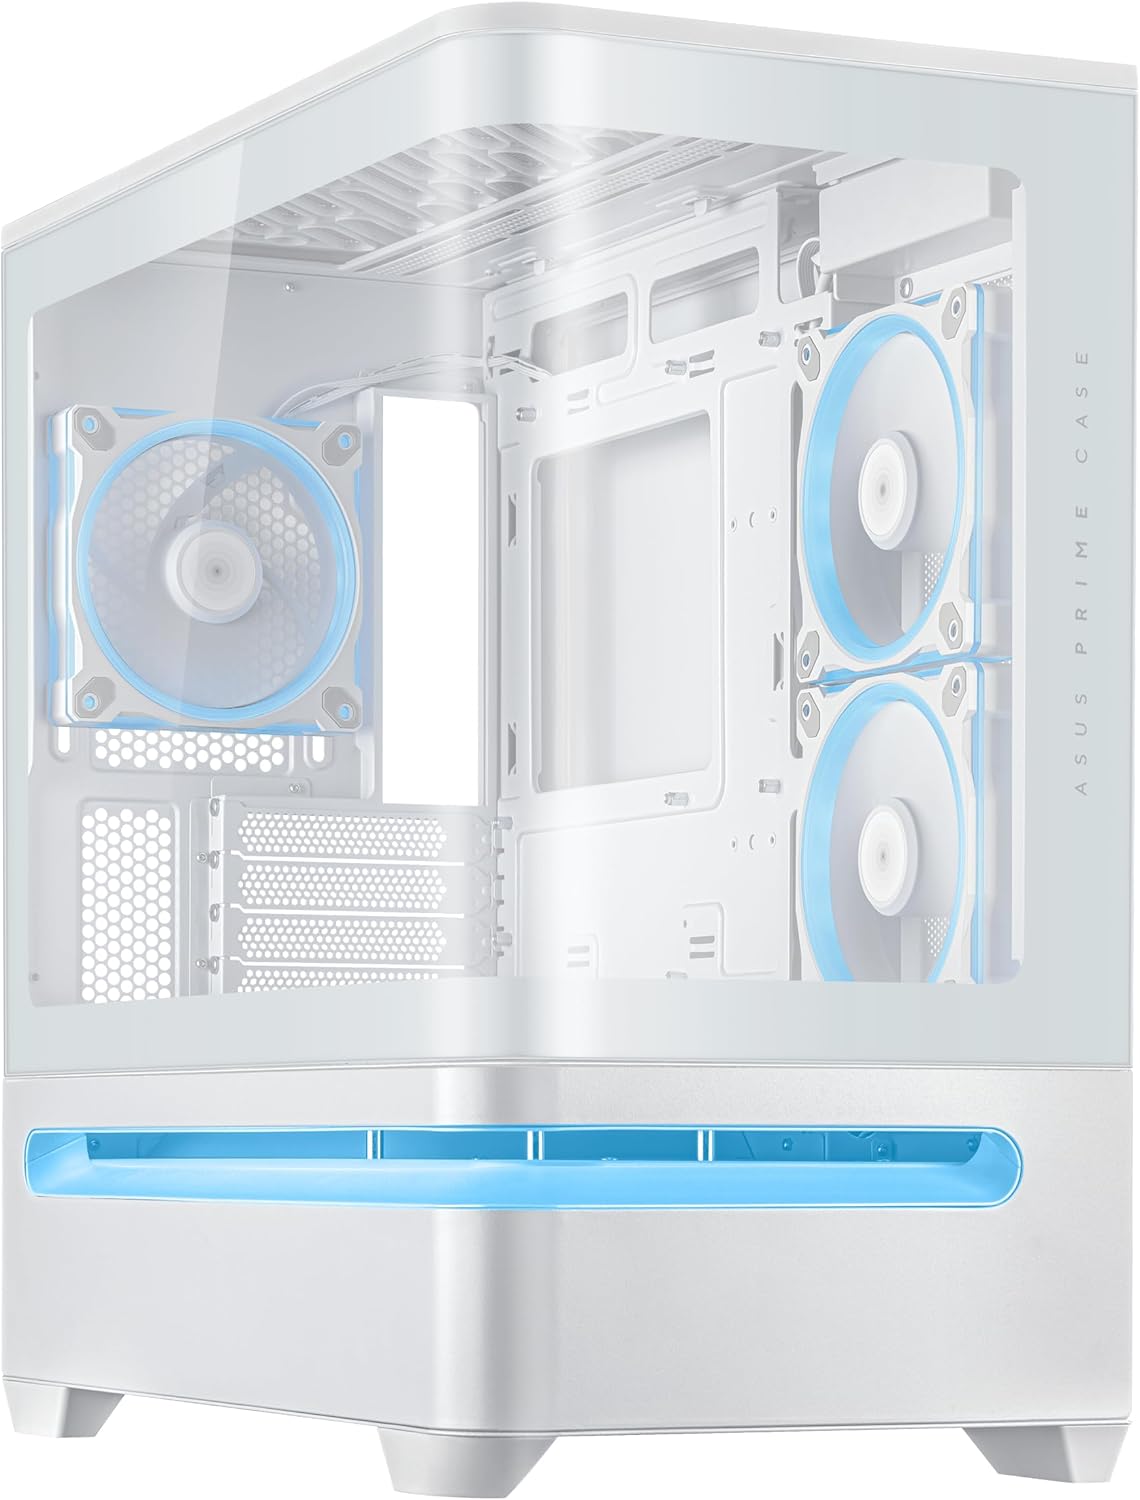
Figure 6: Front I/O panel with power button and USB ports.
5. การบำรุงรักษา
5.1. การทำความสะอาดแผ่นกรองฝุ่น
Regularly clean the dust filters to maintain optimal airflow and prevent dust buildup inside the case. The filters are easily removable for cleaning.
5.2. การทำความสะอาดทั่วไป
ใช้ผ้าแห้งนุ่มๆ เช็ดทำความสะอาดด้านนอกของเคส สำหรับแผงกระจกนิรภัย ให้ใช้น้ำยาทำความสะอาดกระจกและผ้าไมโครไฟเบอร์เพื่อป้องกันรอยขีดข่วน
6 การแก้ไขปัญหา
6.1. ไม่มีอำนาจ
- Ensure the power supply unit (PSU) is properly connected to the wall outlet and the power switch on the PSU is in the "ON" position.
- Verify all power cables from the PSU are securely connected to the motherboard and components.
- ตรวจสอบการเชื่อมต่อของสวิตช์เปิดปิดแผงด้านหน้ากับเมนบอร์ด
6.2. ปัญหาความร้อนสูงเกินไป
- Ensure all case fans are spinning and properly oriented for optimal airflow (front/bottom for intake, rear/top for exhaust).
- Clean any dust buildup on fans, radiators, and dust filters.
- ตรวจสอบว่าพัดลมระบายความร้อน CPU และพัดลม GPU ทำงานอย่างถูกต้องหรือไม่
6.3. ไฟ ARGB ไม่ทำงาน
- Check all ARGB cable connections from the fans and light band to the motherboard's ARGB headers or a dedicated controller.
- Ensure ASUS Aura Sync software (or equivalent motherboard software) is installed and configured correctly.
7. ข้อมูลจำเพาะ
| คุณสมบัติ | รายละเอียด |
|---|---|
| ยี่ห้อ | เอซุส |
| ชื่อรุ่น | PRIME AP202 TG ARGB WHITE |
| ประเภทเคส | มิดทาวเวอร์ |
| สี | สีขาว |
| ขนาดสินค้า (กxยxส) | 9.3 x 17.4 x 18.1 นิ้ว |
| น้ำหนักสินค้า | 20.1 ปอนด์ |
| วัสดุ | เหล็กอัลลอยด์ พลาสติก กระจกนิรภัย |
| ความเข้ากันได้ของเมนบอร์ด | ไมโคร-ATX มินิ-ITX |
| รองรับการ์ดจอ | Up to 420mm long |
| ฐานรองหม้อน้ำ | Up to 360mm long |
| ประเภทการติดตั้งแหล่งจ่ายไฟ | Compatible with PSUs up to 200mm length |
| วิธีการทำความเย็น | อากาศ |
| จำนวนพอร์ต USB 3.0 | 1 |
8. การรับประกันและการสนับสนุน
สำหรับข้อมูลการรับประกัน การสนับสนุนทางเทคนิค หรือสอบถามเกี่ยวกับบริการ โปรดไปที่เว็บไซต์สนับสนุนอย่างเป็นทางการของ ASUS website or contact your local ASUS representative. Keep your purchase receipt for warranty validation.
การสนับสนุน ASUS Webเว็บไซต์: https://www.asus.com/support/