1. บทนำ
The Arducam GMSL2 12MP IMX477 Raspberry Pi Camera Extension Kit (Model B0550) provides a robust solution for long-distance camera applications with Raspberry Pi. This kit enables high-quality imaging at distances up to 15 meters without signal degradation, leveraging advanced GMSL2 technology for stable and high-speed data transmission.
คุณสมบัติหลัก:
- Long-distance transmission up to 15 meters.
- Utilizes GMSL2 technology for robust bandwidth and low latency.
- Equipped with a 12MP IMX477 sensor for exceptional image clarity.
- Simplified installation with a single-cable system.
- Backward compatible with GMSL1 serializers.
- Versatile for various industrial and embedded applications.

This image displays the Arducam GMSL2 12MP IMX477 camera module connected to the GMSL2 deserializer board using a coaxial cable, illustrating the primary components of the extension kit.
2. อะไรอยู่ในกล่อง
โปรดตรวจสอบให้แน่ใจว่าส่วนประกอบทั้งหมดที่ระบุไว้ด้านล่างนี้รวมอยู่ในแพ็คเกจของคุณแล้ว:
- 1 x Arducam GMSL2 Rx board
- 1 x Arducam GMSL2 camera Tx board
- สายเคเบิลโคแอกเชียล RF Fakra Z ตัวเมียถึงตัวเมีย ยาว 1 เมตร จำนวน 1 เส้น
- 1 x Arducam IMX477 Camera Module
- สายเคเบิล FPC 22-22 พิน ขนาด 40 มม. จำนวน 1 เส้น
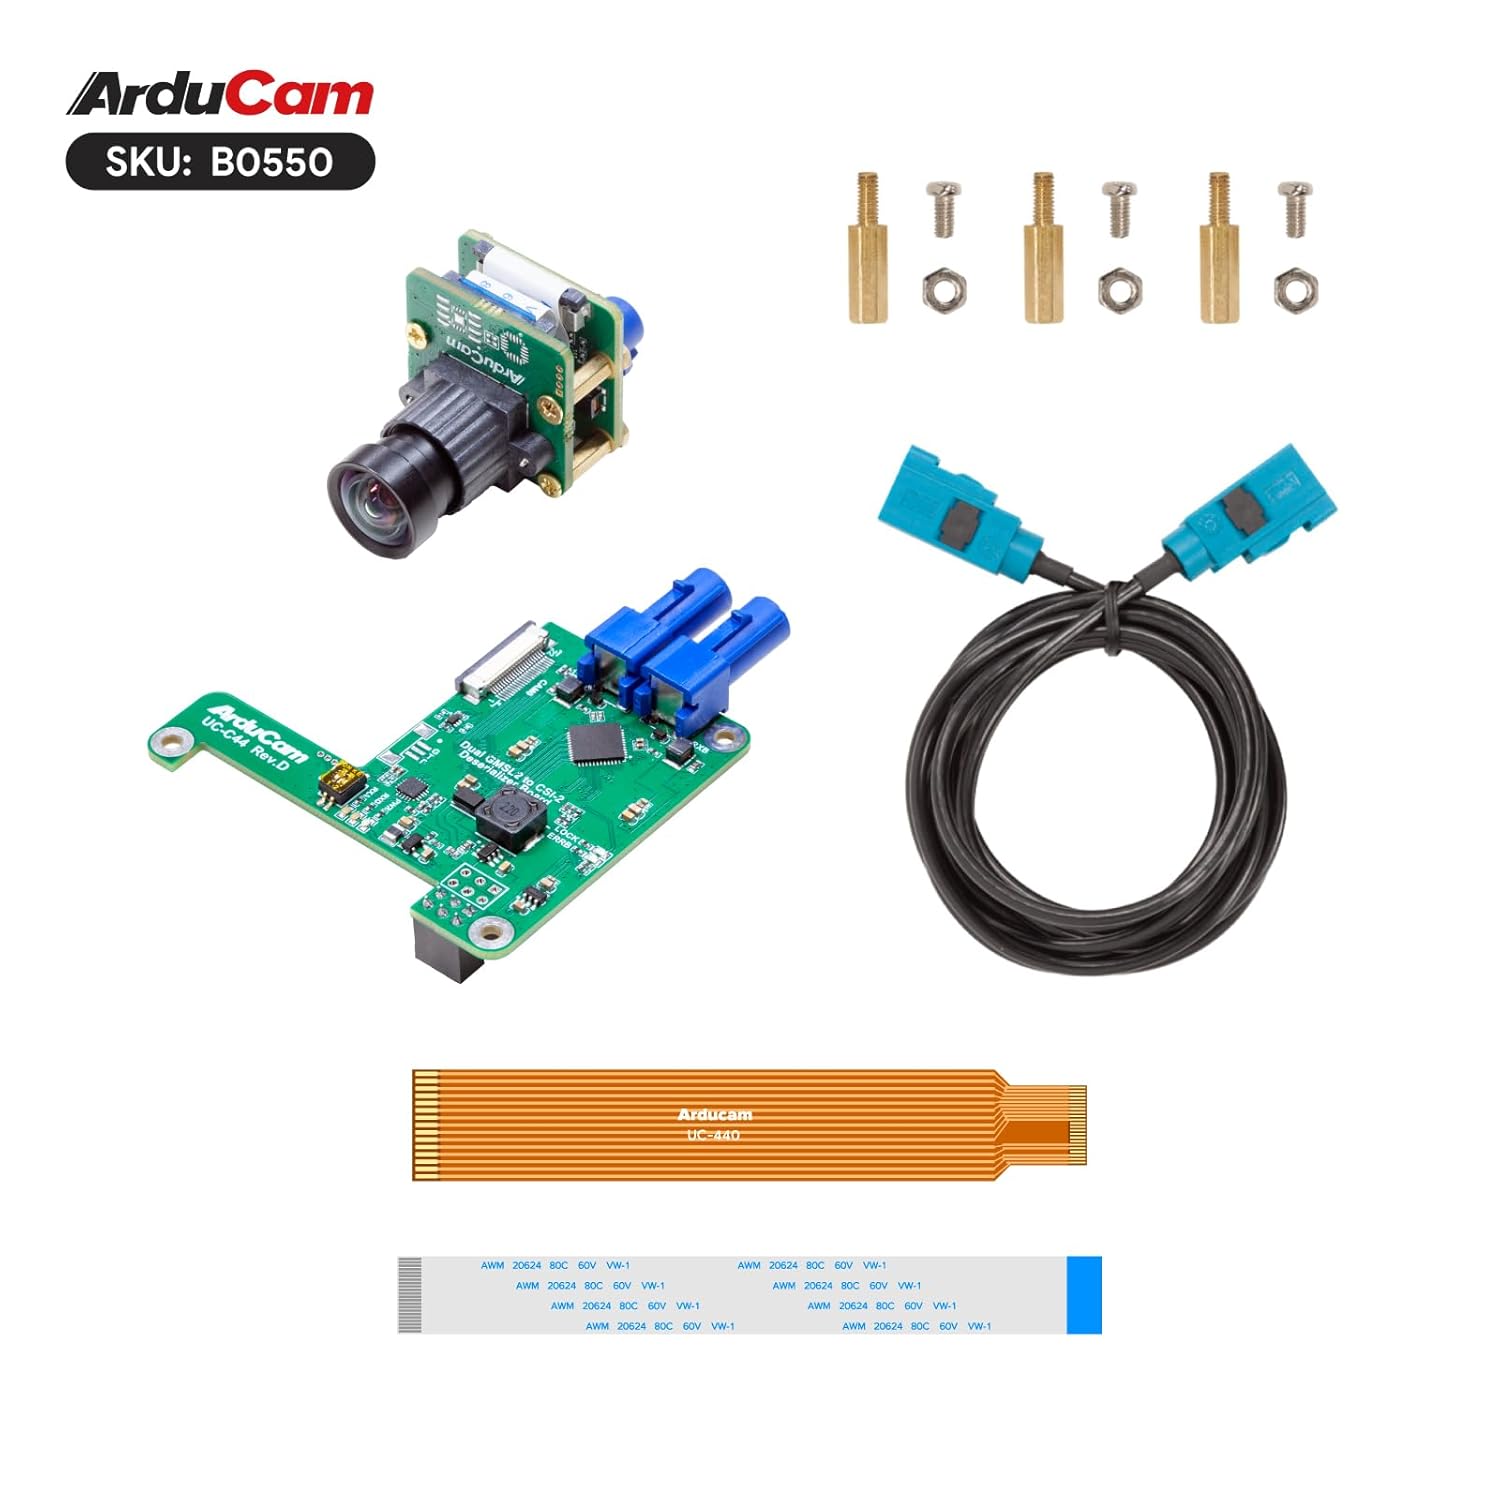
This image shows all items included in the kit: the Arducam IMX477 camera module, the GMSL2 deserializer board, a Fakra Z coaxial cable, an FPC cable, and mounting hardware (standoffs, screws, nuts).
3. คำแนะนำในการตั้งค่า
This section details the steps required to assemble and connect your Arducam GMSL2 Camera Extension Kit with a Raspberry Pi.
- Connect the Camera Module: Carefully connect the Arducam IMX477 Camera Module to the Arducam GMSL2 camera Tx board. Ensure the connector is properly aligned and secured.
- Connect Tx to Rx Board: Use the provided 1m Fakra Z Female to Female RF Coaxial Cable to connect the GMSL2 camera Tx board to the GMSL2 Rx board. Ensure the Fakra connectors click into place.
- Connect Rx Board to Raspberry Pi: Attach the GMSL2 Rx board to your Raspberry Pi's CSI port using the 40mm 22-22pin FPC Cable. Gently lift the connector's locking tab, insert the FPC cable with the blue strip facing away from the board, and then push the tab down to secure it.
- Secure the Rx Board: Use the provided mounting hardware (standoffs, screws, nuts) to securely attach the GMSL2 Rx board to your Raspberry Pi board. This provides stability and proper alignment.
- ตรวจสอบการเชื่อมต่อ: Double-check all cable connections to ensure they are firm and correctly oriented before powering on your Raspberry Pi.

A complete assembly view showing the Arducam IMX477 camera module connected to the GMSL2 deserializer board via a coaxial cable, and the deserializer board connected to a Raspberry Pi via an FPC cable. This demonstrates the full setup.

This image illustrates the Arducam GMSL2 deserializer board mounted onto a Raspberry Pi board, showing the FPC cable connection to the Raspberry Pi's CSI port and the coaxial cable connected to the deserializer board.
4. คู่มือการใช้งาน
To operate the Arducam GMSL2 Camera Extension Kit, ensure your Raspberry Pi is running a compatible operating system (e.g., Raspberry Pi OS) and that the necessary camera drivers are installed. Arducam typically provides detailed software setup guides on their official webเว็บไซต์.
Once the hardware is connected and software configured, you can use standard Raspberry Pi camera commands or libraries (e.g., libcamera or picamera2) to capture images and video. Refer to Arducam's online documentation for specific software configuration and exampสคริปต์
5. การบำรุงรักษา
Proper maintenance ensures the longevity and optimal performance of your Arducam GMSL2 Camera Extension Kit:
- การทำความสะอาด: Keep the camera module and circuit boards clean and free from dust. Use a soft, dry, lint-free cloth for cleaning. Avoid using liquid cleaners directly on electronic components.
- พื้นที่จัดเก็บ: Store the kit in a dry, cool environment when not in use, away from direct sunlight, high humidity, and extreme temperatures.
- การจัดการสายเคเบิล: Handle the FPC and coaxial cables with care to prevent bending, crimping, or other damage that could affect signal integrity.
6 การแก้ไขปัญหา
If you encounter issues with your Arducam GMSL2 Camera Extension Kit, refer to the following troubleshooting tips:
- ไม่มีการแสดงผลภาพ/วิดีโอ:
- Verify all cable connections (FPC, coaxial) are secure and correctly seated.
- Ensure the camera module is properly connected to the Tx board.
- Check that the GMSL2 Rx board is correctly connected to the Raspberry Pi's CSI port.
- Confirm that the Raspberry Pi camera interface is enabled in the
raspi-configการตั้งค่า. - Ensure the correct camera drivers and software libraries are installed and configured.
- คุณภาพของภาพต่ำ:
- Check the camera lens for smudges, dust, or obstructions.
- Ensure adequate and consistent lighting in the environment.
- Verify camera settings (resolution, frame rate, exposure) in your software application.
- ปัญหาเสถียรภาพในการเชื่อมต่อ:
- Ensure the coaxial cable is not bent sharply, kinked, or otherwise damaged.
- Verify the length of the coaxial cable is within the recommended 15-meter limit for optimal performance.
7. ข้อมูลจำเพาะ
Detailed specifications for the Arducam GMSL2 12MP IMX477 Raspberry Pi Camera Extension Kit:
| คุณสมบัติ | คำอธิบาย |
|---|---|
| หมายเลขรุ่น | B0550 |
| ยี่ห้อ | อาร์ดูแคม |
| ผู้ผลิต | อาร์ดูแคม |
| เซ็นเซอร์ | 12 ล้านพิกเซล IMX477 |
| เทคโนโลยี | GMSL2 (Gigabit Multimedia Serial Link 2) |
| ระยะยืดสูงสุด | สูงสุด 15 เมตร |
| ประเภทขั้วต่อ | MIPI CSI-2 (Rx board to Pi), Fakra Z (Tx to Rx board) |
| ประเภทสายเคเบิล | โคแอกเซียล |
| อุปกรณ์ที่รองรับ | Raspberry Pi (including HQ Camera compatible models) |
| คุณสมบัติพิเศษ | Long distance extension, low latency, high-speed data transmission |
8. การรับประกันและการสนับสนุน
For detailed warranty information, technical support, and additional product documentation, please visit the official Arducam website or contact Arducam customer service directly. You can find more resources and support at the ร้าน Arducam.


