Anderic MRAC06S1M Ceiling Fan Receiver Instruction Manual
Model: MRAC06S1M
สินค้าเกินview
The Anderic MRAC06S1M is a replacement ceiling fan receiver specifically designed for use with Harbor Breeze Mazon ceiling fans. This receiver facilitates the remote control functionality of your ceiling fan, managing fan speeds and light operation. It is engineered for a plug-and-play installation, connecting directly into the fan's motor assembly via a square plug connector.
This receiver is compatible with various Harbor Breeze Mazon models, including 0807421, 2599776, 1059534, MZ44WW3LR, MZ44MBLK3LR, and others. It also works seamlessly with existing Anderic remote models such as RRTR214D, A25-FA0138, KUJCE10311, TR214B, KUJCE10712, TR214A, KUJCE10610, and 2BB78ITLF304C.
ข้อมูลด้านความปลอดภัยที่สำคัญ
- Always disconnect power to the ceiling fan at the circuit breaker before attempting any installation, maintenance, or troubleshooting.
- Installation should be performed by a qualified electrician or a person with sufficient electrical knowledge to ensure safety and proper function.
- ตรวจสอบให้แน่ใจว่าการเชื่อมต่อสายไฟทั้งหมดมีความปลอดภัยและมีฉนวนหุ้มอย่างเหมาะสม
- This receiver is designed for specific fan models and connector types. Verify compatibility before installation. If your fan uses standard wire connections at the canopy, this receiver will not be compatible for plug-and-play installation.
- Do not exceed the maximum load ratings for the motor (1.0A) and light (100W incandescent / 60W LED).
เนื้อหาแพ็คเกจ
- Anderic MRAC06S1M Ceiling Fan Receiver (1 unit)
- คู่มือการใช้งาน (เอกสารนี้)
Note: Remote control is not included and must be purchased separately if needed. This receiver is designed to work with existing compatible remotes.
การติดตั้งและการตั้งค่า
The Anderic MRAC06S1M receiver is designed for a straightforward plug-and-play installation into compatible Harbor Breeze Mazon ceiling fans. Ensure your fan's existing receiver uses a square plug connector for direct replacement.
รายการตรวจสอบก่อนการติดตั้ง:
- Verify that your ceiling fan model is listed as compatible or uses a square plug connector for its receiver.
- Ensure you have the necessary tools (e.g., screwdriver, wire strippers if any wiring adjustments are needed, though typically not for plug-and-play).
- Confirm power is OFF at the circuit breaker before proceeding.
ขั้นตอนการติดตั้ง:
- ตัดการเชื่อมต่อไฟฟ้า: Turn off the power to the ceiling fan at the main circuit breaker. Verify power is off using a voltagอีผู้ทดสอบ
- เข้าถึงตัวเรือนพัดลม: Carefully lower the canopy or access the motor housing of your ceiling fan where the existing receiver is located.
- Remove Old Receiver: Disconnect the existing receiver from the fan's wiring. Note the orientation and connection points if possible, though the square plug design simplifies this.
- Install New Receiver: Connect the Anderic MRAC06S1M receiver into the fan's motor assembly. The square plug connector should fit directly into the corresponding port. Ensure it is seated firmly.
- ตัวรับสัญญาณที่ปลอดภัย: Carefully tuck the receiver and wires back into the fan housing, ensuring no wires are pinched.
- คืนค่าพลัง: Replace the fan canopy and turn the power back on at the circuit breaker.
- ทดสอบฟังก์ชันการทำงาน: Use your compatible remote control to test the fan speeds and light operation.

รูปที่ 1 : ด้านหน้า view of the Anderic MRAC06S1M receiver, showing its compact design and integrated wiring with the square plug connector.

รูปที่ 2: มุม view of the receiver, clearly showing the distinctive square plug connector essential for plug-and-play compatibility with Harbor Breeze Mazon fans.
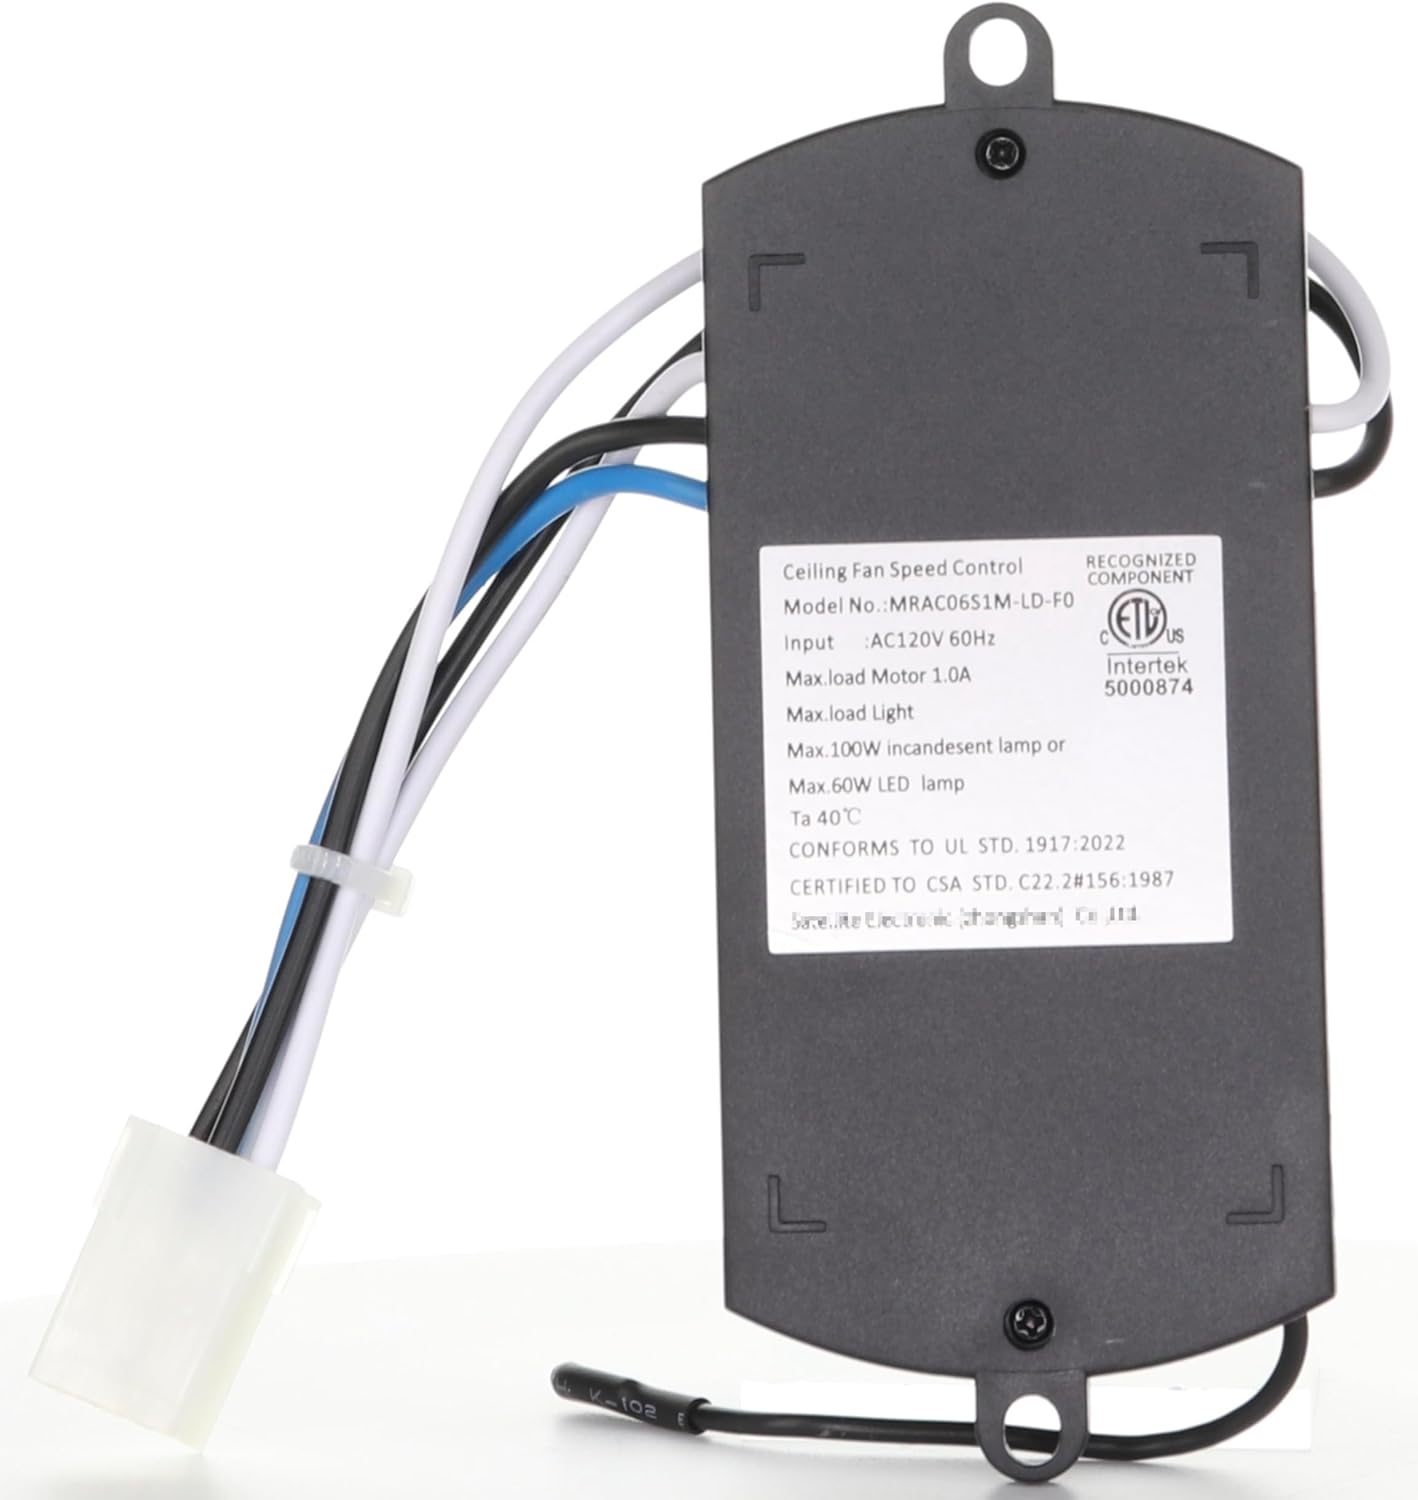
รูปที่ 3: ย้อนกลับ view of the receiver, displaying the product label with model number MRAC06S1M-LD-F0, input voltage (AC120V 60Hz), and maximum load ratings for motor and light.

รูปที่ 4: ด้านข้าง view of the receiver, showing the capacitor specifications (5+6UF/250V) and a QC Pass sticker, indicating quality control inspection.
หมายเหตุสำคัญเกี่ยวกับความเข้ากันได้:
This receiver is designed for fans where the receiver connects directly into the motor assembly with a square plug. If your existing receiver connects at the canopy with standard wire connections (individual wires that need to be spliced or connected via wire nuts), this MRAC06S1M receiver will ไม่ be a plug-and-play replacement and may not be compatible without significant modification.
คำแนะนำการใช้งาน
Once the Anderic MRAC06S1M receiver is correctly installed, it will enable remote control functionality for your ceiling fan. This receiver is designed to work with specific Anderic and compatible remote models.
Compatible Remote Controls:
The MRAC06S1M receiver is fully compatible with the following remote control models:
- Anderic RRTR214D
- A25-FA0138
- KUJCE10311
- TR214B
- KUJCE10712
- TR214A
- KUJCE10610
- 2BB78ITLF304C
Note: The TR214D remote control is often required for initial pairing or full functionality and is not included with the receiver.
Pairing the Remote (if necessary):
Most compatible remotes will automatically pair or have a simple pairing procedure. Refer to your specific remote control's instruction manual for detailed pairing steps. Typically, this involves:
- Ensure power to the fan is on.
- Within a short timeframe (e.g., 30 seconds) of restoring power, press and hold a specific button on the remote (often a "Learn" button, "Fan Off" button, or a combination of buttons) until the fan light blinks or the fan responds.
- Test all functions (fan speeds, light on/off, dimming if applicable).
การซ่อมบำรุง
The Anderic MRAC06S1M receiver is a sealed electronic component and requires minimal maintenance. Follow these guidelines to ensure its longevity:
- ให้แห้ง: Ensure the receiver is installed in a dry environment, protected from moisture and humidity.
- ความสะอาด : If accessing the receiver during fan maintenance, gently wipe away any dust or debris with a dry, soft cloth. Do not use liquid cleaners.
- การระบายอากาศ : Ensure the fan housing allows for adequate airflow around the receiver to prevent overheating.
- ไฟกระชาก: Consider using surge protection for your home's electrical system to protect electronic components like the receiver from power fluctuations.
การแก้ไขปัญหา
If you experience issues with your ceiling fan after installing the MRAC06S1M receiver, refer to the following common problems and solutions:
Problem: Fan or Light Does Not Respond to Remote
- ไม่มีไฟฟ้า: Check the circuit breaker to ensure power is supplied to the fan.
- แบตเตอรี่ระยะไกล: Replace the batteries in your remote control.
- การจับคู่ระยะไกล: Attempt to re-pair the remote control with the receiver. Refer to the "Operating Instructions" section or your remote's manual.
- Incorrect Remote: Ensure you are using a compatible remote control model.
- การเชื่อมต่อหลวม: Turn off power at the breaker, then re-check the square plug connection of the receiver within the fan housing to ensure it is secure.
Problem: Fan Operates Intermittently or Incorrectly
- การรบกวน: Other electronic devices or nearby remote controls might cause interference. Try operating the fan from a different distance or checking for other active remotes.
- โอเวอร์โหลด: Ensure the fan motor and light wattage do not exceed the receiver's maximum load ratings (1.0A for motor, 100W incandescent / 60W LED for light).
- Damaged Receiver: If all other troubleshooting steps fail, the receiver may be faulty and require replacement.
Problem: Light Flickers or Does Not Turn On
- Bulb Issue: Check if the light bulb is properly screwed in or if it needs replacement.
- วัดtage Exceeded: Ensure the light bulb wattage does not exceed the receiver's maximum rating (60W for LED, 100W for incandescent).
- การเดินสายไฟ: With power off, check the light wiring connection to the receiver.
If problems persist after following these steps, consult a qualified electrician or contact Anderic customer support.
ข้อมูลจำเพาะ
| คุณสมบัติ | รายละเอียด |
|---|---|
| ชื่อรุ่น | MRAC06S1M |
| หมายเลขรุ่นของผู้ผลิต | MRAC06S1M-LD-F0 |
| ยี่ห้อ | อันเดอริก |
| อินพุต Voltage | ไฟ AC120V 60Hz |
| Max Load Motor | 1.0เอ |
| Max Load Light (Incandescent) | 100วัตต์ |
| Max Load Light (LED) | 60วัตต์ |
| อุณหภูมิในการทำงาน (ตา) | 40 องศาเซลเซียส |
| สี | สีดำ |
| น้ำหนักสินค้า | 3.36 ออนซ์ |
| ประเภทตัวควบคุม | Button Control (via compatible remote) |
| คุณสมบัติพิเศษ | Plug-in-play, Must pair with TR214D remote (not included) |
| ยูพีซี | 191713654939 |
การรับประกันและการสนับสนุน
For warranty information and customer support regarding your Anderic MRAC06S1M Ceiling Fan Receiver, please contact Anderic directly or refer to their official webไซต์ โปรดเก็บใบเสร็จรับเงินไว้เป็นหลักฐานการซื้อ
Anderic Official Webเว็บไซต์: www.anderic.com
For further assistance, you may also refer to the product page on Amazon: หน้าผลิตภัณฑ์ของ Amazon


