การแนะนำ
This manual provides detailed instructions for the setup, operation, and maintenance of your Hieasy 4MP 2.5K Dual-Band WiFi Window Dome Camera. Please read this manual thoroughly before using the product to ensure proper functionality and safety.

Image: Hieasy 4MP 2.5K Window Camera mounted on a window, displaying the mobile application interface with live monitoring and recording options, highlighting its dual-band WiFi capability and no monthly fees.
มีอะไรอยู่ในกล่อง
ตรวจสอบว่ารายการทั้งหมดที่ระบุไว้ด้านล่างนี้รวมอยู่ในแพ็คเกจของคุณ:
- ตัวกล้อง
- 6.6/Ft Charging Cable
- คู่มือการใช้งาน
- อะแดปเตอร์แปลงไฟ
- การ์ด Micro SD 32GB

Image: All components included in the Hieasy 4MP 2.5K Window Camera package, including the camera body, power adapter, charging cable, instruction manual, and 32GB Micro SD card.
การตั้งค่า
1. Prepare the Mounting Surface
Ensure the window surface where the camera will be mounted is clean and dry for optimal adhesion of the magnetic fixation system.
2. Attach the Mounting System
The camera features an innovative magnetic fixation system for quick installation. Peel off the protective film from the adhesive side of the mounting pad and firmly press it onto the desired spot on your window. Ensure the central opening aligns with your desired viewพื้นที่ที่กำลังก่อสร้าง
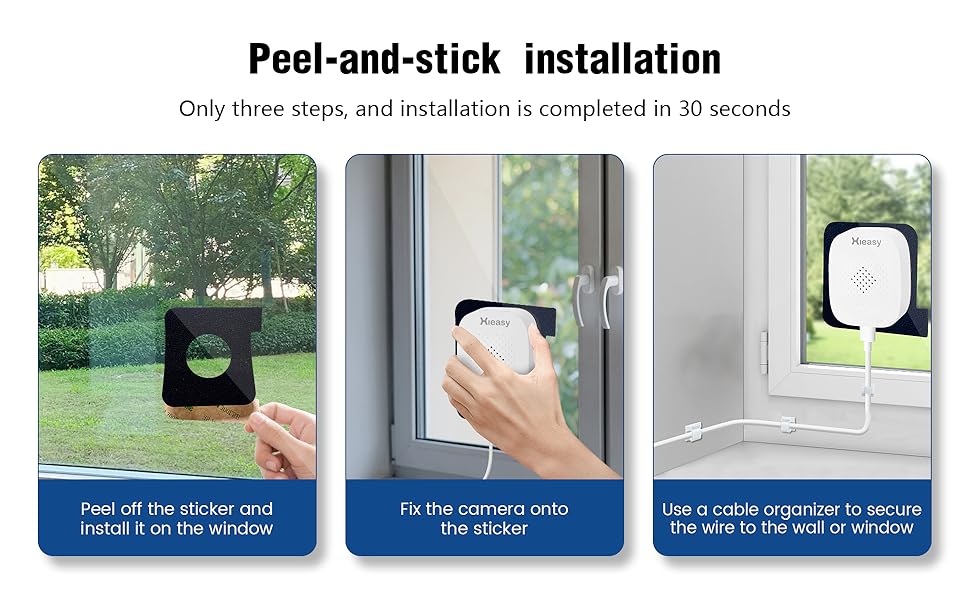
Image: Visual guide demonstrating the three simple steps for peel-and-stick installation of the Hieasy window camera onto glass.
3. ติดตั้งกล้อง
Align the camera body with the magnetic mounting pad on the window. The camera will securely attach magnetically. The design allows for easy removal and reattachment without damaging the window frame.
4. เชื่อมต่อกับพลังงาน
Connect the provided 6.6/Ft Charging Cable to the camera and then to the Power Adapter. Plug the Power Adapter into a suitable electrical outlet. The camera requires continuous power to operate as it does not have a built-in battery.
5. Download and Install the HiEasy App
Scan the QR code provided in the Instruction Manual or search for
เอกสารที่เกี่ยวข้อง - เอ็กซ์24
 |
AI Smart Camera Instruction Manual - HiEasy Comprehensive instruction manual for the HiEasy AI Smart Camera, covering app download, account registration, camera connection (WiFi and 4G), live view, sharing, recording storage, alarm management, and night vision modes. |
 |
Veneer World Porcelain Veneers: แคตตาล็อกและคู่มือการติดตั้ง Architessa สำรวจคอลเลกชัน Veneer World ของ Architessa ซึ่งประกอบด้วยแผ่นวีเนียร์พอร์ซเลนประสิทธิภาพสูงสำหรับการออกแบบผนังและพื้นร่วมสมัย ฟีเจอร์ต่างๆ ประกอบด้วยข้อมูลผลิตภัณฑ์โดยละเอียด ข้อมูลจำเพาะทางเทคนิค และคำแนะนำการติดตั้งที่ครอบคลุมสำหรับการใช้งานทั้งที่อยู่อาศัยและเชิงพาณิชย์ |
 |
Instrukcja Obsługi Monitora MSI MAG 245F X24 / MAG 245PF X24 Szczegółowy podręcznik użytkownika dla monitorów MSI MAG 245F X24 i MAG 245PF X24, zawierający informacje o instalacji, konfiguracji OSD, danych technicznych, rozwiązywaniu problemów i instrukcjach bezpieczeństwa. |
 |
Руководство пользователя ЖК-монитора MSI MAG 245F X24 / MAG 245PF X24 Подробное руководство пользователя для ЖК-мониторов MSI MAG 245F X24 и MAG 245PF X24, охватывающее установку, эксплуатацию, технические характеристики, устранение неполадок и информацию по безопасности. |
 |
คู่มือผู้ใช้จอ LCD MSI MAG 245F X24 / MAG 245PF X24 คู่มือผู้ใช้สำหรับจอ LCD MSI MAG 245F X24 และ MAG 245PF X24 ครอบคลุมการติดตั้ง การตั้งค่า OSD ข้อมูลจำเพาะ การแก้ไขปัญหา และข้อมูลด้านความปลอดภัย |
 |
Посібник користувача MSI MAG 245F X24 та MAG 245PF X24 Дізнайтеся, як налаштувати, використовувати та усунути несправності вашого монітора MSI MAG 245F X24 або MAG 245PF X24 за допомогою цього вичерпного посібника користувача. |