1. บทนำ
This manual provides comprehensive instructions for the installation, operation, and maintenance of your STUDIOFINIX 6.5 Inch Bluetooth Ceiling Speakers. Please read this manual thoroughly before using the product to ensure proper setup and optimal performance. Keep this manual for future reference.
มีอะไรอยู่ในกล่อง
ตรวจสอบว่าส่วนประกอบทั้งหมดมีอยู่ก่อนเริ่มการติดตั้ง
- 2x 6.5" Ceiling Speakers
- 2x 5 Meters Speaker Cables
- แหล่งจ่ายไฟ 1x
- 1x Amplifier (Bluetooth AMP กล่อง)

Image 1.1: Package contents including two 6.5-inch ceiling speakers, a Bluetooth amplifier, power adapter, and speaker cables.
2. ข้อมูลด้านความปลอดภัย
Adhere to the following safety guidelines to prevent damage to the product or personal injury:
- ความปลอดภัยทางไฟฟ้า: Ensure the power supply is disconnected before installation or maintenance. Only use the provided power adapter.
- การติดตั้ง: Installation should be performed by qualified personnel if you are unsure about electrical wiring or structural integrity. Ensure the mounting surface can support the weight of the speakers.
- สิ่งแวดล้อม: These speakers are designed for indoor and semi-outdoor use (covered patios, finished basements). Avoid direct exposure to water or extreme temperatures.
- การระบายอากาศ : ตรวจสอบให้แน่ใจว่ามีพื้นที่ว่างรอบๆ อย่างเพียงพอ amplifier for proper ventilation to prevent overheating.
- การป้องกันการได้ยิน: ควรหลีกเลี่ยงการฟังเพลงด้วยเสียงดังเป็นเวลานานเพื่อป้องกันความเสียหายต่อการได้ยิน
3. คุณสมบัติของผลิตภัณฑ์
The STUDIOFINIX 6.5 Inch Bluetooth Ceiling Speakers offer a high-quality audio experience with convenient features:
- การเชื่อมต่อบลูทูธ: Seamless wireless audio streaming from compatible devices up to 30 meters.
- กำลังขับสูง: Boasting 300W peak power per pair (150W per speaker) for robust and clear sound.
- Space-Saving Flush Mount Design: Integrates discreetly into ceilings or walls with a mounting depth of 4.1 inches (10.5 cm).
- การใช้งานที่หลากหลาย: Suitable for various indoor spaces like kitchens, living rooms, home theaters, and semi-outdoor areas such as covered patios.
- 6.5 Inch Woofer: Delivers rich bass and balanced audio performance.

ภาพที่ 3.1: รายละเอียด view of the 6.5-inch woofer, designed for enhanced stereo sound.

ภาพที่ 3.2: ระเบิด view illustrating the speaker's removable grill, coaxial tweeter, and durable ABS construction.
4. คู่มือการติดตั้ง
Follow these steps for proper installation of your ceiling speakers.
4.1 ข้อควรพิจารณาก่อนการติดตั้ง
- ที่ตั้ง: Choose a suitable location in your ceiling or wall, ensuring there are no obstructions (e.g., electrical wires, plumbing, studs) behind the mounting surface.
- เคลียร์สต๊อก : Ensure sufficient mounting depth. The required mounting depth is 4.13 inches (10.5 cm).
- เครื่องมือ: You will need a drill, a drywall saw, a measuring tape, and a pencil.

Image 4.1: Key dimensions for speaker installation, including cut-out diameter and mounting depth.
4.2 การติดตั้งลำโพง
- Using the provided template, mark the cut-out area on your ceiling or wall. The cut-out diameter is 8.07 inches (20.5 cm).
- Carefully cut the marked hole using a drywall saw.
- Connect the speaker wires to the terminals on the back of each speaker. Ensure correct polarity (+ to + and - to -).
- Insert the speaker into the cut-out hole. Tighten the mounting screws (usually located on the front baffle) to secure the speaker. The mounting clamps will pivot and secure the speaker to the ceiling/wall.
- Attach the magnetic grille to the speaker frame.
4.3 Ampการเชื่อมต่อ lifier
- Connect the speaker cables from the installed speakers to the corresponding terminals on the Bluetooth ampเครื่องฟอก (AMP-BTX01). Ensure Left (SPK L) and Right (SPK R) channels are correctly connected, maintaining polarity.
- Connect the provided power supply to the 'Power Jack' input on the ampใช้เครื่องขยายเสียง แล้วเสียบเข้ากับเต้ารับที่ผนัง
- การ amplifier will power on, and the Bluetooth indicator light will activate.

Image 4.2: Connection diagram for the ceiling speakers and Bluetooth ampชีวิต.
5. คู่มือการใช้งาน
5.1 การจับคู่บลูทูธ
- ให้แน่ใจว่า amplifier is powered on. The Bluetooth indicator will typically blink, indicating it's in pairing mode.
- บนอุปกรณ์เคลื่อนที่ของคุณ (สมาร์ทโฟน แท็บเล็ต ฯลฯ) ไปที่การตั้งค่าบลูทูธ
- Scan for available devices. You should see 'STUDIOFINIX' or a similar name appear in the list.
- Select the device to pair. Once connected, the Bluetooth indicator on the amplifier will typically become solid, and your device will confirm the connection.
- You can now stream audio wirelessly to your ceiling speakers.
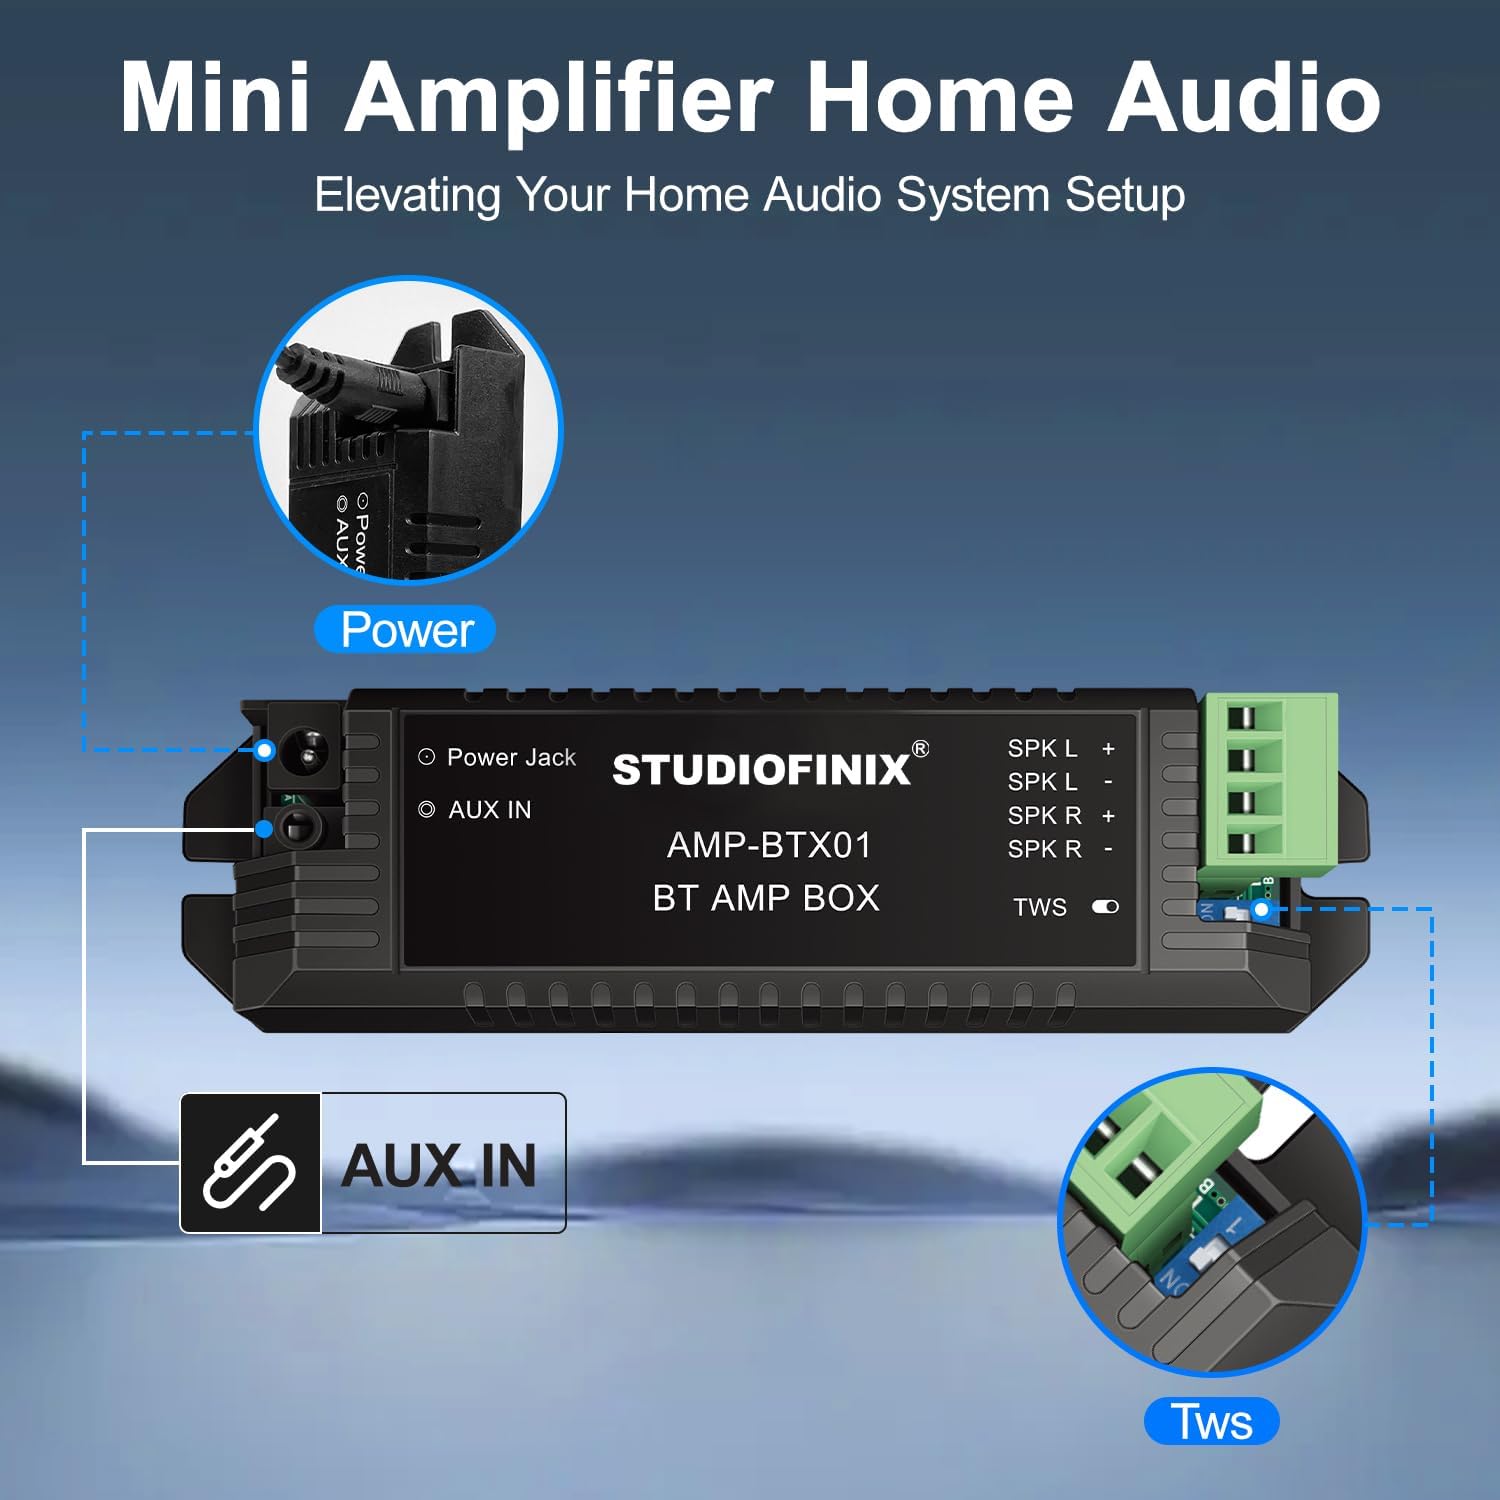
Image 5.1: Wireless audio streaming via Bluetooth from a mobile device.
5.2 Wired Connection (AUX IN)
For devices without Bluetooth or for a direct connection, use the AUX IN port:
- Connect a 3.5mm audio cable (not included) from your audio source (e.g., TV, computer, MP3 player) to the 'AUX IN' port on the ampชีวิต.
- การ amplifier will automatically switch to AUX input mode.
5.3 ฟังก์ชั่น TWS (True Wireless Stereo)
การ amplifier supports TWS for connecting two separate amplifier units for a wider stereo soundstagจ. อ้างถึง amplifier's specific instructions for TWS pairing if you have two ampหน่วย lifier

ภาพที่ 5.2: Amplifier connections for power, AUX IN, and TWS.
6. การบำรุงรักษา
To ensure the longevity and optimal performance of your speakers:
- การทำความสะอาด: Use a soft, dry cloth to wipe the speaker grilles and ampห้ามใช้สารทำความสะอาดที่มีฤทธิ์กัดกร่อนหรือตัวทำละลาย
- การถอดกระจังหน้า: The grilles are magnetic and can be carefully removed for cleaning or painting.
- การดูแลสิ่งแวดล้อม: Avoid exposing the speakers to excessive dust, moisture, or direct sunlight.
7 การแก้ไขปัญหา
หากคุณพบปัญหา โปรดดูปัญหาทั่วไปและวิธีแก้ไขต่อไปนี้:
- ไม่มีเสียง:
- ให้แน่ใจว่า amplifier is powered on and the power adapter is securely connected.
- Check speaker wire connections for correct polarity and secure fit.
- Verify your audio source is playing and its volume is turned up.
- If using Bluetooth, ensure the device is paired and connected to the correct ampชีวิต.
- หากใช้ AUX โปรดตรวจสอบให้แน่ใจว่าเสียบสายจนสุดและใช้งานได้
- ปัญหาการเชื่อมต่อบลูทูธ:
- ให้แน่ใจว่า amplifier is within the 30-meter range of your device.
- ปิดและเปิดบลูทูธบนอุปกรณ์ของคุณ จากนั้นลองจับคู่ใหม่อีกครั้ง
- Unpair and re-pair the device from your Bluetooth settings.
- Ensure no other devices are actively connected to the ampชีวิต.
- เสียงผิดเพี้ยน:
- Reduce the volume on your audio source or the ampชีวิต.
- ตรวจสอบการเชื่อมต่อสายลำโพงว่ามีสายหลวมหรือไฟฟ้าลัดวงจรหรือไม่
- ตรวจสอบให้แน่ใจว่าแหล่งกำเนิดเสียงส่งสัญญาณที่ชัดเจน
8. ข้อมูลจำเพาะ
| คุณสมบัติ | ข้อมูลจำเพาะ |
|---|---|
| ประเภทลำโพง | ในเพดาน |
| ขนาดลำโพง | 6.5 นิ้ว |
| กำลังขับสูงสุดของลำโพง | 300 วัตต์ (ต่อคู่) |
| เทคโนโลยีการเชื่อมต่อ | บลูทูธ |
| ประเภทการติดตั้ง | Flush Mount |
| ขนาดผลิตภัณฑ์ (แต่ละลำโพง) | ลึก 9 นิ้ว x กว้าง 9 นิ้ว x สูง 4 นิ้ว (ลึก 23.5 ซม. x กว้าง 23.5 ซม. x สูง 10.5 ซม.) |
| เส้นผ่านศูนย์กลางคัตเอาท์ | 8.07 นิ้ว (20.5 ซม.) |
| ความลึกในการติดตั้ง | 4.13 นิ้ว (10.5 ซม.) |
| น้ำหนักสินค้า | 9.75 ปอนด์ (4.43 กิโลกรัม) |
| การใช้ที่แนะนำ | ภายใน/ภายนอกอาคาร (มีหลังคาคลุม) |
| คุณสมบัติพิเศษ | Waterproof (for semi-outdoor use) |
| ชื่อรุ่น | ST-HCS818BT-US |
9. การรับประกันและการสนับสนุน
STUDIOFINIX products are manufactured to high-quality standards. For information regarding product warranty, please refer to the warranty card included with your purchase or visit the official STUDIOFINIX webเว็บไซต์.
For technical support, troubleshooting assistance, or to inquire about replacement parts, please contact STUDIOFINIX customer service through the retailer where the product was purchased or visit the STUDIOFINIX Brand Store.


