1. บทนำ
Welcome to the user manual for your AOOSTAR WTR PRO AMD Ryzen 7 5825u 4 Bay NAS Mini PC. This document provides essential information for setting up, operating, maintaining, and troubleshooting your device. Please read this manual thoroughly before using the product to ensure optimal performance and longevity.
The AOOSTAR WTR PRO is a versatile mini PC designed for various applications, including Network Attached Storage (NAS), home server, and desktop computing. It features an AMD Ryzen 7 5825U processor, support for multiple storage drives, and extensive connectivity options.
2. สินค้าหมดview
2.1 คุณสมบัติหลัก
- โปรเซสเซอร์: โปรเซสเซอร์ AMD Ryzen 7 5825U (8 คอร์, 16 เธรด, ความเร็วสูงสุด 4.5 GHz) พร้อมกราฟิก Radeon Vega ในตัว
- ช่องเก็บของ: 4 x 3.5" SATA bays (up to 22TB each) for NAS functionality.
- สล็อต M.2: 2 x M.2 2280-NVMe slots for high-speed storage.
- แรม : Dual-channel DDR4 3200MHz RAM support (2 slots, up to 64GB).
- เอาท์พุตวิดีโอ: Triple 4K display support via DP1.4 (144Hz), HDMI 2.1, and Type-C.
- เครือข่าย: พอร์ต LAN 2.5G จำนวน 2 พอร์ต
- การเชื่อมต่อ: 2 x USB 3.0, 2 x USB 2.0, 1 x 3.5mm Audio Jack, 1 x Micro SD Card Port, Type-C (100W power supply support).
- การระบายความร้อน: Efficient cooling system with a 12CM fan and dustproof design.
- การใช้พลังงาน: Low power consumption (15W - 25W).
2.2 การระบุส่วนประกอบ
Familiarize yourself with the external and internal components of your AOOSTAR WTR PRO Mini PC.

รูปที่ 1: ด้านหน้า view of the AOOSTAR WTR PRO Mini PC with the magnetic cover removed, revealing the four 3.5-inch drive bays. The "WTR PRO" logo is visible at the bottom.

รูปที่ 2: Rear panel connectivity of the AOOSTAR WTR PRO. Ports include 2x USB 3.0, 2x USB 2.0, 1x DisplayPort, 1x HDMI, 2x 2.5G LAN, 1x Type-C, 1x Micro SD slot, 1x 3.5mm Audio Jack, and DC power input.

รูปที่ 3: ภายใน view of the AOOSTAR WTR PRO, illustrating the two DDR4 RAM slots and two M.2 NVMe SSD slots. The four 3.5-inch SATA drive bays are also visible.
3. คู่มือการติดตั้ง
3.1 Installing RAM and M.2 NVMe SSDs
The AOOSTAR WTR PRO is shipped without RAM or SSDs. Follow these steps to install them:
- Carefully open the chassis to access the internal components.
- Locate the two DDR4 SO-DIMM slots. Insert RAM modules firmly until the clips secure them.
- Identify the two M.2 2280-NVMe slots. Insert your M.2 SSDs at an angle and secure them with the provided screw.
- Ensure all components are seated correctly before proceeding.
3.2 Installing 3.5" SATA Hard Drives
The device supports up to four 3.5" SATA hard drives.
- Open the front magnetic cover to reveal the drive bays.
- Slide out an empty drive tray.
- Mount your 3.5" SATA HDD onto the tray using the provided screws.
- Carefully slide the tray back into the bay until it clicks into place.
- Repeat for additional drives.
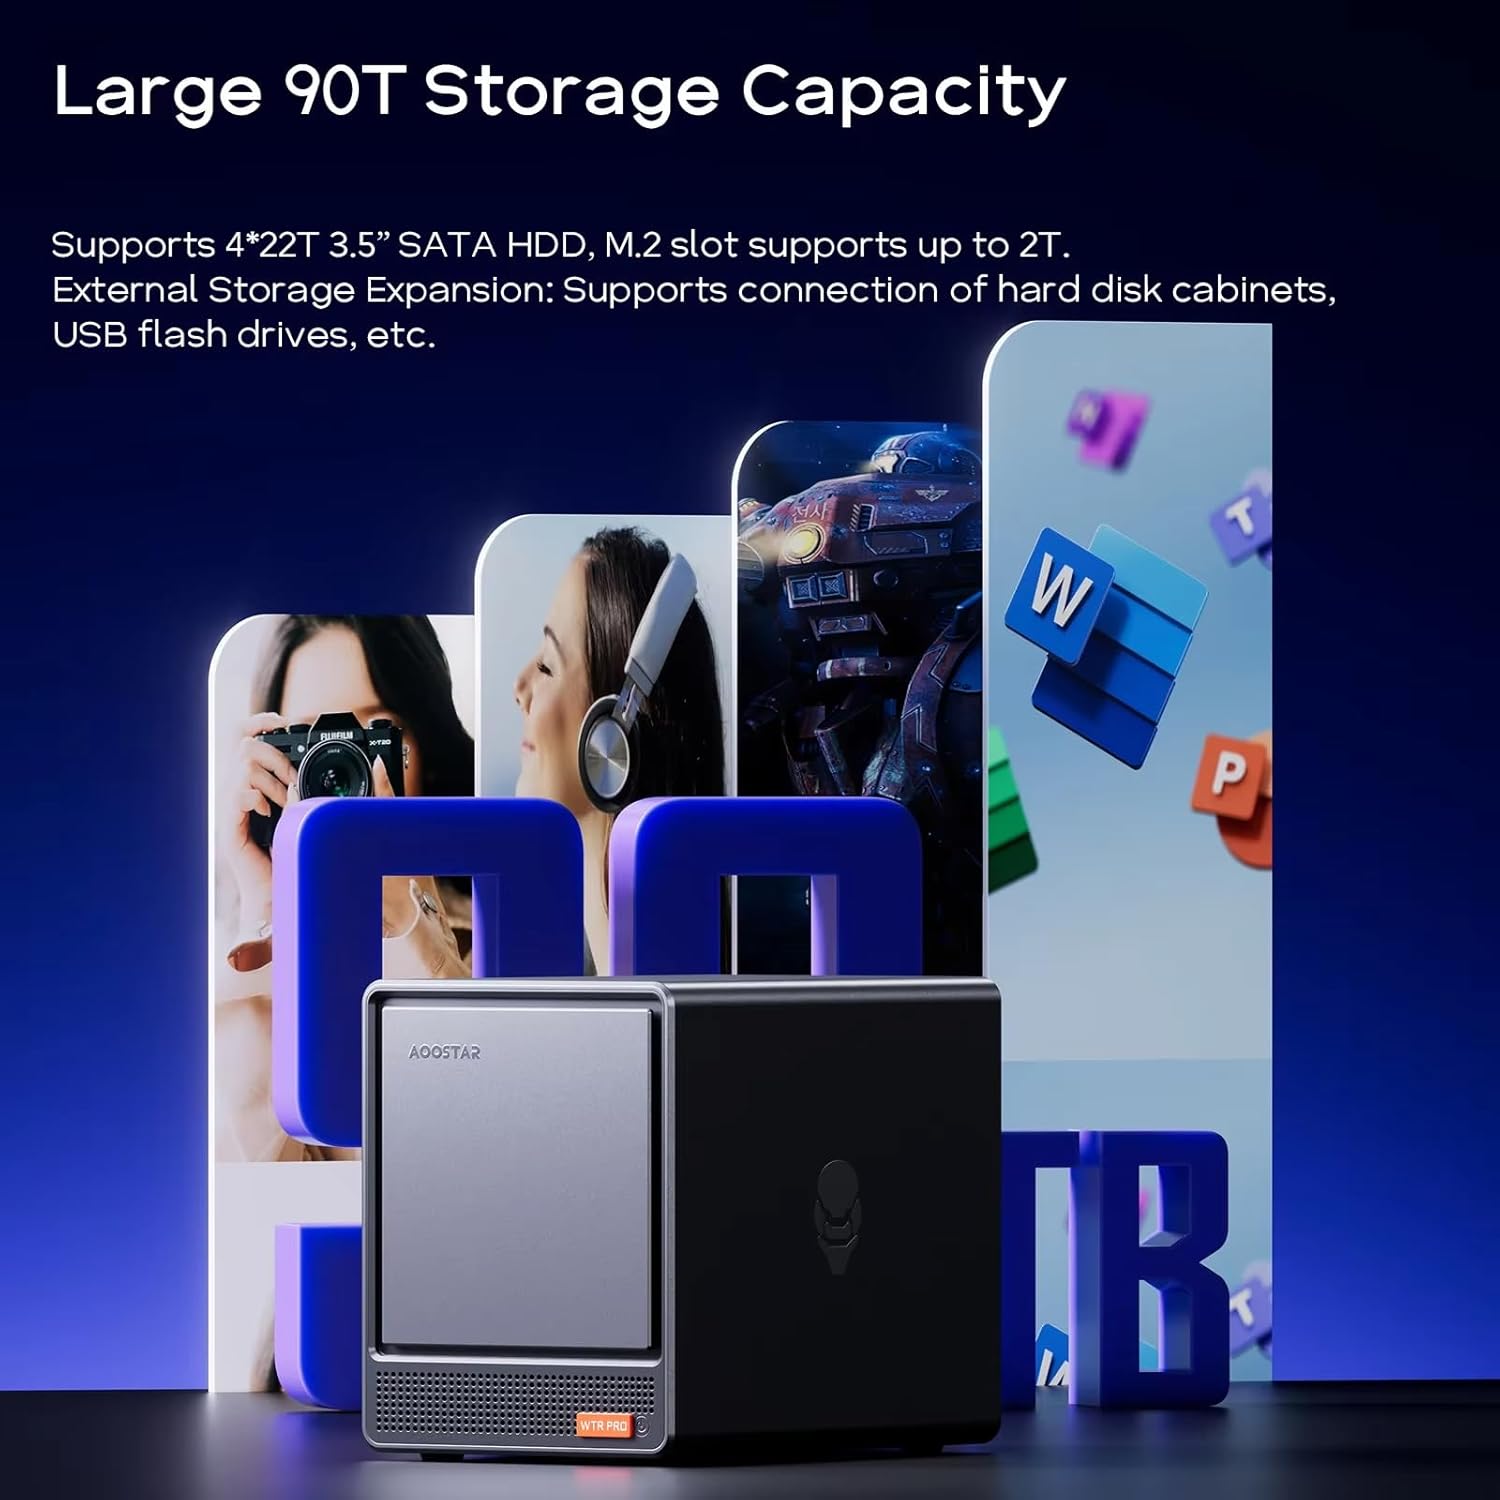
รูปที่ 4: The AOOSTAR WTR PRO showcasing its large storage capacity with four 3.5-inch SATA HDDs and M.2 SSDs.
3.3 การเชื่อมต่ออุปกรณ์ต่อพ่วง
- พลัง: Connect the power adapter to the DC input port and then to a power outlet.
- แสดง: Connect your monitor(s) to the HDMI, DisplayPort, or Type-C video output ports. The device supports up to three 4K displays simultaneously.
- เครือข่าย: Connect an Ethernet cable from your router/switch to one of the 2.5G LAN ports.
- อุปกรณ์ยูเอสบี: Connect your keyboard, mouse, and other USB peripherals to the available USB 2.0 or USB 3.0 ports.
4. คู่มือการใช้งาน
4.1 เปิด/ปิดเครื่อง
- เปิดเครื่อง: กดปุ่มเปิด/ปิดที่อยู่ด้านหน้าเครื่อง ไฟแสดงสถานะการทำงานจะสว่างขึ้น
- หมดแรง: Perform a proper shutdown through your operating system. Alternatively, press and hold the power button for 5 seconds to force a shutdown.
- เปิดใช้งานการเชื่อมต่อ LAN (WOL): The Mini PC supports WOL. Ensure this feature is enabled in the BIOS/UEFI settings and your network adapter properties for remote wake-up.
4.2 การติดตั้งระบบปฏิบัติการ
The AOOSTAR WTR PRO is compatible with various operating systems, including Windows 11 Pro, Linux, and other server operating systems. You will need to install your preferred operating system onto an M.2 NVMe SSD or a SATA HDD. Refer to your chosen operating system's installation guide for detailed steps.
4.3 ฟังก์ชันการทำงานของ NAS
With its four drive bays, the WTR PRO is ideal for Network Attached Storage (NAS) setups. You can install NAS-specific operating systems like TrueNAS, Unraid, or FreeNAS to manage your storage, create RAID configurations, and share fileทั่วทั้งเครือข่ายของคุณ
1 วิดีโอ: โอเวอร์view of the AOOSTAR WTR PRO Mini PC, highlighting its features and potential uses as a NAS or mini PC.
4.4 การตั้งค่าจอแสดงผลหลายจอ
The Mini PC supports connecting up to three 4K displays simultaneously. Connect your monitors to the available HDMI, DisplayPort, and Type-C video outputs. Configure your display settings within your operating system to extend or duplicate your desktop across multiple screens.

รูปที่ 5: The AOOSTAR WTR PRO Mini PC configured with a triple 4K display setup, suitable for multitasking and enhanced productivity.
5. การบำรุงรักษา
5.1 การทำความสะอาด
To ensure optimal cooling and prevent dust buildup, regularly clean the exterior of the Mini PC and the ventilation grilles.
- ใช้ผ้าแห้งนุ่มเช็ดภายนอก
- For ventilation grilles, use a can of compressed air to gently remove dust. Ensure the device is powered off and unplugged before cleaning.
- หลีกเลี่ยงการใช้น้ำยาทำความสะอาดโดยตรงกับอุปกรณ์

รูปที่ 6: Internal cooling system of the AOOSTAR WTR PRO, highlighting the 12CM fan and airflow path for efficient heat dissipation.
5.2 ข้อพิจารณาด้านสิ่งแวดล้อม
Operate the Mini PC in a well-ventilated area, away from direct sunlight, heat sources, and excessive moisture. Ensure adequate space around the device for proper airflow.
6 การแก้ไขปัญหา
If you encounter issues with your AOOSTAR WTR PRO, refer to the following common troubleshooting steps:
- ไม่มีไฟฟ้า:
- ตรวจสอบให้แน่ใจว่าอะแดปเตอร์ไฟฟ้าเชื่อมต่อกับอุปกรณ์และเต้ารับไฟฟ้าที่ใช้งานได้แน่นหนา
- ตรวจสอบว่ากดปุ่มเปิด/ปิดเครื่องถูกต้องแล้ว
- ไม่มีการแสดงผล:
- Check all display cable connections (HDMI, DisplayPort, Type-C).
- ตรวจสอบให้แน่ใจว่าจอภาพของคุณได้รับการตั้งค่าแหล่งอินพุตที่ถูกต้อง
- If using multiple displays, try connecting only one display at a time.
- Hard Drive Overheating:
- ตรวจสอบให้แน่ใจว่าอุปกรณ์อยู่ในบริเวณที่มีการระบายอากาศดี
- Verify that the internal fan is operating correctly and not obstructed by dust.
- Consider reducing the number of active drives or improving ambient cooling if temperatures remain high.
- ปัญหาการเชื่อมต่อเครือข่าย:
- ตรวจสอบการเชื่อมต่อสายเคเบิลอีเธอร์เน็ต
- ตรวจสอบว่าเราเตอร์/สวิตช์ของคุณทำงานได้อย่างถูกต้อง
- Ensure network drivers are properly installed in your operating system.
- ความไม่เสถียรของระบบ:
- Ensure RAM and SSDs are correctly installed and seated.
- อัปเดตระบบปฏิบัติการและไดรเวอร์อุปกรณ์ของคุณให้เป็นเวอร์ชันล่าสุด
If the issue persists, please contact AOOSTAR customer support for further assistance.
7. ข้อมูลจำเพาะ

รูปที่ 7: Detailed technical specifications of the AOOSTAR WTR PRO Mini PC.
| คุณสมบัติ | รายละเอียด |
|---|---|
| ยี่ห้อ | อาโอสตาร์ |
| ชื่อรุ่น | WTR PRO 5825U |
| โปรเซสเซอร์ | AMD Ryzen 7 5825U (8 Cores, 16 Threads, 2.0 GHz Base, 4.5 GHz Max Boost) |
| กราฟฟิก | Integrated Radeon Vega Graphics (2000 MHz Graphics Clock) |
| ประเภทแรม | DDR4 3200MHz (Dual Channel, 2 slots, up to 64GB) |
| ช่องเก็บของ | 4 x 3.5" SATA (up to 22TB each) |
| สล็อต M.2 | 2 x M.2 2280-NVMe (up to 4TB total) |
| เอาท์พุตวิดีโอ | 1 x HDMI 2.1, 1 x DisplayPort 1.4 (4K@144Hz), 1 x Type-C (Triple 4K Display Support) |
| พอร์ตแลน | 2x2.5G แลน |
| พอร์ต USB | 2 x USB 3.0, 2 x USB 2.0 |
| พอร์ตอื่น ๆ | 1 x 3.5mm Audio Jack, 1 x Micro SD Card Port, 1 x DC Power Input |
| ความเข้ากันได้ของระบบปฏิบัติการ | Windows 11 Pro, Linux, etc. |
| ขนาด (กxยxส) | 7.3 x 5.9 x 9 นิ้ว (18.5 x 15 x 22.8 ซม.) |
| น้ำหนักสินค้า | 11 ปอนด์ (5.0 กิโลกรัม) |
8. การรับประกันและการสนับสนุน
8.1 ข้อมูลการรับประกัน
AOOSTAR provides 12 months of after-sales service from the date of purchase. Please retain your proof of purchase for warranty claims.

รูปที่ 8: AOOSTAR's commitment to service. (Note: Product description states 12 months, A+ content image shows "THREE YEARS OF SERVICE".)
8.2 การสนับสนุนลูกค้า
For any questions or issues regarding your AOOSTAR WTR PRO Mini PC, you can contact customer support through the following methods:
- การสนับสนุนของ Amazon: Log in to your Amazon account, check your order, and click "Get Help" to request support for this product.
- การสนับสนุนทางอีเมล์: Send your inquiries to the official after-sales email address: aoostar-shop@outlook.com.
- Online Customer System: Contact us using the desktop client. If the after-sales service system client is not installed, you can reach out via email or Amazon, and they will provide the client.

รูปที่ 9: Available customer support channels for AOOSTAR products.


