1. บทนำ
This manual provides detailed instructions for the safe and effective operation of your TOOLTOP ET120M 120MHz Handheld Digital Oscilloscope. Please read this manual thoroughly before using the device to ensure proper functionality and to prevent damage.
2. ข้อมูลด้านความปลอดภัย
Always observe the following safety precautions when using the ET120M oscilloscope:
- ห้ามใช้งานอุปกรณ์ในสภาพเปียกหรืองamp เงื่อนไข.
- Ensure the device is powered off before connecting or disconnecting probes.
- ใช้เฉพาะอุปกรณ์เสริมที่ให้มาหรืออะไหล่ที่ได้รับการอนุมัติเท่านั้น
- Do not attempt to open or modify the device; refer all servicing to qualified personnel.
- เก็บอุปกรณ์ให้ห่างจากสนามแม่เหล็กไฟฟ้าที่มีความแรง
3. เนื้อหาบรรจุภัณฑ์
ตรวจสอบว่ามีสินค้าทั้งหมดที่ระบุไว้ด้านล่างอยู่ในแพ็คเกจของคุณ:
- TOOLTOP ET120M Handheld Digital Oscilloscope
- 100MHz Oscilloscope Probe
- สายชาร์จ USB
- คู่มือการใช้งาน
- กระเป๋าผ้า

รูปที่ 3.1: สิ่งของในบรรจุภัณฑ์
4. สินค้าหมดview
4.1. คุณสมบัติของอุปกรณ์
The TOOLTOP ET120M is a compact and portable handheld digital oscilloscope designed for various electrical testing and repair applications. Key features include:
- 120MHz analog bandwidth and 500MS/s real-time sampอัตราลิง
- 2.4-inch 320x240 clear color LCD screen.
- Integrated square wave signal output (1kHz, 10KHz, 100KHz, 1MHz).
- 12 types of automatic parameter measurements (Vpp, Vrms, Vavg, Vp, Vmax, Vmin, F, T, T+, T-, Du+, Du-).
- Three scan modes: Auto, Normal, and Single.
- Ability to store 2500 DSO waveforms with thumbnail browsing.
- Built-in rechargeable lithium battery for up to 6 hours of continuous use.
- Durable design with a silicone protective cover.

รูปที่ 4.1: คุณสมบัติหลักเหนือview
4.2. การระบุส่วนประกอบ
Familiarize yourself with the main components and controls of the ET120M oscilloscope:

รูปที่ 4.2 : ด้านหน้า View of ET120M Oscilloscope
- หน้าจอแสดงผล: 2.4-inch LCD for waveform display and menu navigation.
- Input BNC Connector: For connecting the oscilloscope probe.
- ปุ่มควบคุม: Including MENU, F1, F2, SAVE, AC/DC, 1X/10X, 50%, TRIG, EDGE, STOP, AUTO, and directional/OK buttons for navigation and settings adjustment.
- พอร์ต USB: สำหรับการชาร์จอุปกรณ์
5. การตั้งค่า
5.1. การชาร์จครั้งแรก
Before first use, fully charge the built-in lithium battery using the provided USB charging cable and a standard USB power adapter (not included). The charging indicator will show the charging status.
5.2. การเชื่อมต่อโพรบ
Connect the oscilloscope probe to the BNC input connector on the top of the device. Ensure the connection is secure. Set the probe attenuation switch (if applicable) to the desired setting (e.g., 1X or 10X) and match this setting on the oscilloscope via the 1X/10X button.
6. คู่มือการใช้งาน
6.1. เปิด/ปิดเครื่อง
กดปุ่มเปิด/ปิดค้างไว้ (โดยปกติจะอยู่ด้านข้างหรือด้านบน) เพื่อเปิดหรือปิดอุปกรณ์
6.2. Basic Waveform Acquisition
After powering on, connect the probe to the circuit under test. The oscilloscope will display the waveform. Use the directional buttons to navigate menus and adjust settings.
6.3. Waveform Acquisition Modes
The ET120M supports three scan modes:
- อัตโนมัติ: Automatically adjusts time base and vertical amplitude for a stable waveform display. Press the ออโต้ button for one-key waveform adaptation.
- ปกติ: Displays a waveform only when a trigger condition is met.
- เดี่ยว: Captures and displays a single waveform when a trigger condition is met, then stops.

Figure 6.1: Auto Waveform Adaptation
6.4. Parameter Measurement
The device can automatically measure 12 different waveform parameters. Access these measurements through the menu system. Parameters include Peak-to-Peak Voltage (Vpp), Root Mean Square Voltage (Vrms), Average Voltage (Vavg), Peak Voltage (Vp), Maximum Voltage (Vmax), Minimum Voltage (Vmin), Frequency (F), Period (T), Positive Pulse Width (T+), Negative Pulse Width (T-), Positive Duty Cycle (Du+), and Negative Duty Cycle (Du-).
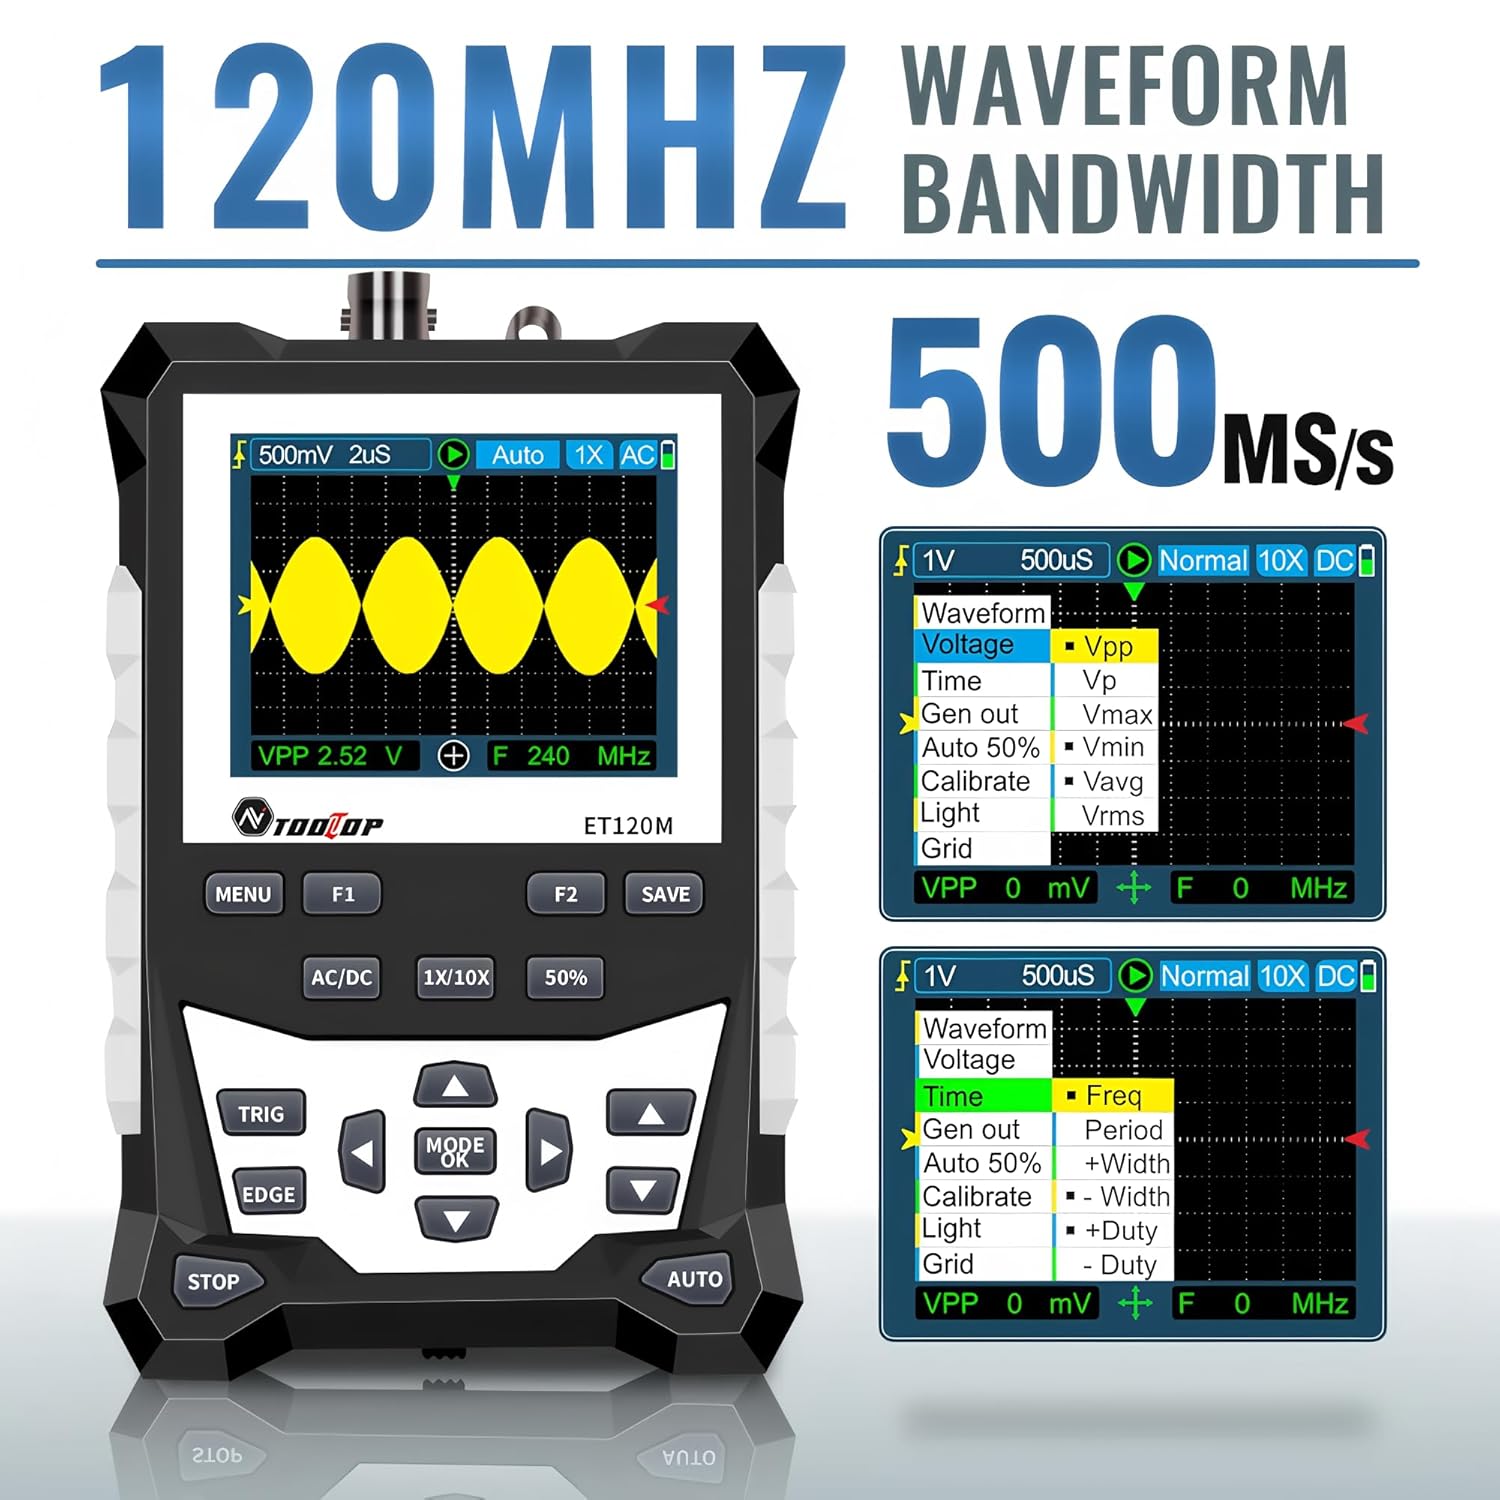
Figure 6.2: Automatic Measurement Functions
6.5. Square Wave Signal Output
The ET120M can generate square wave signals at specific frequencies. Navigate to the signal output function in the menu to select between 1kHz, 10KHz, 100KHz, and 1MHz output frequencies. This feature is useful for testing circuits.

Figure 6.3: Square Wave Signal Output Function
6.6. Waveform Storage and Recall
The device can store up to 2500 DSO waveforms. Use the บันทึก button to store the current waveform. Stored waveforms can be browsed via thumbnails for easy recall and analysis.

Figure 6.4: Waveform Storage and Browsing
6.7. Adjusting Waveform Parameters
You can manually adjust various waveform display parameters to fine-tune your measurements:
- ฐานเวลา: Adjusts the horizontal scale (time per division).
- Amplitude (Vertical Sensitivity): Adjusts the vertical scale (volts per division).
- Trigger Slope: Sets the trigger to rising or falling edge.
- ระดับทริกเกอร์: ตั้งค่าปริมาตรtage level at which the waveform is triggered.

Figure 6.5: Adjusting Waveform Display Parameters
7. การบำรุงรักษา
7.1. การทำความสะอาด
ในการทำความสะอาดอุปกรณ์ ให้ใช้ผ้าแห้งนุ่มๆ เช็ด สำหรับคราบสกปรกฝังแน่น ให้ใช้ผ้าชุบน้ำหมาดๆ เช็ดเบาๆamp สามารถใช้ผ้าชุบน้ำยาทำความสะอาดอ่อนๆ เช็ดได้ โดยระวังอย่าให้ของเหลวเข้าไปในตัวเครื่อง ห้ามใช้สารทำความสะอาดที่มีฤทธิ์กัดกร่อนหรือตัวทำละลาย
7.2. การจัดเก็บ
When not in use for extended periods, store the oscilloscope in a cool, dry place, away from direct sunlight and extreme temperatures. It is recommended to store it in the provided cloth bag to protect it from dust and scratches.
7.3. การดูแลแบตเตอรี่
To prolong battery life, avoid fully discharging the battery frequently. If storing for a long time, charge the battery to approximately 50% every few months.
8 การแก้ไขปัญหา
If you encounter issues with your ET120M oscilloscope, refer to the following common problems and solutions:
- อุปกรณ์ไม่เปิดเครื่อง: ตรวจสอบให้แน่ใจว่าแบตเตอรี่ชาร์จเต็มแล้ว เสียบสายชาร์จ USB แล้วลองใหม่อีกครั้ง
- ไม่แสดงรูปคลื่น: Check probe connection. Ensure the probe is properly connected to the circuit under test. Adjust vertical sensitivity and time base settings. Try the AUTO function.
- รูปคลื่นไม่เสถียร: Adjust the trigger level and trigger slope. Ensure the trigger mode is appropriate for the signal.
- การวัดที่ไม่แม่นยำ: Verify probe attenuation setting (1X/10X) matches the device setting. Perform a probe compensation if necessary (refer to advanced operation in a full manual).
For persistent issues, contact TOOLTOP customer support.
9. ข้อมูลจำเพาะ
9.1. ข้อกำหนดทั่วไป
| แสดง | 320x240 LCD screen |
| พื้นที่แสดงผล | 50มม. x 40มม. |
| แสงไฟแบ็คไลท์ | White, brightness adjustable |
| อิมพีแดนซ์ | x1: 1MΩ / x10: 10MΩ |
| แบตเตอรี่ | 18650 lithium battery (built-in) |
| ปิดเครื่องอัตโนมัติ | ไม่มีการดำเนินการเป็นเวลา 15 นาที |
| การจัดเก็บรูปคลื่น | 2500 DSO waveforms |
| ขนาด | 124มม. x 80มม. x 35มม. |
| เงื่อนไขการใช้งาน | 0°C ~ +40°C; <75%RH |
| เงื่อนไขการจัดเก็บ | -10°C ~ +60°C; <90%RH |
9.2. ข้อมูลจำเพาะของออสซิลโลสโคป
| แบนด์วิดท์แบบอะนาล็อก | 120เมกะเฮิรตซ์ |
| แบบเรียลไทม์สูงสุด Sampลิงอัตรา | 500MSps |
| ความละเอียดแนวตั้ง | 8 บิต |
| ความแม่นยำในแนวตั้ง | ± (5% + 0.2div) |
| Auto Zero Reference | ระหว่างการวัด DC |
| ระดับทริกเกอร์ | ±3.8div (0.1div per step) |
| ตำแหน่งทริกเกอร์ | ±6div (0.1div per step) |
| Cursor Function | ΔV, Δt, 1/Δt |
| ความไม่เชิงเส้น | ±1 bits |
| วิธีการจับคู่ | กระแสตรง/กระแสสลับ |
| Division Vertical | ±3.8 Horizontal: 12 |
| ช่วงฐานเวลา | 6ns / div ~ 50 วินาที / div |
| ความแม่นยำของฐานเวลา | ±(0.01%+0.1ดิวิชั่น) |
| โหมดสแกน | อัตโนมัติ/เดี่ยว/ปกติ |
| ความลาดชันของทริกเกอร์ | ขึ้น / ลง |
| ความยาวบันทึก | 12ดิวิชั่น |
| การกำหนดค่าอัตโนมัติ | Automatically set time base and vertical ampความสูง |
| Automatic Measurement Functions | Vpp, Vrms, Vavg, Vp, Vmax, Vmin, F, T, T+, T-, Du+, Du- |
| Vertical Sensitivity Range | x1: 50mV/div ~ 10V/div; x10: 500mV/div ~ 100V/div |
10. การรับประกันและการสนับสนุน
For warranty information or technical support, please refer to the documentation provided with your purchase or contact TOOLTOP customer service directly. Keep your purchase receipt as proof of purchase.


