1. บทนำ
This manual provides essential information for setting up, operating, maintaining, and troubleshooting your NIMO 15.6-inch FHD Business Laptop. Please read this guide thoroughly to ensure optimal performance and longevity of your device. Keep this manual for future reference.
2. อะไรอยู่ในกล่อง
ตรวจสอบว่ามีสินค้าทั้งหมดอยู่ในบรรจุภัณฑ์:
- 1 x Nimo N154 Laptop
- 1 x ที่ชาร์จเร็ว Type-C 65W PD
- 1 x คู่มือผู้ใช้ (เอกสารนี้)
- ระบบปฏิบัติการ Windows 11 Home (ติดตั้งมาแล้ว)
3. สินค้าหมดview
Familiarize yourself with the components and ports of your NIMO laptop.
ภาพ: ด้านหน้า view of the NIMO 15.6-inch FHD Business Laptop, showcasinก. จอภาพและแป้นพิมพ์
3.1. พอร์ตและขั้วต่อ
The NIMO N154 laptop features a variety of ports for connecting peripherals and external devices.

Image: Diagram illustrating the various ports on the left and right sides of the NIMO laptop, including USB, HDMI, Type-C, and audio jack.
- ด้านซ้าย:
- Kensington Lock: For securing your laptop.
- Headphone Combo Jack: For audio output and microphone input.
- USB 3.0 Port (x2): For high-speed data transfer.
- USB 2.0 Port (x1): For connecting standard USB devices.
- Micro SD Card Reader: For expanding storage or transferring fileจากการ์ดหน่วยความจำ
- ด้านขวา:
- Type-C Port (Charge Only): For connecting the 65W PD charger.
- USB 3.0 Port (x1): For high-speed data transfer.
- HDMI Port: For connecting to external displays.
- Type-C Port (Multifunction): Supports data transfer and display output.
- Charge LED Indicator: Shows charging status.
4. การตั้งค่า
4.1. การเปิดเครื่องครั้งแรกและการชาร์จ
- แกะ: ถอดแล็ปท็อปและอุปกรณ์เสริมทั้งหมดออกจากบรรจุภัณฑ์อย่างระมัดระวัง
- เชื่อมต่อพลังงาน: Plug the 65W Type-C PD Fast Charger into a power outlet and then connect the Type-C connector to the designated "Charge Only" Type-C port on the laptop.
- ชาร์จแบตเตอรี่: Allow the laptop to charge for at least 30 minutes before initial use, or until the charge LED indicates a full charge.
- เปิดเครื่อง: เปิดฝาแล็ปท็อปแล้วกดปุ่มเปิดปิด ซึ่งโดยปกติจะอยู่ทางด้านบนขวาของแป้นพิมพ์หรือด้านข้าง

Image: The 65W Type-C PD Fast Charger, illustrating its compact design and universal compatibility.
4.2. Windows 11 Setup
Follow the on-screen instructions to complete the Windows 11 initial setup:
- เลือกภูมิภาคและเค้าโครงแป้นพิมพ์ของคุณ
- เชื่อมต่อกับเครือข่าย Wi-Fi
- ลงชื่อเข้าใช้ด้วยบัญชี Microsoft ของคุณหรือสร้างบัญชีใหม่
- ตั้งรหัส PIN เพื่อการเข้าสู่ระบบอย่างรวดเร็ว
- Review และยอมรับการตั้งค่าความเป็นส่วนตัว
5. คู่มือการใช้งาน
5.1. เครื่องอ่านลายนิ้วมือ
The integrated fingerprint sensor allows for secure and quick login without passwords.
- การตั้งค่า: Navigate to Windows Settings > Accounts > Sign-in options > Fingerprint recognition (Windows Hello).
- ลงทะเบียนลายนิ้วมือ: Follow the on-screen prompts to register your fingerprint. You may need to scan your finger multiple times from different angles.
- การใช้งาน: To log in, simply place your registered finger on the fingerprint sensor when prompted.

Image: Close-up of the laptop's touchpad area showing the fingerprint reader, and a separate image of the webcam with a privacy shield.
5.2. Backlit Keyboard
The backlit keyboard enhances visibility in low-light conditions.
- เปิด/ปิดไฟแบ็คไลท์: Use the dedicated function key (often เอฟเอ็น + เอฟเอ็กซ์, where Fx is a key with a keyboard backlight icon) to cycle through backlight brightness levels or turn it off. Refer to your keyboard for the specific key combination.
5.3. Webcam Privacy Shield
The laptop includes a physical webcam privacy shield for enhanced security.
- เปิดใช้งาน/ปิดใช้งาน: Slide the physical switch located next to the webcam to cover or uncover the camera lens.
5.4. การเชื่อมต่อจอแสดงผลภายนอก
You can extend your workspace by connecting an external monitor or projector.
- เชื่อมต่อสายเคเบิล: Use an HDMI cable to connect your external display to the laptop's HDMI port, or a compatible Type-C to DisplayPort/HDMI adapter for the multifunction Type-C port.
- ตั้งค่าการแสดงผล: กด ปุ่ม Windows + P to open the Project menu. Select your preferred display mode (e.g., Duplicate, Extend, Second screen only).
6. การบำรุงรักษา
6.1. การทำความสะอาดแล็ปท็อปของคุณ
- หน้าจอ: ใช้ผ้านุ่มไม่เป็นขุยค่อยๆ งampล้างออกด้วยน้ำหรือน้ำยาทำความสะอาดหน้าจอ ห้ามฉีดน้ำยาลงบนหน้าจอโดยตรง
- แป้นพิมพ์และตัวเครื่อง: ใช้ผ้านุ่มและแห้ง สำหรับคราบฝังแน่น ให้เช็ดเบาๆamp สามารถใช้ผ้าชุบน้ำสบู่ชนิดอ่อนๆ เช็ดได้ โดยให้แน่ใจว่าไม่มีของเหลวเข้าไปในช่องเปิด
- พอร์ต: ใช้ลมอัดเพื่อเป่าฝุ่นออกจากพอร์ตอย่างอ่อนโยน
6.2. การดูแลแบตเตอรี่
- หลีกเลี่ยงการปล่อยแบตเตอรี่จนหมดบ่อยครั้ง
- เก็บแล็ปท็อปไว้ในที่แห้งและเย็นหากไม่ได้ใช้งานเป็นเวลานาน
- อย่าวางแล็ปท็อปไว้ในที่ที่มีอุณหภูมิสูงหรือต่ำเกินไป
6.3. การอัปเดตซอฟต์แวร์
- ตรวจสอบและติดตั้งการอัปเดต Windows เป็นประจำเพื่อให้มั่นใจถึงเสถียรภาพและความปลอดภัยของระบบ ไปที่ การตั้งค่า > การอัปเดต Windows
- โปรดอัปเดตไดรเวอร์อุปกรณ์เพื่อให้ได้ประสิทธิภาพสูงสุด
7 การแก้ไขปัญหา
หัวข้อนี้จะกล่าวถึงปัญหาทั่วไปที่คุณอาจพบเจอ
7.1. แล็ปท็อปไม่สามารถเปิดเครื่องได้
- Ensure the charger is securely connected to both the laptop and a working power outlet.
- ตรวจสอบว่าเต้ารับไฟฟ้าใช้งานได้โดยเสียบอุปกรณ์อื่น
- Allow the laptop to charge for at least 30 minutes if the battery is completely drained.
- ลองรีเซ็ตเครื่องโดยการกดปุ่มเปิด/ปิดค้างไว้ 15-20 วินาที
7.2. ปัญหาการแสดงผล (ไม่มีภาพ, กะพริบ)
- If an external monitor is connected, disconnect it to see if the laptop's screen works.
- ปรับความสว่างหน้าจอโดยใช้ปุ่มฟังก์ชัน (เช่น Fn + F5/F6).
- รีสตาร์ทแล็ปท็อป
- If connected to an external display, ensure the cable is properly seated and try a different cable or port.
7.3. ปัญหาการเชื่อมต่อ Wi-Fi
- Ensure Wi-Fi is enabled in Windows Settings > Network & Internet > Wi-Fi.
- รีสตาร์ทเราเตอร์และโมเด็มของคุณ
- ลืมเครือข่ายและเชื่อมต่อใหม่อีกครั้ง
- อัปเดตไดรเวอร์ Wi-Fi ของคุณ
7.4. ประสิทธิภาพช้า
- ปิดแอปพลิเคชันที่ไม่จำเป็นซึ่งทำงานอยู่เบื้องหลัง
- ตรวจสอบ Task Manager (Ctrl+Shift+Esc) เพื่อดูว่ามีกระบวนการใดที่ใช้ CPU, RAM หรือพื้นที่ดิสก์สูงเป็นพิเศษ
- ตรวจสอบให้แน่ใจว่ามีพื้นที่ว่างเพียงพอใน SSD ของคุณ
- รันการล้างข้อมูลบนดิสก์และดีแฟร็กเมนต์ (สำหรับ HDD แม้ว่าจะเป็น SSD ก็ตาม)
- สแกนหามัลแวร์หรือไวรัส
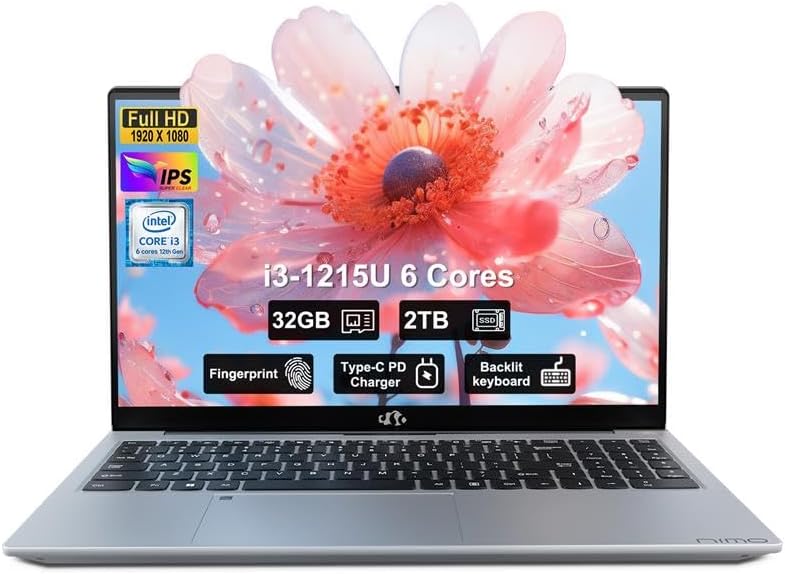
8. ข้อมูลจำเพาะ
Detailed technical specifications for the NIMO N154 Laptop.

Image: Diagram illustrating the Intel Core i3-1215U processor with details on cores, threads, power consumption, and Turbo Boost frequency.

Image: Visual representation of 32GB DDR4 RAM and 2TB PCIe 4.0 SSD, highlighting dual RAM channel capability.
| คุณสมบัติ | ข้อมูลจำเพาะ |
|---|---|
| ชื่อรุ่น | นิโม N154 |
| ขนาดหน้าจอ | 15.6 นิ้ว |
| ความละเอียดหน้าจอ | 1920 x 1080 พิกเซล (FHD IPS) |
| โปรเซสเซอร์ | Intel Core i3-1215U (6-core, 8-thread, up to 4.4GHz) |
| แรม | 32GB DDR4 (3200 เมกะเฮิรตซ์) |
| พื้นที่จัดเก็บ | 2 TB PCIe SSD |
| โคโปรเซสเซอร์กราฟิก | แบบบูรณา Intel Graphics |
| ระบบปฏิบัติการ | วินโดวส์ 11 โฮม |
| ประเภทไร้สาย | 802.11a/b/g/n/ac (Wi-Fi 6) |
| พอร์ต USB | 2x USB 3.0, 1x USB 2.0, 2x Type-C (1x Charge Only, 1x Multifunction) |
| พอร์ต HDMI | 1x HDMI2.1 การเชื่อมต่อ |
| คุณสมบัติพิเศษ | Backlit Keyboard, Fingerprint Reader, HD Audio, Memory Card Slot, Numeric Keypad, Webcam Privacy Shield |
| อายุการใช้งานแบตเตอรี่ (เฉลี่ย) | 5 ชั่วโมง |
| น้ำหนักสินค้า | 3.8 ปอนด์ |
| ขนาดสินค้า (กxยxส) | 14.07 x 8.98 x 0.76 นิ้ว |
| สี | เงิน |
9. การรับประกันและการสนับสนุน
Nimo Direct Inc. is committed to customer satisfaction.
- การรับประกันของผู้ผลิต: Your NIMO laptop is covered by a comprehensive 2-Year Manufacturer's Warranty. This warranty covers defects in materials and workmanship under normal use.
- นโยบายการคืนสินค้า: We offer 90-Day Hassle-Free Returns. If you are not satisfied with your purchase, you may return it within 90 days of receipt.
- การสนับสนุนลูกค้า: Our dedicated US support team is available to provide swift issue resolution or immediate replacements. For assistance, please refer to the contact information provided on the NIMO official webเว็บไซต์หรือเอกสารการซื้อของคุณ

Image: Illustration of NIMO's after-sales support, including partial US assembly, 90-day free returns, 2-year after-sales support, and 24/7 customer service.


