การแนะนำ
Thank you for choosing the BESTTEN Super Slim Dimmer Switch. This manual provides detailed instructions for the safe installation, operation, and maintenance of your new dimmer switch. Please read all instructions carefully before installation and retain this manual for future reference.

Image: Six BESTTEN Super Slim Dimmer Switches.
ข้อมูลด้านความปลอดภัย
- คำเตือน: เพื่อป้องกันอันตรายจากไฟไหม้ ไฟฟ้าช็อต หรือการเสียชีวิต ให้ปิดสวิตช์ไฟที่เบรกเกอร์หรือกล่องฟิวส์ และตรวจสอบให้แน่ใจว่าไฟดับแล้วก่อนทำการต่อสายไฟ
- ติดตั้งตามรหัสไฟฟ้าในประเทศและท้องถิ่นทั้งหมด
- ใช้ลวดทองแดงเท่านั้น
- อุปกรณ์นี้มีไว้สำหรับใช้ภายในอาคารเท่านั้น
- Do not use with non-dimmable bulbs.
- Maximum load: 300W for dimmable LED/CFL, 600W for incandescent/halogen.
- Only one dimmer switch can be installed per 3-way circuit.
เนื้อหาแพ็คเกจ
- BESTTEN Super Slim Dimmer Switch (Quantity as purchased, e.g., 6 switches)
- สกรูยึด
Note: Wall plates are not included and must be purchased separately.
ข้อมูลจำเพาะ
| พารามิเตอร์ | ค่า |
|---|---|
| เล่มที่tage | 120V, 60Hz |
| Dimmable LED/CFL Max. Load | 300วัตต์ |
| Incandescent/Halogen Max. Load | 600วัตต์ |
| ประเภทสวิตซ์ | Single Pole / 3-Way |
| ประเภทสายไฟ | Wire Pigtails |
| อุณหภูมิการทำงาน | 32°F – 104°F (0°C – 40°C) |
| การรับรอง | ETL/cETL จดทะเบียน |
| ขนาด (กว้าง x ยาว x สูง) | 4.13 x 1.73 x 0.87 นิ้ว |

Image: Detailed specifications for the dimmer switch.

Image: Super Slim Design dimensions.

Image: Bulb compatibility and wattagการให้คะแนนอี
การติดตั้งและการตั้งค่า
Before beginning installation, ensure the power is turned off at the circuit breaker. This dimmer switch is designed for both single-pole and 3-way applications and does not require a neutral wire, making it suitable for older electrical systems.

Image: No neutral wire required feature.
คำแนะนำในการเดินสายไฟ
- ปิดไฟ: Locate your circuit breaker or fuse box and turn off the power to the switch location. Verify power is off using a voltagอีผู้ทดสอบ
- ถอดสวิตช์ที่มีอยู่: ถอดสวิตช์เก่าออกจากกล่องที่ผนังอย่างระมัดระวัง
- ระบุสายไฟ: Identify the Line (Hot), Load, Ground, and Traveler wires (for 3-way installations). It is recommended to take a picture of the existing wiring before disconnecting.
- เชื่อมต่อสายไฟ: Refer to the wiring diagrams below for single-pole and 3-way installations. Use wire nuts to secure connections.
- สายสีดำ: Connect to the Line (Hot) wire.
- สายสีแดง: Connect to the Load wire.
- สายสีเขียว: Connect to the Ground wire.
- Red & White wire: This wire is used only in 3-way installations. For single-pole installations, cap this wire with a wire nut. In 3-way installations, connect it to one of the Traveler wires.
- ติดตั้งตัวหรี่ไฟ: Gently push the wired dimmer switch into the wall box and secure it with the provided screws.
- ติดตั้งแผ่นปิดผนัง: Attach your desired wall plate (not included).
- คืนพลังงาน: เปิดไฟที่เบรกเกอร์อีกครั้ง

Image: Single Pole and 3-Way Wiring Diagrams.
สำคัญสำหรับการใช้งาน 3 ทาง
For 3-way switches, there are three terminals besides the ground. One terminal is typically a different color than the other two. Label this wire as the Line/Load. The other two terminals connect to the Traveler wires. Caution: Only one dimmer switch can be installed in a 3-way circuit.
คำแนะนำการใช้งาน
The BESTTEN Super Slim Dimmer Switch features a rocker switch for ON/OFF control and a slide dimmer for brightness adjustment.
- การเปิด/ปิด: Press the bottom part of the rocker switch to turn the lights ON, and the top part to turn them OFF.
- การปรับความสว่าง: Use the vertical slider on the side of the rocker switch to adjust the light level. Slide up for brighter light and down for dimmer light.
Dimming Range Setting (Sensitivity Dial)
To optimize performance and eliminate flickering with certain bulb types, you may need to adjust the dimmer's sensitivity dial. This small dial is located on the side of the dimmer switch, accessible after removing the wall plate.
- Turn on the switch and move the slide dimmer to its lowest (all the way down) setting.
- Rotate the Sensitivity Dial clockwise all the way down. บันทึก: If the dial stops in either direction, do not continue to turn it.
- Rotate the Sensitivity Dial counter-clockwise slowly until the preferred lowest light level is achieved and the lights are not flickering.
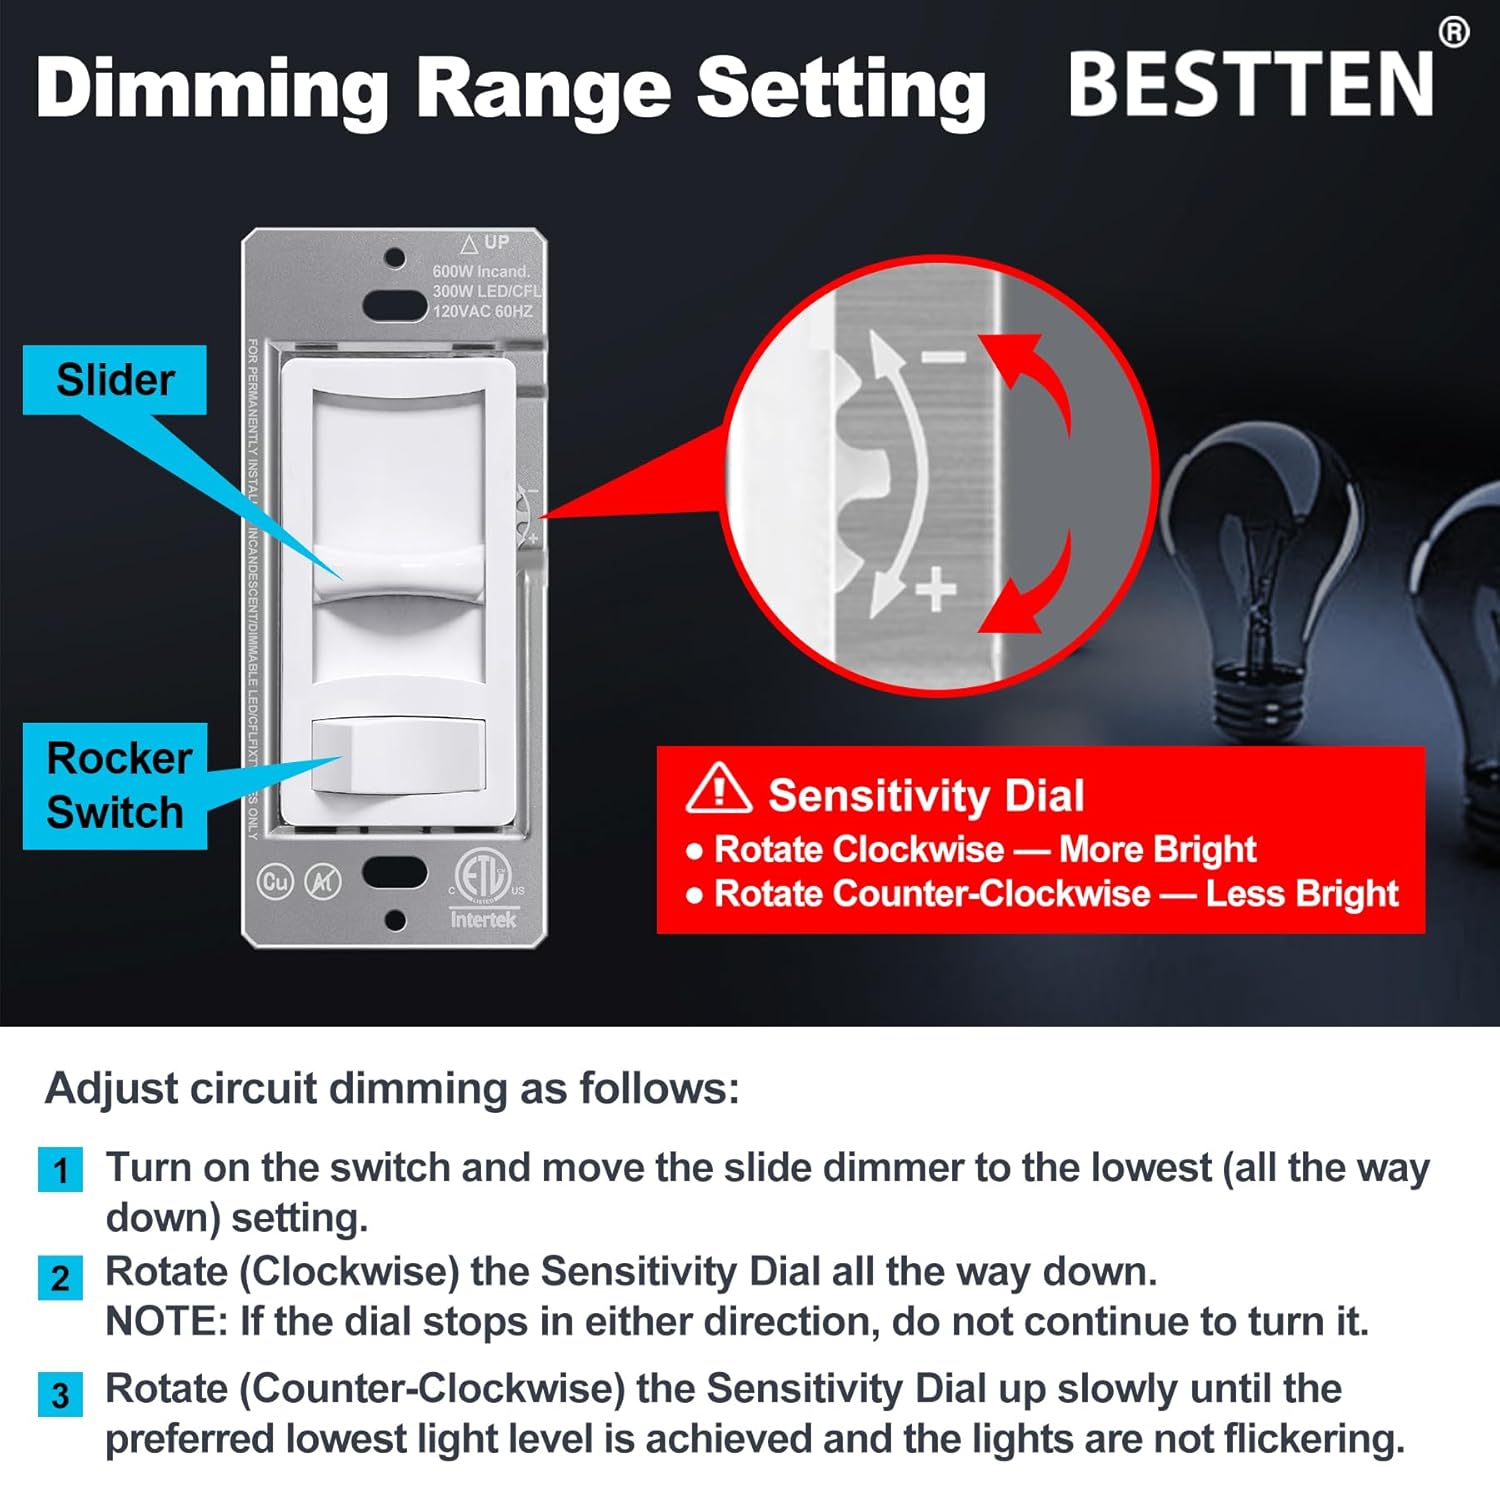
Image: Dimming Range Setting with Sensitivity Dial.
การซ่อมบำรุง
To maintain your dimmer switch, ensure power is off before cleaning. Wipe the surface with a soft, damp cloth. Do not use abrasive cleaners or solvents, as these can damage the finish or internal components. Regular inspection for loose connections or damage is recommended.
การแก้ไขปัญหา
- ไฟไม่เปิด:
- ตรวจสอบเบรกเกอร์วงจรและตรวจสอบให้แน่ใจว่ากระแสไฟฟ้ากลับมาใช้งานได้แล้ว
- ตรวจสอบว่าการเชื่อมต่อสายทั้งหมดปลอดภัย
- Ensure the bulb is functional and correctly installed.
- Lights flicker, hum, or buzz:
- Adjust the dimming range using the sensitivity dial as described in the 'Operating Instructions' section.
- Ensure your bulbs are specifically rated as 'dimmable'. Non-dimmable bulbs will not function correctly with a dimmer.
- Some dimmable LED/CFL bulbs may not be fully compatible with all dimmers. Consider trying a different brand or type of dimmable bulb.
- ตรวจสอบให้แน่ใจว่าวัตต์รวมtage of connected bulbs does not exceed the dimmer's maximum load capacity.
- Dimmer switch is warm to the touch:
- It is normal for dimmer switches to feel warm during operation. If the dimmer feels excessively hot, ensure the load does not exceed the maximum wattagคะแนนอี

Image: Information on eliminating flickering.
การรับประกันและการสนับสนุน
BESTTEN products are designed for reliability and performance. For warranty information or technical support, please refer to the manufacturer's official webหรือติดต่อฝ่ายบริการลูกค้าโดยตรง โปรดเก็บใบเสร็จรับเงินไว้เป็นหลักฐานการซื้อ
คุณสามารถค้นหาข้อมูลเพิ่มเติมและรายละเอียดการติดต่อได้โดยเข้าไปที่เว็บไซต์ BESTTEN Store on Amazon.


