1. บทนำ
This manual provides detailed instructions for the installation, operation, and maintenance of your ESX Vision VMX900DAB Universal 1-DIN Multimedia Receiver. Please read this manual thoroughly before using the device to ensure proper functionality and to maximize your user experience.
The ESX Vision VMX900DAB is a versatile 1-DIN multimedia receiver featuring a 9-inch multi-angle touchscreen display. It integrates advanced connectivity options including wireless Apple CarPlay and Android Auto, DAB+ digital radio, Bluetooth hands-free calling and audio streaming, and a comprehensive media player. The unit is designed for universal compatibility and offers a removable monitor for enhanced security.
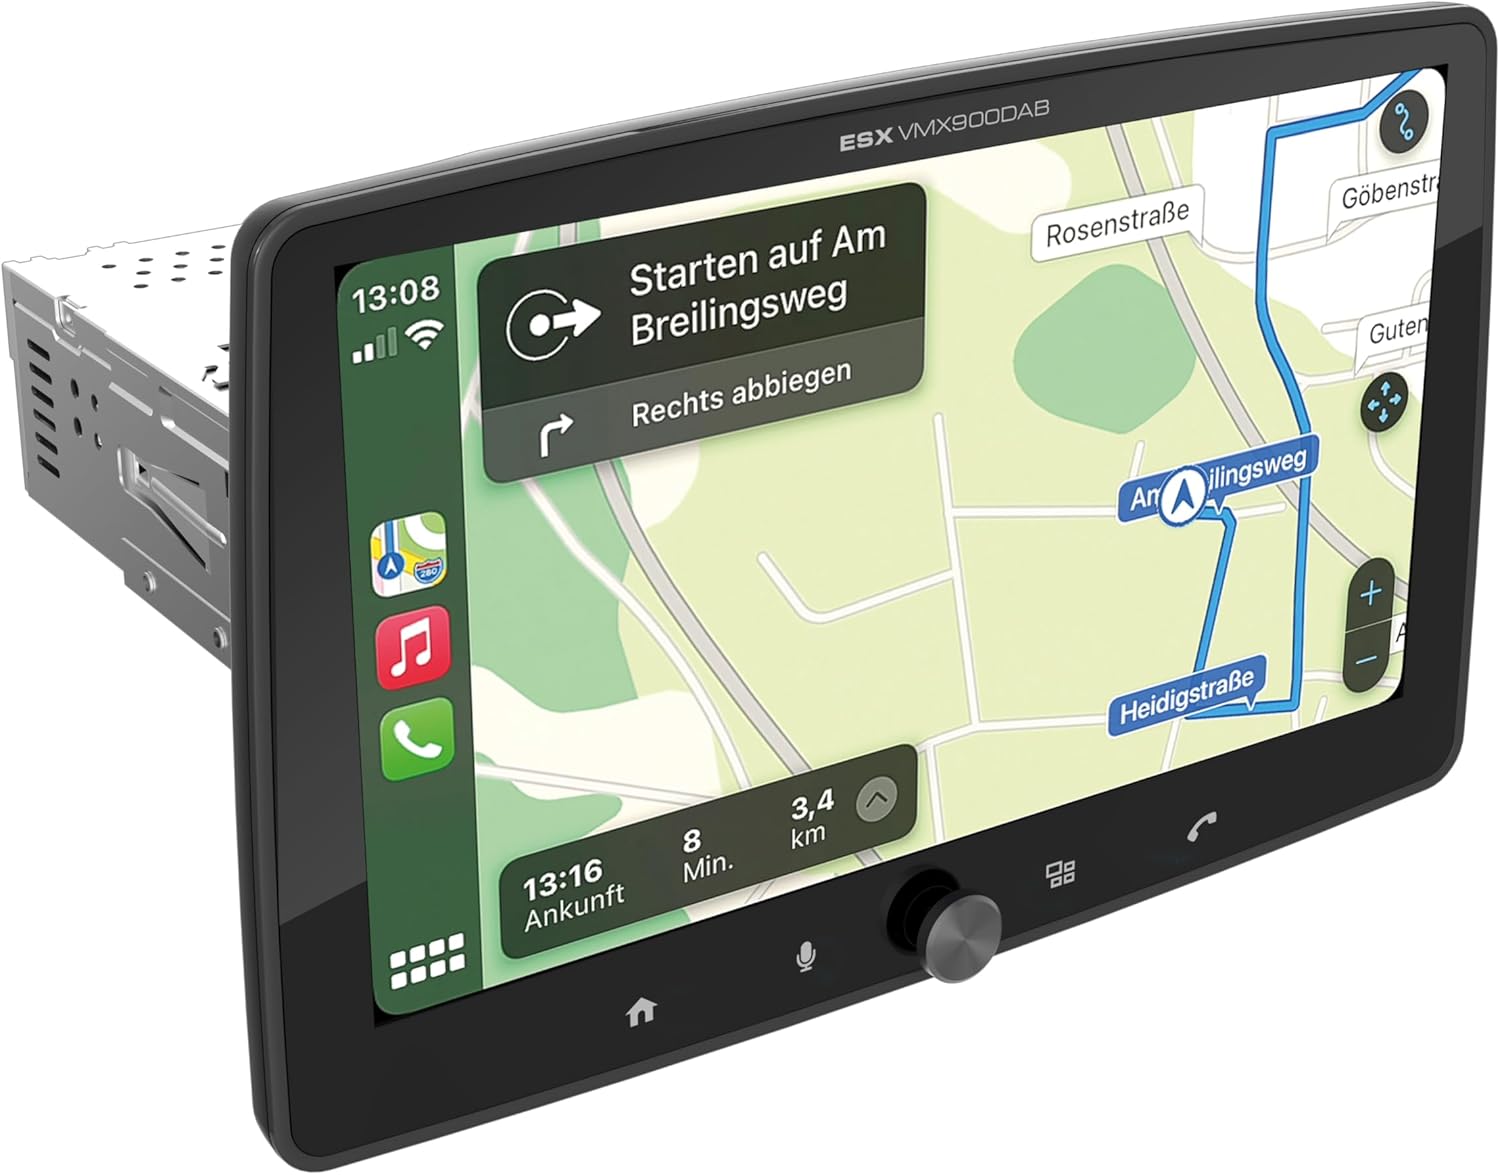
Figure 1.1: ESX Vision VMX900DAB with navigation interface.
2. การตั้งค่าและการติดตั้ง
2.1 เนื้อหาบรรจุภัณฑ์
ก่อนการติดตั้ง ตรวจสอบว่ามีส่วนประกอบทั้งหมดครบถ้วน:
- ESX Vision VMX900DAB Main Unit
- Detachable 9-inch Touchscreen Monitor
- สายไฟ/ลำโพง
- ไมโครโฟนภายนอก
- เสาอากาศ GPS
- เสาอากาศ DAB+
- สายต่อขยาย USB
- อุปกรณ์สำหรับติดตั้ง (ขายึด, สกรู)
- คู่มือการใช้งาน (เอกสารนี้)

รูปที่ 2.1: อุปกรณ์เสริมและส่วนประกอบที่รวมอยู่
2.2 การติดตั้งตัวเครื่องหลัก
- ตรวจสอบให้แน่ใจว่าได้ถอดแบตเตอรี่ของรถออกก่อนเริ่มการติดตั้ง
- Insert the 1-DIN main unit into the vehicle's dashboard opening.
- Secure the main unit using the provided mounting brackets and screws.
2.3 การเชื่อมต่อจอภาพ
The 9-inch monitor is detachable and connects to the main unit via a click system.
- Align the monitor's connector with the slot on the main unit.
- Gently push the monitor until it clicks securely into place.
- To remove, press the release button (if applicable) and pull the monitor away.

Figure 2.2: Detachable monitor with click system.
2.4 การเชื่อมต่อสายไฟ
โปรดดูแผนผังการเดินสายไฟที่ให้มาพร้อมกับตัวเครื่องสำหรับรายละเอียดการเชื่อมต่อที่ถูกต้อง การเชื่อมต่อที่สำคัญได้แก่:
- Power and Speakers: Connect the main wiring harness to the vehicle's power supply and speakers.
- ไมโครโฟนภายนอก: Plug the external microphone into its dedicated input for optimal hands-free call quality.
- เสาอากาศ GPS: เชื่อมต่อเสาอากาศ GPS และติดตั้งในตำแหน่งที่โล่ง view ของท้องฟ้าเพื่อการวางตำแหน่งที่แม่นยำ
- เสาอากาศ DAB+: Connect the DAB+ antenna for digital radio reception.
- พอร์ต USB: Two USB-A ports are available. One for media playback and charging (1.5A), and another specifically for Apple CarPlay/Android Auto and charging (1.5A).
- อาร์ซีเอ พรี-ampเอาท์พุทที่สดใส: Six 4V RCA outputs (FL/FR/RL/RR/SUB1/SUB2) are available for connecting external ampลิตเตอร์
- AUX RCA Inputs: Stereo audio and video inputs (L/R/VIDEO) for external audio/video sources.
- Camera RCA Inputs: ช่องเสียบเฉพาะสำหรับกล้องหน้าและกล้องหลัง
- ระบบควบคุมพวงมาลัย: Analog steering wheel remote control input (learnable) for integration with vehicle controls.
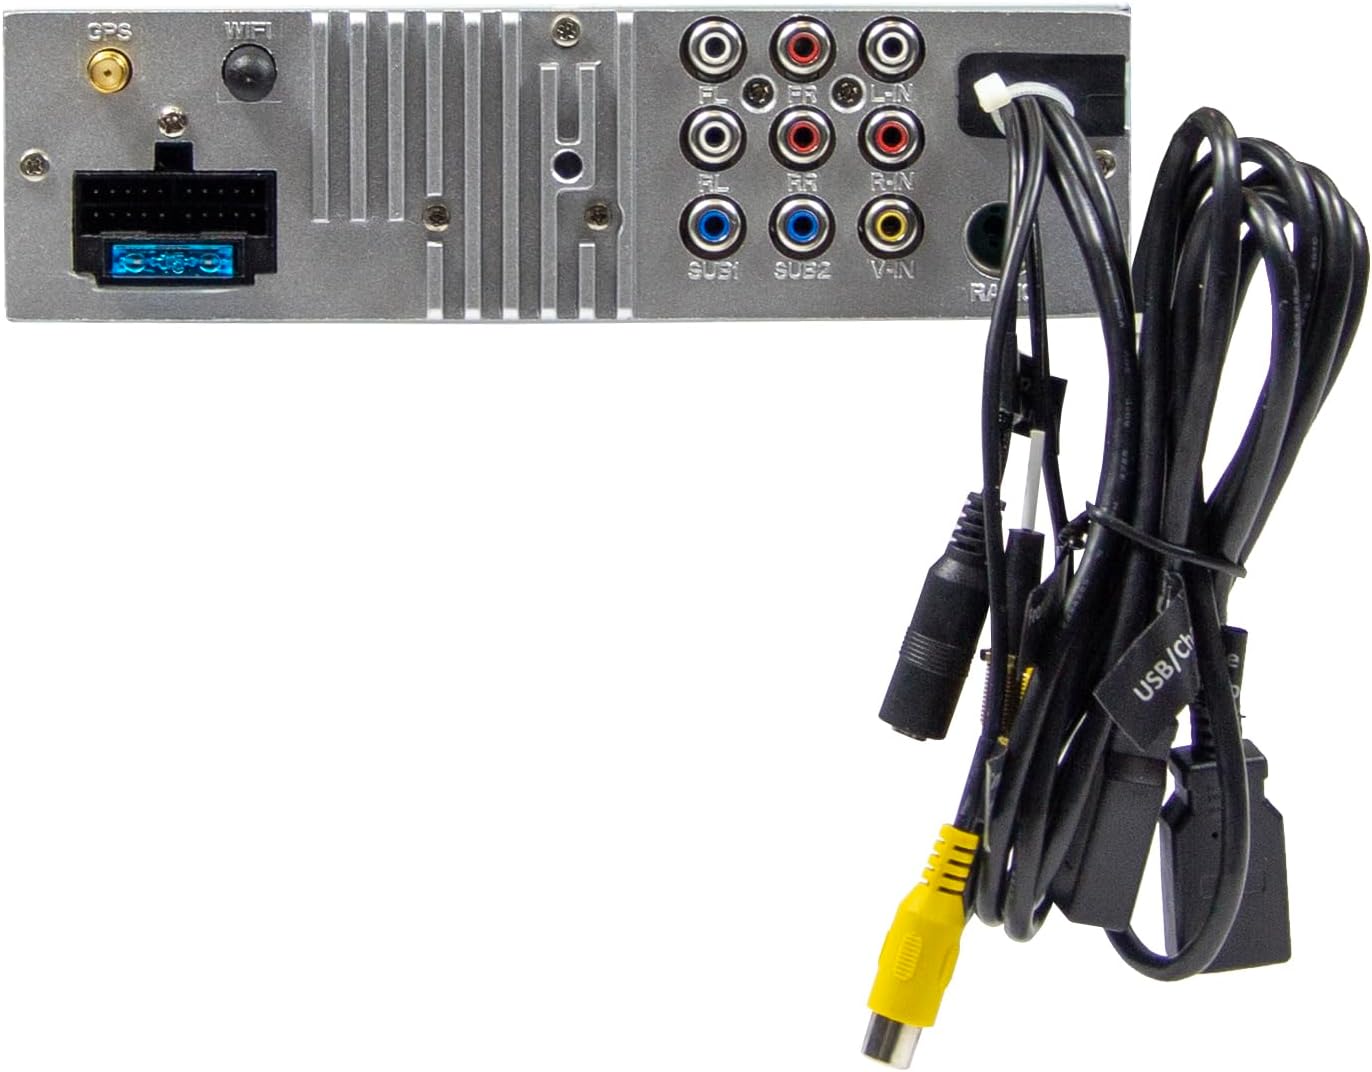
Figure 2.3: Rear connections of the main unit.
3. คู่มือการใช้งาน
3.1 การเปิด/ปิดเครื่องและการควบคุมพื้นฐาน
- เปิดเครื่อง: The unit will power on automatically with the vehicle's ignition.
- หมดแรง: The unit will power off automatically with the vehicle's ignition.
- การควบคุมระดับเสียง: Use the large rotary knob on the front panel to adjust the volume.
- ปุ่มฟังก์ชัน: Four function keys on the front panel provide quick access to common features.
- หน้าจอสัมผัส: All primary functions are controlled via the 9-inch touchscreen.
3.2 หน้าจอหลักและการนำทาง
The home screen provides access to all main functions and applications.

Figure 3.1: Main menu/home screen.
3.3 Apple CarPlay และ Android Auto
The VMX900DAB supports both wireless and wired (via USB) Apple CarPlay and Android Auto.
- การเชื่อมต่อแบบไร้สาย: Enable Bluetooth and Wi-Fi on your smartphone and follow the on-screen prompts to connect.
- การเชื่อมต่อแบบมีสาย: Connect your smartphone to the dedicated USB-A port using a compatible USB cable.
- Once connected, your smartphone's compatible apps (navigation, music, calls, messages) will be mirrored on the receiver's display.

Figure 3.2: Apple CarPlay interface.
3.4 Radio Functions (DAB+/FM/AM)
- วิทยุ DAB+: Select the DAB+ icon from the home screen. The unit will scan for available digital radio stations.
- วิทยุ FM/AM: Select the Radio icon. Use the touchscreen to tune to stations, save presets, and access RDS functions.
3.5 บลูทูธแฮนด์ฟรีและการสตรีมเสียง
- การจับคู่: Enable Bluetooth on your smartphone and search for the VMX900DAB. Select the device and confirm pairing.
- การโทรแบบแฮนด์ฟรี: Once paired, you can make and receive calls directly through the receiver. The external microphone ensures clear voice transmission. Your phonebook can be synchronized.
- การสตรีมเสียง: Stream music wirelessly from your smartphone to the receiver.
3.6 การเล่นสื่อ
The unit supports various audio, video, and photo formats via USB.
- รองรับ File รูปแบบ: AVI, FLV, MOV, MKV, WMV, WMA, MP3, FLAC, JPEG, PNG, BMP.
- Insert a USB drive into the media USB-A port. Select the USB icon from the home screen to browse and play media files.
3.7 การปรับแต่งจอภาพ
The monitor can be tilted and adjusted in height to achieve the optimal viewing angle and prevent obstruction of vehicle controls.

Figure 3.3: Adjustable monitor mechanism.
ไม่เคยปรับแต่ง
- Startup Logo: Customize the startup logo in the settings menu.
- RGB Key Illumination: Select from various RGB colors and animation effects for the key illumination.
- ภาษาเมนู: Supported languages include DEU, ENG, SWE, ITA.
4. การบำรุงรักษา
4.1 การทำความสะอาดหน่วย
- Use a soft, dry cloth to wipe the display and unit surfaces.
- For stubborn marks on the screen, use a screen cleaner specifically designed for electronic displays and a microfiber cloth.
- Do not use abrasive cleaners, solvents, or harsh chemicals, as these can damage the finish or screen.
4.2 การดูแลทั่วไป
- หลีกเลี่ยงการวางเครื่องไว้ในอุณหภูมิที่สูงหรือต่ำเกินไป แสงแดดโดยตรงเป็นเวลานาน หรือความชื้นสูง
- ตรวจสอบให้แน่ใจว่ามีการระบายอากาศที่เหมาะสมรอบๆ ตัวเครื่องเพื่อป้องกันความร้อนสูงเกินไป
- When removing the monitor, handle it carefully to avoid damage to the connectors.
5 การแก้ไขปัญหา
If you encounter issues with your VMX900DAB, refer to the following common problems and solutions:
| ปัญหา | สาเหตุที่เป็นไปได้ | สารละลาย |
|---|---|---|
| ไม่มีไฟฟ้า | การเดินสายไฟไม่ถูกต้อง; ฟิวส์ขาด; สวิตช์กุญแจรถดับ | Check power connections; Replace fuse; Turn on vehicle ignition |
| ไม่มีเสียง | ระดับเสียงต่ำเกินไป ปิดเสียงแล้ว ปัญหาสายลำโพง | Increase volume; Deactivate mute; Check speaker connections |
| บลูทูธไม่เชื่อมต่อ | Bluetooth off on phone/unit; Incorrect pairing process | Ensure Bluetooth is on; Re-attempt pairing process |
| Apple CarPlay/Android Auto ไม่เริ่มทำงาน | Incorrect USB port; Faulty USB cable; Phone not compatible/configured | Use the dedicated USB port; Try a different USB cable; Check phone settings for CarPlay/Android Auto |
| การรับสัญญาณวิทยุไม่ดี | Antenna not connected; Poor antenna placement; Weak signal area | Check antenna connection; Adjust antenna position; Try in a different location |
| จอภาพไม่แสดงผล | Monitor not securely attached; Connector issue | Ensure monitor is fully clicked into place; Check for debris in connector |
If the problem persists after attempting these solutions, please contact ESX customer support or your authorized dealer.
6. ข้อมูลจำเพาะ
| คุณสมบัติ | ข้อมูลจำเพาะ |
|---|---|
| หมายเลขรุ่น | VMX900DAB |
| แสดง | 9-inch Multi-angle Touchscreen |
| ฟอร์มแฟกเตอร์ | 1-DIN Universal |
| การเชื่อมต่อ | USB, บลูทูธ, ช่องต่อเสริม |
| คุณสมบัติพิเศษ | Wireless Apple CarPlay, Wireless Android Auto, Detachable Monitor with Click System |
| เครื่องรับวิทยุ | DAB+ (Digital Radio), FM/AM with RDS |
| บลูทูธ | Hands-free function, Audio Streaming |
| พอร์ต USB | 2x USB-A (1.5A charging, one dedicated for CarPlay/Android Auto) |
| Max Music Power | 4 x 80 วัตต์ |
| ก่อนampเอาท์พุทที่สดใส | 6x RCA (4V) (FL/FR/RL/RR/SUB1/SUB2) |
| อินพุต AUX | RCA (L/R/VIDEO) |
| อินพุตกล้อง | RCA (Front/Rear) |
| รองรับ File รูปแบบ | AVI, FLV, MOV, MKV, WMV, WMA, MP3, FLAC, JPEG, PNG, BMP |
| ไมโครโฟนภายนอก | รวมอยู่ด้วย |
| ระบบควบคุมพวงมาลัย | Analog (learnable) |
| เครื่องรับ GPS | รวมอยู่ด้วย |
| เมนูภาษา | DEU, ENG, SWE, ITA |
| กำลังขับรวม | 320 วัตต์ |
| การกำหนดค่าช่องเสียงรอบทิศทาง | 4.2 |
| โหมดเอาต์พุตเสียง | สเตอริโอ |
7. การรับประกันและการสนับสนุน
For warranty information, please refer to the documentation provided at the time of purchase or contact your authorized ESX dealer. Warranty terms and conditions may vary by region and retailer.
For technical support or further assistance, please contact ESX customer service or visit the official ESX webเว็บไซต์สำหรับทรัพยากรสนับสนุน