1. บทนำ
This manual provides essential information for the safe and effective operation of your ION Audio Retro Glow Boombox. This device combines classic audio playback with modern connectivity, featuring an AM/FM radio, cassette player/recorder, Bluetooth 5.3, USB, and SD card playback capabilities. Please read this manual thoroughly before use and retain it for future reference.
2. ข้อมูลด้านความปลอดภัย
- อย่าให้เครื่องโดนน้ำหรือความชื้น
- หลีกเลี่ยงการวางเครื่องไว้ใกล้แหล่งความร้อนหรือโดนแสงแดดโดยตรง
- ตรวจสอบให้แน่ใจว่ามีการระบายอากาศที่เหมาะสม อย่าปิดกั้นช่องระบายอากาศใดๆ
- ใช้เฉพาะอุปกรณ์เสริม/สิ่งที่แนบที่ผู้ผลิตกำหนดเท่านั้น
- ถอดปลั๊กเครื่องในระหว่างที่เกิดพายุฝนฟ้าคะนองหรือเมื่อไม่ได้ใช้งานเป็นเวลานาน
- ส่งต่อการบริการทั้งหมดไปยังบุคลากรบริการที่มีคุณสมบัติเหมาะสม
3. สิ่งที่รวมอยู่
เมื่อแกะกล่อง โปรดตรวจสอบให้แน่ใจว่าสิ่งของทั้งหมดที่ระบุไว้ด้านล่างครบถ้วนและอยู่ในสภาพดี:
- ION Audio Retro Glow Boombox
- สายไฟ
- คู่มือการเริ่มต้นอย่างรวดเร็ว
4. สินค้าหมดview
The Retro Glow Boombox features a translucent housing with multi-colored LED lights that synchronize with music. It includes dual full-range speakers for robust audio output.
แผงด้านหน้า

รูปที่ 1 : ด้านหน้า view of the Retro Glow Boombox, showcasing the cassette deck, radio tuner, and illuminated dual speakers.
การควบคุมยอดนิยม

รูปที่ 2: รายละเอียด view of the top panel, including volume, bass, treble controls, cassette function buttons (Pause, Stop/Eject, F.FWD, REW, Play, REC), and mode selectors (Tape, Aux, Radio, Bluetooth/USB/SD).
Side Panel and Rear
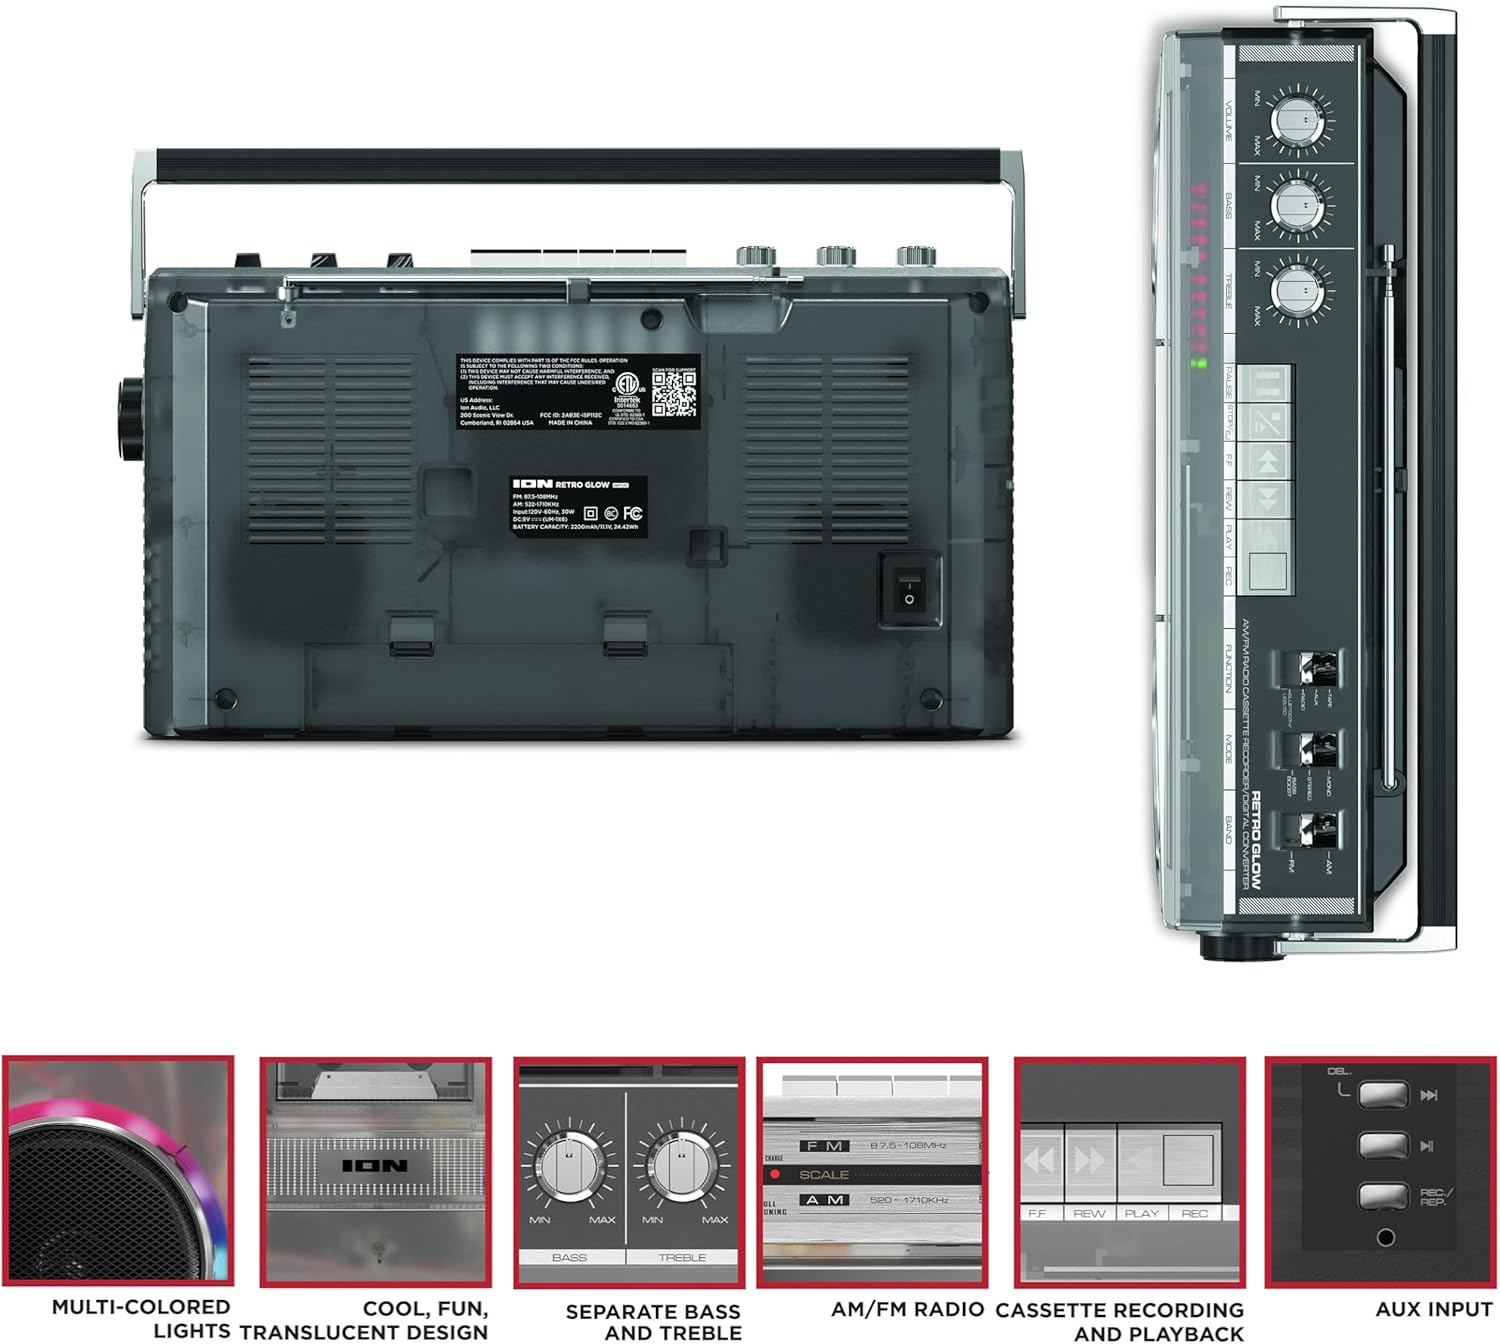
Figure 3: Side panel illustrating the USB port, SD card slot, and playback control buttons. The rear panel includes the power input and battery compartment.
5. การตั้งค่า
การจ่ายไฟให้กับบูมบ็อกซ์
The Retro Glow Boombox can be powered via the included AC power cable or by batteries for portable use.
- ไฟฟ้ากระแสสลับ: Connect the power cable to the AC input on the rear of the unit and then to a wall outlet.
- พลังงานแบตเตอรี่: Open the battery compartment on the rear and insert the required batteries (type and quantity specified in specifications).

รูปที่ 4: ด้านหลัง view of the boombox, highlighting the power input and the battery compartment for portable operation.
6. คู่มือการใช้งาน
การดำเนินงานทั่วไป
- เปิด/ปิดเครื่อง: Use the power switch to turn the unit on or off.
- การควบคุมระดับเสียง: Adjust the 'VOLUME' knob on the top panel to increase or decrease the sound level.
- การควบคุมเสียง: Use the 'BASS' and 'TREBLE' knobs to customize the audio output to your preference.
- ไฟ LED: The multi-colored LED lights around the speakers dance in sync with the music. Refer to the Quickstart Guide for specific controls to change light modes or turn them off.
Radio Functionality
- Switch the 'FUNCTION' selector to 'RADIO'.
- Select 'AM' or 'FM' using the 'BAND' switch.
- ยืดเสาอากาศแบบยืดหดได้เพื่อการรับสัญญาณวิทยุ FM ที่ดีที่สุด สำหรับวิทยุ AM ให้หมุนตัวเครื่องเพื่อการรับสัญญาณที่ดีที่สุด
- Use the 'TUNING' knob to scan for stations.
Cassette Player/Recorder
- การเล่นซ้ำ: Press the 'STOP/EJ' button to open the cassette door. Insert a cassette tape and close the door. Press 'PLAY' to begin playback.
- การบันทึก: To record from the radio, built-in microphone, or an external source (via Aux input), ensure a blank cassette is inserted. Select the desired source using the 'FUNCTION' switch. Press the 'REC' button (often simultaneously with 'PLAY') to start recording.
- กรอไปข้างหน้า / ย้อนกลับ: Use the 'F.FWD' and 'REW' buttons for tape navigation.
การเชื่อมต่อบลูทูธ
- Switch the 'FUNCTION' selector to 'BLUETOOTH/USB/SD'. The unit will enter pairing mode.
- On your Bluetooth-enabled device, search for 'Retro Glow Boombox' and select it to pair.
- Once paired, you can stream audio wirelessly to the boombox.
การเล่นไฟล์ผ่าน USB และการ์ด SD
- Insert a USB drive or SD card into the respective slot on the side panel.
- Switch the 'FUNCTION' selector to 'BLUETOOTH/USB/SD'. The unit should automatically detect and begin playing audio fileจากสื่อที่แทรกเข้าไป
- Use the playback control buttons (play/pause, skip forward/backward) on the side panel to manage your audio.
อินพุตเสริม
- Connect an external audio device (e.g., smartphone, MP3 player) to the 'AUX' input using a 3.5mm audio cable (not included).
- Switch the 'FUNCTION' selector to 'AUX'. Audio from your external device will play through the boombox speakers.
7. การบำรุงรักษา
- การทำความสะอาด: ใช้ผ้านุ่มและแห้งเช็ดทำความสะอาดภายนอกตัวเครื่อง ห้ามใช้น้ำยาทำความสะอาดที่มีฤทธิ์กัดกร่อนหรือตัวทำละลาย
- การดูแลรักษาเทปคาสเซ็ต: ทำความสะอาดหัวเทปและลูกกลิ้งหนีบเทปเป็นประจำด้วยสำลีชุบน้ำยาหมาดๆampเคลือบด้วยไอโซโพรพิลแอลกอฮอล์เพื่อให้ได้คุณภาพเสียงที่ดีที่สุดและป้องกันเทปเสียหาย
- พื้นที่จัดเก็บ: When not in use, store the boombox in a cool, dry place away from direct sunlight and extreme temperatures.
8 การแก้ไขปัญหา
ไม่มีไฟฟ้า
- ตรวจสอบให้แน่ใจว่าสายไฟเชื่อมต่อกับตัวเครื่องและเต้ารับไฟฟ้าที่ใช้งานได้แน่นหนาดีแล้ว
- หากใช้แบตเตอรี่ โปรดตรวจสอบว่าใส่แบตเตอรี่ถูกต้องและแบตเตอรี่ไม่หมด
ไม่มีเสียง
- Check the volume level on the boombox and the connected audio source (if applicable).
- Ensure the correct function mode (Radio, Tape, Bluetooth, USB/SD, Aux) is selected.
- For cassette playback, verify the tape is inserted correctly and the heads are clean.
ปัญหาการจับคู่บลูทูธ
- Make sure the boombox is in Bluetooth pairing mode.
- Ensure your Bluetooth device is within range (typically 30 feet or 10 meters).
- ลองยกเลิกการจับคู่แล้วจับคู่อุปกรณ์ใหม่อีกครั้ง
9. ข้อมูลจำเพาะ
| ขนาดสินค้า | 9.25 x 16.25 x 5.25 นิ้ว |
| น้ำหนักสินค้า | 8.93 ปอนด์ |
| เทคโนโลยีการเชื่อมต่อ | Bluetooth 5.3, USB, SD Card, Aux Input |
| ประเภทลำโพง | Stereo, Full-Range |
| แหล่งพลังงาน | AC Power Cable, Rechargeable Battery (approx. 10-hour life) |
| คุณสมบัติพิเศษ | AM/FM Radio, Cassette Player/Recorder, Multi-colored LED Lights, Retro VU Meters, Separate Bass and Treble Controls |
10. การรับประกันและการสนับสนุน
For warranty information or technical support, please refer to the Quickstart Guide included with your product or visit the official ION Audio webโปรดเก็บใบเสร็จรับเงินไว้ เนื่องจากอาจจำเป็นต้องใช้เป็นหลักฐานการซื้อสำหรับการเรียกร้องการรับประกัน


