1. บทนำ
This manual provides detailed instructions for the safe and efficient operation of your Jaguar SJ-23 Super Jeans sewing machine. Please read it thoroughly before initial use and keep it for future reference. Understanding the functions and proper handling will ensure optimal performance and longevity of your machine.
2. ข้อมูลด้านความปลอดภัยที่สำคัญ
To reduce the risk of electric shock, burns, fire, or injury to persons, always follow these basic safety precautions:
- ควรดึงปลั๊กเครื่องออกจากเต้ารับไฟฟ้าทันทีหลังใช้งาน และก่อนทำความสะอาด ถอดฝาครอบ หรือทำการซ่อมบำรุงใดๆ
- ห้ามปล่อยให้เด็กเล่นกับเครื่องนี้ ต้องมีการดูแลอย่างใกล้ชิดเมื่อเด็กใช้งานเครื่องหรืออยู่ใกล้เครื่อง
- โปรดใช้เครื่องใช้ไฟฟ้านี้เฉพาะตามวัตถุประสงค์ที่ระบุไว้ในคู่มือนี้เท่านั้น และใช้อุปกรณ์เสริมที่ผู้ผลิตแนะนำเท่านั้น
- ห้ามใช้งานเครื่องนี้หากสายไฟหรือปลั๊กชำรุด หรือไม่ทำงานอย่างถูกต้อง ทำตกหรือชำรุด หรือตกน้ำ
- วางนิ้วให้ห่างจากชิ้นส่วนที่เคลื่อนไหวทั้งหมด ต้องใช้ความระมัดระวังเป็นพิเศษรอบ ๆ เข็มจักรเย็บผ้า
- Always use the correct needle plate. The wrong plate can cause the needle to break.
- Do not pull on the power cord to disconnect. Grasp the plug, not the cord.
- ห้ามทำตกหรือเสียบวัตถุใดๆ ลงในช่องเปิดใดๆ
- ห้ามใช้กลางแจ้ง
3. เนื้อหาบรรจุภัณฑ์
Your Jaguar SJ-23 Super Jeans sewing machine package includes the following items:

This image displays the Jaguar SJ-23 Super Jeans sewing machine along with its standard accessories, including the foot pedal, power cord, instruction manual, various presser feet, bobbins, needles, and other tools.
- Jaguar SJ-23 Super Jeans Sewing Machine
- แป้นเหยียบ
- สายไฟ
- คู่มือการใช้งาน
- ตีนเย็บผ้ามาตรฐาน
- ขาซิป
- ตีนผีรังดุม
- ชุดเข็ม
- ลูกกระสวย
- Seam Ripper/Brush
- ไขควง
4. สินค้าหมดview
Familiarize yourself with the various parts and controls of your sewing machine before operation.
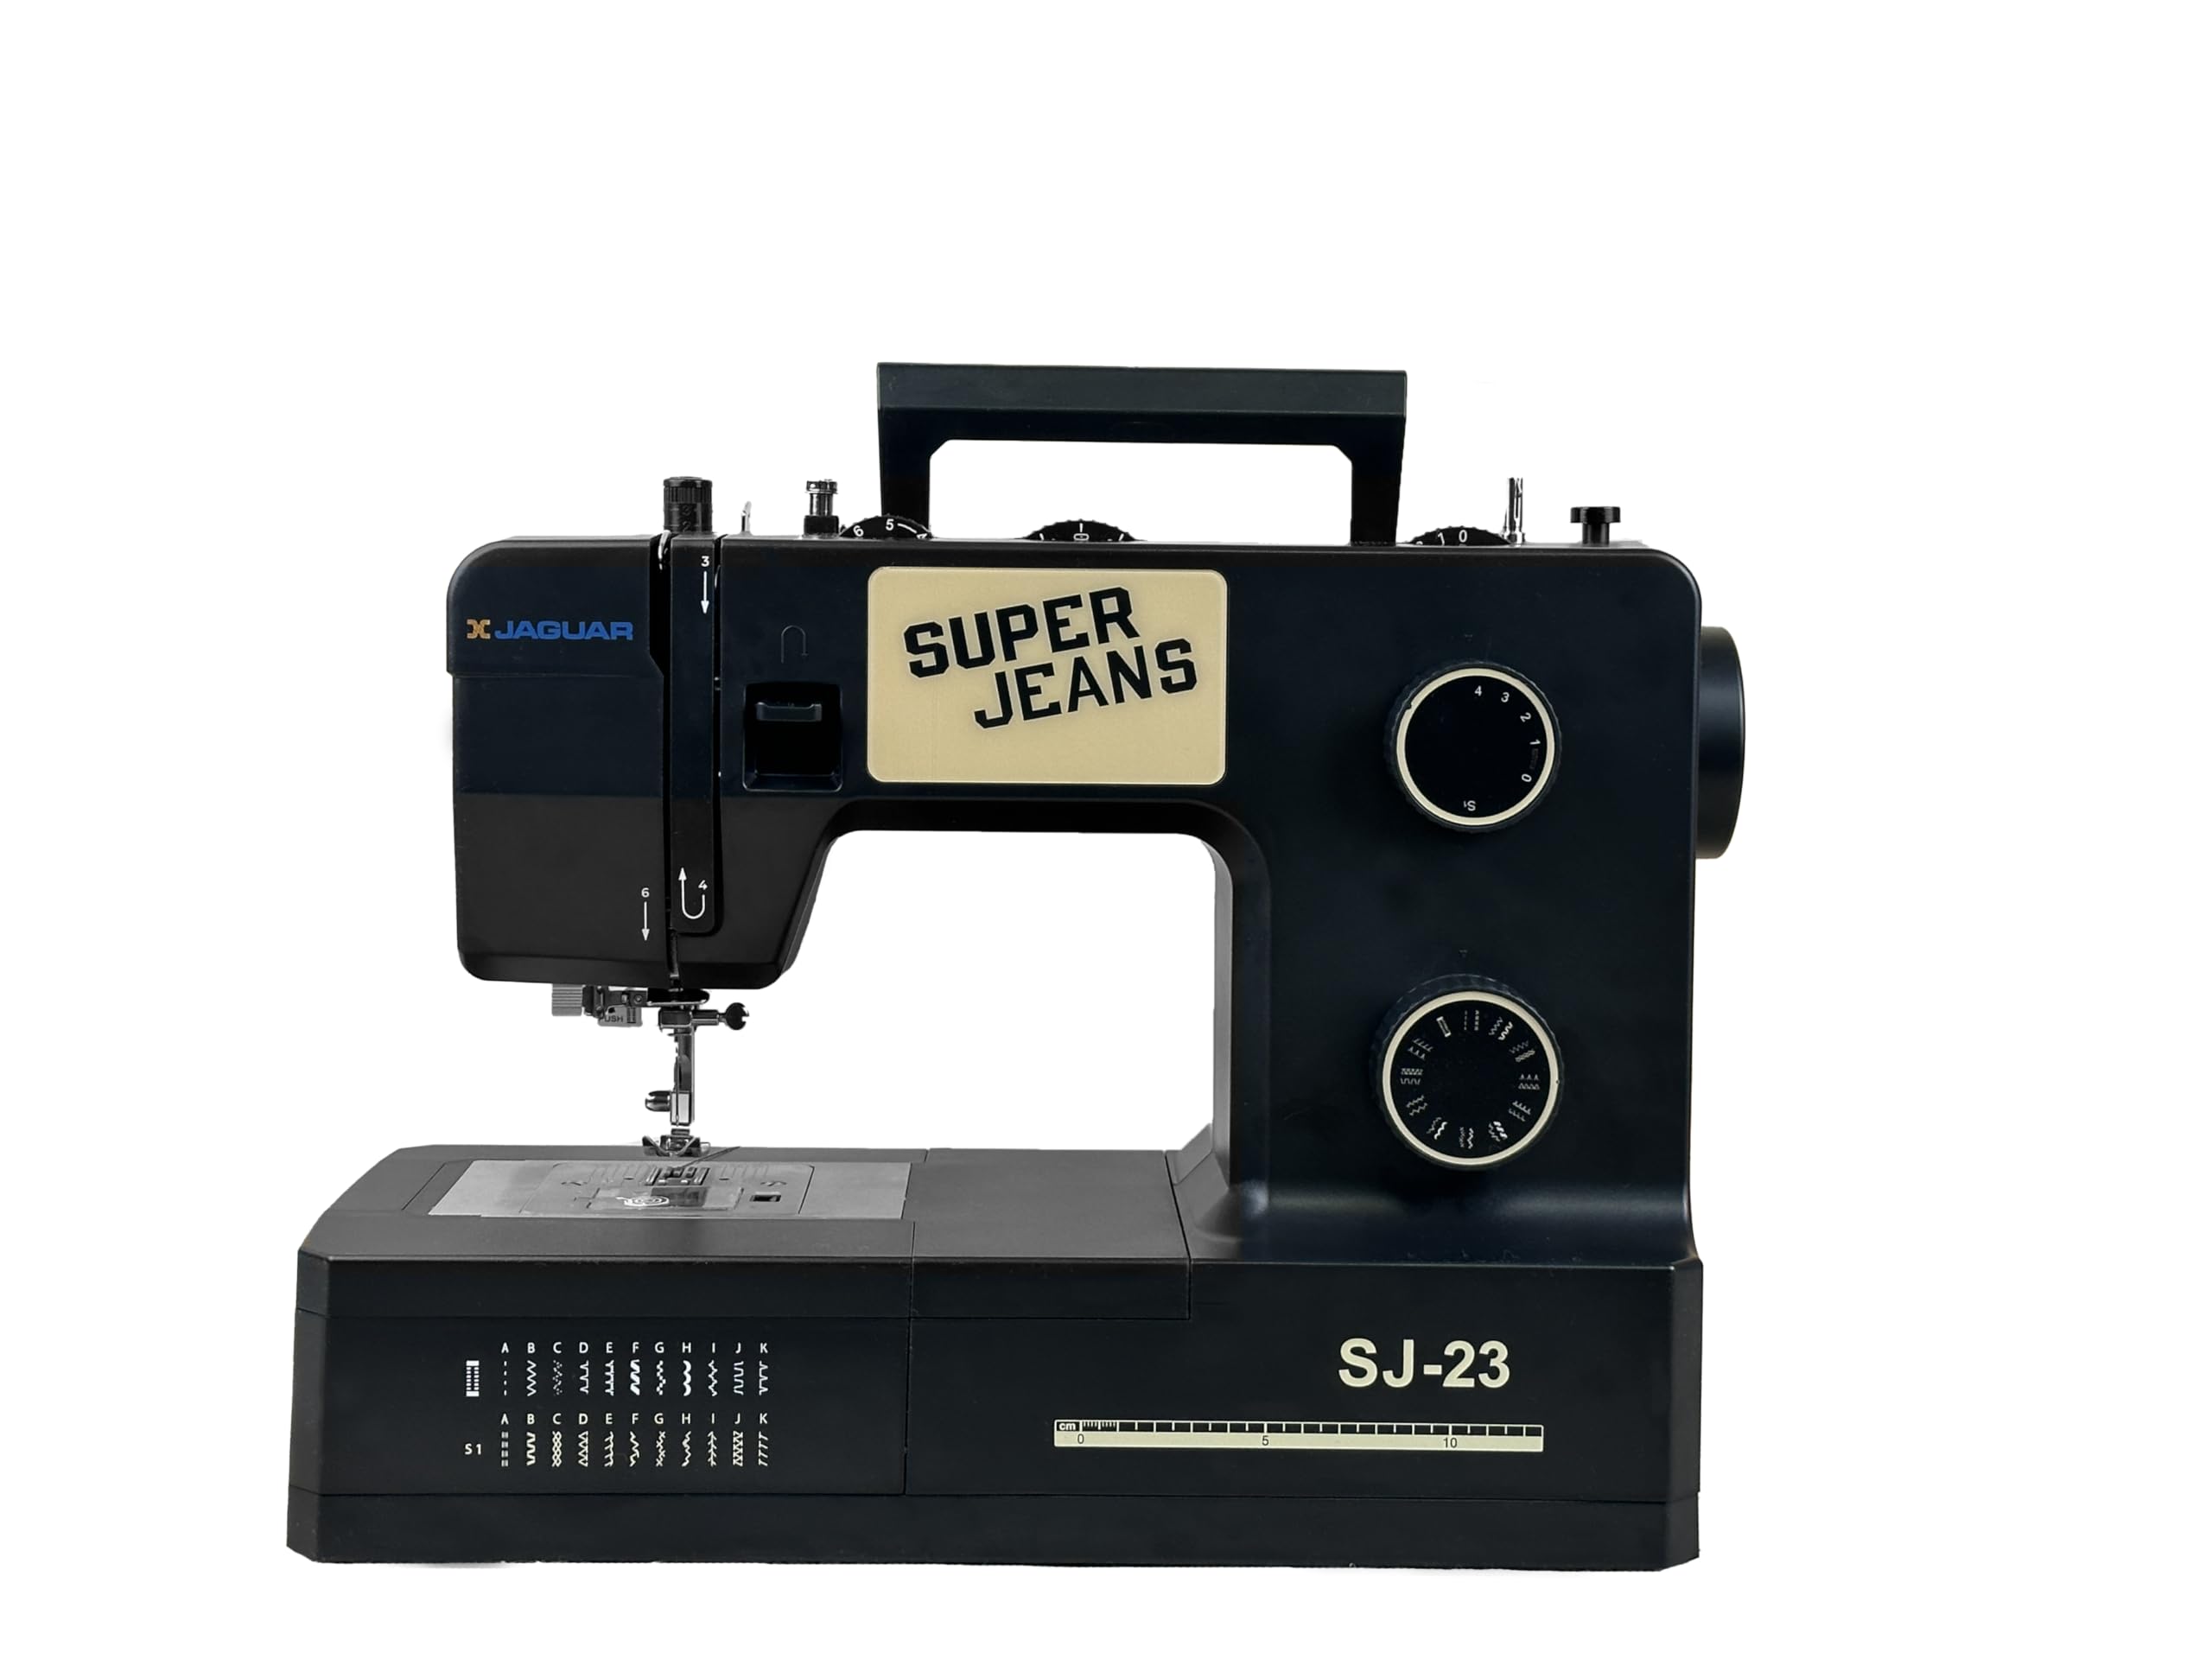
ภาพนี้แสดงด้านหน้า view of the Jaguar SJ-23 Super Jeans sewing machine, highlighting the main body, needle area, stitch selection dial, tension dial, and handwheel.
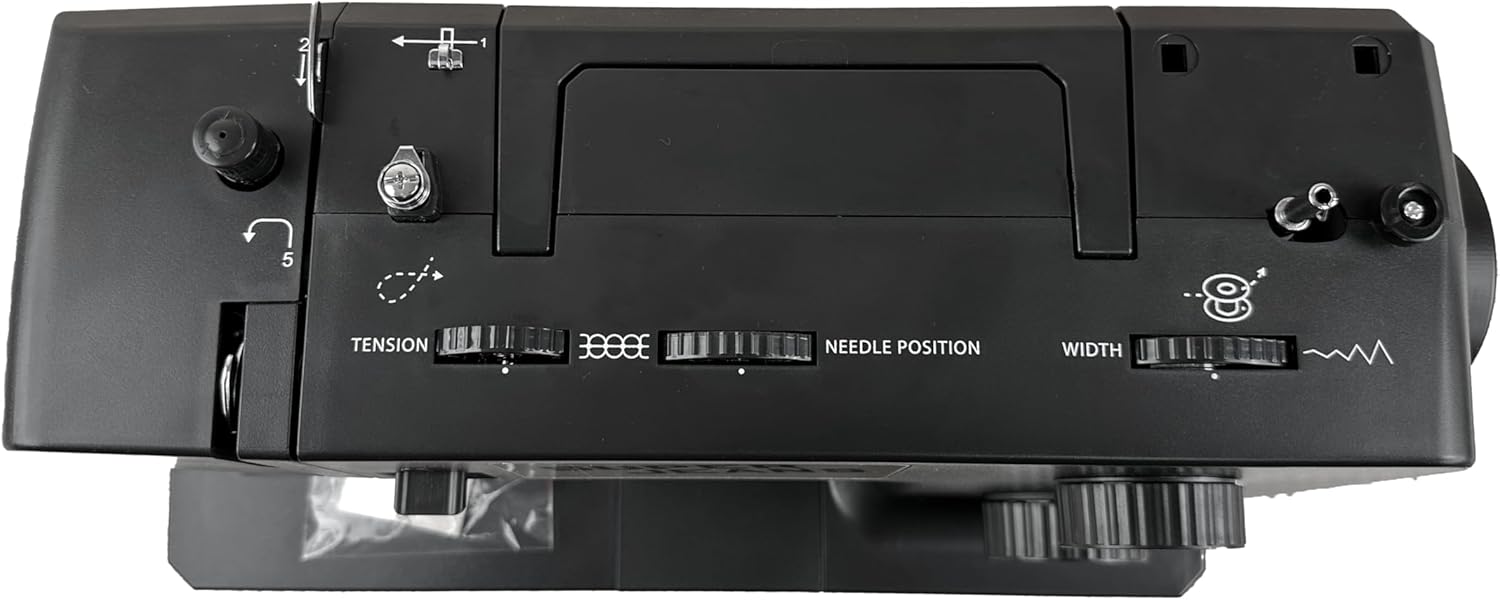
ภาพนี้แสดงมุมมองจากบนลงล่าง view of the machine's control panel, showing the tension dial, needle position selector, stitch width selector, and stitch pattern guide.
ส่วนประกอบหลัก:
- แกนหมุน: ใช้สำหรับยึดม้วนด้าย
- คู่มือการเลือกเกลียว: Guides the upper thread during threading.
- หน้าปัดปรับความตึง: ปรับความตึงของด้ายด้านบน
- แป้นหมุนเลือกตะเข็บ: Used to choose desired stitch patterns.
- วงล้อ: ยกและลดเข็มด้วยมือ
- คันโยกถอยหลัง: Engages reverse stitching for reinforcement.
- Foot Pedal Connector: ช่องสำหรับเชื่อมต่อแป้นเหยียบ
- สวิตช์ไฟ: เปิด/ปิดเครื่อง
- เข็ม: เจาะผ้าเพื่อสร้างตะเข็บ
- ตีนผีเย็บผ้า: ช่วยยึดผ้าให้แนบสนิทกับฟันเฟืองของจักรเย็บผ้า
- ฝาครอบกระสวย: Protects the bobbin area.
- Stitch Pattern Guide: Displays available stitch patterns and their corresponding settings.
5. การตั้งค่า
5.1 การจัดวาง
Place the sewing machine on a stable, flat surface. Ensure there is adequate lighting for your work area.
5.2 การเชื่อมต่อสายไฟ
Connect the foot pedal cord to the machine's foot pedal connector. Then, connect the power cord to the machine's power input and plug it into a suitable electrical outlet. Ensure the power switch is in the 'OFF' position before connecting.

This image displays the right side of the sewing machine, indicating the location of the power input and foot pedal connection ports.
6. คู่มือการใช้งาน
6.1 การพันด้ายเข้ากระสวย
- วางหลอดด้ายเปล่าลงบนแกนม้วนหลอดด้าย
- วางหลอดด้ายไว้บนแกนยึดหลอดด้าย
- นำเส้นด้ายผ่านแผ่นปรับความตึงของด้ายในกระสวย
- พันด้ายรอบกระสวยสองสามรอบ แล้วดันแกนหมุนกระสวยไปทางขวา
- Press the foot pedal gently to start winding. Stop when the bobbin is full.
- ตัดด้ายและดันแกนม้วนด้ายกลับไปทางซ้าย
6.2 การร้อยเกลียวด้านบน
- Raise the presser foot and needle to their highest positions using the handwheel.
- วางหลอดด้ายไว้บนแกนยึดหลอดด้าย
- สอดด้ายผ่านตัวนำด้ายด้านบน
- Bring the thread down through the right channel, up through the left channel, and through the take-up lever.
- นำด้ายลงผ่านตัวนำด้ายของก้านเข็ม
- Thread the needle from front to back. Pull about 15 cm (6 inches) of thread through the needle eye.
6.3 การใส่กระสวย
- เปิดฝาครอบกระสวย
- Insert the bobbin into the bobbin case, ensuring the thread unwinds in the correct direction (usually counter-clockwise).
- นำด้ายจากกระสวยผ่านสปริงปรับความตึงและเข้าไปในช่องนำด้าย
- ปิดฝาครอบกระสวย
- Hold the upper thread lightly, turn the handwheel towards you to lower and raise the needle, catching the bobbin thread. Pull both threads under the presser foot and towards the back.
6.4 Selecting a Stitch
Use the stitch selector dial on the front of the machine to choose one of the 23 available stitch patterns. Refer to the stitch pattern guide printed on the machine's front panel for visual reference and recommended settings.

This image shows a close-up of the stitch pattern guide located on the front of the machine, illustrating the various stitch options available.
6.5 การปรับความยาวและความกว้างของตะเข็บ
The Jaguar SJ-23 features adjustable stitch length and width. Use the dedicated dials, typically located on the top or front panel, to fine-tune these settings according to your fabric and desired stitch appearance.
6.6 การเย็บผ้า
- วางผ้าไว้ใต้ตีนผี
- ลดคันโยกตีนผี
- หมุนวงล้อด้วยมือเพื่อลดเข็มลงไปในเนื้อผ้า
- Gently press the foot pedal to begin sewing. Control your speed with the pedal.
- Guide the fabric gently; do not pull or push it forcefully.
6.7 การเย็บย้อนกลับ
To reinforce stitches at the beginning or end of a seam, press and hold the reverse lever while sewing. Release the lever to resume forward stitching.
6.8 การเปลี่ยนเข็ม
- ปิดเครื่องและถอดปลั๊กออก
- คลายเข็ม clamp สกรู
- ถอดเข็มเก่าออก
- Insert a new needle with the flat side facing the back, pushing it up as far as it will go.
- ขันเข็มให้แน่นamp ขันสกรูให้แน่น
6.9 Changing the Presser Foot
- ปิดเครื่องและถอดปลั๊กออก
- ยกเข็มและตีนผีขึ้น
- Press the release button or lever at the back of the presser foot holder to detach the current foot.
- Align the new presser foot with the holder and lower the presser foot lever until it snaps into place.
7. การบำรุงรักษา
7.1 การทำความสะอาด
ควรทำความสะอาดเศษด้ายและฝุ่นละอองออกจากบริเวณกระสวย ฟันเฟือง และแผ่นปรับความตึงด้ายเป็นประจำ โดยใช้แปรงขนาดเล็ก ควรดึงปลั๊กเครื่องออกก่อนทำความสะอาดทุกครั้ง
7.2 การหล่อลื่น
The Jaguar SJ-23 Super Jeans sewing machine is designed for minimal user lubrication. If you notice unusual noises or stiffness, consult a qualified sewing machine technician for professional lubrication and servicing.
8 การแก้ไขปัญหา
โปรดดูตารางด้านล่างเพื่อดูปัญหาทั่วไปและวิธีแก้ไขที่เป็นไปได้
| ปัญหา | สาเหตุที่เป็นไปได้ | สารละลาย |
|---|---|---|
| ข้ามตะเข็บ | ขนาด/ประเภทเข็มไม่ถูกต้อง เข็มงอ ร้อยด้ายไม่ถูกต้อง | เปลี่ยนเข็มเป็นชนิด/ขนาดที่ถูกต้อง และร้อยด้ายเข้าเครื่องให้ถูกต้อง |
| ด้ายขาด (ด้านบน) | Incorrect upper thread tension, poor quality thread, burr on needle/thread path, improper threading. | Adjust tension, use quality thread, check thread path for obstructions, re-thread. |
| Thread Breakage (Lower) | Improperly wound bobbin, incorrect bobbin tension, lint in bobbin case. | Re-wind bobbin evenly, check bobbin tension, clean bobbin case. |
| เครื่องติดขัด | Thread tangled in bobbin area, fabric pulled forcefully, incorrect stitch setting. | Turn off machine, clear tangled thread, ensure proper fabric handling, check stitch settings. |
| เย็บไม่เท่ากัน | Incorrect tension settings, worn needle, inconsistent fabric feeding. | Adjust tension, replace needle, ensure even fabric feeding. |
9. ข้อมูลจำเพาะ
Detailed technical specifications for the Jaguar SJ-23 Super Jeans sewing machine:
| คุณสมบัติ | รายละเอียด |
|---|---|
| ยี่ห้อ | จาร์กัวร์ |
| หมายเลขรุ่น | SJ-23 |
| สี | สีดำ |
| ขนาดสินค้า (กว้าง x ยาว x สูง) | 38 x 27.5 x 16 ซม. |
| น้ำหนักสินค้า | 6.4 กิโลกรัม |
| แหล่งพลังงาน | สายไฟ |
| ไฟฟ้า | ใช่ |
| จำนวนฝีเย็บ | 23 |
10. การรับประกันและการสนับสนุน
For warranty details, technical assistance, or to inquire about replacement parts, please refer to the warranty card included with your product. You may also contact the retailer from whom you purchased the machine or the manufacturer's customer support directly. Please have your model number (SJ-23) and purchase date available when contacting support.


