1. บทนำ
This manual provides detailed instructions for the installation, operation, and maintenance of your MT-VIKI 17-inch 16-Port Rack KVM Switch. This device is designed to manage up to 16 computers or servers from a single console, integrating a 17-inch LCD monitor, keyboard, and touchpad into a compact 1U rack-mountable drawer.

Image 1.1: The MT-VIKI 17-inch 16-Port Rack KVM Switch console, featuring an integrated LCD, keyboard, and touchpad.
2. ข้อมูลด้านความปลอดภัย
Please read and follow these safety guidelines to ensure proper operation and prevent damage to the device or injury to yourself.
- ตรวจสอบให้แน่ใจว่าติดตั้งอุปกรณ์ในบริเวณที่มีการระบายอากาศที่ดีเพื่อป้องกันความร้อนสูงเกินไป
- Use only the provided power adapter. Using an incorrect adapter may cause damage.
- อย่าให้เครื่องสัมผัสกับน้ำ ความชื้น หรืออุณหภูมิที่สูงหรือต่ำเกินไป
- หลีกเลี่ยงการวางของหนักบนอุปกรณ์
- ตัดการเชื่อมต่อไฟฟ้าก่อนทำความสะอาดหรือดำเนินการบำรุงรักษาใดๆ
3. เนื้อหาบรรจุภัณฑ์
ตรวจสอบว่ามีรายการทั้งหมดอยู่ในแพ็คเกจของคุณ:
- 1x MT-VIKI 17-inch 16-Port Rack KVM Switch Console (Model: MT-1716UL)
- 16x VGA KVM Cables (various lengths)
- อะแดปเตอร์ไฟฟ้า 1x
- 1x คู่มือผู้ใช้

Image 3.1: The KVM console and the assortment of included VGA KVM cables.
4. สินค้าหมดview
The MT-VIKI 17-inch 16-Port Rack KVM Switch integrates essential components for server management into a single unit.
4.1 ส่วนประกอบแผงด้านหน้า
- 17-inch LCD Monitor: Displays video output from connected computers.
- แป้นพิมพ์: Standard 98-key layout for input.
- ทัชแพด: อุปกรณ์ชี้ตำแหน่งแบบรวมในตัว
- Panel Switch Buttons: For direct port selection.
- External USB Interface: สำหรับเชื่อมต่ออุปกรณ์ USB เพิ่มเติม
4.2 พอร์ตแผงด้านหลัง
- KVM Control Interface: Connects to the KVM module.
- USB Software Debug Port: For firmware updates or diagnostics.
- ปุ่มสวิตช์เปิดปิด: เพื่อเปิด/ปิดเครื่อง
- เอาต์พุต VGA: For connecting an external monitor (if supported).
- External USB Interface: Additional USB connectivity.
- กำลังไฟเข้า: For the DC12V power adapter.
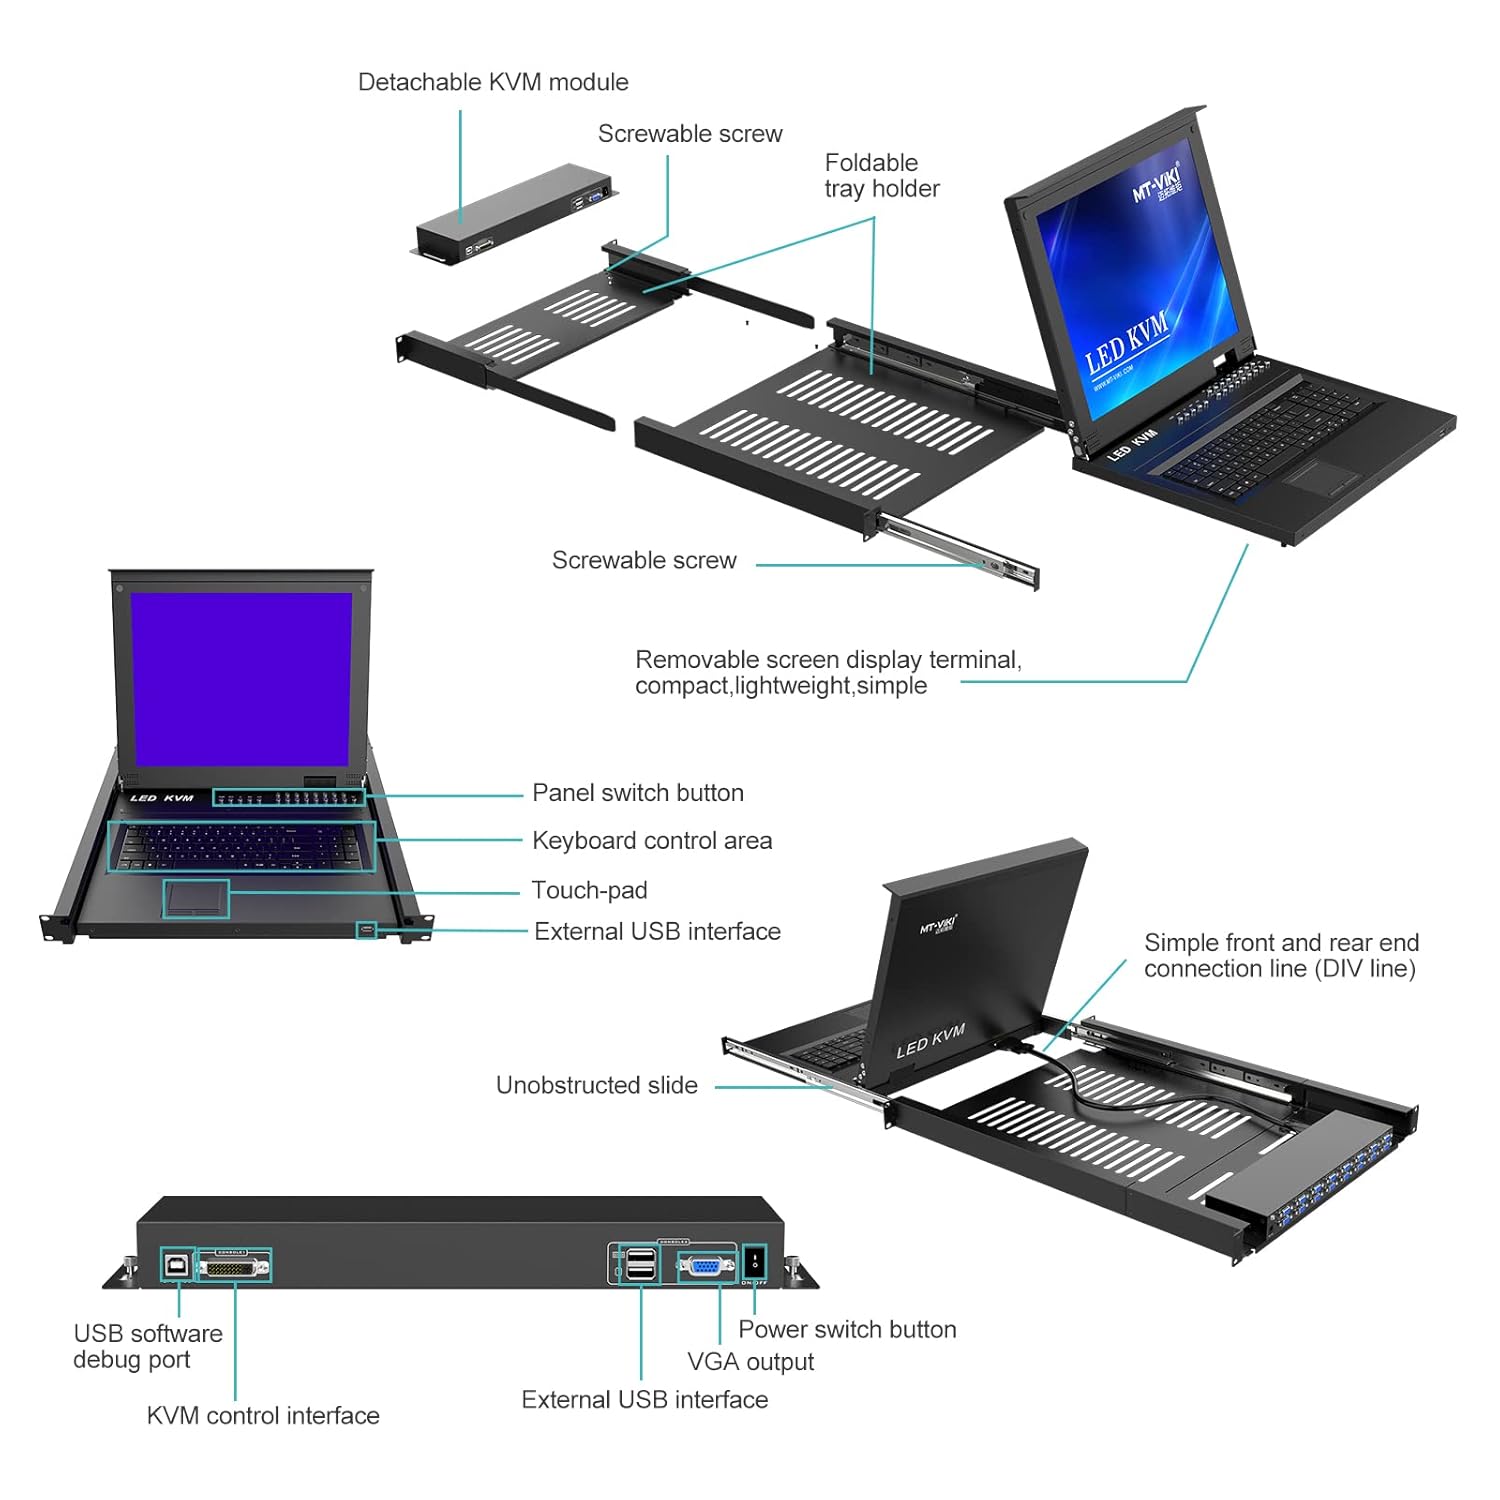
Image 4.1: Detailed diagram illustrating the detachable KVM module, screwable screws, foldable tray holder, panel switch button, keyboard control area, touchpad, external USB interface, unobstructed slide, simple front and rear end connection line, USB software debug port, KVM control interface, power switch button, VGA output, and external USB interface.

ภาพที่ 4.2: ด้านหลัง view of the KVM module, highlighting the USB software debug port, KVM control interface, power switch button, VGA output, and external USB interface.
5. การตั้งค่า
5.1 การติดตั้งแร็ค
The KVM switch is designed for installation in a standard 1U 19-inch rack. The cabinet installation depth should be between 23.6 inches (60cm) and 31.8 inches (81cm).
- Extend the mounting rails from the KVM console.
- Secure the console into the 19-inch rack using appropriate rack screws.
- Ensure the console slides smoothly in and out of the rack.

Image 5.1: The KVM console mounted in a 1U server rack, illustrating the mounting depth range of 23.6 to 31.8 inches and the convenient front USB port.

Image 5.2: The KVM console integrated into a server room setup, demonstrating its application in managing multiple servers.
5.2 Connecting Computers
Use the provided VGA KVM cables to connect your computers to the KVM switch.
- Connect the VGA connector of a KVM cable to the VGA output of your computer.
- Connect the USB connector of the same KVM cable to a USB port on your computer.
- Connect the other end of the KVM cable to an available KVM port on the rear of the KVM switch.
- Repeat for all computers you wish to connect.
5.3 การเปิดเครื่อง
- Connect the DC12V power adapter to the power input port on the KVM switch.
- เสียบอะแดปเตอร์แปลงไฟเข้ากับเต้ารับที่เหมาะสม
- Press the power switch button on the rear panel to turn on the KVM switch.
6. การใช้งานสวิตช์ KVM
The MT-VIKI KVM switch offers multiple methods for switching between connected computers.
6.1 วิธีการสลับใช้งาน
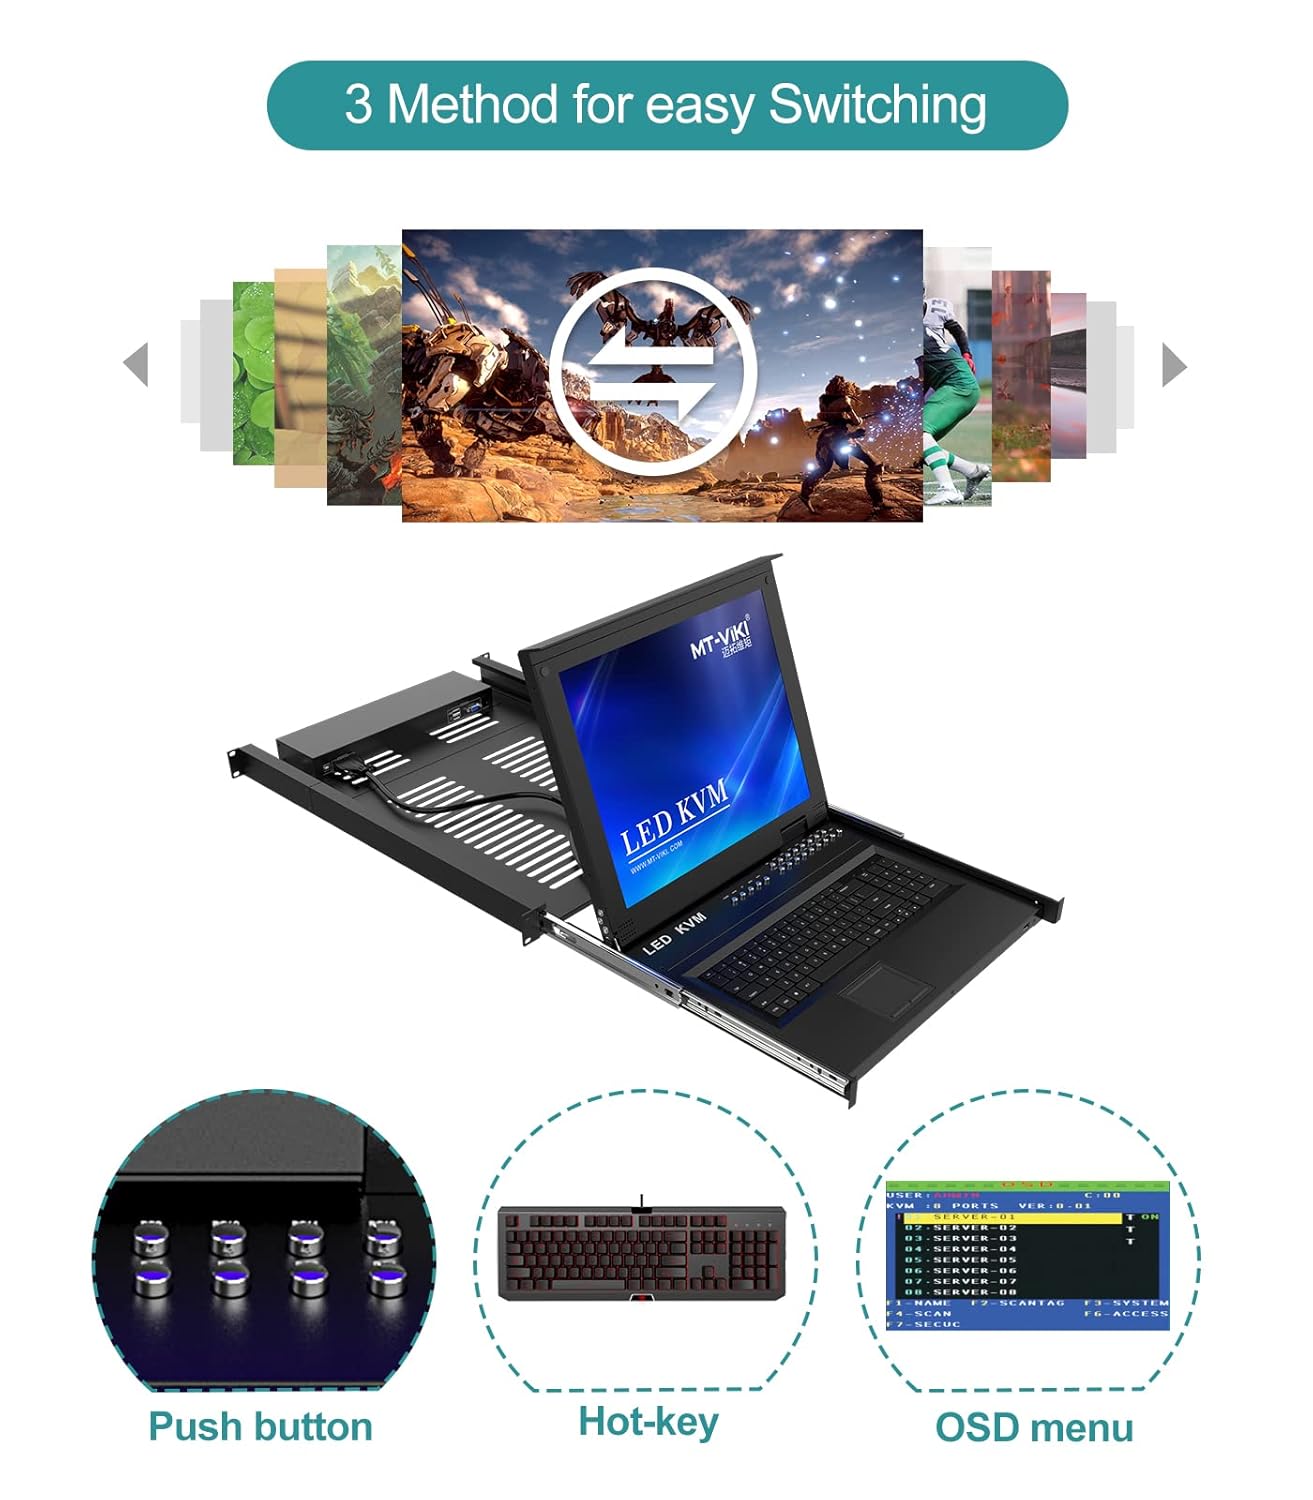
Image 6.1: Illustration of the three available methods for switching between connected computers: Push button, Hot-key commands, and the On-Screen Display (OSD) menu.
- ปุ่มกด: Use the physical buttons on the front panel of the KVM console to directly select a port.
- ปุ่มลัด: Utilize keyboard hotkey combinations to switch between ports. Refer to the OSD menu for specific hotkey sequences.
- เมนู OSD: Access the On-Screen Display menu to navigate and select ports, configure settings, and manage security.
6.2 การนำทางเมนู OSD
The OSD menu provides a graphical interface for managing the KVM switch. Typically, you can activate the OSD menu by pressing a specific hotkey combination (e.g., Scroll Lock + Scroll Lock, or Ctrl + Ctrl). Once activated, use the arrow keys and Enter key on the keyboard to navigate and make selections.
6.3 คุณสมบัติด้านความปลอดภัย
The KVM switch supports 2-level password security, allowing for administrator and user accounts. Up to 8 authorized users and an administrator can view and control the connected computers. Refer to the OSD menu for setting up and managing user accounts and passwords.
6.4 การเชื่อมต่อแบบลูกโซ่
This KVM switch supports daisy-chaining, allowing you to control up to 256 computers by connecting multiple KVM units. Consult the daisy-chaining diagram and instructions for proper setup.

Image 6.2: Diagram showing the daisy-chaining capability, allowing control of up to 256 computers by connecting multiple 16-port KVM switches.
7. การบำรุงรักษา
7.1 การทำความสะอาด
- Before cleaning, ensure the KVM switch is powered off and disconnected from the power source.
- ใช้ผ้าแห้งนุ่มเช็ดพื้นผิวภายนอก
- สำหรับการทำความสะอาดหน้าจอ LCD ให้ใช้น้ำยาทำความสะอาดหน้าจอโดยเฉพาะและผ้าไมโครไฟเบอร์ ห้ามฉีดของเหลวลงบนหน้าจอโดยตรง
- หลีกเลี่ยงการใช้น้ำยาทำความสะอาดหรือตัวทำละลายที่มีฤทธิ์กัดกร่อน
7.2 ข้อพิจารณาด้านสิ่งแวดล้อม
To ensure longevity and optimal performance, operate the KVM switch within the specified temperature and humidity ranges. Avoid dusty environments.
8 การแก้ไขปัญหา
หากคุณพบปัญหาเกี่ยวกับสวิตช์ KVM โปรดดูปัญหาและวิธีแก้ไขทั่วไปต่อไปนี้:
| ปัญหา | สาเหตุที่เป็นไปได้ | สารละลาย |
|---|---|---|
| ไม่มีการแสดงผลบนจอ LCD | Power cable disconnected; KVM cable loose; Computer not powered on; Incorrect port selected. | Check power connections; Ensure KVM cables are securely connected; Verify computer is on; Select correct port via button/hotkey/OSD. |
| คีย์บอร์ด/เมาส์ไม่ตอบสนอง | USB cable loose; KVM cable faulty; Driver issue on computer. | Check USB connections; Try a different KVM cable; Restart the computer; Ensure KVM switch is powered on. |
| Cannot switch between computers | Hotkey conflict; OSD menu frozen; KVM switch malfunction. | Check hotkey settings in OSD; Power cycle the KVM switch; Ensure all KVM cables are properly connected. |
| คุณภาพวิดีโอไม่ดี | KVM cable too long or low quality; Resolution mismatch. | Use shorter or higher quality KVM cables; Adjust computer's display resolution to 1280x1024. |
9. ข้อมูลจำเพาะ
| คุณสมบัติ | รายละเอียด |
|---|---|
| แบบอย่าง | MT-1716UL |
| ขนาดจอ LCD | 17 inches TFT LED |
| อัตราส่วนภาพ | 4:3 น. |
| ปณิธาน | ขนาด 1280x1024 |
| จอแสดงผลสี | 16.7 ล้าน |
| ความสว่าง | 300 ซีดี/ตรม. |
| อายุการใช้งานของจอ LCD | มากกว่า 50,000 ชั่วโมง |
| การใช้พลังงาน | แม็กซ์ 24W |
| แป้นพิมพ์ | 98 keys, internal PS/2 port, external USB port |
| Touchpad Lifespan | 1,000,000 ครั้ง |
| กำลังไฟเข้า | กระแสตรง12โวลต์ |
| วัสดุที่ใช้ทำตัวเรือน | อลูมิเนียม + โลหะ |
| ขนาดสินค้า (กว้าง×ลึก×สูง) | 600x400x45mm (23.6x15.7x1.78 inches) |
| ความลึกในการติดตั้งตู้ | 600-810 มม. (23.6-31.8 นิ้ว) |
| อุณหภูมิการทำงาน | -45°C ถึง 60°C |
| อุณหภูมิในการจัดเก็บ | -20°C ถึง 65°C |
| ประเภทวงจร | 16 ทาง |
10. การรับประกันและการสนับสนุน
For warranty information, technical support, or service inquiries, please contact MT-VIKI customer support or visit the official MT-VIKI webไซต์นี้ โปรดเก็บใบเสร็จรับเงินที่ซื้อไว้เพื่อใช้เรียกร้องการรับประกัน
Manufacturer: MT-VIKI


