สินค้าเกินview
The HOVERAir Beacon & Joystick Set is a lightweight motion controller designed to enhance your HOVERAir X1, X1 PRO, and X1 PROMAX drone experience. It features a real-time display, flexible control options, and advanced audio capabilities, making it ideal for cycling, travel, and outdoor filming.
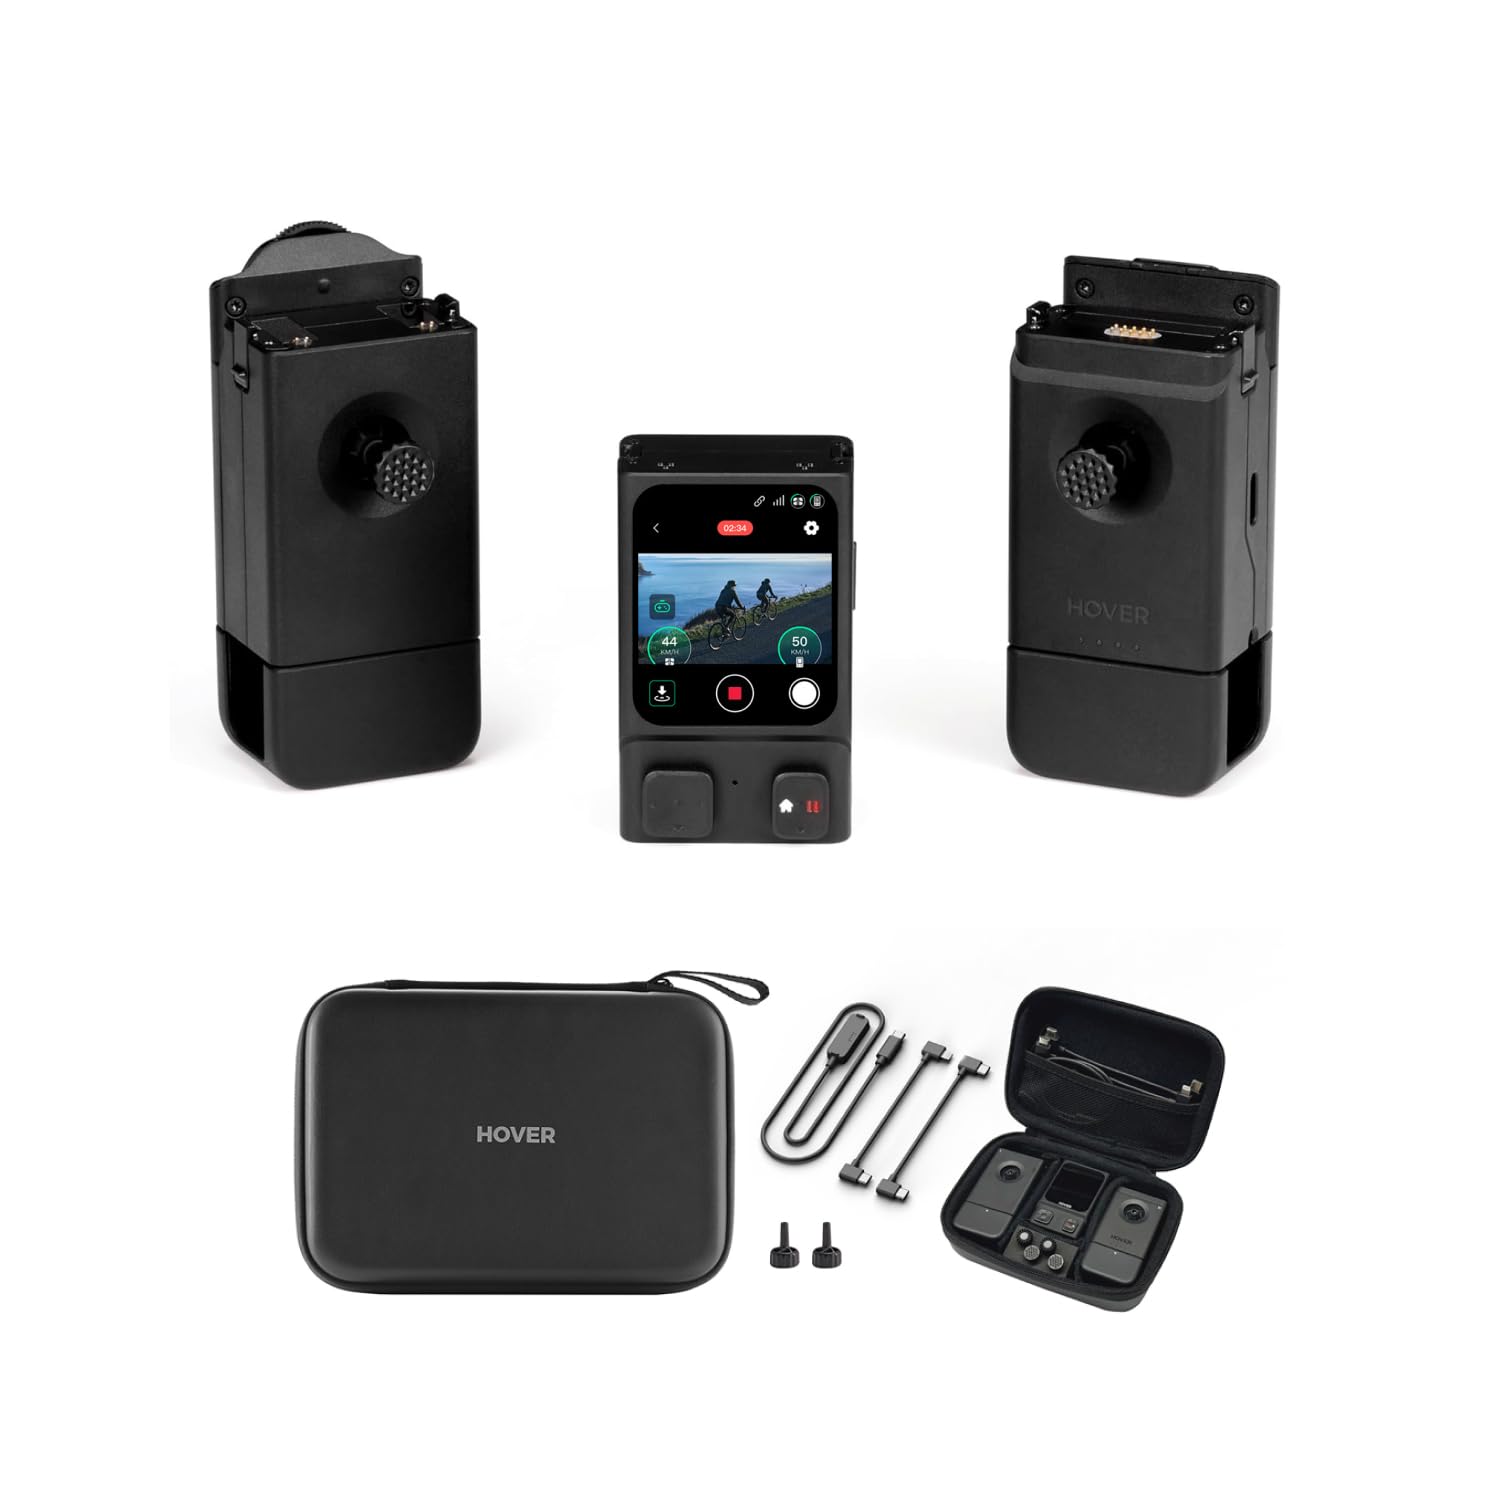
Image: The complete HOVERAir Beacon & Joystick Set, showcasing the Beacon unit, two detachable joysticks, a compact carrying case, and essential charging/connection cables.
มีอะไรอยู่ในกล่อง
- Beacon x1
- Beacon USB x1
- Left Joystick x1
- Right Joystick x1
- สายซีซี x1
- C-Lightning Cable x1
- Precision Control Knob x2
- Beacon Combo Case x1

Image: A clear layout of all components included in the HOVERAir Beacon & Joystick Set packaging, ready for setup.
คู่มือการติดตั้ง
ขั้นตอนที่ 1: อัปเดตเฟิร์มแวร์
Before first use, ensure your HOVERAir X1 | X1 PRO | PROMAX drone and the Beacon device have the latest firmware. Open the Hover X1 | X1 PRO | PROMAX App, connect your flying camera, and follow the on-screen prompts to download and install the latest firmware on both devices.

Image: Visual representation of the firmware update process within the HOVERAir application.
Step 2: Power On and Pair Devices
- Ensure your HOVERAir X1 | X1 PRO | PROMAX is powered on and in standby mode.
- Long-press the Beacon's Power button to switch it on.
- The Beacon will automatically search for the flying camera and pair. If automatic pairing fails, press and hold both the drone's Function (Fn) and Power buttons simultaneously for 3 seconds to initiate manual pairing.
- Once paired, the Beacon's display will show your X1 | X1 PRO | PROMAX's name; select it to complete the connection.

Image: Illustration of the HOVERAir Beacon and drone ready for the pairing process.
Step 3: One-handed / Two-handed Controller
For a richer one-handed motion controller or two-handed full-featured controller experience, install the Joysticks (A or B) onto the Beacon. Switch the mode to Manual Control, and enjoy responsive remote operation. The Tri-State Modular Design allows for flexible gameplay: clip the Beacon onto the right joystick for intuitive one-handed control, or attach it to the left joystick for comprehensive two-handed operation by connecting your smartphone.

Image: The HOVERAir Beacon integrated with joysticks and a smartphone, demonstrating the versatile control configurations.
คำแนะนำการใช้งาน
การตรวจสอบแบบเรียลไทม์
The Beacon features a 1.78-inch OLED display that allows you to monitor your footage in real-time, ensuring safe and informed riding or filming. Enjoy a transmission range of up to 1 kilometer with the Beacon, keeping you connected to your X1/X1 PRO/X1 PROMAX.

Image: The Beacon mounted on bicycle handlebars, showing its real-time monitoring capabilities during outdoor activity.
Customizing Shots
Adjust flight and camera parameters and select flight modes directly from your Beacon. This advanced controller includes high-precision joystick control, a scroll wheel, and a trigger button for gimbal adjustments and photo capture, all while supporting smartphone display for effortless operation.

Image: A user interacting with the Beacon's display to customize drone flight and camera settings.
Return to Home Function
With OmniTerrain enabled, the Beacon allows for instant Return To Beacon (RTB)*. Manual takeover is available at all times for flexibility and safety. The quick return function provides peace of mind for safe landings, allowing you to focus on your flight.
*RTB requires both HOVERAir device and Beacon to be in open areas with strong GNSS signal. Only available for PRO and PROMAX devices.

Image: A user initiating the Return to Home function on the Beacon, with the drone returning to its position.
การลดเสียงรบกวนขั้นสูง
Equipped with a built-in microphone for sound recording and advanced noise reduction, the Beacon ensures crystal-clear audio capture during your drone's flight.

Image: The Beacon worn by a user, highlighting its microphone and noise reduction features for clear audio recording.
ตัวเลือกการควบคุมที่ยืดหยุ่น
Experience seamless operation with the one-handed controller, featuring haptic feedback and extending Beacon's battery life by up to 60 minutes for longer, uninterrupted use. The modular design allows for both one-handed and two-handed control configurations.

Image: The Beacon unit securely attached to a joystick, illustrating the compact and ergonomic one-handed control setup.
ข้อมูลจำเพาะ
| คุณสมบัติ | รายละเอียด |
|---|---|
| หมายเลขรุ่น | ZZ-H-2-001-12 |
| น้ำหนักสินค้า | 1.34 ปอนด์ |
| ขนาดแพ็คเกจ | 8.43 x 4.96 x 2.64 นิ้ว |
| แสดง | จอ OLED ขนาด 1.78 นิ้ว |
| ช่วงการส่งผ่าน | Up to 1 km (with X1 PRO/PROMAX) |
| แบตเตอรี่ | แบตเตอรี่ CR1 5 ก้อน (รวมอยู่ด้วย) |
| ผู้ผลิต | บริษัท เซินเจิ้น ซีโร่ ซีโร่ อินฟินิตี้ เทคโนโลยี จำกัด |
| ยูพีซี | 198715320916 |

Image: The product label displaying key identification details such as model number, SKU, serial number, and UPC.
การซ่อมบำรุง
To ensure the longevity and optimal performance of your HOVERAir Beacon & Joystick Set, follow these maintenance guidelines:
- การทำความสะอาด: Use a soft, dry cloth to wipe down the Beacon and joysticks. Avoid using liquid cleaners or solvents, as they may damage the electronic components.
- พื้นที่จัดเก็บ: Store the device in its provided carrying case in a cool, dry place away from direct sunlight and extreme temperatures.
- การดูแลแบตเตอรี่ If storing for extended periods, ensure the battery is charged to approximately 50% to prevent over-discharge or over-charge, which can reduce battery life.
- พอร์ตเชื่อมต่อ: Keep all ports and connectors free of dust and debris.
การแก้ไขปัญหา
If you encounter issues with your HOVERAir Beacon & Joystick Set, consider the following common troubleshooting steps:
- อุปกรณ์ไม่ได้เปิดเครื่อง: Ensure the Beacon's battery is sufficiently charged. Connect it to a power source using the provided cable.
- ปัญหาการจับคู่: Confirm both the Beacon and your HOVERAir drone are powered on and within range. Attempt manual pairing as described in the Setup Guide (Step 2). Ensure firmware is up to date on both devices.
- No Real-time Display: Check the connection between the Beacon and the drone. Verify that the drone is transmitting video feed.
- การควบคุมไม่ตอบสนอง: Ensure joysticks are properly attached. Restart both the Beacon and the drone. Check for any physical obstructions or damage to the controls.
- Poor Transmission Range: Operate in open areas free from interference. Ensure the Beacon and drone have a clear line of sight.
การรับประกันและการสนับสนุน
For warranty information and detailed support, please refer to the official HOVERAir website or contact HOVERAir customer service directly. The manufacturer, Shenzhen Zero Zero Infinity Technology Co., Ltd., provides support for their products.
คุณยังสามารถเยี่ยมชม HOVERAir Store on Amazon สำหรับข้อมูลผลิตภัณฑ์และทรัพยากรเพิ่มเติม

Image: The HOVERAir Beacon & Joystick Set was recognized as a CES Innovation Awards 2025 Honoree.


