1. บทนำ
This manual provides detailed instructions for the installation, operation, and maintenance of your Sharkoon MK6 RGB Micro ATX PC Case. Please read this manual thoroughly before beginning assembly to ensure proper setup and optimal performance.
The Sharkoon MK6 RGB is a compact Micro ATX PC case designed with a modern glass aesthetic, featuring tempered glass panels on the front and side. It includes three pre-installed addressable RGB PWM fans for efficient cooling and customizable lighting. The case supports BTF motherboards and offers ample space for various components, including large graphics cards and extensive cooling solutions.
2. การตั้งค่าและการติดตั้งส่วนประกอบ
Before starting, ensure you have all necessary tools, including a screwdriver set and anti-static wrist strap.
2.1 การเปิดคดี
Carefully remove the tempered glass side panel by unscrewing the retaining thumbscrews, typically located at the rear of the case. Gently slide the panel off and set it aside on a soft, flat surface to prevent scratches.
2.2 การติดตั้งเมนบอร์ด
- Install the I/O shield into the designated opening at the rear of the case.
- Align your Micro ATX or BTF motherboard with the standoffs inside the case. Ensure all standoffs match the motherboard's mounting holes.
- ยึดเมนบอร์ดด้วยสกรูที่ให้มา อย่าขันแน่นเกินไป
2.3 การติดตั้งหน่วยจ่ายไฟ (PSU)
The MK6 RGB supports bottom-mount power supplies up to 23.5 cm in length.
- เลื่อนพาวเวอร์ซัพพลายเข้าไปในช่องที่กำหนดไว้ที่ด้านล่างด้านหลังของเคส
- Secure the PSU to the case using screws from the rear panel.
2.4 การติดตั้งไดรฟ์จัดเก็บข้อมูล
The case accommodates up to two 3.5" HDDs or three 2.5" SSDs.
- ฮาร์ดดิสก์ขนาด 3.5 นิ้ว: Locate the drive cage, typically near the PSU shroud. Mount the HDDs using the provided trays or screws.
- SSD ขนาด 2.5 นิ้ว: SSDs can be mounted on dedicated brackets behind the motherboard tray or within the drive cage.
2.5 การติดตั้งการ์ดจอ (GPU)
The MK6 RGB supports graphics cards up to 41 cm in length and includes a rubberized graphics card holder for support.
- ถอดฝาครอบสล็อต PCIe ที่จำเป็นออกจากด้านหลังของเคส
- ใส่การ์ดกราฟิกของคุณเข้าไปในสล็อต PCIe ที่เหมาะสมบนเมนบอร์ด
- Secure the graphics card with screws. Adjust the graphics card holder to provide additional support if needed.
2.6 การติดตั้งระบบระบายความร้อน
The case comes with three pre-installed 120mm addressable RGB PWM fans. Two fans are inverted on the side for intake, and one is at the rear for exhaust. The case supports up to eight fans in total.
- พัดลมเพิ่มเติม: Install additional 120mm or 140mm fans in available mounting positions (top, bottom, side) as required for optimal airflow.
- Liquid Cooling Radiators: The case supports a 360mm radiator and an additional 240mm radiator. Mount radiators to the designated areas (e.g., top, side) using appropriate screws.
2.7 การจัดการสายเคเบิล
ใช้ช่องเจาะและจุดยึดสายเคเบิลด้านหลังถาดเมนบอร์ดเพื่อจัดระเบียบสายเคเบิล ซึ่งจะช่วยเพิ่มการไหลเวียนของอากาศและทำให้ดูสวยงามยิ่งขึ้น

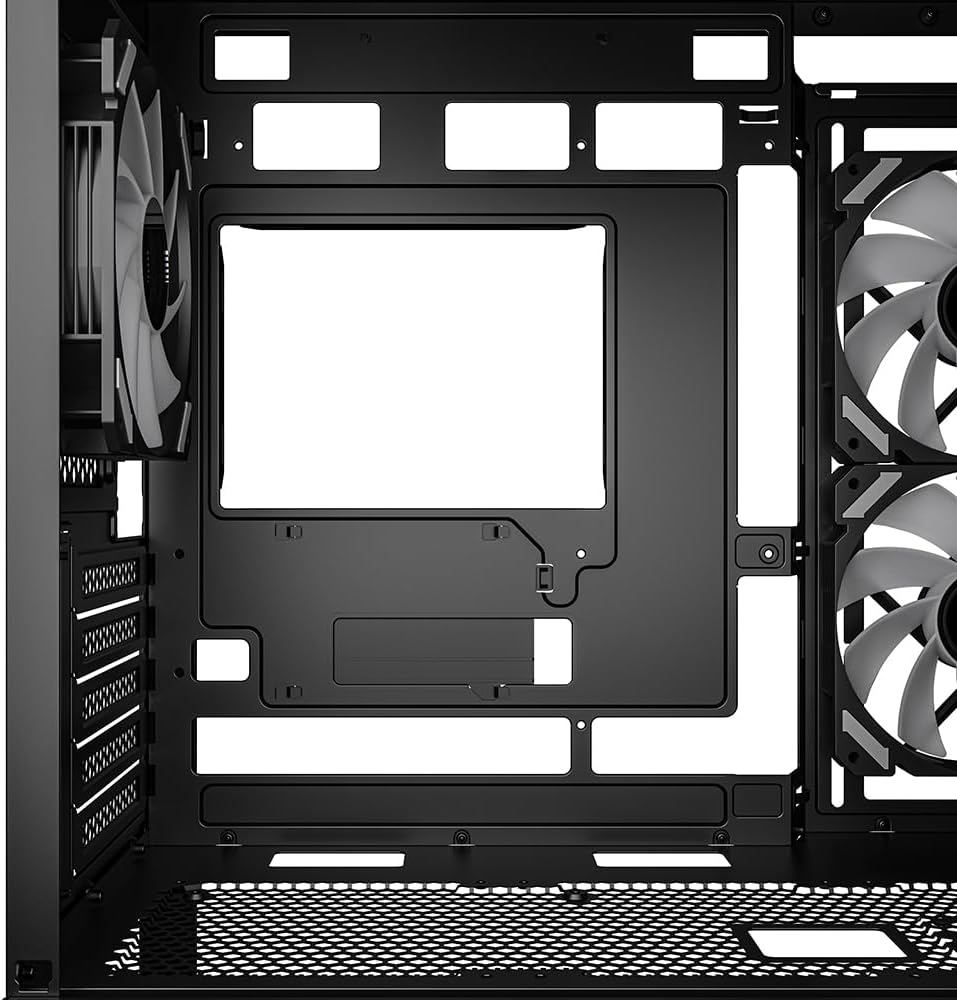
รูปที่ 1: ภายใน view of the Sharkoon MK6 RGB PC case, highlighting the pre-installed fans and drive bay locations.

รูปที่ 2: ภายใน view showing the motherboard tray and various cutouts for efficient cable management.

รูปที่ 3: ภายใน view illustrating the available mounting points for liquid cooling radiators.

รูปที่ 4: ภายใน view displaying the adjustable graphics card holder for enhanced GPU support.
3. คู่มือการใช้งาน
3.1 การเปิดเครื่อง
After all components are installed and cables are connected, close the side panel. Connect your monitor, keyboard, mouse, and power cable to the PC. Press the power button on the front panel to start your system.
3.2 การควบคุมแสง RGB
The MK6 RGB includes an RGB controller that provides connections for up to four LED elements and up to four PWM fans. The pre-installed fans are connected to this controller.
- Default Modes: The RGB lighting will typically cycle through default patterns upon startup.
- การควบคุมซอฟต์แวร์: If connected to a compatible motherboard, RGB lighting can be controlled via the motherboard's RGB synchronization software. Refer to your motherboard manual for specific instructions.
- ควบคุมด้วยมือ: Some cases may feature a dedicated button on the front panel to cycle through RGB modes. Consult the case's quick start guide for this feature.
3.3 การเชื่อมต่อแผงด้านหน้า
The front panel features modern TRRS and USB-C ports for broad compatibility with various devices. Connect your peripherals and storage devices as needed.

รูปที่ 5 : ด้านหน้า view of the Sharkoon MK6 RGB PC case, showcasing the tempered glass panel and visible RGB fans.
4. การบำรุงรักษา
การบำรุงรักษาตามปกติจะช่วยให้มั่นใจได้ถึงประสิทธิภาพสูงสุดและอายุการใช้งานที่ยาวนานของส่วนประกอบพีซีของคุณ
4.1 การทำความสะอาดตัวกรองฝุ่น
The case features dust filters to prevent dust accumulation. Regularly clean these filters to maintain good airflow.
- Locate and remove the dust filters (e.g., top, bottom, front).
- Clean the filters using compressed air or by rinsing them with water. Ensure they are completely dry before reinstallation.
4.2 การทำความสะอาดกระจกนิรภัย
Use a soft, lint-free cloth and a non-abrasive glass cleaner to clean the tempered glass panels. Avoid harsh chemicals that could damage the glass or coatings.
4.3 การทำความสะอาดพัดลม
Over time, dust can accumulate on fan blades, reducing cooling efficiency. Use compressed air to gently clean the fan blades. Ensure the system is powered off before cleaning.
รูปที่ 6: ด้านบน view of the Sharkoon MK6 RGB PC case, illustrating the removable magnetic dust filter for easy cleaning.
5 การแก้ไขปัญหา
หัวข้อนี้จะกล่าวถึงปัญหาทั่วไปที่คุณอาจพบเจอ
5.1 ระบบไม่เปิดเครื่อง
- การเชื่อมต่อสายไฟ: ตรวจสอบให้แน่ใจว่าได้เสียบปลั๊กไฟเข้ากับเต้ารับอย่างถูกต้อง และสวิตช์เปิดปิดบนปลั๊กไฟอยู่ในตำแหน่ง 'เปิด' แล้ว
- ขั้วต่อแผงด้านหน้า: Ensure the power button cable from the front panel is correctly connected to the motherboard's front panel header.
- ส่วนประกอบภายใน: Check that all major components (motherboard, CPU, GPU, RAM) are securely seated and connected to the PSU.
5.2 พัดลมไม่หมุนหรือไฟ RGB ไม่ติด
- การเชื่อมต่อพัดลม: Confirm that all fan power cables are securely connected to the motherboard or the RGB controller.
- RGB Controller Power: Ensure the RGB controller itself is receiving power, typically via a SATA power connector from the PSU.
- Software/Button: If using software control, check the software settings. If there's a physical RGB button, try cycling through modes.
5.3 การระบายอากาศไม่ดีหรือความร้อนสูงเกินไป
- ตัวกรองฝุ่น: ทำความสะอาดแผ่นกรองฝุ่นที่อุดตัน
- การวางแนวพัดลม: Ensure fans are oriented correctly for optimal airflow (intake at front/side, exhaust at rear/top).
- การจัดการสายเคเบิล: Improve cable management to reduce obstructions to airflow.
6. ข้อมูลจำเพาะ
| คุณสมบัติ | รายละเอียด |
|---|---|
| ชื่อรุ่น | MK6 อาร์จีบี |
| ยี่ห้อ | ชาร์คูน |
| ประเภทเคส | มิดทาวเวอร์ |
| ความเข้ากันได้ของเมนบอร์ด | Micro ATX, BTF |
| วัสดุ | กระจกนิรภัย |
| สี | สีดำ |
| ขนาดสินค้า (กxยxส) | 17.13 x 8.86 x 17.52 นิ้ว (43.5 x 22.5 x 44.5 ซม.) |
| น้ำหนักสินค้า | 13.42 ปอนด์ (6.1 กก.) |
| ระยะห่างความสูงของชุดระบายความร้อน CPU | สูงถึง 17 ซม. |
| Graphics Card Length Clearance | สูงถึง 41 ซม. |
| ระยะห่างความยาว PSU | สูงถึง 23.5 ซม. |
| ช่องไดรฟ์ | ฮาร์ดดิสก์ 3.5 นิ้ว 2 ตัว หรือ SSD 2.5 นิ้ว 3 ตัว |
| พัดลมที่ติดตั้งล่วงหน้า | 3x 120mm Addressable RGB PWM Fans |
| รองรับพัดลมสูงสุด | พัดลมสูงสุด 8 ตัว |
| ฐานรองหม้อน้ำ | 1x 360มม., 1x 240มม. |
| พอร์ต I / O ด้านหน้า | TRRS, USB-C, USB 3.0 (1 port listed in specs) |
| วิธีการทำความเย็น | อากาศ |
| ประเภทการติดตั้งแหล่งจ่ายไฟ | การติดตั้งด้านล่าง |
7. ข้อมูลการรับประกัน
For detailed warranty information regarding your Sharkoon MK6 RGB PC Case, please refer to the official Sharkoon website or contact your local retailer. Warranty terms and conditions may vary by region and purchase location.
8. การสนับสนุนด้านเทคนิค
If you encounter any issues or require technical assistance beyond the scope of this manual, please visit the official Sharkoon support website for FAQs, driver downloads, and contact information. You may also reach out to your point of purchase for support.


