1. บทนำ
Thank you for choosing the Spider Farmer SF-PlantStand60. This 4-tier plant stand is designed to provide an optimal environment for indoor plant growth, seed starting, and cultivating microgreens. It features adjustable shelves, full-spectrum LED grow lights, and an optional tent cover to create a mini-greenhouse effect. This manual provides detailed instructions for assembly, operation, maintenance, and troubleshooting to ensure you get the most out of your product.
2. ข้อมูลด้านความปลอดภัย
- อ่านคำแนะนำทั้งหมดก่อนการประกอบและการใช้งาน
- เก็บส่วนประกอบไฟฟ้าให้ห่างจากน้ำ
- Ensure all connections are secure before plugging in the grow lights.
- Do not exceed the maximum weight capacity of 110 lbs per shelf.
- Place the stand on a level, stable surface.
- Unplug the grow lights before performing any maintenance or cleaning.
3. เนื้อหาบรรจุภัณฑ์
Verify that all components are present before beginning assembly. Refer to the image below for a visual guide of the included parts.

รูปที่ 3.1: ส่วนประกอบทั้งหมดที่รวมอยู่ในแพ็คเกจ
- Plant Stand Frame (Poles, Wire Mesh Shelves)
- 6 x LED Grow Light Bars
- 3 x Waterproof Mats
- Semi-transparent Grow Tent Cover
- 4 x Casters with Locks
- 4 x Leveling Adjustable Feet (optional use instead of casters)
- Plastic Ties / Metal Clips for light installation
- สายไฟยาว 150ซม.
- 60cm & 35cm Connecting Cables for lights
- หมวกกันน้ำ
4. การติดตั้งและการประกอบ
Assembly of the SF-PlantStand60 is designed to be straightforward and tool-free. Follow these steps for proper setup.
4.1 Assembling the Plant Stand Frame
- Attach Casters or Leveling Feet: Screw the 4 lockable swivel casters or the adjustable leveling feet into the bottom of the four vertical poles. Ensure they are securely tightened.
- Assemble Bottom Shelf: Slide the plastic clips onto the vertical poles at the desired height for the bottom shelf. Ensure the clips are at the same height on all four poles. Place a wire mesh shelf on top of these clips, pressing down firmly until it locks into place.
- Install LED Grow Lights (Optional during frame assembly): Before adding the next shelf, attach the LED grow light bars to the underside of the installed shelf using the provided plastic ties or metal clips. Connect them using the short connecting cables.
- ทำซ้ำสำหรับชั้นวางที่เหลือ: Continue adding plastic clips and wire mesh shelves for the remaining tiers, adjusting the height as needed. Install LED grow lights for each tier as you go.
- เชื่อมต่อพลังงาน: Once all lights are installed, connect the main power cable to the first light bar and plug it into a power outlet.
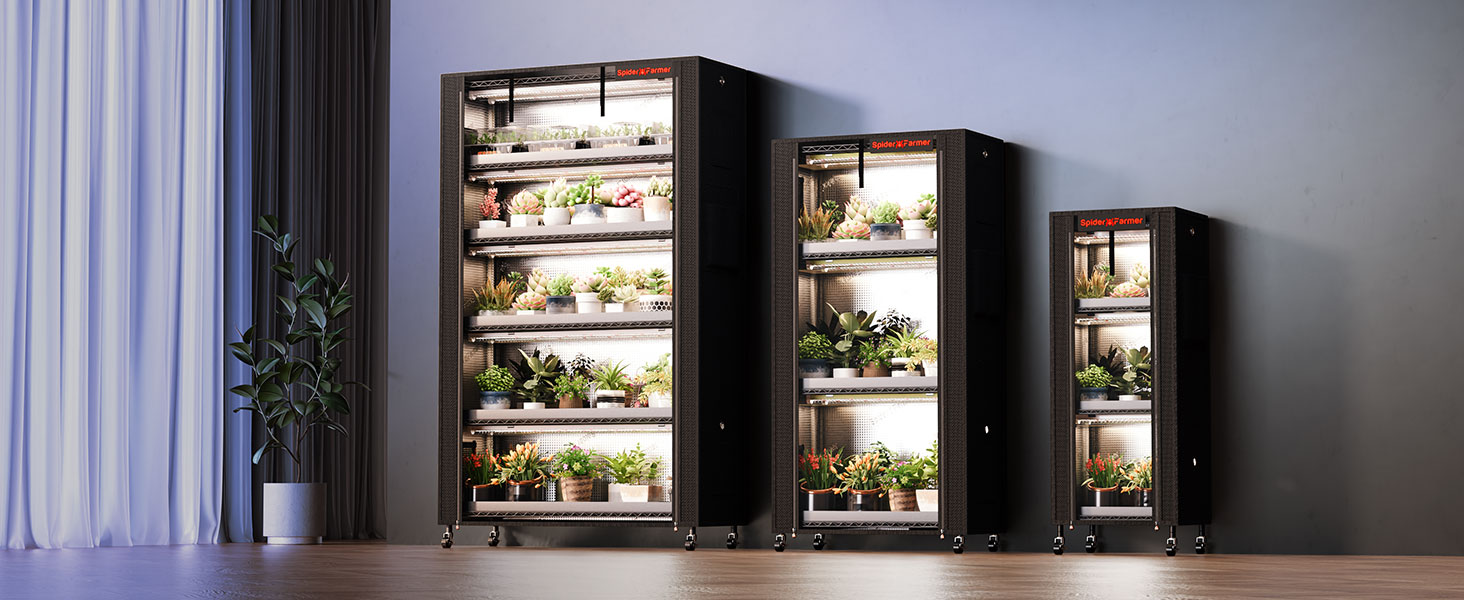
Figure 4.1: Easy assembly steps for the plant stand and lights.
4.2 Attaching the Tent Cover
The semi-transparent tent cover can be installed to create a mini-greenhouse environment.
- Drape Cover: Carefully drape the tent cover over the assembled plant stand, ensuring the front zipper opening aligns with the front of the stand.
- Secure with Velcro: Use the integrated Velcro straps to secure the tent cover to the stand's frame, ensuring a snug fit.
- ใช้ประโยชน์จากคุณสมบัติ: The tent includes a multi-zip closure for easy access, air vents for circulation, and wire holes for cable management.

Figure 4.2: Plant stand with tent cover and its features.
5. คู่มือการใช้งาน
5.1 Using the LED Grow Lights
The SF-PlantStand60 includes 6 full-spectrum 5000K LED grow lights, designed for various stages of plant growth. These lights are energy-efficient and have a lifespan of up to 50,000 hours.
- เปิด/ปิดเครื่อง: Plug the main power cable into a standard electrical outlet to turn on the lights. Unplug to turn off. Consider using an external timer for automated light cycles.
- สเปกตรัมแสง: The 5000K full-spectrum light is suitable for seed starting, vegetative growth, and general indoor plant cultivation.
- Light Intensity (PPFD): The light intensity decreases with distance from the light source. Adjust shelf height to achieve desired PPFD levels for your plants. Refer to the PPFD map for guidance.

Figure 5.1: PPFD values at various heights from LED grow lights.

Figure 5.2: SF-PlantStand60 PPFD Map.
5.2 Adjusting Shelf Height
The shelves are height-adjustable in 1-inch increments to accommodate plants of different sizes and optimize light exposure.
- Empty Shelf: For safety, remove plants and any heavy items from the shelf you wish to adjust.
- Release Clips: Lift the shelf slightly and remove the plastic clips from the vertical poles.
- Reposition Clips: Place the plastic clips at the desired new height on all four poles, ensuring they are level.
- Re-seat Shelf: Carefully lower the shelf onto the clips until it locks into place.
5.3 Using the Tent Cover
The tent cover provides a controlled environment for your plants.
- Observation Window: Use the transparent PVC window to monitor your plants without opening the tent, maintaining internal humidity and temperature.
- ช่องระบายอากาศ: Open the air vents as needed to provide ventilation and prevent excessive heat buildup, especially when lights are on.
- ความคล่องตัว: The lockable casters allow you to easily move the entire unit, even with the tent cover installed. Lock the casters to keep the stand stationary.
5.4 ระบบระบายน้ำ
Each tier includes a waterproof drainage mat with openable drainage holes to manage excess water and keep your growing area clean.
- การจัดวาง: Place the waterproof mats on each shelf before placing plants.
- การระบายน้ำ: If drainage is desired, ensure the drainage holes are open. For water retention, keep them closed.
- การทำความสะอาด: The PVC material of the mats is easy to clean and reusable.

Figure 5.3: Waterproof pad with drainage features.
6. การบำรุงรักษา
- Cleaning the Mats: Regularly remove and clean the waterproof mats with mild soap and water to prevent mold and bacterial growth. Ensure they are dry before placing them back.
- Cleaning the Tent Cover: Wipe down the interior and exterior of the tent cover with a damp cloth. Avoid harsh chemicals that could damage the reflective lining or fabric.
- การทำความสะอาดบูธ: เช็ดพื้นผิวโลหะด้วยโฆษณาamp cloth to remove dust and debris. Ensure the stand remains dry to prevent rust.
- Light Bar Maintenance: Gently wipe the LED light bars with a dry or slightly damp cloth to remove dust. Do not immerse in water.
- การบำรุงรักษาล้อ: ตรวจสอบล้อเลื่อนเป็นระยะว่ามีเศษสิ่งสกปรกหรือไม่ และตรวจสอบให้แน่ใจว่าหมุนได้อย่างราบรื่น หากจำเป็นให้หยอดน้ำมันหล่อลื่น
7 การแก้ไขปัญหา
- ไฟไม่เปิด:
- Check if the power cable is securely plugged into both the light bar and the wall outlet.
- Ensure all connecting cables between light bars are properly seated.
- ทดสอบเต้ารับด้วยอุปกรณ์อื่นเพื่อยืนยันว่ามีไฟอยู่
- ความไม่มั่นคงของขาตั้ง:
- Verify that all plastic clips are correctly installed and supporting the shelves evenly.
- Ensure casters or leveling feet are securely tightened.
- Distribute plant weight evenly across the shelves.
- Excessive Heat Inside Tent:
- Open the tent's air vents to improve ventilation.
- Consider using a small fan inside the tent to circulate air.
- ตรวจสอบให้แน่ใจว่าอุณหภูมิห้องโดยรอบไม่สูงเกินไป
- Water Leakage from Mats:
- Check if the drainage holes on the mats are properly closed if you intend to retain water.
- Ensure the mats are correctly seated on the shelves.
8. ข้อมูลจำเพาะ
| คุณสมบัติ | ข้อมูลจำเพาะ |
|---|---|
| หมายเลขรุ่น | SF-PlantStand60 |
| วัสดุ | High-strength Metal |
| สี | สีดำ |
| Product Dimensions (S-16x12x47in) | ลึก 12 นิ้ว x กว้าง 12 นิ้ว x สูง 47 นิ้ว (ลึก 30 ซม. x กว้าง 30 ซม. x สูง 120 ซม.) |
| จำนวนชั้นวาง | 4 |
| ความจุน้ำหนักของชั้นวาง | 110 ปอนด์ (ต่อชั้น) |
| ความจุน้ำหนักรวม | 440 ปอนด์ |
| ไฟ LED สำหรับปลูกพืช | 6 Pcs, 9W, Full Spectrum 5000K |
| อายุการใช้งานของ LED | นานถึง 50,000 ชั่วโมง |
| Tent Cover Material | 1680D Waterproof Oxford Fabric with Reflective Interior |
| ความคล่องตัว | 4 Lockable Swivel Wheels |
| จำเป็นต้องประกอบ | ใช่ (ไม่ต้องใช้เครื่องมือ) |
| น้ำหนักสินค้า | 21.1 ปอนด์ (9.6 กก.) |
9. การรับประกันและการสนับสนุน
Spider Farmer values customer experience and stands behind its products. The SF-PlantStand60 comes with a รับประกัน 1 ปี และก 30-day replacement policy.
If your product is damaged or experiences any issues, please contact our support team. We are committed to responding within 24 hours to assist you.
For support, please visit the official Spider Farmer webหรือติดต่อฝ่ายบริการลูกค้าโดยตรง


