สินค้าเกินview
This instruction manual provides detailed guidance for assembling your ROBOTIME DIY Miniature House Kit, specifically Cathy's Flower House, and the accompanying 3D Wooden Flower Model Kit. These kits offer an engaging and creative building experience, resulting in decorative miniature models.
The Cathy's Flower House kit allows you to construct a detailed miniature greenhouse scene, complete with furniture, plants, and an LED lighting system. The 3D Wooden Flower Model Kit enables you to assemble a beautiful wooden bouquet featuring various flowers and foliage.

Image: The complete ROBOTIME Cathy's Flower House miniature kit alongside the assembled wooden flower bouquet.
ข้อมูลด้านความปลอดภัย
Please read all safety instructions before beginning assembly. Keep this manual for future reference.
- คำเตือนชิ้นส่วนขนาดเล็ก: This kit contains small parts which may pose a choking hazard. Keep out of reach of small children and pets.
- ขอบที่คมชัด: Some wooden pieces may have sharp edges. Handle with care during assembly.
- Adhesive Use: If adhesive is included or required, use in a well-ventilated area. Avoid contact with skin and eyes. Follow the adhesive manufacturer's instructions.
- ส่วนประกอบไฟฟ้า: For kits with LED lights, ensure batteries are inserted correctly according to polarity markings. Do not mix old and new batteries, or different types of batteries.
- การดูแลผู้ใหญ่: ควรมีผู้ใหญ่คอยดูแลขณะก่อสร้างสำหรับเด็กๆ
คำแนะนำในการประกอบ
Before starting, unpack all components and verify against the parts list provided in your kit. Organize pieces by type or number to facilitate assembly.
Part 1: Cathy's Flower House Assembly
- เตรียมฐาน: Begin by assembling the base structure of the miniature house. Ensure all pieces fit securely.
- Construct Walls and Frame: Attach the wall panels and the main frame components. Pay attention to the orientation of each piece as indicated in the detailed diagrams.
- ติดตั้งองค์ประกอบภายใน: Assemble and place the miniature furniture, shelves, and decorative items within the house. Use adhesive where specified to secure these elements.
- Wiring the LED Lights: Carefully follow the wiring diagram to connect the LED lights. Ensure all connections are secure and test the lights before fully enclosing the structure.
- Add Exterior Details: Attach exterior decorations, plants, and the roof structure.

Image: The assembled Cathy's Flower House, showcasing its detailed interior and the integrated LED lighting system.

ภาพ: รายละเอียด view of the interior of Cathy's Flower House, highlighting miniature furniture, plants, and decorative elements.
Part 2: 3D Wooden Flower Model Kit Assembly
- Identify Flower Components: Separate the wooden pieces for each type of flower (e.g., sunflower, rose, lilac, camellia) and foliage (e.g., eucalyptus).
- Assemble Individual Flowers: Follow the diagrams to slot together the petals, centers, and stems for each flower. Some designs may require gentle bending or interlocking.
- Combine Foliage: Attach the eucalyptus leaves and other greenery to their respective stems or directly to the flower stems as indicated.
- Arrange the Bouquet: Once all individual flowers and foliage are assembled, arrange them into a bouquet. Use the provided wrapping materials or a vase for display.
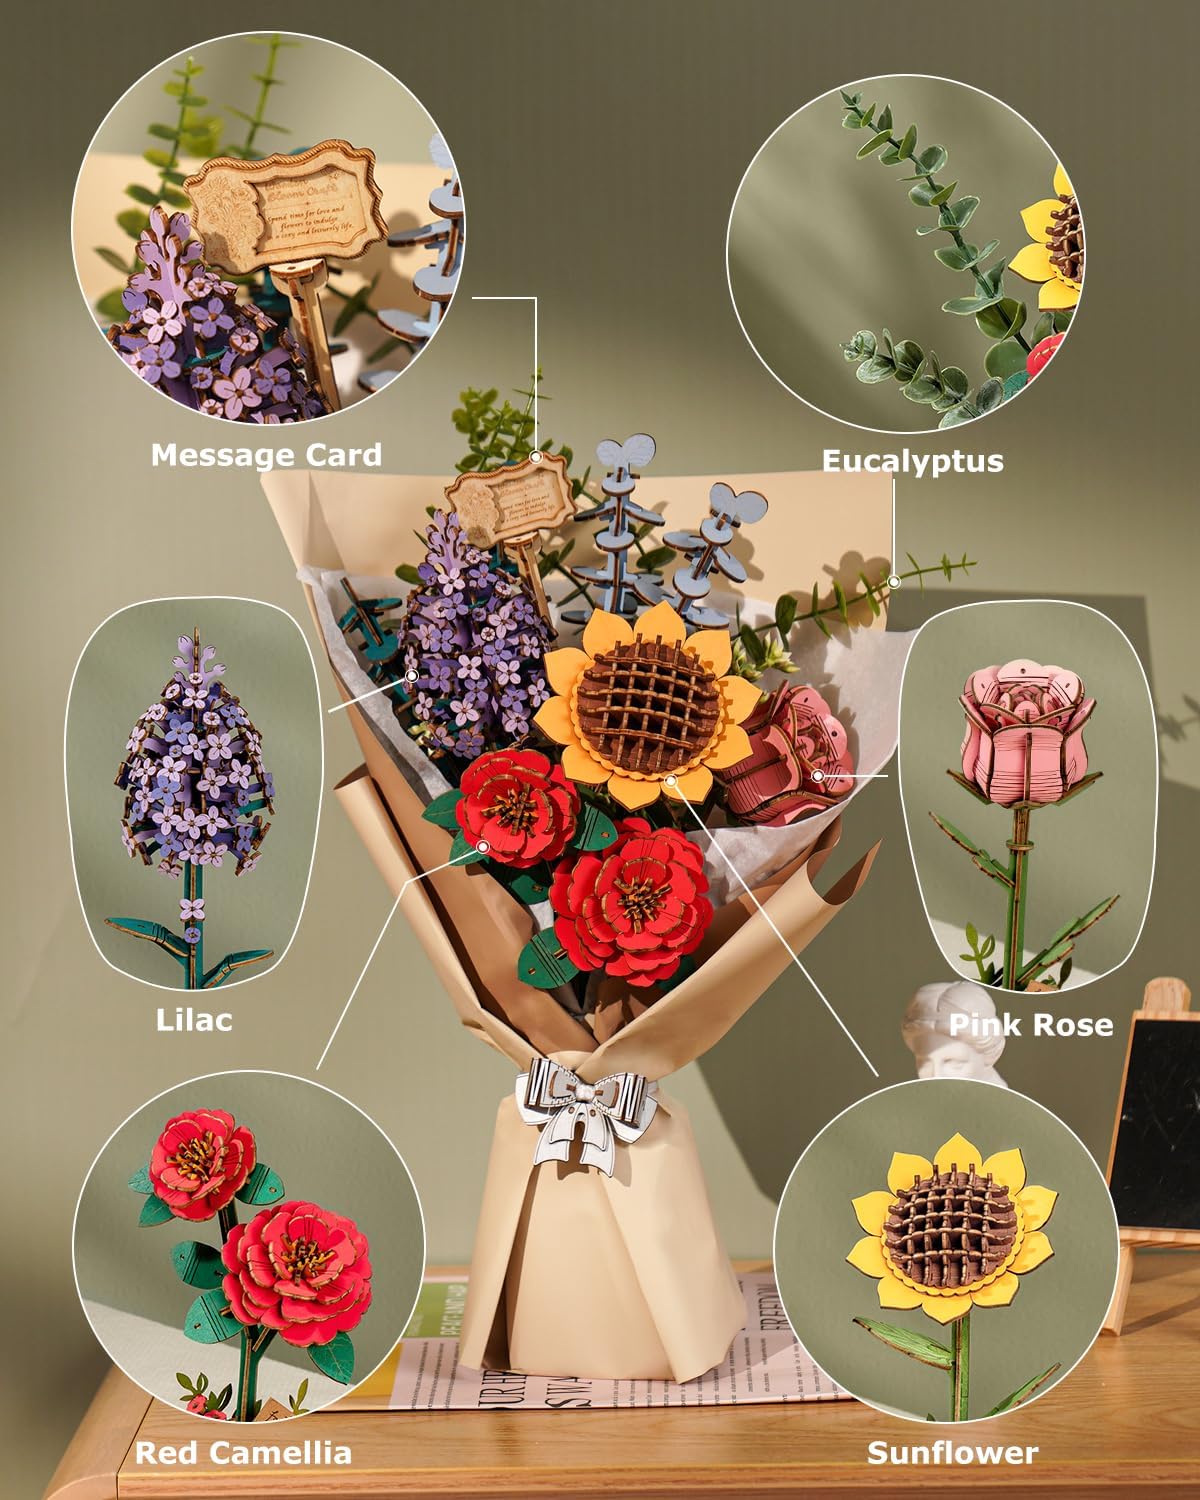
Image: A visual guide to the various wooden flower components, including a message card, eucalyptus, lilac, pink rose, red camellia, and sunflower, ready for assembly.

Image: The fully assembled 3D Wooden Flower Model Kit, presented as a decorative bouquet.
Operating LED Lights (Cathy's Flower House)
The Cathy's Flower House kit includes an LED lighting system to illuminate your miniature scene.
- การติดตั้งแบตเตอรี่: Locate the battery compartment, typically on the underside or back of the base. Insert the required batteries (e.g., AAA or button cells, as specified in your kit's packaging) ensuring correct polarity (+/-).
- เปิด/ปิดเครื่อง: Locate the small switch, usually near the battery compartment or on the side of the base. Flip the switch to the 'ON' position to illuminate the house. Flip to 'OFF' to conserve battery life.
- การเปลี่ยนแบตเตอรี่: When lights dim or stop working, replace all batteries with new ones of the same type.
การบำรุงรักษาและการดูแล
Proper care will ensure the longevity and appearance of your assembled models.
- การทำความสะอาด: Dust the models regularly with a soft, dry brush or a microfiber cloth. Avoid using wet cloths or harsh cleaning agents, which can damage the wood or painted surfaces.
- พื้นที่จัดเก็บ: Store the models in a dry environment, away from direct sunlight and extreme temperatures, to prevent warping or fading of materials.
- การจัดการ: Handle the assembled models gently, especially delicate parts like miniature plants or small accessories, to prevent breakage.
- การดูแลแบตเตอรี่ If the LED lights will not be used for an extended period, remove the batteries to prevent leakage and damage to the electrical components.
การแก้ไขปัญหา
โปรดดูตารางด้านล่างเพื่อดูปัญหาทั่วไปและวิธีแก้ไข
| ปัญหา | สาเหตุที่เป็นไปได้ | สารละลาย |
|---|---|---|
| ชิ้นส่วนไม่พอดีกัน | Incorrect orientation; excess material; slight manufacturing variance. | Check diagrams carefully. Gently sand edges if needed. Do not force pieces. |
| ไฟ LED ไม่ติด | Batteries incorrectly installed; dead batteries; loose wiring connection. | Verify battery polarity. Replace batteries. Check all wire connections. |
| Assembled model is unstable | Adhesive not fully cured; pieces not fully seated; missing support. | Allow adhesive to dry completely. Press pieces firmly into place. Review assembly steps for missed supports. |
ข้อมูลจำเพาะผลิตภัณฑ์
- ชื่อสินค้า : ROBOTIME DIY Miniature House Kit (Cathy's Flower House) & 3D Puzzle Wooden Flower Model Kit
- ยี่ห้อ: โรโบไทม์
- แบบอย่าง: Cathy's Flower House
- วัสดุ: Wood, paper, fabric, plastic, LED components
- เวลาประกอบ: Varies by individual, typically 20-40 hours for the house, 2-4 hours for the flower kit.
- อายุที่แนะนำ: 14 ปีขึ้นไป
- ASIN: B0DF7Q61PC
การรับประกันและการสนับสนุน
ROBOTIME products are designed for quality and enjoyment. If you encounter any issues with missing or defective parts, please contact ROBOTIME customer support.
For assistance, please visit the official ROBOTIME website or contact their customer service department through the retailer where the product was purchased. Please have your product model and purchase information ready.


