1. บทนำ
This manual provides detailed instructions for the safe and effective use of your Zoom H1 XLR Handy Recorder. The H1 XLR is a portable audio recording device designed for musicians, podcasters, filmmakers, and content creators, featuring 32-bit float recording technology and versatile input options. Please read this manual thoroughly before operating the device to ensure proper functionality and to prevent damage.
2. สินค้าหมดview
2.1. ส่วนประกอบและการควบคุม
Familiarize yourself with the various parts and controls of your H1 XLR recorder.

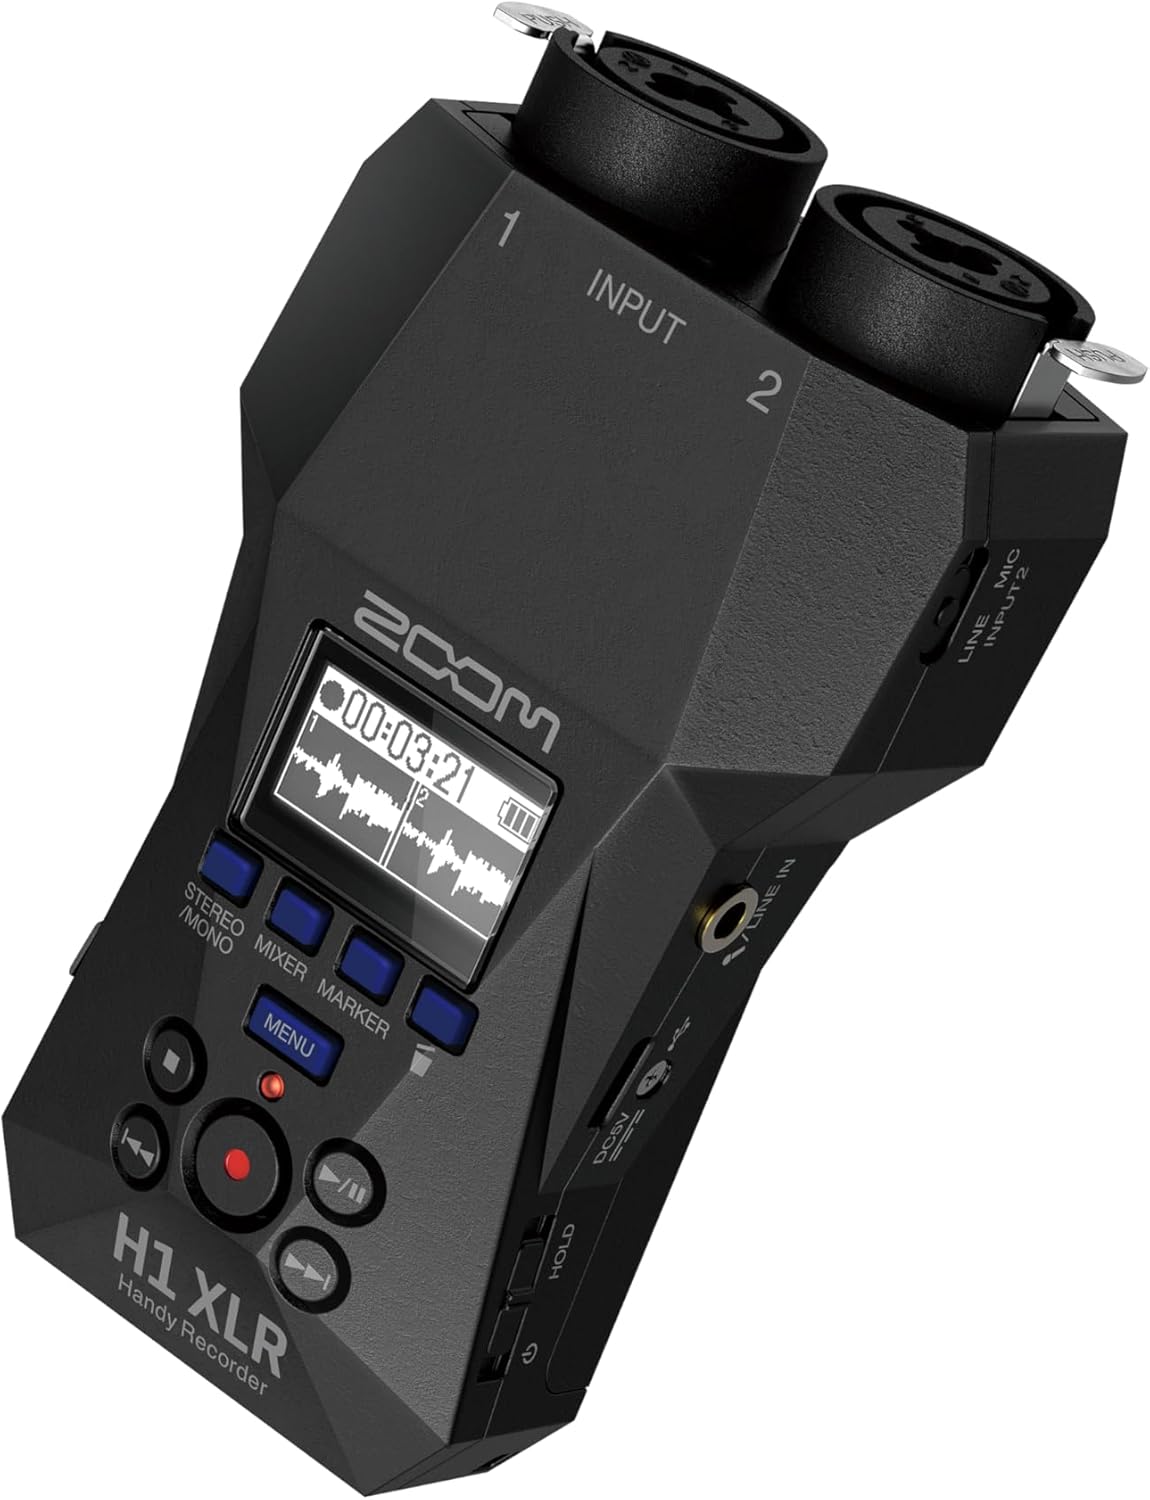
รูปที่ 2.1 : ด้านหน้า View of Zoom H1 XLR
This image displays the front of the Zoom H1 XLR, highlighting the two XLR/TRS combo input jacks at the top, the monochrome OLED display in the center, and the main control buttons including Record, Play/Pause, Stop, Menu, and navigation buttons.
รูปที่ 2.2: มุม View with Side Controls
มุมนี้ view of the H1 XLR shows the side panel, which includes the LINE IN/MIC IN switch, gain adjustment knobs for inputs 1 and 2, the USB-C port, and the power/hold switch.
- XLR/TRS Combo Inputs (1 & 2): Connect XLR microphones or 1/4" TRS line-level devices.
- จอแสดงผล OLED: Shows recording levels, battery status, time, and menu options.
- ปุ่มบันทึก: เริ่มและหยุดการบันทึก
- ปุ่มเมนู: Accesses system settings and options.
- ปุ่มนำทาง: Used for menu navigation and playback control.
- LINE IN / MIC IN Switch: Selects input type for the 3.5mm stereo jack.
- ปุ่มปรับระดับเสียง: ปรับความไวในการรับสัญญาณสำหรับแต่ละช่องสัญญาณ
- พอร์ต USB-C: For data transfer, power, and use as an audio interface.
- แจ็คสเตอริโอ 3.5 มม.: สำหรับเชื่อมต่อไมโครโฟนภายนอกหรือแหล่งสัญญาณระดับไลน์
- เอาท์พุตหูฟัง: 3.5mm stereo jack for monitoring audio.
- Power/Hold Switch: Turns the unit on/off and locks controls.
3. การตั้งค่า
3.1. การติดตั้งแบตเตอรี่
- ตรวจสอบให้แน่ใจว่าปิดเครื่องแล้ว
- เปิดฝาช่องใส่แบตเตอรี่ที่ด้านหลังของเครื่อง
- ใส่แบตเตอรี่ AA สองก้อน โดยสังเกตขั้วที่ถูกต้อง (+/-) ตามที่ระบุไว้ภายในช่องใส่แบตเตอรี่
- ปิดฝาช่องใส่แบตเตอรี่ให้แน่น
The H1 XLR supports alkaline, NiMH, and lithium AA batteries. Battery life is approximately 10 hours with alkaline batteries.
3.2. การติดตั้งการ์ด microSD
- ตรวจสอบให้แน่ใจว่าปิดเครื่องแล้ว
- Locate the microSD card slot on the side of the unit.
- Insert a microSD card (up to 1TB capacity supported) into the slot until it clicks into place. Ensure the card is inserted in the correct orientation.
- To remove, gently push the card until it clicks out, then pull it from the slot.
A microSD card is required for recording audio. Format the card using the H1 XLR's menu before first use.
3.3. การเปิด/ปิดเครื่อง
- การเปิดเครื่อง: Slide the Power/Hold switch upwards and hold for a few seconds until the display illuminates.
- วิธีปิดเครื่อง: Slide the Power/Hold switch upwards and hold for a few seconds until the display turns off.
- ฟังก์ชั่นค้างไว้: Slide the Power/Hold switch downwards to the 'HOLD' position to lock all buttons and prevent accidental operation during recording or transport.
4. การทำงานพื้นฐาน
4.1. Connecting Microphones and Line Devices
- XLR Microphones: Connect XLR cables from your microphones to the XLR/TRS combo inputs (1 and 2) at the top of the unit. Ensure the cables lock securely.
- 1/4" TRS Line Devices: Connect 1/4" TRS cables from line-level sources to the XLR/TRS combo inputs (1 and 2).
- 3.5mm Stereo Input: For external stereo microphones or line-level devices, connect to the 3.5mm stereo jack. Use the LINE IN / MIC IN switch to select the appropriate input level.

Figure 4.1: Connecting XLR Cables
This image shows a user holding the H1 XLR with two XLR cables securely connected to the top input jacks, demonstrating the device's readiness for external microphone input.
4.2. การบันทึกเสียง
- Connect your audio source(s).
- Power on the H1 XLR.
- Adjust the input gain for each channel using the dedicated gain knobs. Monitor the levels on the OLED display to ensure they are not clipping. The 32-bit float recording feature provides significant headroom, reducing the risk of clipping.
- กดปุ่ม บันทึก button once to enter record-standby mode. The record indicator will flash.
- กดปุ่ม บันทึก button again to start recording. The record indicator will illuminate steadily.
- หากต้องการหยุดบันทึก ให้กด หยุด ปุ่มที่บันทึกไว้ file will be saved to the microSD card.
4.3. การตรวจสอบเสียง
Connect headphones to the 3.5mm headphone output jack to monitor your audio in real-time during recording or playback. Adjust the headphone volume using the dedicated volume controls.
4.4. การเล่น
- นำทางไปยังที่ต้องการ file โดยใช้ปุ่มนำทาง
- กดปุ่ม เล่น/หยุดชั่วคราว ปุ่มเพื่อเริ่มเล่น
- กดปุ่ม เล่น/หยุดชั่วคราว ปุ่มอีกครั้งเพื่อหยุดการเล่นชั่วคราว
- กดปุ่ม หยุด ปุ่มเพื่อหยุดเล่น
5. คุณสมบัติขั้นสูง
5.1. USB Audio Interface Functionality
The H1 XLR can function as a 2-input/2-output USB audio interface for your computer or mobile device. Connect the H1 XLR to your computer or smartphone via the USB-C port. Select 'Audio Interface' mode from the device's menu. This allows you to record directly to your digital audio workstation (DAW) or use the H1 XLR as a high-quality microphone input for live streaming or video conferencing.

Figure 5.1: H1 XLR as an Audio Interface
This image illustrates the Zoom H1 XLR connected to a smartphone, showcasing its capability to serve as an external audio interface for mobile recording or streaming setups.
5.2. 32-Bit Float Recording
The H1 XLR utilizes 32-bit float recording technology, which captures audio with an extremely wide dynamic range. This virtually eliminates the need to set input gain levels precisely, as clipping is prevented even with very loud signals. You can adjust the volume of your recordings in post-production without introducing noise or distortion.
6. การบำรุงรักษา
- ควรเก็บรักษาอุปกรณ์ให้แห้งและสะอาด หลีกเลี่ยงการสัมผัสกับอุณหภูมิที่สูงหรือต่ำเกินไป ความชื้นสูง หรือแสงแดดโดยตรง
- ใช้ผ้าแห้งเนื้อนุ่มเช็ดทำความสะอาดภายนอก ห้ามใช้สารทำความสะอาดที่มีฤทธิ์กัดกร่อนหรือตัวทำละลาย
- ถอดแบตเตอรี่ออกหากจะไม่ได้ใช้งานเครื่องเป็นเวลานานเพื่อป้องกันการรั่วไหล
- Handle the microSD card with care to prevent data loss.
7 การแก้ไขปัญหา
- เครื่องไม่เปิดเครื่อง: Check battery installation and charge level. Ensure the Power/Hold switch is not in the 'HOLD' position.
- ไม่มีการบันทึกเสียง: Verify a microSD card is inserted and formatted. Check input connections and gain levels. Ensure the correct input type (LINE IN/MIC IN) is selected.
- คุณภาพเสียงไม่ดี: Check microphone connections. Ensure gain levels are appropriate (though 32-bit float minimizes clipping, extremely low levels can introduce noise). Try a different microphone or cable.
- ปุ่มไม่ตอบสนอง: Check if the Power/Hold switch is in the 'HOLD' position.
For further assistance, refer to the official Zoom support resources.
8. ข้อมูลจำเพาะ
| คุณสมบัติ | ข้อมูลจำเพาะ |
|---|---|
| หมายเลขรุ่น | เอช1 เอ็กซ์แอลอาร์ |
| รูปแบบการบันทึก | WAV (32-bit float) |
| ข้อมูลอินพุต | 2 x XLR/TRS Locking Combo Jacks, 1 x 3.5mm Stereo Mini Jack |
| เอาท์พุต | 1 x 3.5mm Headphone/Line Output |
| แสดง | 0.96" Monochrome OLED |
| แหล่งพลังงาน | 2 x AA Batteries (Alkaline, NiMH, Lithium) or USB-C |
| อายุการใช้งานแบตเตอรี่ | ประมาณ 10 ชั่วโมง (อัลคาไลน์) |
| สื่อบันทึกข้อมูล | microSD/microSDHC/microSDXC card (up to 1 TB) |
| อินเทอร์เฟซ USB | USB Type-C (for data transfer, power, and audio interface) |
| ขนาด (กว้าง x ลึก x สูง) | ขนาด 5.8 x 3.8 x 1.9 นิ้ว (โดยประมาณ) |
| น้ำหนัก | 6.4 ounces / 0.4 pounds (without batteries) |
9. ข้อมูลด้านความปลอดภัย
- อย่าพยายามถอดประกอบหรือปรับเปลี่ยนหน่วย
- หลีกเลี่ยงการทำตกหรือให้เครื่องได้รับแรงกระแทกรุนแรง
- เก็บให้พ้นจากมือเด็ก
- ทิ้งแบตเตอรี่ตามระเบียบข้อบังคับในท้องถิ่น
- ใช้เฉพาะแหล่งจ่ายไฟและอุปกรณ์เสริมที่ระบุไว้เท่านั้น
10. การรับประกันและการสนับสนุน
สำหรับข้อมูลการรับประกันและการสนับสนุนทางเทคนิค โปรดดูที่เว็บไซต์อย่างเป็นทางการของ Zoom webหรือติดต่อตัวแทนจำหน่ายในพื้นที่ของคุณ เก็บใบเสร็จรับเงินไว้เป็นหลักฐานการซื้อ


