1. บทนำ
This manual provides detailed instructions for the assembly, operation, and maintenance of the waveshare Multi-Functional Mini-Computer Kit for Raspberry Pi 5. This kit is designed to transform your Raspberry Pi 5 into a robust mini-computer with enhanced expandability and efficient heat dissipation.
Please read this manual thoroughly before beginning assembly to ensure correct installation and optimal performance of your device.
2. สินค้าหมดview และคุณสมบัติ
The waveshare Mini-Computer Kit for Raspberry Pi 5 is an all-in-one solution featuring an aluminum alloy case, a Pi5 HDMI and Type-C adapter, and a PCIe to M.2 board. It offers significant internal space for expansion and efficient thermal management.

Figure 2.1: Assembled waveshare Mini-Computer Kit for Raspberry Pi 5. This image shows the complete black aluminum alloy case with various ports visible on the front panel, including USB, Ethernet, and HDMI.
คุณสมบัติหลัก:
- All-in-one Mini-Computer Kit: Designed specifically for Raspberry Pi 5 (Raspberry Pi 5 not included), providing a compact and functional enclosure.
- Enhanced Expandability: Features larger internal space to support various HATs (Hardware Attached on Top) such as PoE HATs, and includes space for cable management.
- PCIe to M.2 Interface: The Pi5 Module BOX-C supports PCIe extension to an M.2 interface, enabling the use of M.2 Solid State Drives for faster storage.
- Integrated HDMI and Type-C Adapter: Includes an adapter with dual HDMI female ports and a Type-C port for convenient peripheral connections. Supports two power supply connection methods (front or back).
- การกระจายความร้อนที่มีประสิทธิภาพ: Reserved airflow vents and support for an optional cooling fan ensure optimal thermal performance for the Raspberry Pi 5.
- โครงสร้างทนทาน: Made with an aluminum alloy case and white aluminum alloy base plate for robust protection.

รูปที่ 2.2: เกินview of the Mini-Computer Kit for Raspberry Pi 5. This image highlights the kit's purpose as a mini-computer solution for the Raspberry Pi 5, emphasizing its expandability and rich interfaces.

Figure 2.3: Pi5 HDMI and Type-C Adapter details. This image illustrates the included adapter board, showing its Type-C and dual HDMI female ports, and how it connects to the Raspberry Pi 5.

รูปที่ 2.4: รายละเอียด view of the Pi5 Module BOX-C. This image provides an annotated diagram of the kit's components, including the Type-C port, HDMI ports, Gigabit Ethernet, USB 2.0 and 3.2 ports, internal PCIe to M.2 adapter, M.2 slot, 16PIN PCIe connector, power inputs, and UART debugging connector.

Figure 2.5: Internal space and expandability. This image shows the internal dimensions of the case, indicating ample room for the Raspberry Pi 5 and additional HATs, with measurements in millimeters.

Figure 2.6: Airflow vents for efficient heat dissipation. This image illustrates the design of the case with reserved vents to facilitate airflow and support for an optional cooling fan.
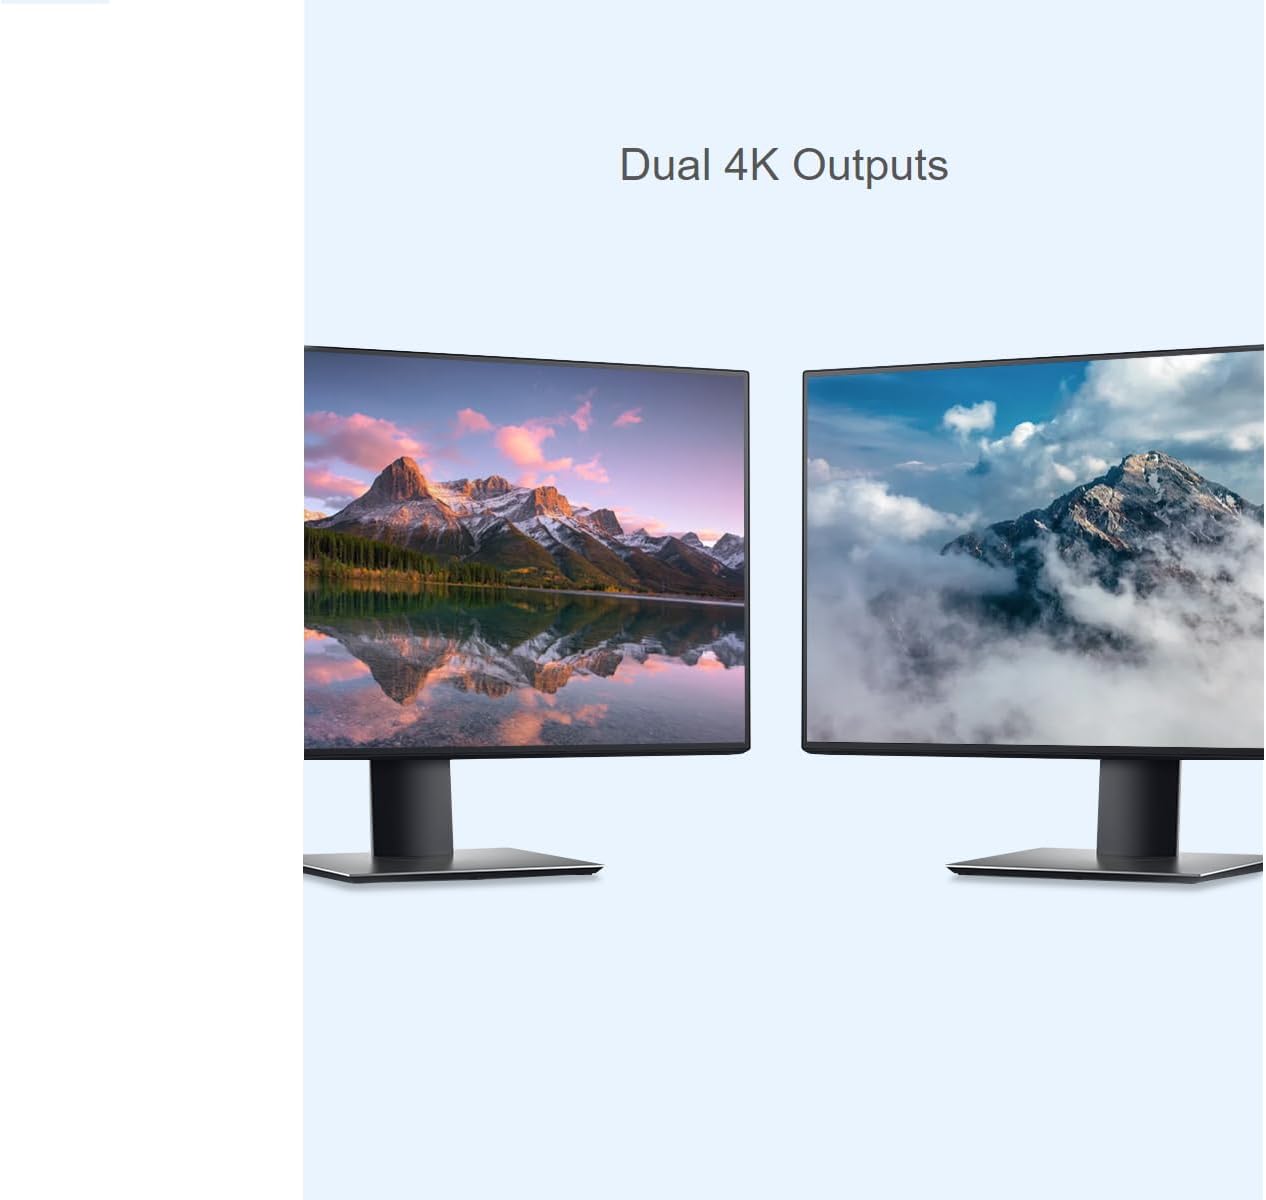
Figure 2.7: Dual 4K output capability. This image demonstrates the kit's ability to support dual 4K displays, showcasing two monitors connected to the system.
3. เนื้อหาบรรจุภัณฑ์
โปรดตรวจสอบว่าสินค้าทั้งหมดที่ระบุไว้ด้านล่างอยู่ในพัสดุของคุณครบถ้วน หากมีสินค้าใดขาดหายหรือเสียหาย โปรดติดต่อฝ่ายบริการลูกค้า
- Pi5 HDMI and Type-C adapter x1
- PCIe TO M.2 Board x1
- Metal case and white aluminum alloy base plate x1
- Silicone button x1
- M.2 Solid State Drive fixed screw x1
- PCIe cable x1
- Screw terminal x1
- ชุดสกรู x1
- SH1.0 3PIN cable x1
- SH1.0 3PIN squid cable x1
- PH2.0 3PIN cable x1
Note: Raspberry Pi 5 board is NOT included in this kit and must be purchased separately.
4. การตั้งค่าและการติดตั้ง
Follow these steps carefully to assemble your waveshare Mini-Computer Kit with the Raspberry Pi 5.
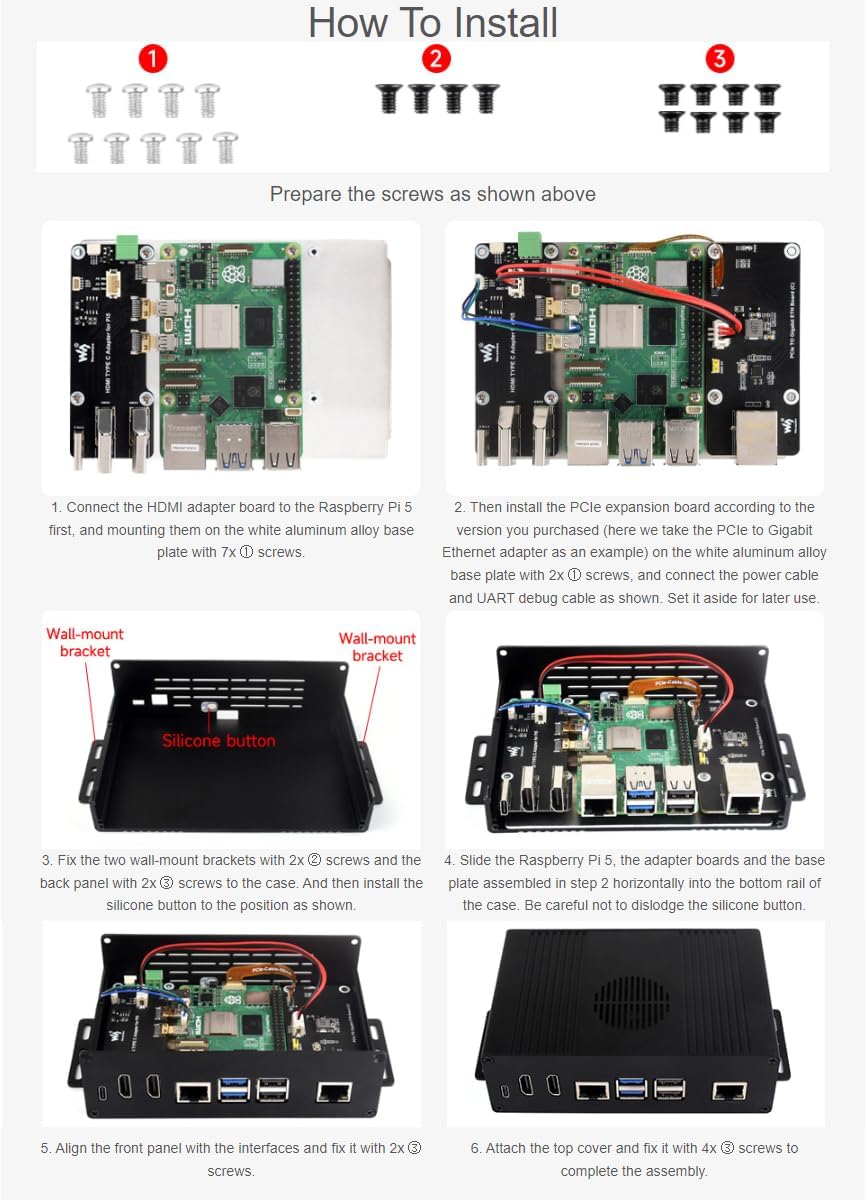
Figure 4.1: Step-by-step installation guide. This image provides a visual walkthrough of the assembly process, showing the components and screw types required for each stage.
ขั้นตอนการติดตั้ง:
- Prepare Screws: Organize the screws as shown in Figure 4.1 (top section) for easy access during assembly.
- Connect HDMI Adapter: Connect the HDMI adapter board to the Raspberry Pi 5 first. Then, mount them onto the white aluminum alloy base plate using 7x ① screws.
- Install PCIe Expansion Board: Install the PCIe expansion board according to the version you purchased. For example, if using the PCIe to Gigabit Ethernet adapter, connect it to the white aluminum alloy base plate with 2x ② screws. Connect the power cable and UART debug cable as shown in Figure 4.1. Set it aside for later use.
- Attach Wall-Mount Brackets: Fix the two wall-mount brackets with 2x ② screws and the back panel with 2x ③ screws to the case. Then, install the silicone button into its designated position.
- Slide Raspberry Pi Assembly: Carefully slide the Raspberry Pi 5, adapter boards, and the base plate assembly (from step 2) horizontally into the bottom rail of the case. Exercise caution to avoid dislodging the silicone button.
- Align Front Panel: Align the front panel with the interfaces and fix it with 2x ① screws.
- ติดตั้งฝาครอบด้านบน: Attach the top cover and fix it with 4x ③ screws to complete the assembly.
Ensure all connections are secure and screws are tightened appropriately, but do not overtighten.
5. คู่มือการใช้งาน
Once assembled, your waveshare Mini-Computer Kit with Raspberry Pi 5 is ready for operation. The kit enhances the functionality and connectivity of your Raspberry Pi 5.
เปิดเครื่อง:
- Connect a compatible 5V power supply to the Type-C port on the front panel or the screw terminal on the back panel, as per your preference.
- Ensure all peripherals (monitor, keyboard, mouse) are connected before powering on.
- The Raspberry Pi 5 will boot up according to its configured operating system (e.g., Raspberry Pi OS).
การเชื่อมต่อ:
- ช่องต่อ HDMI: Utilize the dual HDMI ports for connecting up to two displays, supporting resolutions up to 4K.
- ยูเอสบี: The front panel provides USB 2.0 and USB 3.2 ports for connecting various USB devices.
- อีเธอร์เน็ต: เชื่อมต่อกับเครือข่ายแบบใช้สายโดยใช้พอร์ต Gigabit Ethernet
- M.2 SSD: If an M.2 SSD is installed via the PCIe to M.2 board, configure your Raspberry Pi 5 to boot from or utilize the SSD for storage, significantly improving data transfer speeds.
- HATs: The internal space allows for the installation of various Raspberry Pi HATs, expanding functionality such as Power over Ethernet (PoE) or other custom applications.
6. การบำรุงรักษา
To ensure the longevity and optimal performance of your waveshare Mini-Computer Kit, follow these maintenance guidelines:
- การทำความสะอาด: Periodically clean the exterior of the case with a soft, dry cloth. Avoid using liquid cleaners directly on the case or near ports.
- การกำจัดฝุ่น: Use compressed air to gently clear dust from the airflow vents and internal components. Ensure the device is powered off and disconnected from power before cleaning.
- การระบายอากาศ : Ensure the case's airflow vents are not obstructed to maintain proper heat dissipation.
- สภาพแวดล้อม : Operate the kit in a well-ventilated area, away from direct sunlight, excessive heat, humidity, and dust.
- Firmware/OS Updates: Regularly update the Raspberry Pi OS and any relevant firmware for connected HATs or components to ensure stability and security.
7 การแก้ไขปัญหา
If you encounter issues with your waveshare Mini-Computer Kit, refer to the following common troubleshooting steps:
- ไม่มีพลังงาน/บูต:
- Verify the power supply is correctly connected and providing sufficient voltagอี (5V)
- Ensure the Raspberry Pi 5 is properly seated and all internal cables (e.g., PCIe cable) are securely connected.
- Check the power button connection if applicable.
- ไม่มีการแสดงผล:
- Confirm HDMI cables are securely connected to both the kit and the monitor.
- ลองทดสอบกับสาย HDMI หรือจอภาพอื่นดู ถ้าเป็นไปได้
- Ensure the Raspberry Pi 5 is booting correctly (check activity LEDs).
- ไม่พบ M.2 SSD:
- Ensure the M.2 SSD is correctly installed in the M.2 slot and the fixed screw is in place.
- Verify the PCIe cable connecting the M.2 board to the Raspberry Pi 5 is secure.
- Check Raspberry Pi OS documentation for M.2 SSD setup and booting instructions.
- ความร้อนสูงเกินไป:
- Ensure the case's ventilation holes are not blocked.
- Consider installing an optional cooling fan if temperatures remain high under load.
- Reduce the workload on the Raspberry Pi 5 if necessary.
For further assistance, please refer to the official Raspberry Pi documentation or contact waveshare customer support.
8. ข้อมูลจำเพาะ
Below are the technical specifications for the waveshare Mini-Computer Kit (Model: Pi 5 BOX C).

Figure 8.1: Outline dimensions of the waveshare Mini-Computer Kit. This technical drawing provides precise measurements of the assembled case in millimeters.
| คุณสมบัติ | ข้อมูลจำเพาะ |
|---|---|
| ชื่อรุ่น | Pi 5 BOX C |
| ยี่ห้อ | เวฟแชร์ |
| ความเข้ากันได้ | ราสเบอร์รี่ Pi 5 |
| วัสดุตัวเรือน | โลหะผสมอลูมิเนียม |
| สี | White (Base Plate), Black (Case) |
| ขนาดแพ็คเกจ | 8.11 x 5.94 x 2.13 นิ้ว |
| น้ำหนักสินค้า | 11.6 ออนซ์ |
| พอร์ต HDMI ทั้งหมด | 2 (via adapter) |
| พอร์ต USB รวม | 1 (Type-C for power/data), additional USB 2.0/3.2 ports on Pi5 |
| เทคโนโลยีการเชื่อมต่อ | HDMI, USB, Ethernet, PCIe |
| การขยาย PCIe | Supports M.2 interface via included board |
| การระบายความร้อน | Reserved airflow vents, supports optional cooling fan |
| ผู้ผลิต | เวฟแชร์ |
| วันที่พร้อมใช้งานครั้งแรก | 22 กรกฎาคม 2024 |
9. การรับประกันและการสนับสนุน
This waveshare product is covered by a standard manufacturer's warranty. For specific warranty terms and conditions, please refer to the documentation provided with your purchase or visit the official waveshare webเว็บไซต์.
For technical support, troubleshooting assistance, or inquiries regarding replacement parts, please contact waveshare customer service through their official channels. When contacting support, please have your product model number (Pi 5 BOX C) and purchase information readily available.
แหล่งข้อมูลออนไลน์:
- Official waveshare Webเว็บไซต์: www.waveshare.com
- Raspberry Pi Documentation: www.raspberrypi.com/documentation/


