1. บทนำ
This manual provides detailed instructions for the installation, operation, and maintenance of your Reobiux D20-1P 2K Outdoor Surveillance Camera. Please read this manual thoroughly before using the product to ensure proper functionality and safety.
2. เนื้อหาบรรจุภัณฑ์
ตรวจสอบว่าสินค้าทั้งหมดที่ระบุไว้ด้านล่างนี้รวมอยู่ในแพ็คเกจของคุณแล้ว หากมีสินค้าใดสูญหายหรือเสียหาย โปรดติดต่อฝ่ายสนับสนุนลูกค้า
- 1x Reobiux D20-1P Solar PTZ Camera
- 1x Solar Collector
- 1x คู่มือผู้ใช้
- 1x ฐานยึด
- 1x Power Supply (for initial charging)
- 1x Screws Bag (for installation)
- 1x Type-C Charging Line
3. สินค้าหมดview
The Reobiux D20-1P is a 2K outdoor surveillance camera designed for comprehensive home security. It features dual lenses, 360° Pan-Tilt-Zoom (PTZ) capabilities, and operates wirelessly via Wi-Fi. Key features include PIR motion detection, color night vision, two-way audio, and an IP66 weatherproof rating, powered by a solar panel and rechargeable battery.
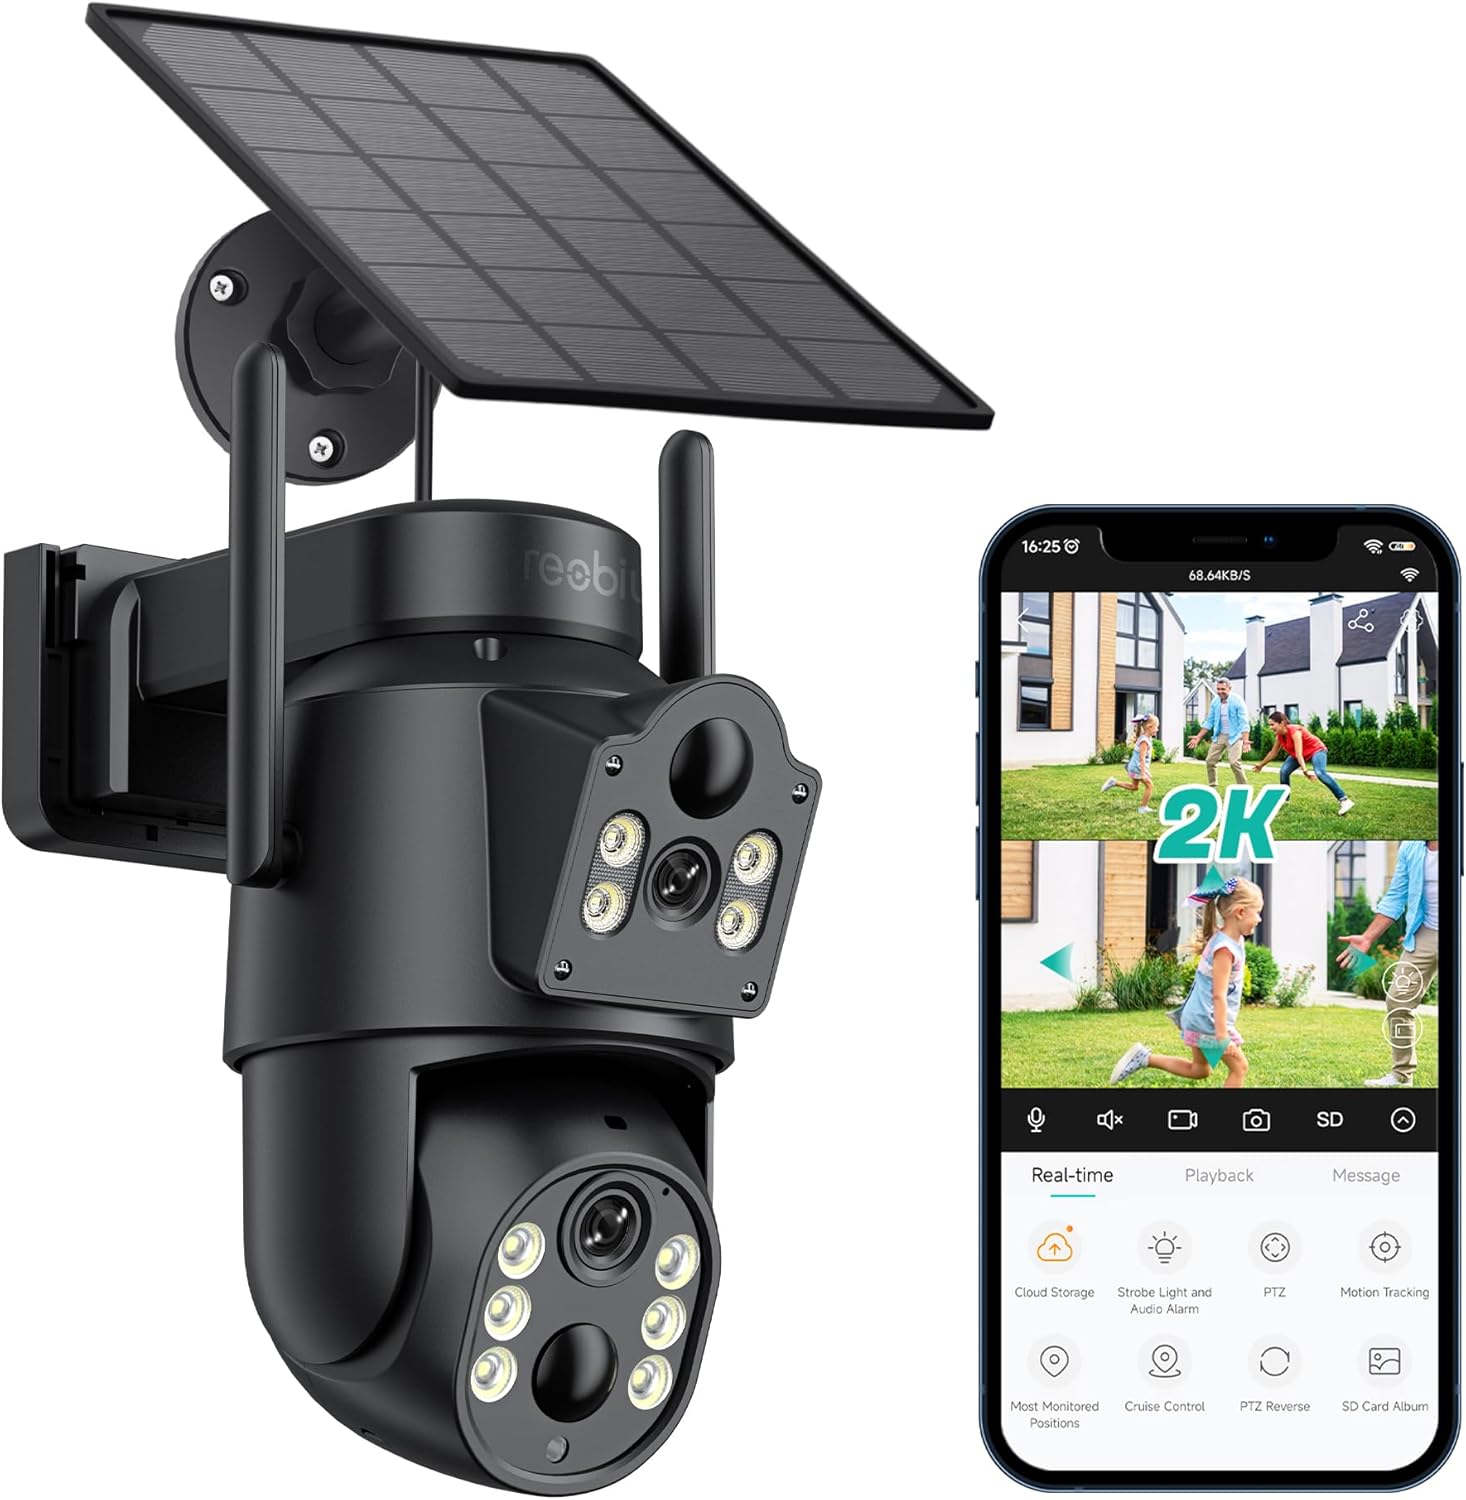
รูปที่ 3.1: Reobiux D20-1P Solar PTZ Camera and its mobile application interface showing real-time monitoring, playback, and various control options.
คุณสมบัติหลัก:
- 2K QHD High Resolution: ให้ภาพวิดีโอที่ชัดเจนและมีรายละเอียดtage.
- ดีไซน์เลนส์คู่: Combines a fixed lens with a rotating lens for comprehensive coverage.
- ฟังก์ชันการหมุน 360° PTZ: Allows remote control of pan, tilt, and zoom for flexible viewมุมการเอียง
- Solar Powered with Rechargeable Battery: Ensures continuous operation with minimal manual charging.
- การตรวจจับการเคลื่อนไหว PIR: Intelligently detects human movement to reduce false alarms.
- การมองเห็นสีกลางคืน: Offers full-color video even in low-light conditions, alongside infrared night vision.
- เสียงสองทาง: Enables communication with visitors or deterrence of intruders.
- กันฝนระดับ IP66: ออกแบบมาเพื่อทนต่อสภาพอากาศกลางแจ้งที่หลากหลาย
- Wireless Wi-Fi Connectivity: Easy setup and remote access via smartphone.
4. คู่มือการติดตั้ง
4.1 การชาร์จเริ่มต้น
Before first use, fully charge the camera's internal battery using the provided Type-C charging line and power supply. This ensures the camera has sufficient power for initial setup and operation, especially if solar charging conditions are not optimal immediately after installation.
4.2 การติดตั้งแอปและการสร้างบัญชี
- ดาวน์โหลด ไอซีซี แอปจาก App Store ของสมาร์ทโฟนของคุณ (iOS App Store หรือ Google Play Store)
- ติดตั้งแอปและเปิดใช้งาน
- Follow the on-screen instructions to create a new account or log in if you already have one.
4.3 Camera Connection to Wi-Fi
- Ensure your camera is powered on.
- In the iCSee app, tap the "+" icon to add a new device.
- Select the option for "Wi-Fi Camera" or "Add Device by AP Hotspot" (refer to app for exact wording).
- Follow the app's instructions to connect the camera to your 2.4GHz Wi-Fi network. You may need to scan a QR code displayed on your phone with the camera, or listen for a sound prompt.
- เมื่อเชื่อมต่อเสร็จแล้ว คุณสามารถตั้งชื่อกล้องและเริ่มตรวจสอบได้
4.4 การติดตั้งกล้อง
Choose a location that provides optimal surveillance coverage and receives direct sunlight for the solar panel. Ensure the camera is within range of your Wi-Fi network.
- เลือกสถานที่: Identify a suitable wall or surface for mounting. Consider the camera's viewing angle (355° pan, 90° tilt) and the solar panel's exposure to sunlight.
- ทำเครื่องหมายจุดเจาะ: Use the mounting base as a template to mark the screw holes on the wall.
- เจาะรู: Drill pilot holes at the marked positions. Insert wall anchors if necessary.
- ติดตั้งฐานยึด: ยึดฐานติดตั้งเข้ากับผนังโดยใช้สกรูที่ให้มา
- ติดกล้อง: Mount the camera onto the secured base.
- ปรับแผงโซล่าเซลล์: วางแผงโซลาร์เซลล์ในตำแหน่งที่ได้รับแสงแดดมากที่สุดตลอดทั้งวัน

รูปที่ 4.1: Illustration of the camera mounted with its solar panel, highlighting the fixed and rotating lenses and the benefit of continuous solar power.
5. คู่มือการใช้งาน
5.1 สด View และการเล่น
Open the iCSee app and select your camera to access the live view. From here, you can:
- การตรวจสอบตามเวลาจริง: View ฟีดวิดีโอสด
- การควบคุม PTZ: Use the on-screen joystick to pan (355°) and tilt (90°) the camera.
- ซูมดิจิตอล: Pinch to zoom on the live feed.
- การเล่นซ้ำ: การเข้าถึงที่บันทึกไว้ footage stored on the SD card or cloud storage.

รูปที่ 5.1: Demonstrates the superior clarity of 2K QHD resolution compared to 1080P, providing more details for monitoring.
5.2 การตรวจจับการเคลื่อนไหวและการแจ้งเตือน
The camera utilizes PIR (Passive Infrared) intelligent detection to identify human movement, minimizing false alarms from pets or swaying branches.
- เปิด/ปิด: Activate or deactivate motion detection in the app settings.
- การปรับความไว: Adjust the PIR sensor's sensitivity to suit your environment.
- การแจ้งเตือนภัย: รับการแจ้งเตือนแบบพุชทันทีบนสมาร์ทโฟนของคุณเมื่อตรวจพบการเคลื่อนไหว
- สัญญาณเสียงและแสง: Configure the camera to trigger a strobe light and audible alarm upon detection.

รูปที่ 5.2: The camera's PIR intelligent detection distinguishes human movement from other objects, reducing unnecessary alerts.

รูปที่ 5.3: When motion is detected, the camera can send real-time push notifications and activate a sound and light alarm to deter intruders.
5.3 โหมดการมองเห็นตอนกลางคืน
The camera offers two night vision modes for clear visibility in the dark:
- Spotlight Full Color Night Vision: Utilizes built-in spotlights to provide full-color video in low-light conditions.
- Spotlight Infrared Night Vision: Uses infrared LEDs for black-and-white video in complete darkness, with a range of up to 30 meters.
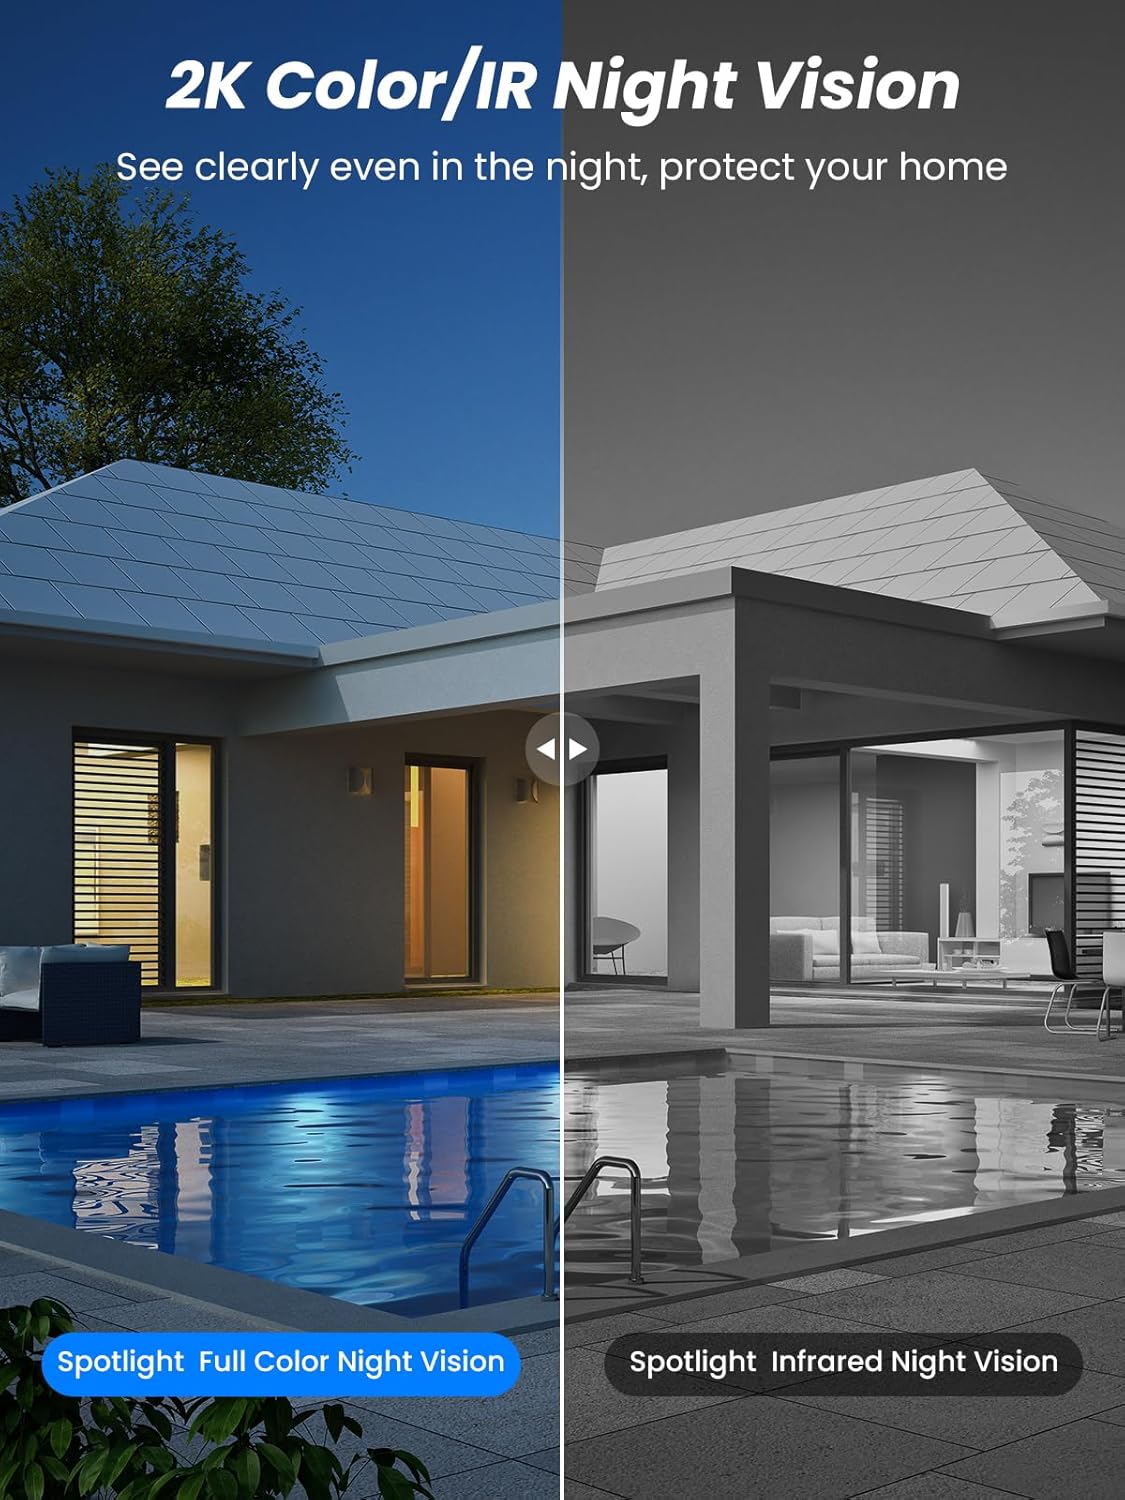
รูปที่ 5.4: Illustrates the difference between full-color night vision, enabled by spotlights, and traditional infrared night vision.
5.4 เสียงสองทาง
The integrated microphone and speaker allow for two-way communication.
- พูด: แตะไอคอนไมโครโฟนในแอปเพื่อพูดผ่านลำโพงของกล้อง
- ฟัง: The camera's microphone captures audio from its surroundings.

รูปที่ 5.5: The two-way audio function allows for direct communication through the camera, useful for interacting with visitors or delivery personnel.
6. การบำรุงรักษา
- การทำความสะอาด: ควรทำความสะอาดเลนส์กล้องและแผงโซลาร์เซลล์เป็นระยะด้วยผ้าเนื้อนุ่มและแห้งamp cloth to ensure optimal performance and clear image quality. Avoid abrasive cleaners.
- สุขภาพแบตเตอรี่: While solar-powered, extreme weather or prolonged periods of low sunlight may require manual charging. Monitor battery levels via the app.
- อัพเดตเฟิร์มแวร์: Check the iCSee app regularly for available firmware updates to ensure your camera has the latest features and security enhancements.
- การป้องกันสภาพอากาศ: The camera is IP66 weatherproof, designed to withstand rain, snow, and sun. However, ensure all connections are secure to maintain water resistance.

รูปที่ 6.1: The IP66 rating ensures the camera's durability and functionality in various outdoor weather conditions, including snow, rain, and direct sunlight.
7 การแก้ไขปัญหา
- กล้องไม่เชื่อมต่อกับ Wi-Fi:
- Ensure the camera is within range of your 2.4GHz Wi-Fi network. 5GHz networks are not supported.
- ตรวจสอบว่ารหัสผ่าน Wi-Fi ของคุณถูกต้อง
- รีสตาร์ทเราเตอร์และกล้องของคุณ
- If issues persist, try resetting the camera (refer to app or product for reset button location).
- Battery not charging or draining quickly:
- Ensure the solar panel is clean and receives direct sunlight for several hours daily.
- ตรวจสอบการเชื่อมต่อระหว่างแผงโซลาร์เซลล์กับกล้อง
- If in a low-light environment, manually charge the camera using the Type-C cable.
- Frequent motion detection events or live view streaming can consume battery faster. Adjust settings if needed.
- False motion detection alarms:
- Adjust the PIR motion detection sensitivity in the iCSee app.
- Ensure the camera is not pointed at areas with constant movement (e.g., busy roads, swaying trees) if not intended for monitoring.
- คุณภาพของภาพไม่ดี:
- ทำความสะอาดเลนส์กล้อง
- ให้แน่ใจว่ามีแสงสว่างเพียงพอสำหรับการจับภาพได้ดีที่สุด โดยเฉพาะในเวลากลางคืน
- Check your Wi-Fi signal strength; a weak signal can affect video streaming quality.
8. ข้อมูลจำเพาะ
| คุณสมบัติ | รายละเอียด |
|---|---|
| ชื่อรุ่น | ดี20-1พี |
| ความละเอียดในการจับภาพวิดีโอ | 2.5K |
| ความละเอียดวิดีโอที่มีประสิทธิภาพ | 2K QHD |
| เทคโนโลยีการสื่อสารไร้สาย | ไวไฟ (2.4GHz) |
| ฟอร์มแฟกเตอร์ | โดม |
| Viewอิงแองเกิล | 355 องศา (แพน), 90 องศา (เอียง) |
| ประเภทการติดตั้ง | ติดผนัง |
| ช่วงการมองเห็นตอนกลางคืน | 30 เมตร |
| อัตราเฟรม | 25 เฟรมต่อวินาที |
| วัสดุ | พลาสติก |
| เล่มที่tage | 12 โวลต์ (กระแสตรง) |
| วัดtage | 5 วัตต์ |
| แหล่งพลังงาน | ใช้พลังงานจากแบตเตอรี่ พลังงานแสงอาทิตย์ |
| แบตเตอรี่ | แบตเตอรี่ลิเธียมไอออน 3 ก้อน (รวมอยู่ด้วย) |
| โปรโตคอลการเชื่อมต่อ | ไวไฟ |
| ประเภทตัวควบคุม | แอพ iCSee |
| คุณสมบัติพิเศษ | Night Vision (Color/IR), PIR Motion Detection, Two-Way Audio, IP66 Weatherproof |
| น้ำหนักสินค้า | 1.06 กก. |
| ขนาดพัสดุ | 21.7 x 19.5 x 13.8 ซม. |
9. การรับประกันและการสนับสนุน
Reobiux offers a รับประกัน 1 ปี for this product. For any issues or inquiries, please do not hesitate to reach out to our customer service. We provide 20 hours of online service to assist you.
For support, please refer to the contact information provided with your purchase or within the iCSee application.


