1. บทนำ
Thank you for choosing the Aigo Q2503 Mini-Tower PC Case. This manual provides detailed instructions for the proper installation, operation, and maintenance of your new computer chassis. Please read this guide thoroughly before beginning assembly to ensure optimal performance and longevity of your system components.
2. สินค้าหมดview
The Aigo Q2503 is a compact Mini-Tower PC case designed for M-ATX and ITX motherboards. It offers a streamlined design with essential features for building a functional and efficient computer system. Its robust construction provides a secure environment for your components.
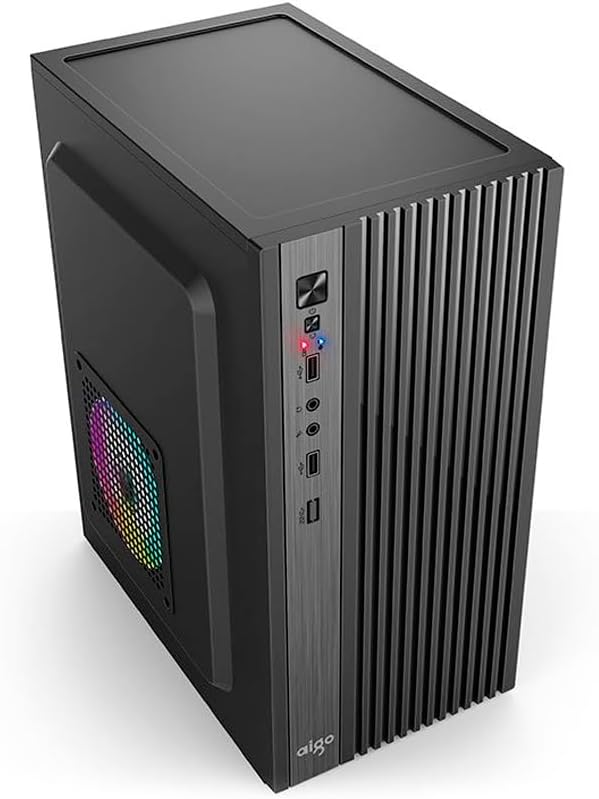
รูปที่ 2.1: ด้านหน้า view of the Aigo Q2503 Mini-Tower PC Case, showcasing its compact design and front panel I/O ports.
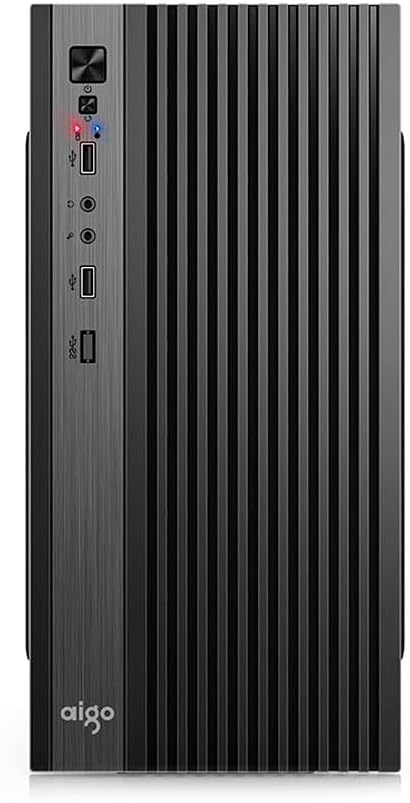
รูปที่ 2.2 : ด้านหน้า view of the Aigo Q2503 Mini-Tower PC Case, highlighting the vertical ventilation slats and front panel controls.
3. การตั้งค่าและการติดตั้ง
Follow these steps for proper component installation within the Aigo Q2503 case.
3.1 การเตรียมคดี
- แกะกล่องและนำวัสดุบรรจุภัณฑ์ทั้งหมดออก
- Carefully remove the side panels by unscrewing the thumbscrews at the rear of the case and sliding the panels backward.
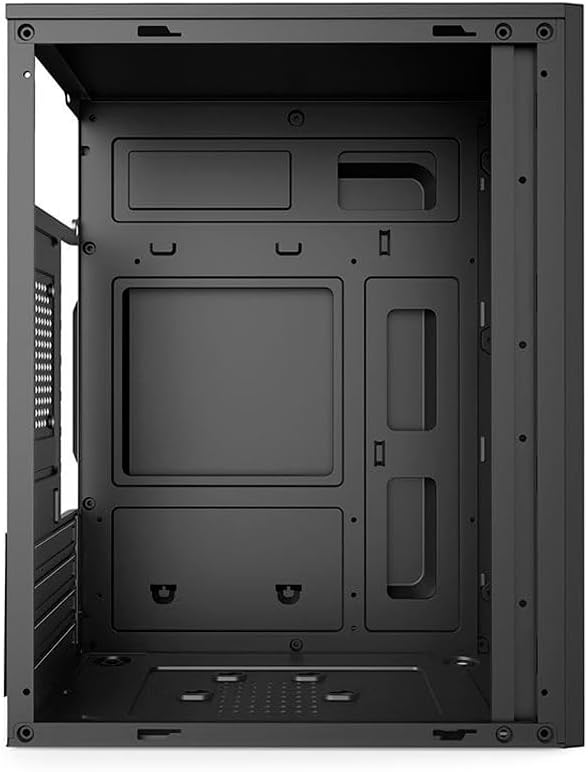
รูปที่ 3.1: ภายใน view of the Aigo Q2503 PC Case, showing the motherboard tray and drive mounting points.
3.2 การติดตั้งเมนบอร์ด
- ติดตั้งแผ่นปิดพอร์ต I/O ที่ให้มาพร้อมกับเมนบอร์ดลงในช่องด้านหลังของเคส
- Align your M-ATX or ITX motherboard with the standoffs inside the case. Ensure all standoffs match the motherboard's mounting holes.
- ยึดเมนบอร์ดด้วยสกรูที่เหมาะสม
3.3 การติดตั้งไดรฟ์
- SSD (1x): Locate the dedicated SSD mounting point (typically on the motherboard tray or behind it). Secure the SSD using screws.
- HDD (1x): Locate the HDD bay. Slide the HDD into the bay and secure it with screws.
3.4 Expansion Card Installation (VGA)
- ถอดฝาครอบช่องขยายที่จำเป็นออกจากด้านหลังของเคส
- Insert your graphics card (VGA) or other expansion cards into the PCIe slots on your motherboard.
- Secure the expansion cards with screws. Note the maximum VGA length supported is 150 mm.
3.5 การติดตั้งตัวระบายความร้อน CPU
Install your CPU cooler according to its manufacturer's instructions. Ensure the cooler's height does not exceed the maximum supported height of 250 mm for this case.
3.6 การติดตั้งแหล่งจ่ายไฟ
The Aigo Q2503 supports ATX power supplies. Mount your ATX power supply in the designated area, typically at the top or bottom rear of the case, and secure it with screws.
3.7 การติดตั้งพัดลม
The case supports the following fan configurations (fans are not included):
- หลัง: 1 x 80 mm fan
- ด้านข้าง: 1 x 120 mm fan
Install fans in the specified locations to optimize airflow.
3.8 การเชื่อมต่อแผงด้านหน้า
Connect the front panel cables (Power SW, Reset SW, HDD LED, Power LED, USB 2.0, Audio/Mic) to the corresponding headers on your motherboard. Refer to your motherboard manual for exact pin layouts.
4. การใช้งานเคสพีซีของคุณ
Once all components are installed and connected, replace the side panels and secure them. Connect your monitor, keyboard, mouse, and power cable to your system. Press the power button on the front panel to start your computer.
แผงด้านหน้าช่วยให้เข้าถึงส่วนต่างๆ ได้อย่างสะดวก:
- ปุ่มเปิดปิด
- ปุ่มรีเซ็ต
- พอร์ต USB 2 จำนวน 2.0 พอร์ต
- Audio Out (Headphone) Jack
- ไมโครโฟนในแจ็ค
5. การบำรุงรักษา
การบำรุงรักษาตามปกติจะช่วยให้มั่นใจถึงประสิทธิภาพที่เหมาะสมที่สุดและยืดอายุการใช้งานของส่วนประกอบพีซีของคุณ
5.1 การทำความสะอาด
- ภายนอก: ใช้แบบนุ่มๆamp ใช้ผ้าเช็ดทำความสะอาดพื้นผิวภายนอก หลีกเลี่ยงการใช้สารทำความสะอาดที่มีฤทธิ์กัดกร่อน
- ภายใน: Periodically open the case and use compressed air to remove dust buildup from components, fans, and filters. Ensure the system is powered off and unplugged before cleaning the interior.
5.2 การไหลเวียนของอากาศ
Ensure that the case's ventilation openings are not obstructed to maintain proper airflow and prevent overheating.
6 การแก้ไขปัญหา
หากคุณพบปัญหาเกี่ยวกับการประกอบพีซี โปรดพิจารณาขั้นตอนการแก้ไขปัญหาทั่วไปต่อไปนี้:
- ไม่มีไฟฟ้า: Double-check all power connections, including the power supply to the wall, the power supply to the motherboard, and the front panel power switch cable to the motherboard.
- ความร้อนสูงเกินไป: Verify that all case fans and CPU cooler fans are spinning correctly. Ensure proper airflow within the case and that ventilation openings are clear.
- พอร์ตด้านหน้าใช้งานไม่ได้: Confirm that the USB and Audio/Mic cables from the front panel are correctly connected to the motherboard headers.
- ปัญหาความพอดีของส่วนประกอบ: Ensure that all components, especially the graphics card and CPU cooler, are within the specified maximum dimensions for the case.
7. ข้อมูลจำเพาะ
Below are the detailed specifications for the Aigo Q2503 Mini-Tower PC Case:
| คุณสมบัติ | ข้อมูลจำเพาะ |
|---|---|
| ยี่ห้อ | aigo |
| แบบอย่าง | Q2503-BK |
| ประเภทเคส | มินิทาวเวอร์ |
| การรองรับเมนบอร์ด | M-ATX/ITX |
| วัสดุ | 0.4mm SPCC (Steel Alloy) |
| ช่องไดรฟ์ | 1 x SSD, 1 x HDD |
| ช่องเสียบขยาย | 4 |
| พอร์ต I / O ด้านหน้า | 2 x USB 2.0, Audio/Mic |
| ความยาว VGA สูงสุด | 150 มม. |
| ความสูงสูงสุดของตัวระบายความร้อนซีพียู | 250 มม. |
| การรองรับแหล่งจ่ายไฟ | เอทีเอ็กซ์ |
| Supported Fans (not included) | Rear: 1 x 80 mm, Side: 1 x 120 mm |
| ขนาด (กว้าง x ยาว x สูง) | 265 x 165 x 340 มม. |
| สี | สีดำ |
8. ข้อมูลการรับประกัน
The Aigo Q2503 Mini-Tower PC Case comes with a manufacturer's warranty of 12 เดือน from the date of purchase. This warranty covers defects in materials and workmanship under normal use. Please retain your proof of purchase for warranty claims. The warranty does not cover damage caused by improper installation, misuse, accidents, modifications, or unauthorized repairs.
9. การสนับสนุน
For technical assistance, troubleshooting, or warranty inquiries, please contact your retailer or the official Aigo support channels. Refer to the Aigo official webเว็บไซต์สำหรับข้อมูลติดต่อและทรัพยากรสนับสนุนล่าสุด
Before contacting support, please have your product model (Q2503-BK) and proof of purchase readily available.


