1. บทนำ
This manual provides detailed instructions for the installation, operation, and maintenance of your MAIMEIMI Universal Motorcycle Digital Speedometer. Please read this manual thoroughly before use to ensure proper functionality and safety.
2. สินค้าหมดview
The MAIMEIMI Universal Motorcycle Digital Speedometer is a multi-functional gauge cluster designed for motorcycles. It integrates several essential functions into a single, compact unit, providing clear digital readouts for various parameters.
คุณสมบัติหลัก:
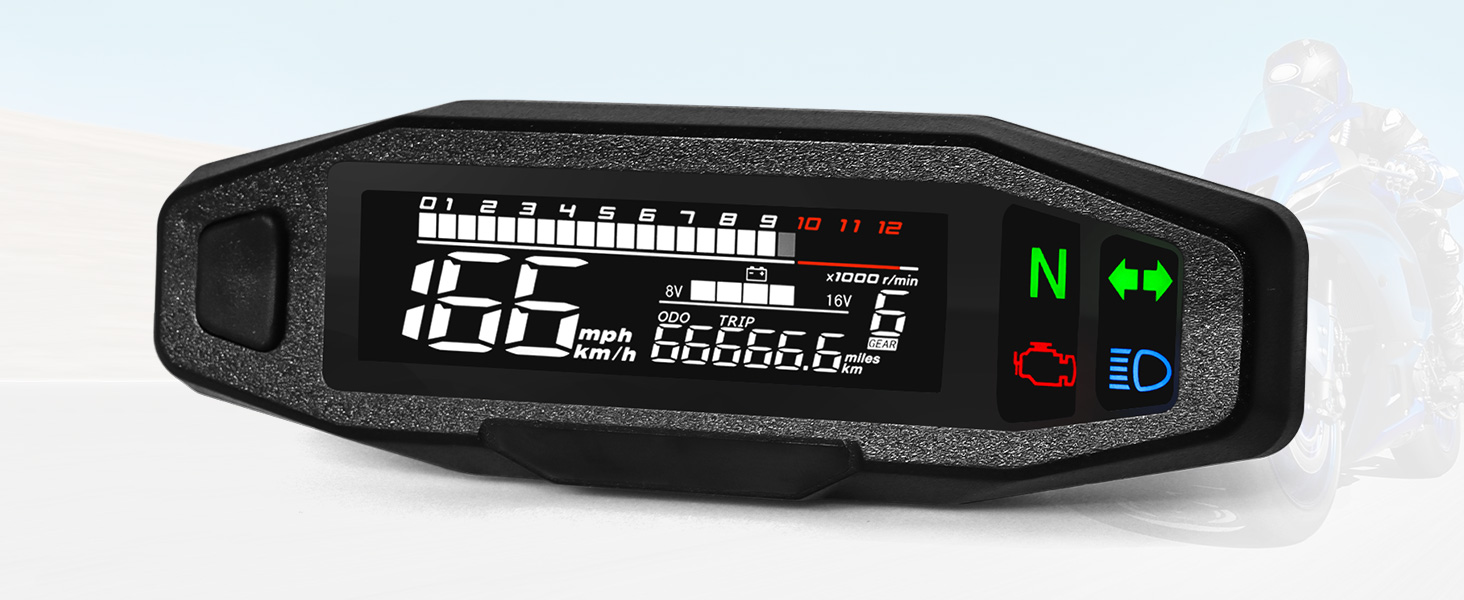
- จอแสดงผลแบบบูรณาการ: Combines speedometer, tachometer, and gear indicator.
- ข้อมูลโดยละเอียด: Displays oil level, steering indicators, and mileage (ODO/TRIP).
- เข้ากันได้สากล: Adjustable for various tire sizes (8-22 inch wheels) and compatible with 2-stroke and 4-stroke motorcycles (1, 2, and 4 cylinders).
- การออกแบบกันน้ำ: Constructed from high-quality, rugged ABS material for durability in various weather conditions.
- หน้าจอ LCD ที่ชัดเจน: Provides excellent visibility for data reading day or night.
เนื้อหาแพ็คเกจ:
- 1 x Digital Speedometer Unit
- 1 x Speed Sensor Cable
- 2 x แม่เหล็ก

Image 2.1: The MAIMEIMI Universal Motorcycle Digital Speedometer unit with its speed sensor cable and magnets.

Image 2.2: Labeled interface display showing speed, unit, mileage, gear, voltage/fuel, engine fault light, and indicators.
3. ข้อมูลจำเพาะ
| ขนาดสินค้า | 6.33 x 1.4 x 1.81 นิ้ว |
| น้ำหนักสินค้า | 0.42 ปอนด์ (6.72 ออนซ์) |
| วัสดุ | โลหะ, พลาสติก (ABS) |
| ปฏิบัติการฉบับที่tage | 9-16โวลต์ |
| ความเข้ากันได้ของขนาดล้อ | 8-22 นิ้ว (ปรับได้) |
| Engine Type Compatibility | 2-stroke and 4-stroke (1, 2, 4 cylinders) |
| RPM Functionality | Works with carburetor motors; does not work with Electric Fuel Injection (EFI) engines. |
4. การตั้งค่าและการติดตั้ง
Careful installation is crucial for the correct operation of the speedometer. It is recommended that installation be performed by a qualified technician if you are unfamiliar with motorcycle electrical systems.
4.1 แผนผังการเดินสายไฟ
โปรดดูแผนภาพต่อไปนี้สำหรับการเชื่อมต่อสายไฟที่ถูกต้อง ตรวจสอบให้แน่ใจว่าการเชื่อมต่อทั้งหมดแน่นหนาและมีฉนวนหุ้ม

Image 4.1: Wiring connections for the speedometer unit and speed sensor.
4.2 การติดตั้งเซ็นเซอร์ความเร็ว
- Mount the speed sensor cable securely near the wheel.
- Attach the two provided magnets to the brake disc, ensuring they are positioned 180 degrees apart. This spacing is critical for accurate speed readings.
- Ensure the sensor is aligned with the magnets and has a consistent, small gap for reliable detection.
4.3 Initial Power-Up and Wheel Size Adjustment
After wiring, turn on the ignition. The speedometer is adjustable for various wheel sizes (8-22 inches). Refer to the 'Parameter Settings' section for instructions on how to configure the tire circumference.

ภาพที่ 4.2: ขนาดของผลิตภัณฑ์สำหรับการวางแผนการติดตั้ง
ภาพที่ 4.3: อดีตamples of compatible motorcycle types.
5. คู่มือการใช้งาน
The speedometer features a single button for most operations and settings.
5.1 Operating Interface
- ข่าวสารแบบสั้น: Switch between ODO (total mileage) and TRIP (trip mileage).
- Long Press in ODO Mode: Switch between metric (km/h) and imperial (mph) units for speed.
- Long Press in TRIP Mode: Reset the trip mileage.
5.2 Background Parameter Settings
เพื่อเข้าถึงการตั้งค่าขั้นสูง:
- Press and hold the button while turning on the ignition switch. Keep it pressed for 5 seconds.
- The screen will display "SETUP". Release the button.
- ข่าวสารแบบสั้น: Enter the background parameter settings.
- Speed Sensor Magnet Number Setting: The interface "E - 2" will flash (factory setting is 2 magnets). Short press to increase the number by 1 (1 to 9). Long press to save and switch to the next parameter.
- Tire Circumference Setting: The interface will jump to "C - 1902" and flash (factory set tire circumference is 1902 mm). Short press to increase the value. Long press to move the cursor. After setting the fourth digit, long press to switch to the next parameter.
- Engine Stroke Setting: The interface "IP" will flash (factory setting is 1). Short press to switch between 1 - 4.
- After completing all parameter settings, long press the button to exit the parameter setting interface.
If there is no operation on the parameter setting interface for 20 seconds, it will automatically exit and return to the operating interface.
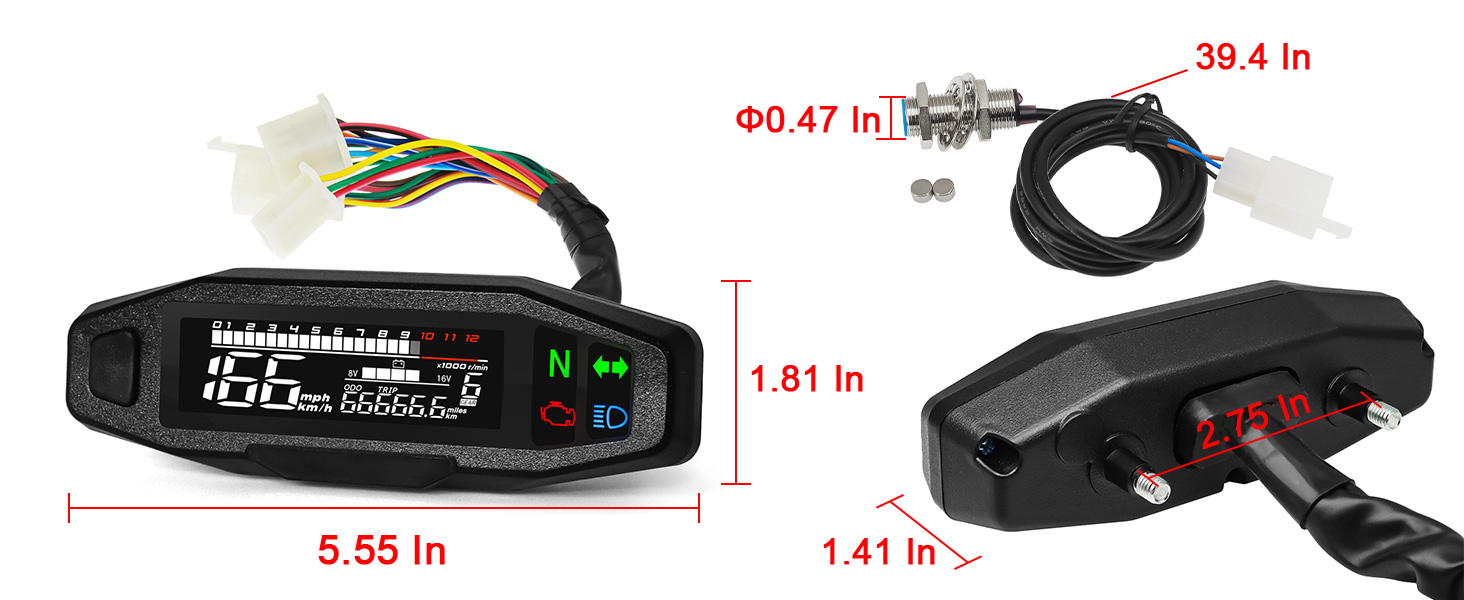
Image 5.1: Detailed instructions for parameter settings.
6. การบำรุงรักษา
The MAIMEIMI Digital Speedometer is designed for durability and minimal maintenance.
6.1 การออกแบบกันน้ำ
The unit features a waterproof design, allowing normal operation in rainy conditions. However, avoid prolonged submersion or high-pressure water jets directly on the unit.

Image 6.1: The speedometer's waterproof capability.
6.2 การดูแลทั่วไป
- Clean the screen and housing with a soft, damp ผ้า. หลีกเลี่ยงน้ำยาทำความสะอาดที่มีฤทธิ์กัดกร่อน
- Regularly check wiring connections for security and signs of wear.

Image 6.2: Display visibility in varying light conditions.
7 การแก้ไขปัญหา
7.1 ปัญหาทั่วไป
- RPM not working: The RPM function is designed for carburetor motors and is not compatible with Electric Fuel Injection (EFI) engines. Verify your engine type.
- การอ่านเร็วที่ไม่แม่นยำ: Check the speed sensor and magnet placement. Ensure magnets are 180 degrees apart and the sensor gap is consistent. Verify the tire circumference setting in the parameter menu.
- No Display/Intermittent Power: Check all wiring connections according to the diagram in Section 4.1. Ensure the operating voltage อยู่ในช่วง 9-16V
7.2 ขั้นตอนการรีเซ็ต
The unit includes a reset function for mileage. Note that once a reset is initiated, it cannot be undone.
- Press and hold the button while turning on the ignition switch and keep it pressed for 5 seconds.
- The screen will display "SETUP". Release the button.
- กดแบบยาว: Enter the reset procedure.
- ข่าวสารแบบสั้น: This will reduce the total mileage by 200 kilometers. The number of resets will increase by 1.
- กดแบบยาว: Exit the reset procedure.
There are a total of three reset opportunities. If the total mileage is less than 200 kilometers, it will be directly reset. If it exceeds 200 kilometers, each press will reduce it by 200 kilometers.
If there is no action on the setting parameter buttons for 20 seconds, the system will automatically exit.
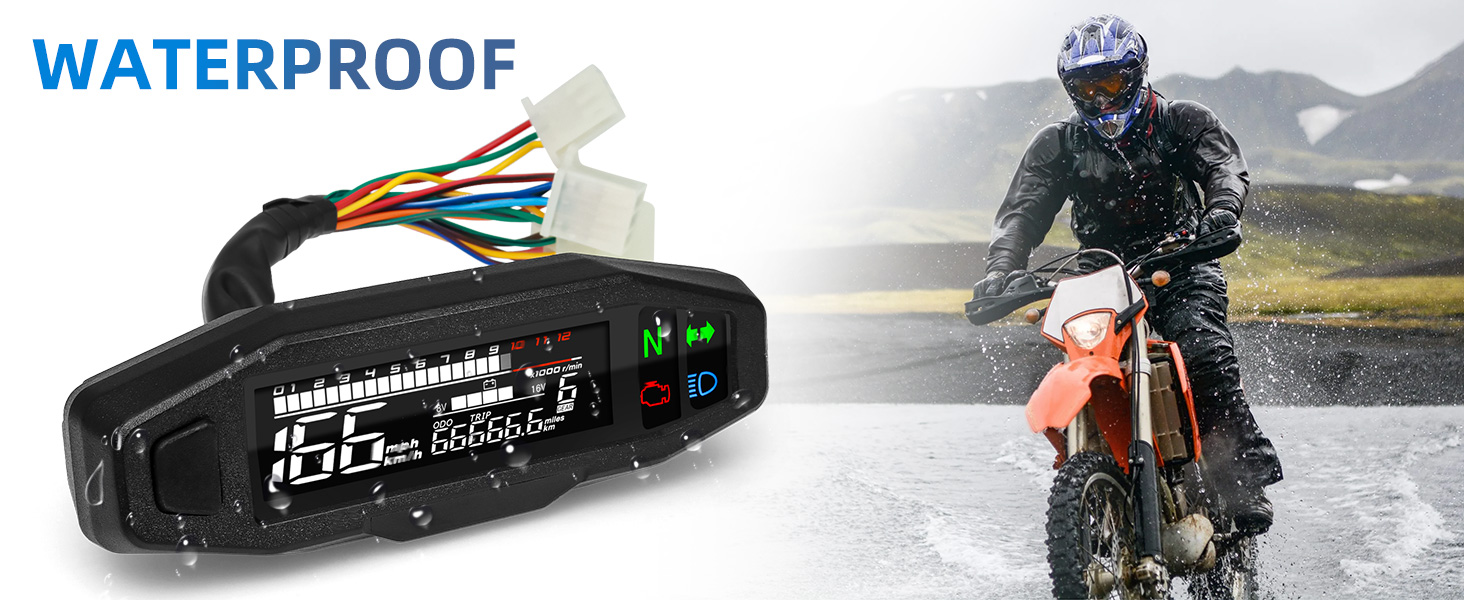
Image 7.1: Detailed instructions for the reset procedure.
8. การรับประกันและการสนับสนุน
สำหรับข้อมูลการรับประกันและการสนับสนุนทางเทคนิค โปรดติดต่อผู้ขายหรือผู้ผลิตโดยตรง เก็บใบเสร็จรับเงินไว้เป็นหลักฐานการซื้อ


