Mastech MS2101 AC/DC ดิจิตอล Clamp คู่มือการใช้งานมิเตอร์
Model: MS2101 | Brand: Mastech
1. ข้อมูลด้านความปลอดภัยที่สำคัญ
Please read and understand all safety information and operating instructions before using this instrument. Improper use may result in electric shock or damage to the meter. Always adhere to local and national safety codes.
- ห้ามป้อนค่าเกินค่าสูงสุดที่กำหนดไว้สำหรับแต่ละฟังก์ชัน
- Ensure the test leads are properly connected and in good condition before making any measurements.
- ห้ามใช้มิเตอร์หากพบว่าชำรุดเสียหาย หรือฉนวนหุ้มสายวัดมีสภาพไม่ดี
- ใช้ความระมัดระวังอย่างยิ่งเมื่อทำงานกับ voltages สูงกว่า 30V AC RMS, 42V peak หรือ 60V DC ปริมาตรเหล่านี้tagอาจทำให้เกิดอันตรายจากการช็อตได้
- ทุกครั้งให้ตัดกระแสไฟของวงจรและปล่อยประจุไฟฟ้าแรงสูงทั้งหมดออกtagตัวเก็บประจุก่อนการวัดความต้านทาน ความต่อเนื่อง ไดโอด หรือความจุ
- เปลี่ยนแบตเตอรี่ทันทีเมื่อไฟแสดงสถานะแบตเตอรี่อ่อนปรากฏขึ้นเพื่อให้แน่ใจว่าการอ่านค่าแม่นยำ
- This device is rated for CAT III 600V and CAT II 1000V. Adhere to these safety categories.
2. สินค้าหมดview
The Mastech MS2101 is a versatile AC/DC digital clamp meter designed for accurate measurement of current, voltage, resistance, capacitance, frequency, and temperature. It features auto-ranging capabilities and a clear digital display, making it suitable for both domestic and industrial electrical testing.
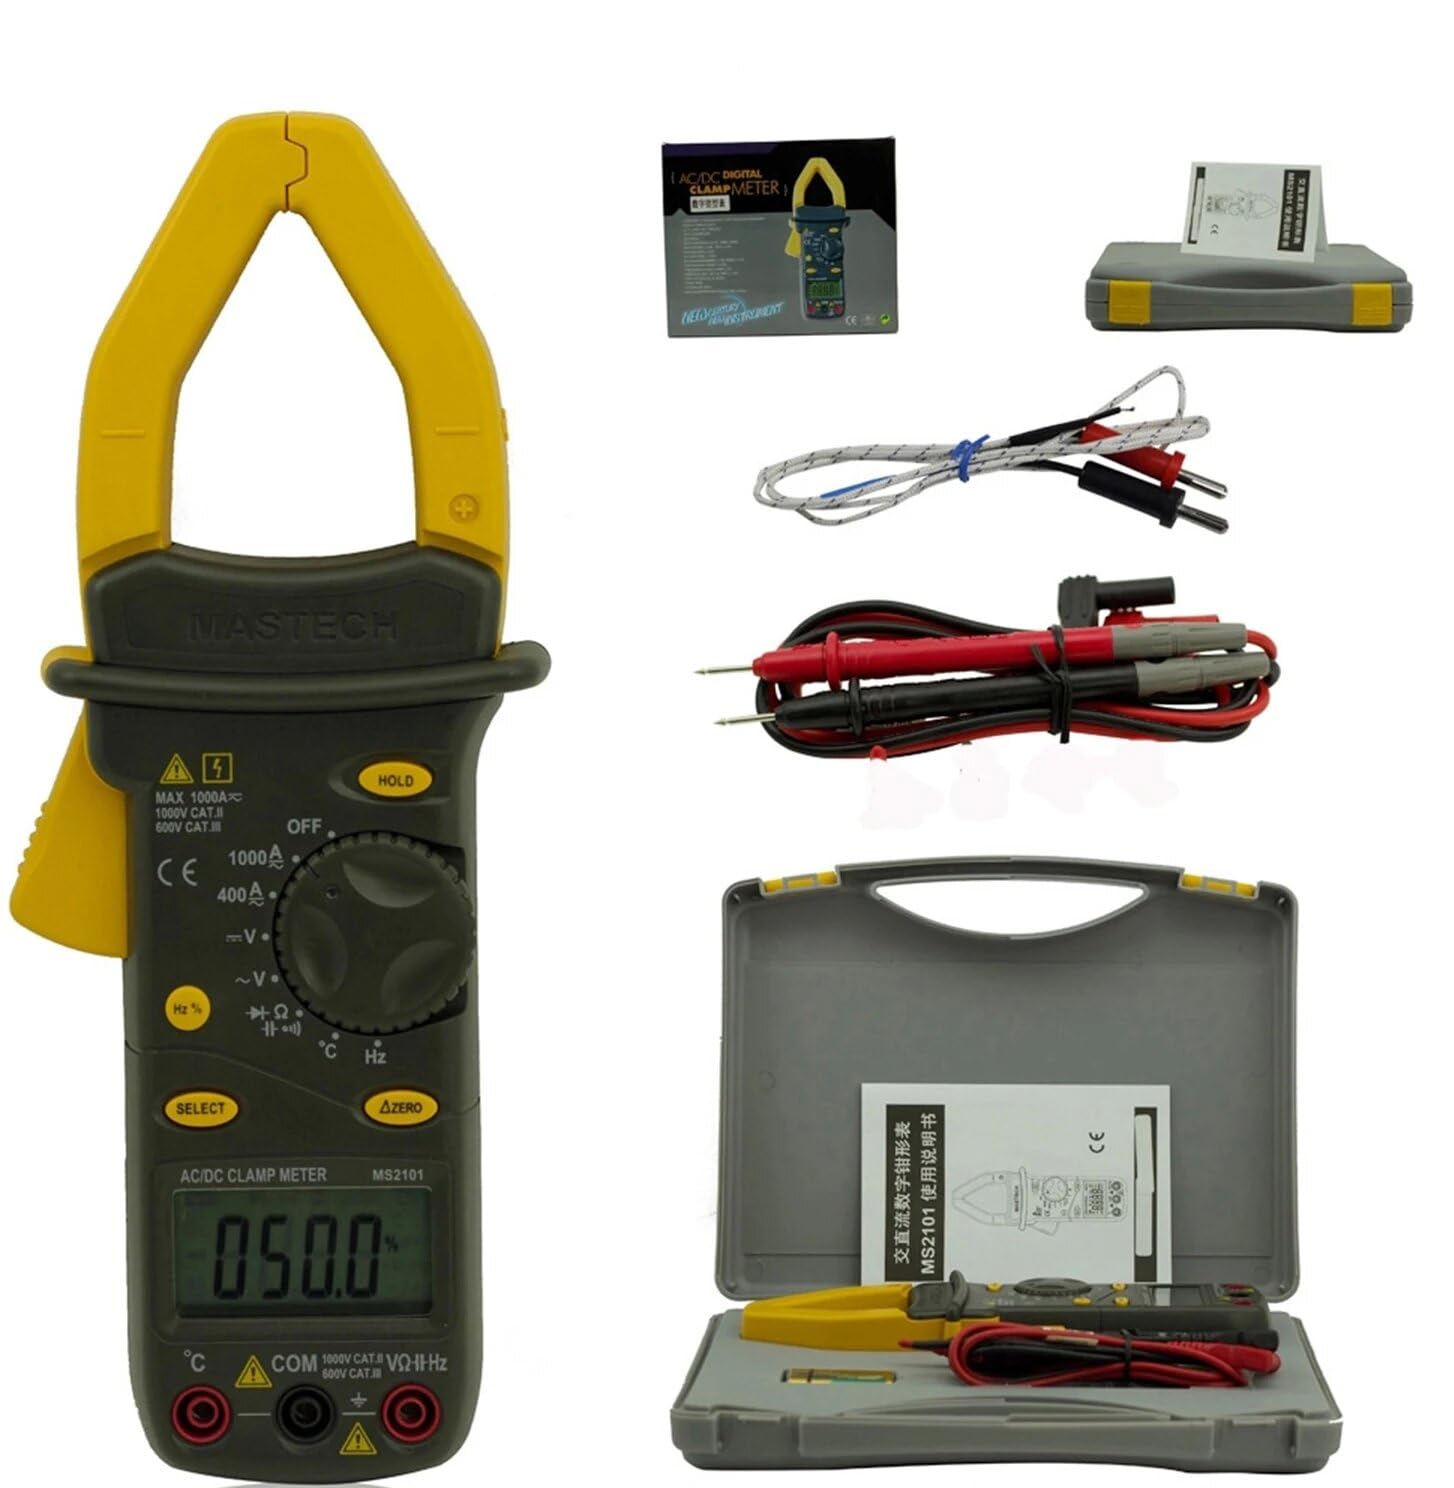
Image: Mastech MS2101 clamp meter with included test leads, temperature probe, and carrying case.
2.1 คุณสมบัติหลัก
- จอแสดงผล: นับ 4000
- Jaw Opening: Φ42mm / 1.7 inches
- ระยะอัตโนมัติและแบบแมนนวล
- ฟังก์ชั่นปิดเครื่องอัตโนมัติ
- ไดโอดเปิดโวลต์tagอี: 2.2V
- Continuity Buzzer: Activates at <50±20Ω
- ฟังก์ชั่น Data Hold
- ไฟแสดงสถานะแบตเตอรี่ต่ำ
3. เนื้อหาบรรจุภัณฑ์
Upon opening the package, verify that all items listed below are present and in good condition.

Image: Contents of the Mastech MS2101 package, including the meter, test leads, and documentation.
- Mastech MS2101 AC/DC ดิจิตอล Clamp เมตร
- Test Leads (one pair)
- K-Type Thermocouple (for temperature measurement)
- กระเป๋าใส่ของ
- ใบรับรองการสอบเทียบ
- คู่มือเริ่มต้นอย่างรวดเร็ว
- Batteries (2 x LR44, included)
4. การจัดวางอุปกรณ์และการควบคุม
Familiarize yourself with the various parts and controls of your MS2101 clamp เมตร.

ภาพ: ด้านหน้า view of the Mastech MS2101, highlighting the display, rotary switch, and function buttons.
- Cl .ปัจจุบันamp ขากรรไกร: ใช้สำหรับวัดกระแสไฟฟ้า AC/DC แบบไม่สัมผัส
- Jaw Trigger: Squeeze to open the current clamp กราม.
- สวิตช์โรตารี่: Selects the desired measurement function (OFF, V, A, Ω, Capacitance, Hz, Diode, Continuity, Temperature).
- จอแสดงผล LCD: แสดงค่าการวัด หน่วย และตัวบ่งชี้ฟังก์ชัน
- ปุ่มถือ: หยุดการอ่านค่าปัจจุบันบนจอแสดงผล
- ปุ่มเลือก: Toggles between AC/DC modes or different functions within a rotary switch position (e.g., Diode/Continuity, AC/DC Voltagจ).
- ΔZERO Button: Used to zero out DC current readings or relative measurements.
- แจ็คอินพุต COM: อินพุตทั่วไป (เชิงลบ) สำหรับสายทดสอบ
- VΩHz Input Jack: อินพุตเชิงบวกสำหรับเล่มtagการวัดค่าต่างๆ ได้แก่ ความต้านทาน ความถี่ ความจุ ไดโอด และความต่อเนื่อง
- Temperature Input Jack: Specific input for the K-type thermocouple.
5. การตั้งค่าเริ่มต้น
5.1 การติดตั้งแบตเตอรี่
The Mastech MS2101 requires two LR44 batteries for operation. These are typically included in the package.

ภาพ: ด้านหลัง view of the Mastech MS2101, indicating the location of the battery compartment screws.
- โปรดตรวจสอบให้แน่ใจว่ามิเตอร์ปิดอยู่
- หาช่องใส่แบตเตอรี่ที่ด้านหลังของมิเตอร์
- Use a screwdriver to remove the screws securing the battery cover.
- ถอดฝาครอบแบตเตอรี่ออกอย่างระมัดระวัง
- Insert two LR44 batteries, observing the correct polarity (+ and -) as indicated inside the compartment.
- ปิดฝาครอบแบตเตอรี่กลับเข้าที่และขันให้แน่นด้วยสกรู
6. คู่มือการใช้งาน
6.1 เปิด/ปิดเครื่อง
To power on the meter, rotate the rotary switch from the 'OFF' position to any desired measurement function. To power off, rotate the switch back to 'OFF'.
6.2 การเลือกฟังก์ชัน
Turn the rotary switch to the desired measurement function. For functions with multiple modes (e.g., AC/DC Voltage, Diode/Continuity), press the 'SELECT' button to toggle between them.
6.3 การวัดกระแสไฟฟ้า AC/DC
- Rotate the switch to the 'A' (Current) position.
- Press 'SELECT' to choose between AC or DC current measurement.
- กดไกปืนเพื่อเปิด clamp กราม.
- ให้หุ้มตัวนำเพียงตัวเดียวของวงจรไว้ภายในตัวหุ้มamp ขากรรไกร ตรวจสอบให้แน่ใจว่าขากรรไกรปิดสนิทแล้ว
- อ่านค่าปัจจุบันบนจอ LCD
- For DC current, use the 'ΔZERO' button to zero the display before measurement if necessary.
6.4 การวัดปริมาณไฟฟ้ากระแสสลับ/กระแสตรงtage
- Rotate the switch to the 'V' (Voltagจ) ตำแหน่ง
- Press 'SELECT' to choose between AC or DC voltagอีการวัด
- Insert the red test lead into the 'VΩHz' jack and the black test lead into the 'COM' jack.
- เชื่อมต่อหัววัดทดสอบแบบขนานกับวงจรหรือส่วนประกอบที่คุณต้องการวัด
- อ่านเล่มที่tagค่า e บนจอ LCD
6.5 การวัดความต้านทาน
- Rotate the switch to the 'Ω' (Resistance) position.
- Insert the red test lead into the 'VΩHz' jack and the black test lead into the 'COM' jack.
- Ensure the circuit or component is de-energized before connecting the test probes across it.
- อ่านค่าความต้านทานบนจอ LCD
6.6 การวัดความจุไฟฟ้า
- Rotate the switch to the 'Capacitance' position.
- Insert the red test lead into the 'VΩHz' jack and the black test lead into the 'COM' jack.
- Ensure the capacitor is fully discharged before connecting the test probes across it.
- อ่านค่าความจุบนจอ LCD
6.7 Measuring Frequency/Duty Cycle
- Rotate the switch to the 'Hz' (Frequency) position.
- Insert the red test lead into the 'VΩHz' jack and the black test lead into the 'COM' jack.
- เชื่อมต่อโพรบทดสอบเข้ากับแหล่งสัญญาณ
- Read the frequency or duty cycle value on the LCD display. Press 'SELECT' to toggle between frequency and duty cycle.
6.8 การทดสอบไดโอด
- Rotate the switch to the Diode/Continuity position. Press 'SELECT' until the diode symbol appears.
- Insert the red test lead into the 'VΩHz' jack and the black test lead into the 'COM' jack.
- เชื่อมต่อโพรบสีแดงเข้ากับขั้วบวก และโพรบสีดำเข้ากับขั้วลบของไดโอด
- อ่านฉบับหน้าtage drop on the display. Reverse the probes to check for open circuit (OL) in reverse bias.
6.9 การทดสอบความต่อเนื่อง
- Rotate the switch to the Diode/Continuity position. Press 'SELECT' until the continuity buzzer symbol appears.
- Insert the red test lead into the 'VΩHz' jack and the black test lead into the 'COM' jack.
- เชื่อมต่อหัววัดทดสอบเข้ากับวงจรหรือชิ้นส่วนนั้น
- ถ้าค่าความต้านทานต่ำกว่าประมาณ 50 โอห์ม เสียงกริ่งจะดังขึ้น ซึ่งแสดงว่ามีการเชื่อมต่อกัน
6.10 การวัดอุณหภูมิ
- Rotate the switch to the '°C/°F' (Temperature) position.
- Insert the K-type thermocouple into the dedicated temperature input jacks, observing polarity.
- Place the thermocouple tip on or near the object whose temperature you wish to measure.
- Read the temperature on the LCD display. Press 'SELECT' to toggle between Celsius and Fahrenheit.
6.11 ฟังก์ชั่นการเก็บข้อมูล
Press the 'HOLD' button to freeze the current reading on the display. Press it again to release the hold and resume live measurements.
6.12 Zeroing (ΔZERO) Function
In DC current mode, press the 'ΔZERO' button to zero the display before making a measurement. This compensates for any residual magnetic fields or offsets, ensuring more accurate DC current readings.
6.13 ปิดเครื่องอัตโนมัติ
The meter will automatically power off after approximately 15 minutes of inactivity to conserve battery life. To reactivate, turn the rotary switch to 'OFF' and then back to the desired function.
7. การบำรุงรักษา
7.1 การทำความสะอาด
เช็ดทำความสะอาดมิเตอร์asinจีกับโฆษณาamp ผ้าและผงซักฟอกอ่อนๆ ห้ามใช้สารกัดกร่อนหรือตัวทำละลาย ตรวจสอบให้แน่ใจว่ามิเตอร์แห้งสนิทก่อนใช้งาน
7.2 การเปลี่ยนแบตเตอรี่
When the low battery indicator appears on the display, replace the batteries as described in Section 5.1. Always use two new LR44 batteries.
7.3 พื้นที่จัดเก็บ
หากไม่ได้ใช้งานมิเตอร์เป็นเวลานาน ให้ถอดแบตเตอรี่ออกเพื่อป้องกันการรั่วไหลและความเสียหาย เก็บมิเตอร์ไว้ในที่แห้งและเย็น หลีกเลี่ยงแสงแดดโดยตรงและอุณหภูมิที่สูงหรือต่ำเกินไป
8 การแก้ไขปัญหา
- มิเตอร์ไม่เปิด: ตรวจสอบการติดตั้งแบตเตอรี่และให้แน่ใจว่าแบตเตอรี่ไม่หมด
- ไม่มีการแสดงข้อความอ่านหรือ 'OL': Ensure test leads are properly connected and making good contact. For current measurements, ensure only one conductor is within the clamp jaw. For resistance/continuity, ensure the circuit is de-energized. 'OL' (Overload) indicates the measured value is beyond the meter's range.
- การอ่านค่าที่ไม่ถูกต้อง: Check battery level. Ensure the correct function is selected. For DC current, use the 'ΔZERO' function.
- Buzzer not sounding in continuity mode: The resistance may be too high (above 50Ω), or the circuit is open.
9. ข้อมูลจำเพาะทางเทคนิค
Detailed specifications for the Mastech MS2101 clamp meter are provided below.

Image: Table detailing the measurement ranges, resolutions, and accuracies of the Mastech MS2101.
| การวัด | พิสัย | ปณิธาน | ความแม่นยำ |
|---|---|---|---|
| DC ฉบับที่tage | 400mV/4V/40V/400V 1000โวลต์ | 0.1mV/1mV/10mV/0.1V 1V | ±(0.7%+1) ±(0.8%+3) |
| ฉบับ ACtage | 4โวลต์/40โวลต์/400โวลต์ 750โวลต์ | 1mV/10mV/0.1V 1V | ±(0.8%+5) ±(1.0%+10) |
| กระแสไฟฟ้าตรง | 400เอ/1000เอ | 0.1เอ/1เอ | ±(3.0%+3) |
| กระแสไฟ AC | 400เอ/1000เอ | 0.1เอ/1เอ | ±(3.0%+3) |
| ความต้านทาน | 400Ω/4kΩ/40kΩ/400kΩ/4MΩ 40เมกะโอห์ม | 0.1Ω/1Ω/10Ω/100Ω/1kΩ 10kΩ | ±(1.2%+1) ±(2.0%+3) |
| ความจุ | 4nF/40nF/400nF 4µF/40µF/100µF | 1pF/10pF/0.1nF 1nF/10nF/100nF | ±(4.0%+10) ±(4.0%+10) |
| ความถี่ | 40Hz/400Hz/4kHz/40kHz/100kHz | 0.01Hz/0.1Hz/1Hz/10Hz/0.1kHz | ±(2.0%+1) |
| รอบการทำงาน | 0.1% ~ 99.9% | 0.10% | ±(2.0%+2) |
| อุณหภูมิ | -40°C ~ 0°C 1°ซ ~ 400°ซ 401°ซ ~ 750°ซ | 1 องศาเซลเซียส 1 องศาเซลเซียส 1 องศาเซลเซียส | ±(1.0%+6) ±(1.0%+3) ±(1.0%+5) |
| แสดง | 4000 นับ | ||
| การเปิดขากรรไกร | 42mm / 1.7 นิ้ว | ||
| Buzzer ต่อเนื่อง | <50±20Ω | ||
| ไดโอดเปิดโวลต์tage | 2.2โวลต์ | ||
| แหล่งพลังงาน | แบตเตอรี่ LR44 จำนวน 2 ก้อน | ||
| ขนาด (กว้าง x ยาว x สูง) | 7.87 x 5.91 x 9.84 นิ้ว | ||
| น้ำหนัก | 1 กิโลกรัม (2.2 ปอนด์) | ||
10. การรับประกันและการสนับสนุน
The Mastech MS2101 Digital Clamp Meter comes with a 1-year warranty from the date of purchase, covering manufacturing defects. Please retain your proof of purchase for warranty claims.
For technical support, product information, or warranty inquiries, please visit the official Mastech webไซต์หรือติดต่อฝ่ายบริการลูกค้า:
- Official Mastech Webเว็บไซต์: www.mastech-group.com
- หน้าสนับสนุน: http://www.mastech-group.com/support.php?n=0


