1. บทนำ
The Mastech MS8250D is a high-performance digital multimeter designed for accurate measurement of AC/DC voltage, AC/DC current, resistance, capacitance, frequency, and temperature. It features a 6600-count display, auto/manual ranging, True RMS, Non-Contact Voltage (NCV) detection, diode and continuity testing, and a USB interface for PC connectivity. This manual provides detailed instructions for safe and effective use of the device.
คุณสมบัติหลัก:
- 6600-count digital display
- Automatic and Manual Ranging
- การวัดค่า True RMS
- แบบไม่สัมผัส Voltage (NCV) การตรวจจับ
- Diode and Continuity Tester (buzzer < 50Ω)
- MAX/MIN value recording
- ฟังก์ชั่น Data Hold
- ไฟแบ็คไลท์หน้าจอ
- ปิดเครื่องอัตโนมัติ
- โหมดการวัดแบบสัมพันธ์
- การบ่งชี้แบตเตอรี่ต่ำ
- USB Interface for Windows OS
2. ข้อมูลด้านความปลอดภัย
คำเตือน: To avoid electric shock or personal injury, and to avoid damage to the meter or to the equipment under test, read all safety information carefully before using the meter. This device complies with CE, RoHS, and UL safety standards.
- Always ensure the test leads are in good condition and properly connected.
- ห้ามใช้เกินปริมาณที่กำหนดtagจ ตามที่ทำเครื่องหมายไว้บนมาตร ระหว่างขั้วต่อหรือระหว่างขั้วต่อใดๆ กับสายดิน
- ใช้ความระมัดระวังเมื่อทำงานกับ voltages สูงกว่า 30V AC RMS, 42V peak หรือ 60V DC ปริมาตรเหล่านี้tagอาจทำให้เกิดอันตรายจากการช็อตได้
- Before measuring current, ensure the circuit is de-energized and the meter is connected in series.
- ควรตัดการเชื่อมต่อสายวัดทดสอบออกจากวงจรทุกครั้งก่อนเปลี่ยนฟังก์ชันหรือช่วงการวัด
- อย่าใช้มิเตอร์หากพบว่ามีความเสียหายหรือหากตัวเครื่องเปิดอยู่
- ควรเปลี่ยนแบตเตอรี่ทันทีที่ไฟแสดงสถานะแบตเตอรี่ต่ำปรากฏขึ้น เพื่อให้ได้ค่าการวัดที่แม่นยำ
- Adhere to the specified measurement categories (CAT III 1000V / CAT IV 600V) for safe operation.
3. สินค้าหมดview
Familiarize yourself with the components of your Mastech MS8250D Digital Multimeter.

ภาพที่ 3.1: ด้านหน้า view of the Mastech MS8250D Digital Multimeter, showing the display, function dial, and input jacks. The display shows "1.987 V", indicating a voltage measurement. The function dial is set to T-RMS. Input jacks are labeled for µA mA, A, VΩHz%, and COM.
องค์ประกอบหลัก:
- จอแสดงผล LCD: แสดงค่าการวัด หน่วย และตัวบ่งชี้ฟังก์ชัน
- แป้นหมุนเลือกฟังก์ชัน: ใช้สำหรับเลือกฟังก์ชันการวัดที่ต้องการ (เช่น ปริมาตร)tage, Current, Resistance, Diode, Continuity, Temperature).
- ปุ่มฟังก์ชั่น:
- ถือ: หยุดการแสดงค่าปัจจุบันบนหน้าจอ
- พิสัย: Switches between auto and manual ranging.
- เรล: เปิดใช้งานโหมดการวัดแบบสัมพันธ์
- สูงสุด/นาที: บันทึกค่าสูงสุดและค่าต่ำสุด
- ฟังก์: Selects sub-functions within a dial position (e.g., AC/DC, Diode/Continuity).
- T-RMS: (Indicated on dial) True RMS measurement.
- เอ็นซีวี: แบบไม่สัมผัส Voltagการตรวจจับอี
- ปุ่มแบ็คไลท์: Activates display backlight.
- แจ็คอินพุต:
- คอม: ขั้วต่อร่วมสำหรับการวัดทั้งหมด (สายลบ)
- VΩHz%: อินพุตสำหรับ voltage, resistance, frequency, capacitance, and diode/continuity measurements (positive lead).
- µA mA: อินพุตสำหรับไมโครampere และ milliampere current measurements (positive lead). Fused for protection.
- A: อินพุตสำหรับ ampere current measurements (positive lead). Fused for protection.
ส่วนประกอบที่รวมอยู่:
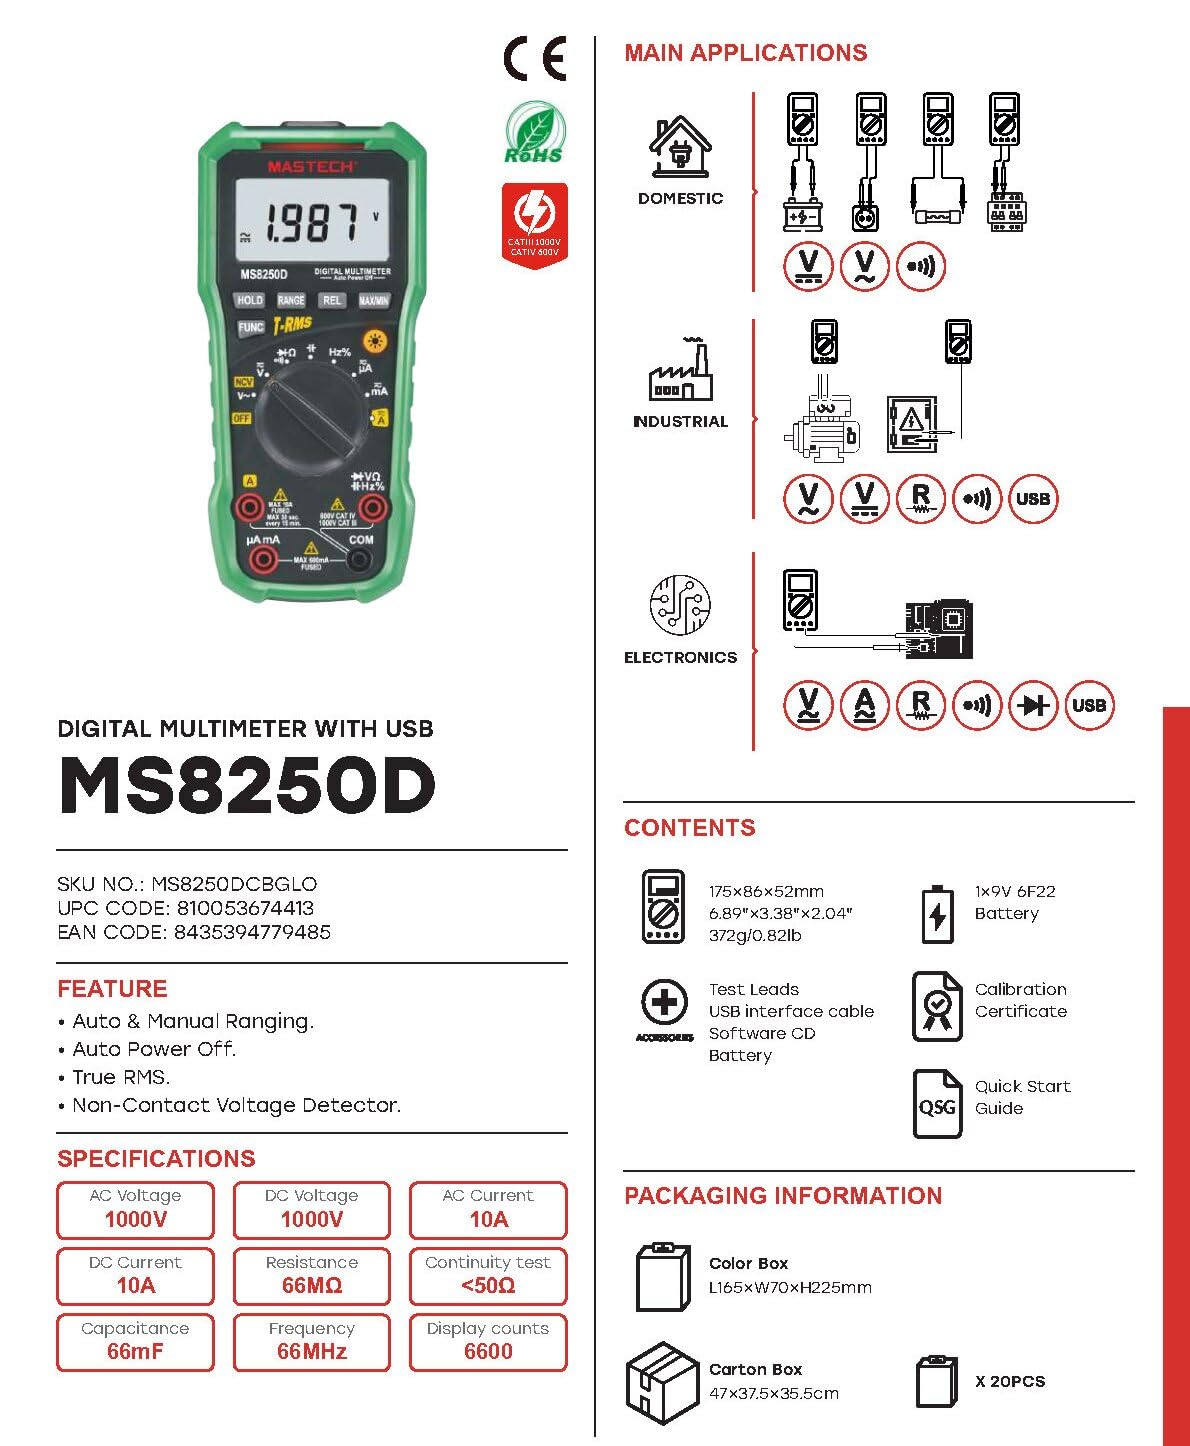
ภาพที่ 3.2: Diagram showing the Mastech MS8250D Multimeter and its included accessories. The image also illustrates typical applications in domestic, industrial, and electronics settings.
- มัลติมิเตอร์ดิจิทัล Mastech MS8250D
- สายทดสอบ (สีแดงและสีดำ)
- แบตเตอรี่ 9V 6F22 จำนวน 1 ก้อน (ติดตั้งมาแล้ว หรือมีจำหน่ายแยกต่างหาก)
- สายเชื่อมต่อ USB
- Software CD (for Windows OS)
- ใบรับรองการสอบเทียบ
- คู่มือเริ่มต้นอย่างรวดเร็ว
4. การตั้งค่า
4.1 การติดตั้งแบตเตอรี่
The MS8250D requires one 9V 6F22 battery for operation. Two LR44 batteries are also mentioned in specifications, likely for a different internal component or an error in data. For the main power, use the 9V battery.
- ตรวจสอบให้แน่ใจว่ามัลติมิเตอร์ปิดอยู่
- ค้นหาฝาครอบช่องใส่แบตเตอรี่ที่ด้านหลังของมิเตอร์
- ใช้ไขควงคลายสกรูที่ยึดฝาครอบออก
- ถอดฝาครอบออก
- Connect the 9V battery to the battery clips, observing correct polarity (+ and -).
- ใส่แบตเตอรี่ลงในช่องใส่
- ปิดฝาช่องใส่แบตเตอรี่และขันสกรูให้แน่น
บันทึก: The meter also uses 2 LR44 batteries, which are typically included and pre-installed for specific functions like the backlight or non-contact voltage detection. Refer to the quick-start guide for specific details on these smaller batteries if replacement is needed.
4.2 การเชื่อมต่อสายทดสอบ
Always connect the black test lead to the COM jack. Connect the red test lead to the appropriate input jack based on the measurement type:
- สำหรับฉบับที่tage, Resistance, Capacitance, Frequency, Diode, and Continuity measurements: Connect the red lead to the VΩเฮิร์ตซ์% แจ็ค.
- For Current measurements (µA or mA): Connect the red lead to the µA มิลลิแอมป์ แจ็ค.
- For High Current measurements (A): Connect the red lead to the A แจ็ค.
ตรวจสอบให้แน่ใจว่าเสียบสายทดสอบเข้ากับแจ็คจนสุดแล้ว
5. คู่มือการใช้งาน
5.1 เปิด/ปิดเครื่อง
To turn the meter ON, rotate the function dial from the "OFF" position to any desired measurement function. To turn the meter OFF, rotate the function dial back to the "OFF" position.
มิเตอร์นี้มีคุณสมบัติ ปิดเครื่องอัตโนมัติ function to conserve battery life. It will automatically power off after a period of inactivity. To disable or re-enable this feature, refer to the quick-start guide or the full user manual provided on the software CD.
5.2 Auto Ranging and Manual Ranging
The MS8250D defaults to ระยะห่างอัตโนมัติ, which automatically selects the best measurement range. Press the ประเภท ปุ่มเพื่อเปลี่ยนเป็น การจัดลำดับด้วยตนเอง. In manual ranging, each press of the ประเภท button cycles through available ranges. To return to auto ranging, press and hold the ประเภท ปุ่ม.
5.3 การวัดปริมาณไฟฟ้ากระแสสลับ/กระแสตรงtagอี (วี)
- ตั้งค่าปุ่มหมุนฟังก์ชั่นไปที่ V~ (AC เล่มtagจ) หรือ V- (DC เล่มtagจ) ตำแหน่ง
- เชื่อมต่อสายทดสอบสีดำเข้ากับ คอม แจ็คและการทดสอบสีแดงนำไปสู่ VΩเฮิร์ตซ์% แจ็ค.
- เชื่อมต่อโพรบวัดทดสอบเข้ากับวงจรหรือชิ้นส่วนที่ต้องการวัด
- อ่านเล่มที่tage value on the display. The meter will automatically detect AC or DC if the dial is set to the combined V position, or you can use the ฟังค์ชั่น button to toggle between AC and DC if available on your model.
5.4 Measuring AC/DC Current (A, mA, µA)
คำเตือน: Never connect the meter in parallel to a voltagอย่าต่อแหล่งจ่ายไฟเข้ากับมิเตอร์ขณะวัดกระแสไฟฟ้า เพราะอาจทำให้ฟิวส์ขาดหรือมิเตอร์เสียหายได้
- ปิดไฟเข้าวงจร
- ตั้งค่าปุ่มหมุนฟังก์ชั่นไปที่ A~ (กระแสไฟฟ้าสลับ) A- (กระแสไฟฟ้าตรง) ม๊า~, ม-, µA~, หรือ µA- ตำแหน่ง.
- เชื่อมต่อสายทดสอบสีดำเข้ากับ คอม แจ็ค.
- เชื่อมต่อสายทดสอบสีแดงเข้ากับ A jack for high current, or µA มิลลิแอมป์ jack for low current.
- Open the circuit where the current is to be measured and connect the meter in series with the load.
- จ่ายไฟฟ้าเข้าสู่วงจร
- Read the current value on the display. Use the ฟังค์ชั่น ปุ่มสำหรับสลับระหว่างไฟ AC และ DC หากจำเป็น
5.5 การวัดค่าความต้านทาน (โอห์ม)
- ตั้งค่าปุ่มหมุนฟังก์ชั่นไปที่ Ω ตำแหน่ง.
- เชื่อมต่อสายทดสอบสีดำเข้ากับ คอม แจ็คและการทดสอบสีแดงนำไปสู่ VΩเฮิร์ตซ์% แจ็ค.
- ตรวจสอบให้แน่ใจว่าวงจรหรืออุปกรณ์ที่กำลังทดสอบนั้นไม่มีกระแสไฟฟ้าไหลผ่าน
- เชื่อมต่อหัววัดทดสอบเข้ากับส่วนประกอบนั้น
- อ่านค่าความต้านทานบนจอแสดงผล
5.6 การทดสอบไดโอดและการทดสอบความต่อเนื่อง
- ตั้งค่าปุ่มหมุนฟังก์ชั่นไปที่ ไดโอด/ความต่อเนื่อง position (often shared with resistance or capacitance).
- เชื่อมต่อสายทดสอบสีดำเข้ากับ คอม แจ็คและการทดสอบสีแดงนำไปสู่ VΩเฮิร์ตซ์% แจ็ค.
- ใช้ ฟังค์ชั่น button to select between Diode Test and Continuity Test.
- สำหรับการทดสอบไดโอด: ต่อหัววัดสีแดงเข้ากับขั้วบวก และต่อหัววัดสีดำเข้ากับขั้วลบของไดโอด จอแสดงผลจะแสดงค่าปริมาตรไปข้างหน้าtage drop (typically 0.5V to 0.8V for silicon diodes). Reversing the probes should show "OL" (Open Loop).
- สำหรับการทดสอบความต่อเนื่อง: Connect the probes across the circuit or component. If resistance is less than approximately 50Ω, the buzzer will sound, indicating continuity.
5.7 การวัดค่าความจุ (ฟารัด)
- ตั้งค่าปุ่มหมุนฟังก์ชั่นไปที่ ความจุ position (often shared with resistance or diode).
- เชื่อมต่อสายทดสอบสีดำเข้ากับ คอม แจ็คและการทดสอบสีแดงนำไปสู่ VΩเฮิร์ตซ์% แจ็ค.
- Ensure the capacitor is fully discharged before testing to avoid damage to the meter.
- ต่อสายวัดทดสอบเข้ากับขั้วของตัวเก็บประจุ
- อ่านค่าความจุบนจอแสดงผล
5.8 Measuring Frequency (Hz) and Duty Cycle (%)
- ตั้งค่าปุ่มหมุนฟังก์ชั่นไปที่ เฮิร์ตซ์% position (often shared with voltagจ).
- เชื่อมต่อสายทดสอบสีดำเข้ากับ คอม แจ็คและการทดสอบสีแดงนำไปสู่ VΩเฮิร์ตซ์% แจ็ค.
- เชื่อมต่อโพรบทดสอบเข้ากับแหล่งสัญญาณ
- The display will show the frequency. Press the ฟังค์ชั่น button to toggle to Duty Cycle measurement if available.
5.9 ไม่สัมผัส Voltagการตรวจจับ e (NCV)
- ตั้งค่าปุ่มหมุนฟังก์ชั่นไปที่ เอ็นซีวี ตำแหน่ง.
- Hold the meter with the NCV sensor (usually at the top of the meter) near a live AC voltagแหล่งที่มา
- มิเตอร์จะแสดงว่ามีแรงดันไฟฟ้ากระแสสลับอยู่หรือไม่tagผ่านทางเสียงบี๊บและ/หรือตัวบ่งชี้ภาพ (เช่น ไฟ LED)
5.10 USB Interface (Windows OS)
The MS8250D includes a USB interface for connecting to a computer running Windows OS. This allows for data logging and real-time monitoring of measurements. Install the provided software from the CD and follow the on-screen instructions for driver installation and software usage.
6. การบำรุงรักษา
6.1 การทำความสะอาด
เช็ดตัวเรือนมิเตอร์ด้วยน้ำยาทำความสะอาดamp ผ้าและผงซักฟอกอ่อนๆ ห้ามใช้สารกัดกร่อนหรือตัวทำละลาย ตรวจสอบให้แน่ใจว่ามิเตอร์แห้งสนิทก่อนใช้งาน
6.2 การเปลี่ยนแบตเตอรี่
When the low battery indicator appears on the display, replace the 9V battery immediately to ensure accurate readings. Follow the steps in Section 4.1 Battery Installation.
6.3 การเปลี่ยนฟิวส์
If the meter fails to measure current, the fuse may be blown. Fuses are located inside the meter. To replace a fuse:
- โปรดตรวจสอบให้แน่ใจว่ามิเตอร์ปิดอยู่และถอดสายวัดทั้งหมดออกแล้ว
- เปิดฝาช่องใส่แบตเตอรี่ (และอาจต้องเปิดเคสหลักด้วย ขึ้นอยู่กับการออกแบบ)
- ถอดฟิวส์เก่าออกอย่างระมัดระวัง
- Replace with a fuse of the exact same type and rating (e.g., F600mA/250V for mA/µA range, F10A/250V for A range). Refer to the meter's internal markings or the full manual for specific fuse ratings.
- ประกอบมิเตอร์กลับเข้าที่ โดยตรวจสอบให้แน่ใจว่าขันสกรูทุกตัวแน่นดีแล้ว
คำเตือน: Never use a fuse with a different rating or bypass the fuse. This can damage the meter and pose a serious safety hazard.
7 การแก้ไขปัญหา
| ปัญหา | สาเหตุที่เป็นไปได้ | สารละลาย |
|---|---|---|
| มิเตอร์ไม่เปิดใช้งาน | แบตเตอรี่หมด | เปลี่ยนแบตเตอรี่ 9V |
| แสดงข้อความ "OL" (Overload) | ค่าที่วัดได้เกินช่วงที่เลือกหรือเกินความจุสูงสุดของมิเตอร์ | Switch to a higher range (if in manual ranging) or ensure the measurement is within the meter's limits. |
| No current reading. | Blown fuse; incorrect lead connection; open circuit. | Check and replace fuse if necessary. Ensure leads are connected correctly (in series). Verify circuit continuity. |
| การอ่านที่ไม่ถูกต้อง | Low battery; poor lead contact; external interference. | Replace battery. Ensure leads are firmly connected. Move away from strong electromagnetic fields. |
| Display shows "USB" but no PC connection. | Drivers not installed; incorrect software settings. | Install drivers from the provided CD. Refer to software manual for connection instructions. |
8. ข้อมูลจำเพาะ
The following table details the technical specifications of the Mastech MS8250D Digital Multimeter.

ภาพที่ 8.1: Detailed specifications table for the Mastech MS8250D, outlining ranges, resolutions, and accuracies for various measurement functions.
| การทำงาน | พิสัย | ปณิธาน | ความแม่นยำ |
|---|---|---|---|
| DC ฉบับที่tage | |||
| 660mV | 0.1mV | ±(0.8%+3) | |
| 6.6V/66V/660V/1000V | 1mV/10mV/0.1V/1V | ±(0.5%+5) | |
| ฉบับ ACtage (ทรูอาร์เอ็มเอส) | |||
| 660mV | 0.1mV | ±(1.5%+5) | |
| 6.6โวลต์/66โวลต์ | 1mV/10mV | ±(1.2%+5) | |
| 660โวลต์/1000โวลต์ | 0.1โวลต์/1โวลต์ | ±(1.0%+3) | |
| กระแสไฟฟ้าตรง | |||
| 660µA / 6600µA / 66mA / 660mA | 0.1µA/1µA/10µA/0.1mA | ±(1.0%+5) | |
| 10เอ | 10มิลลิแอมป์ | ±(2.0%+5) | |
| กระแสไฟ AC (True RMS) | |||
| 660µA / 6600µA / 66mA / 660mA | 0.1µA / 1µA / 0.01mA / 0.1mA | ±(1.5%+5) | |
| 10เอ | 10มิลลิแอมป์ | ±(3.0%+5) | |
| ความต้านทาน | |||
| 660Ω / 6.6kΩ / 66kΩ / 660kΩ / 6.6MΩ | 0.1Ω / 1Ω / 10Ω / 100Ω / 1kΩ | ±(0.8%+5) | |
| 66เมกะโอห์ม | 10kΩ | ±(1.5%+5) | |
| ความจุ | |||
| 6.6nF/66nF/660nF/6.6µF/66µF | 1pF/10pF/0.1nF/1nF/10nF | ±(4.0%+5) | |
| 600µF | 1µF | ±(3.0%+5) | |
| 6.6mF/66mF | 1µF/10µF | ±(4.0%+5) | |
| ความถี่ | |||
| 66เฮิร์ต/660เฮิร์ต/6.6กิโลเฮิร์ตซ์/66กิโลเฮิร์ตซ์ | 0.01 เฮิร์ต / 0.1 เฮิร์ต / 1 เฮิร์ต / 10 เฮิร์ต | ±(1.5%+5) | |
| 660กิโลเฮิร์ตซ์/6.6เมกะเฮิร์ตซ์/66เมกะเฮิร์ตซ์ | 0.1กิโลเฮิร์ตซ์/1กิโลเฮิร์ตซ์/10กิโลเฮิร์ตซ์ | ±(1.5%+5) | |
| รอบการทำงาน | |||
| 0.1%~99.9% | 0.1% | ±(2.0%+5) | |
ข้อมูลจำเพาะทั่วไป:
- แสดง: 6600 นับ
- แหล่งพลังงาน: 1x 9V 6F22 Battery (main power), 2x LR44 batteries (auxiliary, e.g., backlight)
- ปิดเครื่องอัตโนมัติ: ใช่
- RMS ที่แท้จริง: ใช่
- แบบไม่สัมผัส Voltagเครื่องตรวจจับ e (NCV): ใช่
- ไดโอดเปิดโวลต์tage: 3.2โวลต์
- สัญญาณเตือนภัยความต่อเนื่อง: < 50Ω
- สูงสุด/นาที: ใช่
- การเก็บข้อมูล: ใช่
- แสดงสถานะแบตเตอรี่เหลือน้อย: ใช่
- จอแสดงผลแบ็คไลท์: ใช่
- อินเทอร์เฟซ USB: Yes (Windows OS)
- ระดับความปลอดภัย: CAT III 1000V / CAT IV 600V
- ความแม่นยำในการวัด: 0.4% (general, specific accuracies per function in table)
- ปฏิบัติการฉบับที่tagอี (ต่ำสุด): 3.2 โวลต์
- คะแนนอุณหภูมิด้านบน: 50 องศาเซลเซียส
- ขนาด (ยาว x กว้าง x สูง): 20 x 15 x 25 ซม.
- น้ำหนักสินค้า: 1 กก.
- วัสดุ: อะคริโลไนไตรล์ บิวทาไดอีน สไตรีน (ABS)
- สี: สีฟ้า
- ผู้ผลิต: MASTECH
- ประเทศต้นกำเนิด: ไต้หวัน
- ใบรับรอง: CE, RoHS, UL
9. การรับประกันและการสนับสนุน
Mastech products are designed for reliability and durability. For specific warranty information, please refer to the warranty card included with your product or contact Mastech customer support directly. Typically, Mastech offers a limited warranty against defects in materials and workmanship.
For technical support, troubleshooting assistance, or warranty claims, please contact your authorized Mastech dealer or visit the official Mastech webเว็บไซต์สำหรับข้อมูลการติดต่อ
ระยะเวลาที่มีอะไหล่สำรองในสหภาพยุโรป: 1 ปี


