1. บทนำ
This manual provides detailed instructions for the setup, operation, maintenance, and troubleshooting of your Koiiko Wireless Gaming Controller Z01. This versatile controller is designed for compatibility across multiple platforms, including iOS, Android, PC, Nintendo Switch, PlayStation 3, and PlayStation 4, offering an enhanced gaming experience with its advanced features.

ภาพที่ 1.1: ด้านหน้า view of the Koiiko Wireless Gaming Controller Z01, showcasing its design and illuminated elements.
2. ส่วนประกอบของตัวควบคุม
Familiarize yourself with the various buttons and features of your Koiiko Z01 controller:
- Left/Right Analog Sticks (Hall Effect): For precise 3D movement and input, featuring Hall Effect sensors to prevent drift.
- ดี-แพด: Directional pad for digital input.
- ปุ่มการกระทำ (A, B, X, Y): Standard gaming input buttons, with interchangeable key values.
- Shoulder Buttons (LB, RB) & Triggers (Hall Effect Linear): For additional actions and responsive input, featuring Hall Effect linear triggers.
- ปุ่มโฮม: For system menu access and power control.
- Select/Share Button: For various in-game or system functions.
- Start/Options Button: For various in-game or system functions.
- ปุ่ม M1/M2: Programmable back buttons for custom actions.
- ปุ่มเทอร์โบ: Activates continuous input for other buttons.
- ปุ่มปรับแสง: Controls the 7-color RGB breathing light modes.
- พอร์ต USB-C: สำหรับการชาร์จคอนโทรลเลอร์

ภาพที่ 2.1: รายละเอียดเพิ่มเติมview of the Koiiko Wireless Gaming Controller Z01, highlighting its main features.
3. คุณสมบัติหลัก
- ความเข้ากันได้ในวงกว้าง: Supports iOS (iPhone, iPad), Android (phones, tablets), PC, Nintendo Switch/Switch OLED/Switch Lite, PlayStation 3, and PlayStation 4. Compatible with Steam, Xbox Game Pass, Nvidia GeForce Now, Amazon Luna, Google Stadia, and other cloud gaming services.
- เทคโนโลยีฮอลล์เอฟเฟกต์: Equipped with Hall Effect joysticks and linear triggers for enhanced precision, durability, and prevention of stick drift.
- ไฟ RGB ที่ปรับแต่งได้: Features a 7-color RGB breathing light with 5 distinct lighting modes on the joysticks, adjustable via a dedicated button.
- ปุ่มที่สามารถตั้งโปรแกรมได้: Includes two programmable back buttons (M1, M2) and highly customizable LB, RB buttons, supporting up to 30 action keys.
- Six-Axis Gyro: Built-in 6-axis gyroscope for motion control, supported on PC, PS3, PS4, and Switch.
- ฟังก์ชั่นเทอร์โบ: Allows for continuous input with a single press, enhancing gameplay for rapid actions.
- แบตเตอรี่ใช้งานได้ยาวนาน: Integrated 600mAh lithium battery provides approximately 10-15 hours of continuous use on a single charge.
- การออกแบบพกพา: Small and lightweight, making it easy to carry and store.

Image 3.1: Illustration of the Hall Effect 3D joystick, highlighting its drift-prevention design.
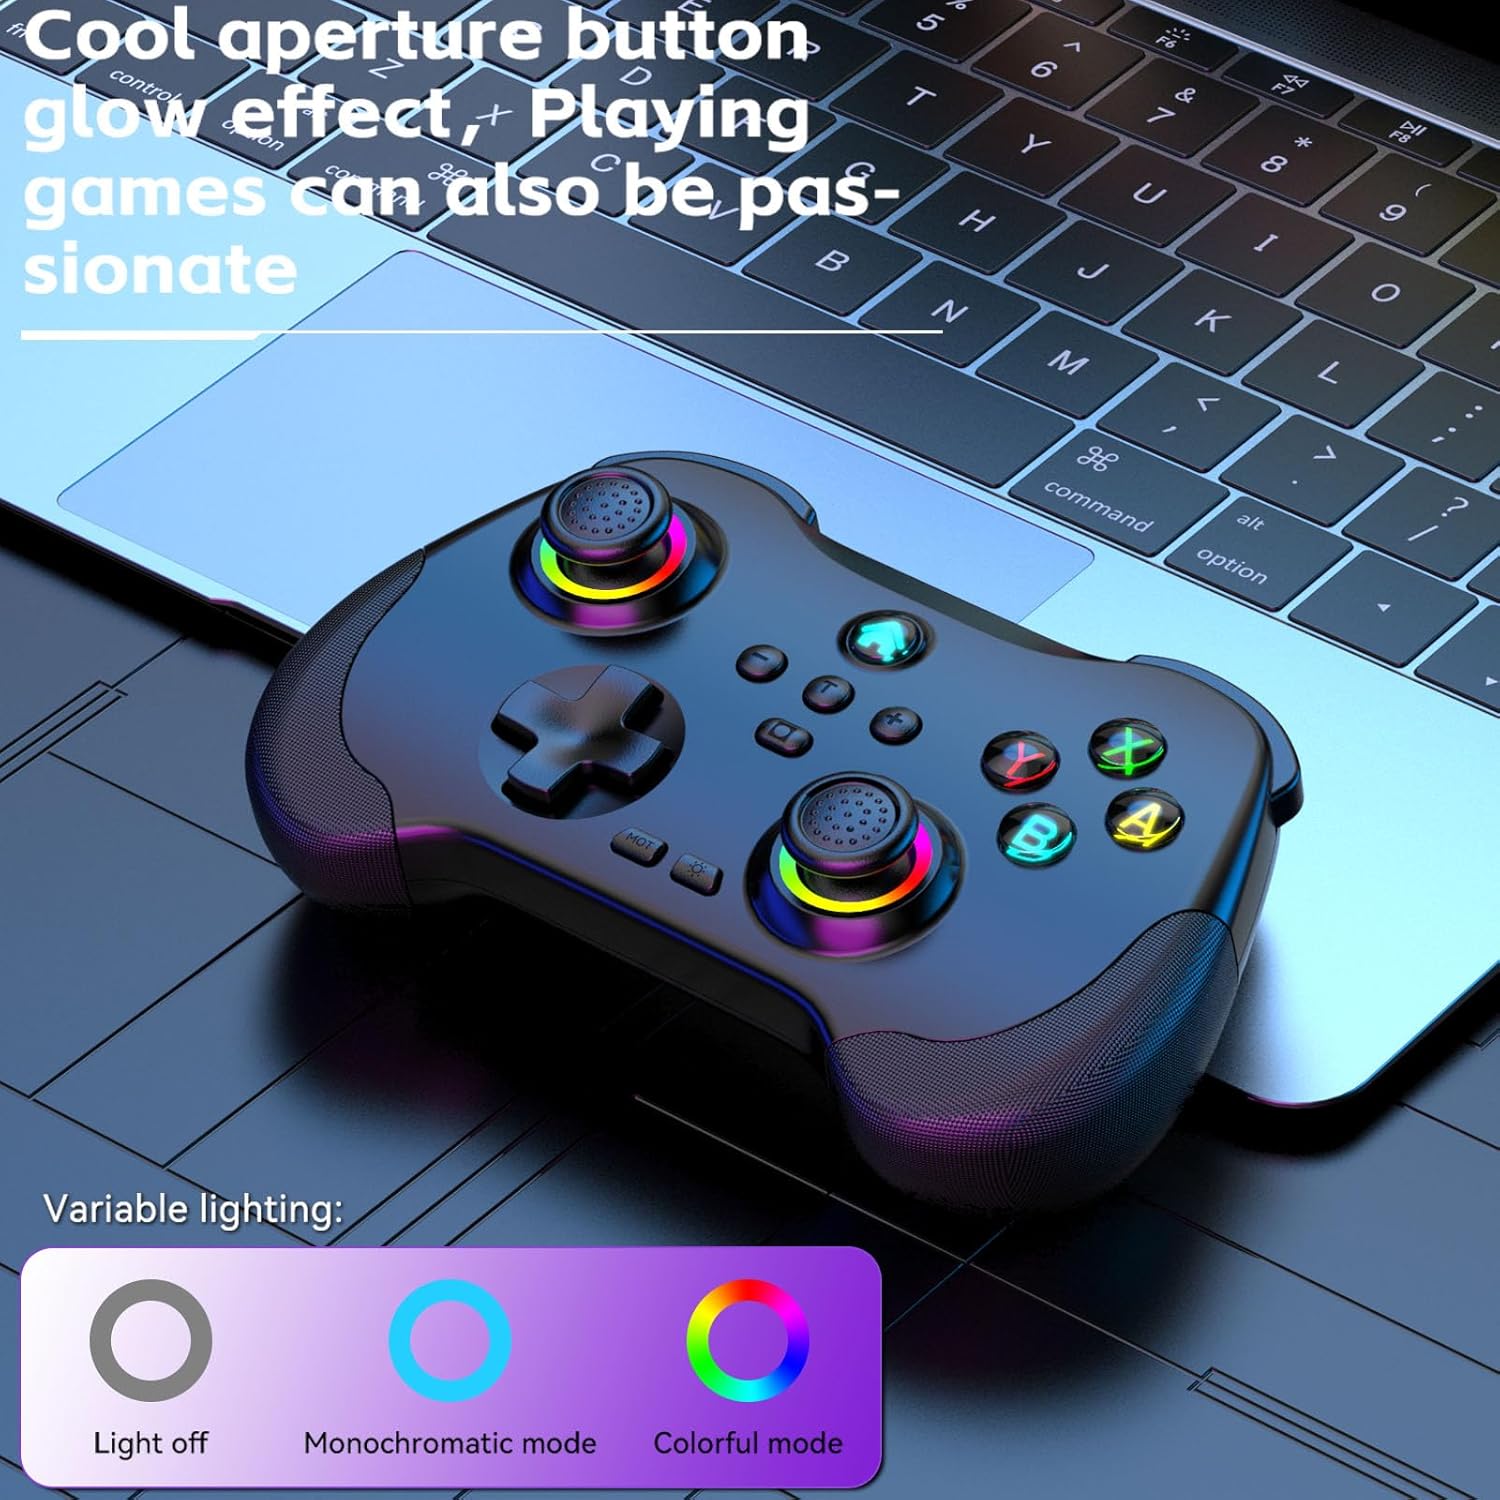
Image 3.2: The controller displaying its customizable RGB lighting on joysticks and buttons.
4. การตั้งค่าและการชาร์จ
4.1. การชาร์จคอนโทรลเลอร์
Before first use, fully charge the controller. Connect the included USB-C cable to the controller's charging port and the other end to a USB power source (e.g., computer, wall adapter). The LED indicators will show charging status and turn off or change color when fully charged.
- ความจุแบตเตอรี่: 600mAh
- เวลาในการชาร์จ: ประมาณ 2 ชั่วโมง
- ความทนทาน: ประมาณ 10-15 ชั่วโมง
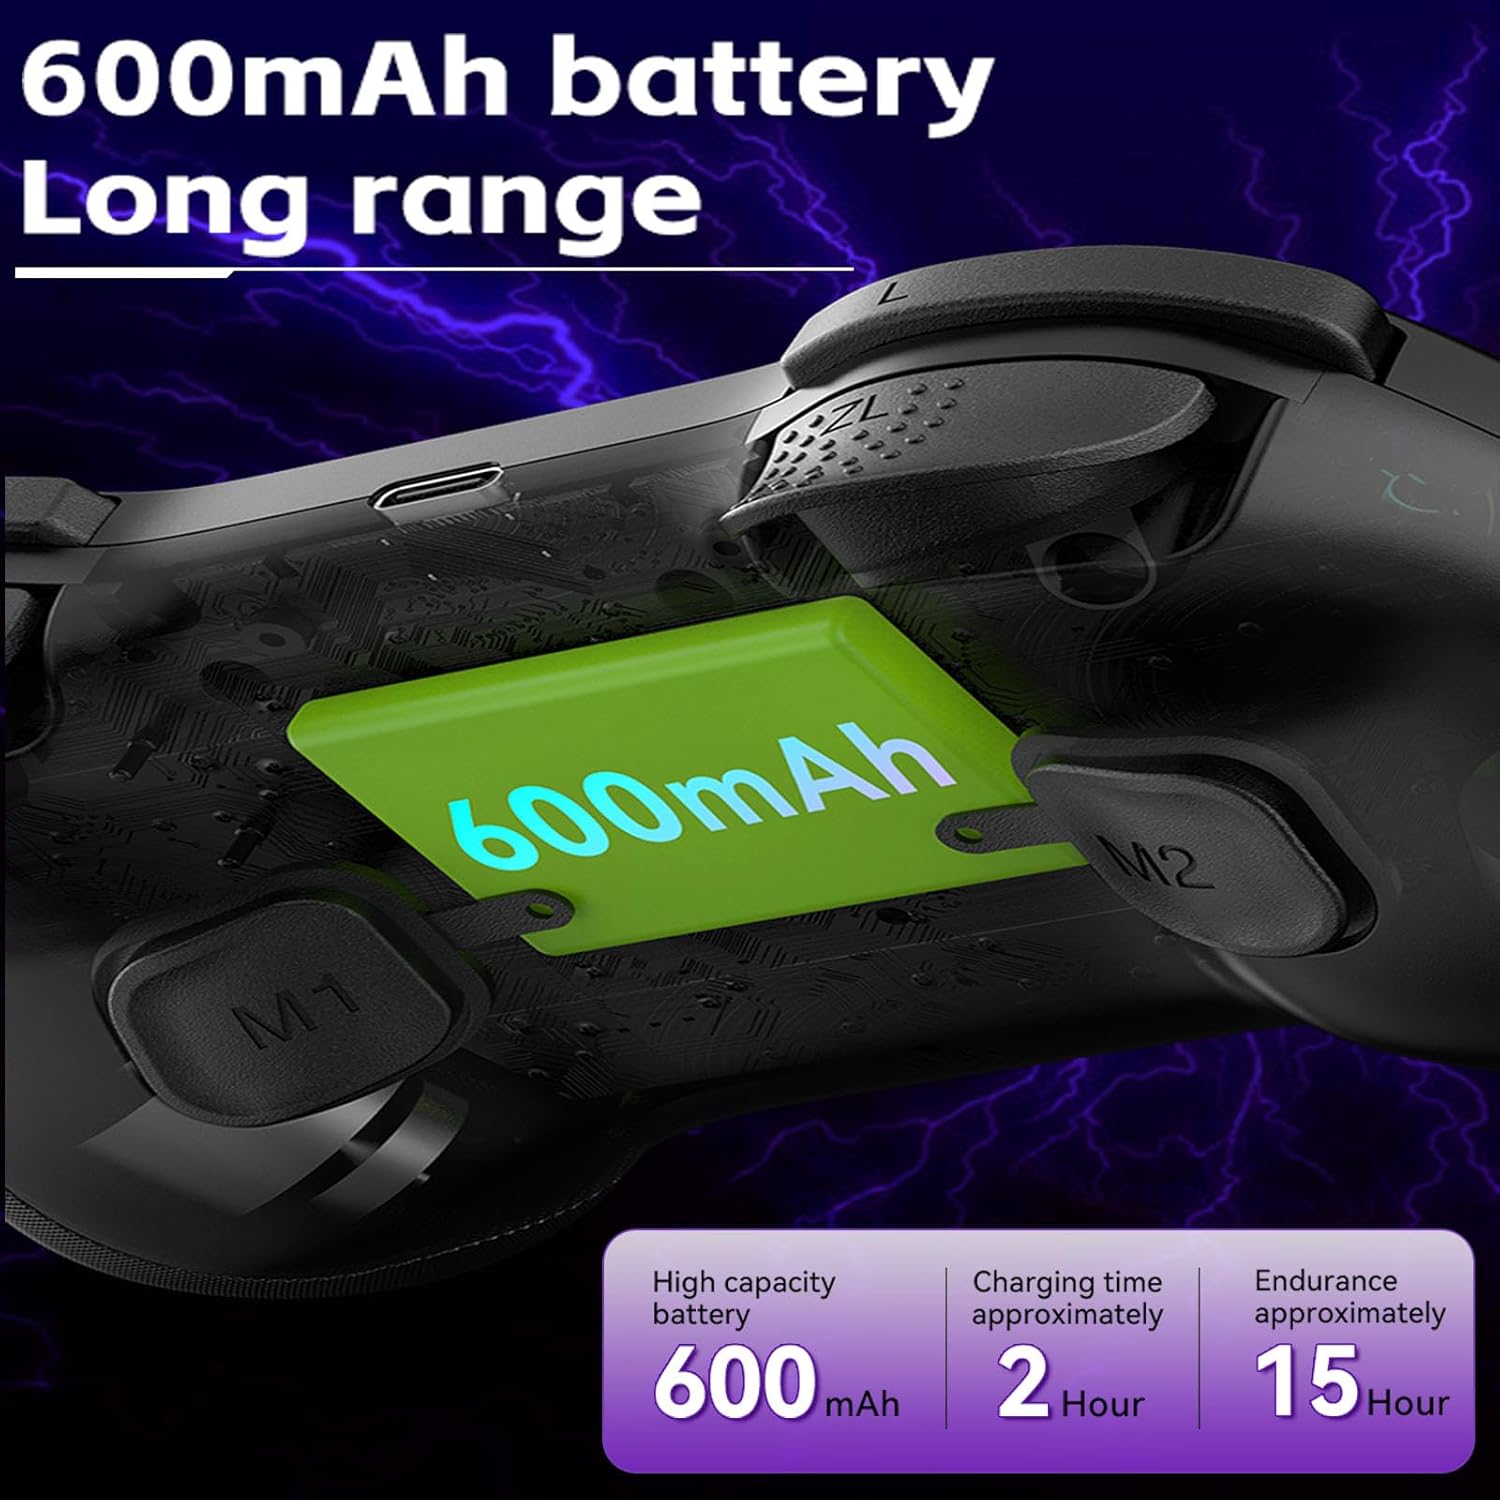
Image 4.1: Diagram illustrating the 600mAh battery capacity and charging specifications.
4.2. การเปิด/ปิดเครื่อง
- การเปิดเครื่อง: Press and hold the Home button for 1-2 seconds.
- วิธีปิดเครื่อง: Press and hold the Home button for 3-5 seconds until the indicator lights turn off.
5. คู่มือการใช้งาน
5.1. การเชื่อมต่อกับอุปกรณ์
The Koiiko Z01 controller supports various connection modes. The specific button combination to enter pairing mode may vary by platform. Please refer to the included physical user manual for exact button combinations for each mode. Below are general guidelines:
- General Bluetooth Pairing: Typically involves holding a combination of buttons (e.g., Home + X, Home + A, Home + B) until the indicator lights flash rapidly, indicating pairing mode. Then, search for "Koiiko Z01" or similar on your device's Bluetooth settings and connect.
- นินเทนโดสวิตช์: Navigate to the 'Controllers' menu on your Switch, then 'Change Grip/Order'. Hold the specific pairing button combination on the controller until it connects.
- พีซี (Windows): Ensure your PC has Bluetooth enabled. Hold the specific pairing button combination, then go to 'Bluetooth & other devices' in Windows settings and add a new Bluetooth device. The controller will typically connect as an X-Input device.
- ไอโอเอส/แอนดรอยด์: Enable Bluetooth on your mobile device. Hold the specific pairing button combination, then select the controller from the list of available Bluetooth devices.
- เพลย์สเตชัน 3/4: Connect the controller via USB cable first to register it, then it may be used wirelessly. Specific pairing methods may vary; consult your console's instructions.

Image 5.1: Connection guideline for PC.

Image 5.2: Connection guideline for Nintendo Switch.
5.2. ABXY Key Value Interchange
The controller allows you to switch the ABXY button layout between Nintendo Switch and Xbox settings without physically removing the buttons.
- To Interchange: กดปุ่มค้างไว้ X + B + HOME keys simultaneously. The controller will switch its ABXY key value. Repeat the combination to revert to the previous setting.

Image 5.3: ABXY key value interchange function.
5.3. การปรับแสง RGB
The controller features customizable RGB lighting around the joysticks and on the buttons.
- วิธีเปลี่ยนโหมด: Press the dedicated Light Adjustment button (refer to the controller diagram in your physical manual for location) to cycle through the 5 available RGB light modes, including a mode to turn the lights off.
5.4. ปุ่มย้อนกลับที่ตั้งโปรแกรมได้ (M1/M2)
The M1 and M2 buttons on the back of the controller can be programmed to perform specific actions or sequences.
- ขั้นตอนการเขียนโปรแกรม: Refer to your physical user manual for detailed instructions on how to program the M1 and M2 buttons, as the process typically involves entering a programming mode and then inputting the desired button sequence.
5.5. ฟังก์ชั่นเทอร์โบ
The Turbo function allows a button to register continuous presses when held down.
- ในการเปิดใช้งาน: กดปุ่ม เทอร์โบ button simultaneously with the desired action button (e.g., TURBO + A).
- วิธีปิดใช้งาน: Repeat the activation step (TURBO + A) for the same button.

ภาพที่ 5.4: จบแล้วview of advanced functions including macro programming and Turbo mode.
6. การบำรุงรักษา
การดูแลอย่างเหมาะสมจะช่วยยืดอายุการใช้งานของคอนโทรลเลอร์ของคุณ
- การทำความสะอาด: ใช้ผ้านุ่มและแห้งเช็ดคอนโทรลเลอร์ สำหรับสิ่งสกปรกฝังแน่น ให้เช็ดเบาๆampชุบผ้าด้วยน้ำ หลีกเลี่ยงสารเคมีรุนแรงหรือน้ำยาทำความสะอาดที่มีฤทธิ์กัดกร่อน
- พื้นที่จัดเก็บ: เก็บตัวควบคุมไว้ในที่แห้งและเย็น ห่างจากแสงแดดโดยตรงและอุณหภูมิที่สูงหรือต่ำมาก
- การดูแลแบตเตอรี่ To maintain battery health, avoid fully discharging the controller frequently. If storing for an extended period, charge it to about 50% every few months.
- หลีกเลี่ยงการกระทบกระเทือนทางกายภาพ: ห้ามทำตกหรือกระแทกตัวควบคุมอย่างรุนแรง เพราะอาจทำให้ชิ้นส่วนภายในเสียหายได้
7 การแก้ไขปัญหา
If you encounter issues with your Koiiko Z01 controller, try the following solutions:
| ปัญหา | วิธีแก้ปัญหาที่เป็นไปได้ |
|---|---|
| คอนโทรลเลอร์เปิดไม่ติด | ตรวจสอบให้แน่ใจว่าคอนโทรลเลอร์ชาร์จเต็มแล้ว เชื่อมต่อกับแหล่งจ่ายไฟโดยใช้สาย USB-C |
| ไม่สามารถเชื่อมต่อผ่านบลูทูธได้ |
|
| Buttons or joysticks are unresponsive or drifting. |
|
| ไฟ RGB ไม่ทำงาน | Press the Light Adjustment button to cycle through modes or turn them on. Ensure the controller is powered on. |
| ตัวควบคุมตัดการเชื่อมต่อบ่อยครั้ง |
|
8. ข้อมูลจำเพาะ
| คุณสมบัติ | รายละเอียด |
|---|---|
| แบบอย่าง | Z01 |
| ขนาดสินค้า | 2.44 x 6.85 x 4.84 นิ้ว (6.2 x 17.4 x 12.3 ซม.) |
| น้ำหนักสินค้า | 12.6 ออนซ์ (357.2 กรัม) |
| แบตเตอรี่ | 1 AA battery required (included) - Note: Product features mention 600mAh Lithium, please refer to product packaging for exact battery type. |
| ความจุของแบตเตอรี่ | 600mAh (Lithium, built-in) |
| เวลาในการชาร์จ | ประมาณ 2 ชั่วโมง |
| ระยะเวลาการใช้งาน | ประมาณ 10-15 ชั่วโมง |
| ระยะการส่งสัญญาณบลูทูธ | ≤ 8 เมตร |
| ฉบับทำงานtage | กระแสตรง3.7โวลต์ |
| กระแสไฟฟ้าทำงาน | < 35มิลลิแอมป์ |
| ผู้ผลิต | บริษัท เซินเจิ้น ซานวาน เทคโนโลยี จำกัด |
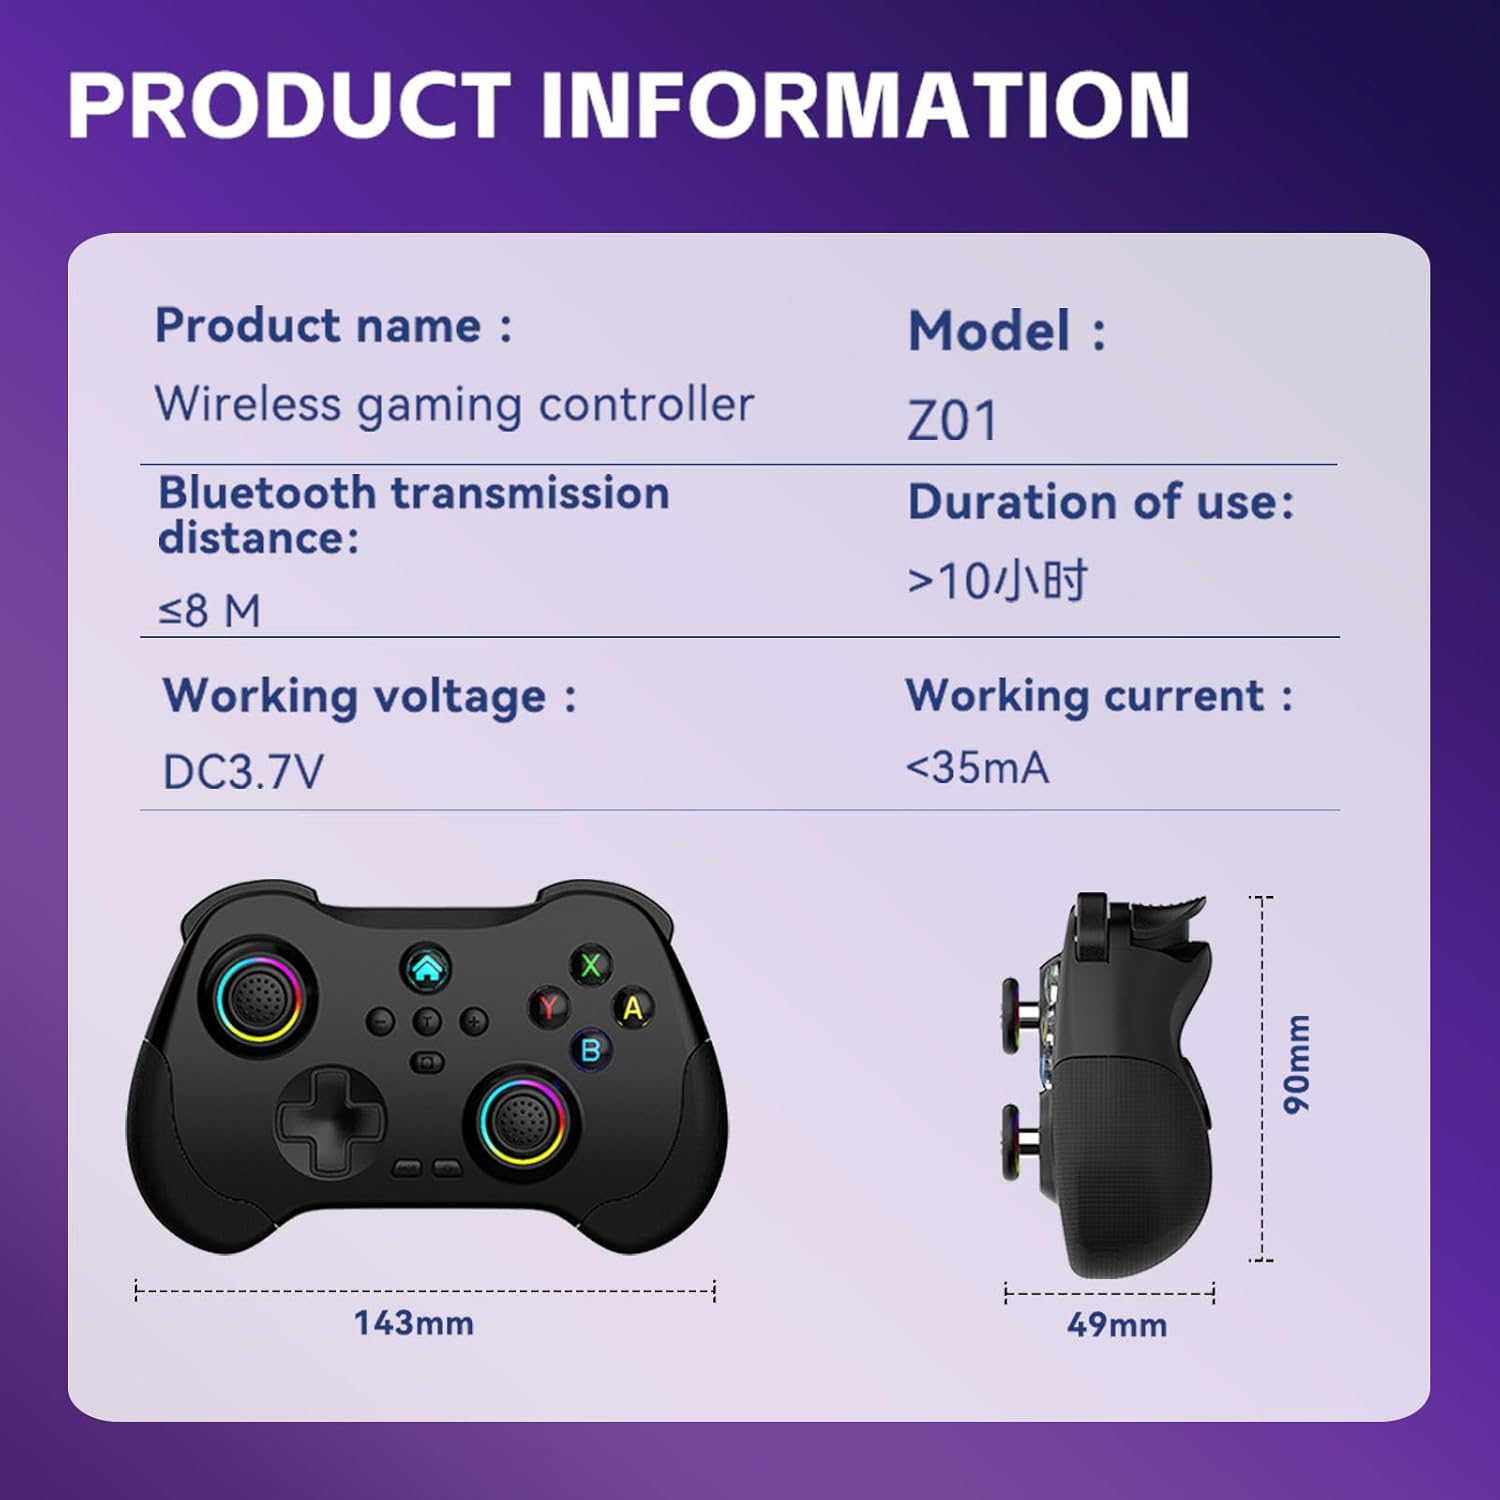
Image 8.1: Product information table with key specifications.
9. การรับประกันและการสนับสนุน
Koiiko provides technical support for its products. If you have any questions, encounter issues, or require assistance with your Koiiko Wireless Gaming Controller Z01, please contact our customer support team.
- ข้อมูลติดต่อ: Please refer to the contact details provided on your product packaging or the official Koiiko webเว็บไซต์นี้เป็นแหล่งรวมช่องทางการสนับสนุนที่ทันสมัยที่สุด
- การรับประกัน: Information regarding product warranty periods and terms can be found on the official Koiiko webไซต์หรือภายในบรรจุภัณฑ์ของผลิตภัณฑ์ของคุณ


