1. สินค้าหมดview
The FITCAMX 4K Dash Cam (HD2-7738) is designed for Audi vehicles, offering an OEM-style integration that blends seamlessly with your car's interior. It records high-definition video to capture driving events.

Image: FITCAMX 4K Dash Cam (HD2-7738) installed, demonstrating its integrated design.
Key features include 2160P UHD video recording, built-in WiFi for app connectivity, loop recording, and parking mode functionality. The camera is constructed from durable PC+ABS material, designed to withstand temperatures from -20°C to 85°C (-4°F to 185°F).

Image: Dash cam view from inside a vehicle.
2. เนื้อหาบรรจุภัณฑ์
ตรวจสอบว่ามีรายการทั้งหมดอยู่ในแพ็คเกจ:
- 1 x FITCAMX 4K Front Dash Cam (HD2-7738)
- สายไฟ 1 เส้น
- 1 x คู่มือผู้ใช้ (เอกสารนี้)
- 1 x การ์ดหน่วยความจำ 64GB
- 1 x Removal Pry Tool
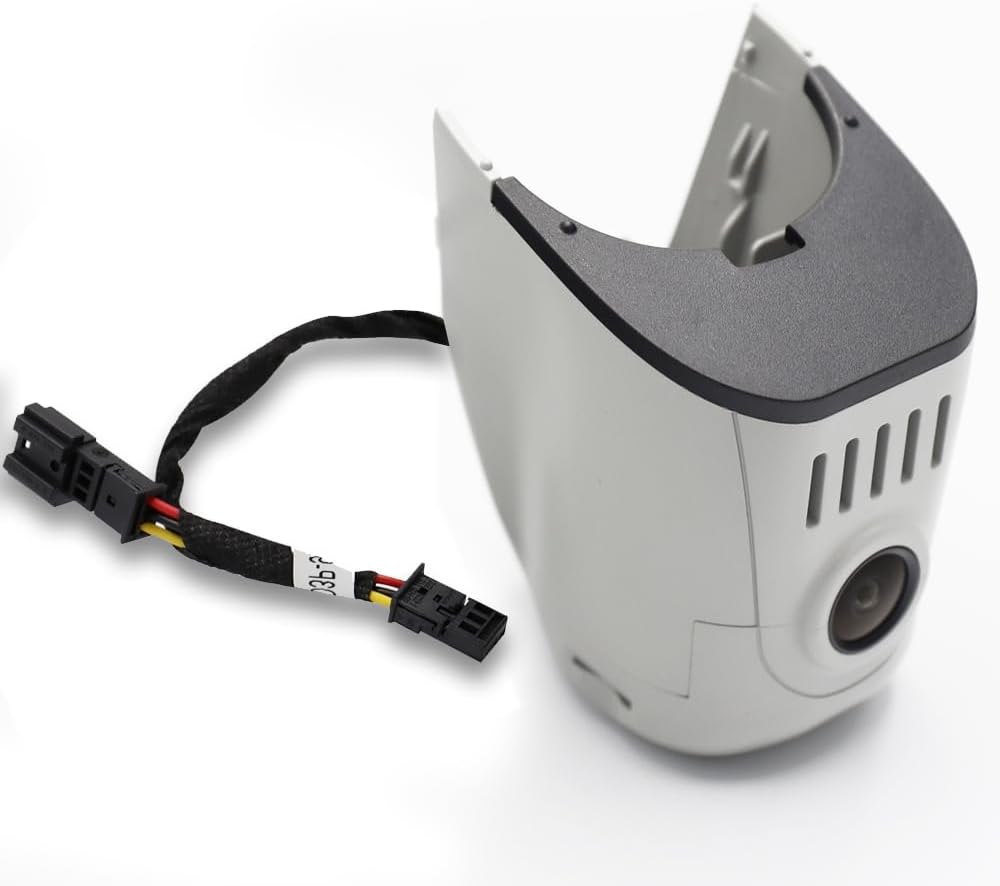
Image: FITCAMX Dash Cam unit and cable.
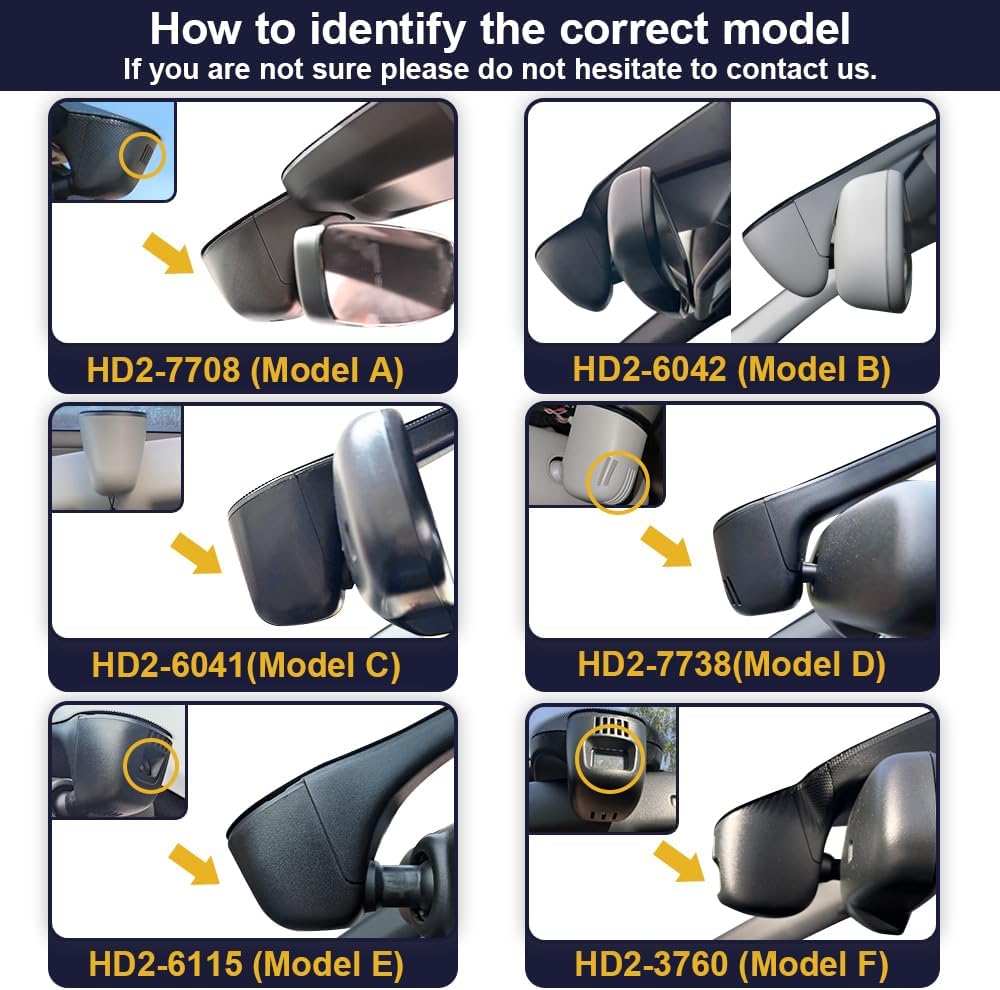
3. Product Identification and Model Selection
To ensure compatibility, it is crucial to select the correct dash cam model for your Audi vehicle. The HD2-7738 model is specifically designed for certain Audi vehicle styles.
Identifying the Correct Model:
- Confirm Vehicle Details: Verify your vehicle's style and year of manufacture (e.g., 2013 Audi A3).
- Compare Rearview ฝาครอบกระจก: Examine the shape of your original rearview mirror cover.
- Color Match: Confirm the color of your original cover (Grey or Black) to match the dash cam variant.

Image: Guide to identify the correct dash cam model based on rearview mirror cover shape. HD2-7738 is Model D.
4. คำแนะนำในการติดตั้ง
The FITCAMX dash cam is designed for a clean, OEM-style installation without visible wires or suction cups. Follow these steps carefully:
ขั้นตอนการติดตั้ง:
- Remove Original Plastic Cover: Use the provided pry tool to carefully remove the original plastic cover around your rearview กระจกเงา.
- Unplug Humidity Sensor: Locate and unplug the humidity sensor cable.
- ถอดฝาหลังออก: Detach the back cover of the original housing.
- Transfer Humidity Sensor: Carefully transfer the humidity sensor from the original cover to the FITCAMX dash cam unit.
- Connect Y Harness: Connect the provided Y harness to the rain sensor connection point.
- Insert Humidity Sensor Plug: Plug the humidity sensor back into its designated port on the FITCAMX unit.
- ติดตั้งกล้อง: Securely install the FITCAMX dash cam unit into position, ensuring all connections are firm and the unit is properly seated.
- การตรวจสอบขั้นสุดท้าย: Verify that the camera is firmly installed and all covers are properly reattached.
ภาพ: คู่มือการติดตั้งทีละขั้นตอน

Image: Comparison of the rearview mirror area before and after FITCAMX installation.
5. คู่มือการใช้งาน
The FITCAMX dash cam operates automatically once installed and powered. It begins recording when the vehicle starts.
คุณสมบัติการใช้งานหลัก:
- บันทึกอัตโนมัติ: The camera automatically starts recording when the vehicle's ignition is turned on.
- การบันทึกแบบวนซ้ำ: อาหารเก่าtage is automatically overwritten by new recordings when the memory card is full, ensuring continuous recording. Important footagสามารถล็อกไฟล์ e เพื่อป้องกันการเขียนทับได้
- โหมดจอดรถ: When enabled, the dash cam can detect impacts or motion while the vehicle is parked and automatically record footage. Refer to the FITCAMX app for detailed settings and activation of parking mode.
6. App Usage (FITCAMX APP)
The FITCAMX dash cam features built-in 2.4Ghz WiFi for seamless connection to the FITCAMX mobile application (available for Android and iOS devices).
ฟังก์ชั่นแอพ:
- แบบเรียลไทม์ View: Stream live video footage from the dash cam directly to your smartphone.
- การเล่นวิดีโอ: Review recorded videos directly on your phone.
- ดาวน์โหลด Footage: Download important video clips to your device for storage or sharing.
- การปรับการตั้งค่า: Configure dash cam settings, including resolution, loop recording duration, parking mode sensitivity, and more.
บันทึก: To ensure proper preview functionality, it may be necessary to temporarily turn off cellular data or Bluetooth on your smartphone when connecting to the dash cam's WiFi. The FITCAMX camera will not interfere with Apple CarPlay or Android Auto functionality.
7. การบำรุงรักษา
Regular maintenance ensures optimal performance and longevity of your FITCAMX dash cam.
- ทำความสะอาดเลนส์: Periodically clean the camera lens with a soft, dry cloth to ensure clear video recording. Avoid abrasive materials.
- การจัดการการ์ดหน่วยความจำ: Format the 64GB memory card regularly (e.g., once a month) via the app to maintain optimal recording performance and prevent data corruption. Back up any important footage ก่อนการจัดรูปแบบ
- อัพเดตเฟิร์มแวร์: Check the FITCAMX app or official webเว็บไซต์สำหรับการอัปเดตเฟิร์มแวร์ที่มีอยู่เพื่อให้แน่ใจว่ากล้องติดรถยนต์ของคุณมีคุณสมบัติล่าสุดและการแก้ไขข้อบกพร่อง
8 การแก้ไขปัญหา
If you encounter issues with your FITCAMX dash cam, refer to the following common solutions:
- กล้องติดรถยนต์ไม่บันทึกภาพ:
- Ensure the memory card is properly inserted and formatted.
- ตรวจสอบว่าการเชื่อมต่อไฟฟ้าแน่นหนาดีหรือไม่
- Verify that loop recording is enabled in the app settings.
- ปัญหาการเชื่อมต่อ WiFi:
- Ensure your phone's cellular data or Bluetooth is temporarily disabled when connecting to the dash cam's WiFi.
- รีสตาร์ททั้งกล้องหน้ารถและสมาร์ทโฟนของคุณ
- ไม่มีวิดีโอพรีview ในแอป:
- As mentioned, turn off cellular data/Bluetooth on your phone.
- Ensure a stable WiFi connection to the dash cam.
- Can I use CarPlay/Bluetooth while driving?
Yes. Your phone cannot be connected to CarPlay and the dash cam's WiFi simultaneously for app functions. However, the camera records automatically after the car starts, so you do not need to maintain a WiFi connection to the camera at all times for recording. - Can I add a rear camera to a front-only setup?
No, because the internal PCB boards are different. If you require a front and rear camera setup, you would need to replace the entire unit with a compatible dual-channel system.
For further assistance, please contact FITCAMX customer support.
9. ข้อมูลจำเพาะ
| ยี่ห้อ | FITCAMX |
| หมายเลขรุ่น | HD2-7738 |
| ความละเอียดวิดีโอ | 4K / 2160P (Front Only) |
| รูรับแสง | เอฟ/1.6 |
| ซีพียู | โนวาเทค |
| ไวไฟ | 2.4กิกะเฮิรตซ์ |
| ความเข้ากันได้ของแอป | Android / iOS (FITCAMX APP) |
| วัสดุของเปลือกหอย | พีซี + เอบีเอส |
| อุณหภูมิในการทำงาน | -20°C ถึง 85°C (-4°F ถึง 185°F) |
| ขนาดสินค้า | 9 x 7 x 4 นิ้ว |
| น้ำหนักสินค้า | 1 ปอนด์ |
| แบตเตอรี่ | แบตเตอรี่ลิเธียมโลหะ 1 ก้อน (รวมอยู่ด้วย) |
| เทคโนโลยีการเชื่อมต่อ | สายส่งไฟฟ้า |
| คุณสมบัติพิเศษ | สไตล์ OEM |
| ประเภทบริการยานพาหนะ | Audi (HD2-7738) / Grey |
10. การรับประกันและการสนับสนุน
FITCAMX offers lifetime after-sales support for its products. If you have any questions, concerns, or require technical assistance, please do not hesitate to contact our customer service team.
For support, please refer to the contact information provided on the official FITCAMX webเว็บไซต์หรือผ่านแพลตฟอร์มการซื้อของคุณ


