1. บทนำ
The ANDYCINE T6 is a professional 6-inch camera field monitor designed to enhance your filmmaking and photography experience. Featuring a durable aluminum housing, a 1920x1080 Full HD display, and support for 4K HDMI input/output, the T6 provides accurate monitoring and advanced analysis tools. This manual provides detailed instructions for setting up, operating, and maintaining your ANDYCINE T6 monitor.

Figure 1.1: The ANDYCINE T6 Camera Field Monitor shown with its complete accessory kit, including battery, charger, cables, sunhood, and carry case.
2. เนื้อหาบรรจุภัณฑ์
โปรดตรวจสอบว่าสินค้าทั้งหมดที่ระบุไว้ด้านล่างนี้รวมอยู่ในแพ็คเกจของคุณแล้ว หากมีสินค้าใดสูญหายหรือเสียหาย โปรดติดต่อฝ่ายสนับสนุนลูกค้า
- 1x ANDYCINE T6 Monitor
- 1x Sunhood
- 1x คู่มือผู้ใช้
- 1x กระเป๋าใส่อุปกรณ์พกพา
- 1x Hot Shoe Mount
- สาย Micro HDMI 1 เส้น
- สายชาร์จ USB-C 1x
- 1x F550 Battery

Figure 2.1: Visual representation of the ANDYCINE T6 monitor's packing list, detailing all components included in the box.
3. สินค้าหมดview
3.1 ลักษณะทางกายภาพ
The ANDYCINE T6 monitor is designed for portability and durability, featuring a lightweight aluminum alloy frame.

Figure 3.1: The ANDYCINE T6 monitor demonstrating its compact and lightweight design, easily fitting into a backpack for portability.
3.2 พอร์ตและปุ่มควบคุม
The monitor features essential ports for connectivity and power, along with intuitive controls for menu navigation.
- HDMI ใน: Input for video signal from camera or other source.
- HDMI ออก: Output for looping through video signal to another monitor or device.
- กระแสตรงใน 12V: Power input for external DC power supply (barrel connector).
- กระแสตรงออก 8.4V: Power output to power a DSLR or mirrorless camera.
- Type-C (5V): กำลังไฟเข้า USB-C
- แจ็คหูฟัง 3.5 มม.: สำหรับการตรวจสอบเสียง
- ปุ่มควบคุม: A series of buttons (typically 7) for menu navigation and function activation.

รูปที่ 3.2: ระยะใกล้ view of the ANDYCINE T6 monitor's HDMI input and output ports, supporting 4K 60Hz signals.
4. การตั้งค่าและการเชื่อมต่อ
4.1 การติดตั้งจอภาพ
The ANDYCINE T6 can be mounted to your camera rig using the included hot shoe mount or other compatible mounting solutions.
- Attach the hot shoe mount to the monitor's 1/4-inch screw hole located at the bottom.
- Secure the hot shoe mount to your camera's hot shoe or a compatible rig accessory.
- ปรับมุมของจอภาพเพื่อให้ได้ผลลัพธ์ที่ดีที่สุด viewการไอเอ็นจี

Figure 4.1: Detail of the monitor's mounting screw hole, designed for secure attachment to camera setups.

Figure 4.2: The ANDYCINE T6 monitor mounted on a camera rig, showcasing its use with the included sunhood for improved visibility in bright conditions.
4.2 การจ่ายไฟให้จอภาพ
The T6 monitor offers flexible power options:
- แบตเตอรี่ NP-F: Insert the included NP-F battery into the battery slot on the back of the monitor. Ensure it clicks into place securely.
- อินพุต DC 12V: Connect a compatible 12V DC power adapter (not included) to the DC IN 12V port.
- USB-C 5V Input: Connect a 5V/2A or higher USB-C power supply (e.g., power bank, wall adapter) to the Type-C (5V) port using the provided USB-C cable.
4.3 การเชื่อมต่อแหล่งวิดีโอ
Use an HDMI cable to connect your camera or video source to the monitor.
- Connect one end of an HDMI cable (e.g., the included Micro HDMI cable) to your camera's HDMI output port.
- Connect the other end of the HDMI cable to the HDMI IN port on the ANDYCINE T6 monitor.
- If you need to loop the signal to another display, connect an HDMI cable from the HDMI OUT port on the T6 to your secondary display.
5. คู่มือการใช้งาน
5.1 เปิด/ปิดเครื่อง
Press and hold the power button (usually located on the side or top) for a few seconds to turn the monitor on or off.
5.2 การนำทางเมนู
The monitor's functions are accessed via the control buttons. Typically, there are dedicated buttons for menu access, navigation (up/down/left/right), and confirmation.
- กดปุ่ม เมนู ปุ่มเพื่อเปิดเมนูหลัก
- ใช้ ปุ่มทิศทาง เพื่อไปยังตัวเลือกต่างๆ ในเมนู
- กดปุ่ม ตกลง/ตั้งค่า ปุ่มเพื่อยืนยันการเลือกหรือเข้าสู่เมนูย่อย
- กดปุ่ม EXIT/BACK button to return to the previous menu or exit the menu system.
5.3 คุณสมบัติการตรวจสอบขั้นสูง
The ANDYCINE T6 includes a suite of professional monitoring tools to assist with accurate focus, exposure, and framing.
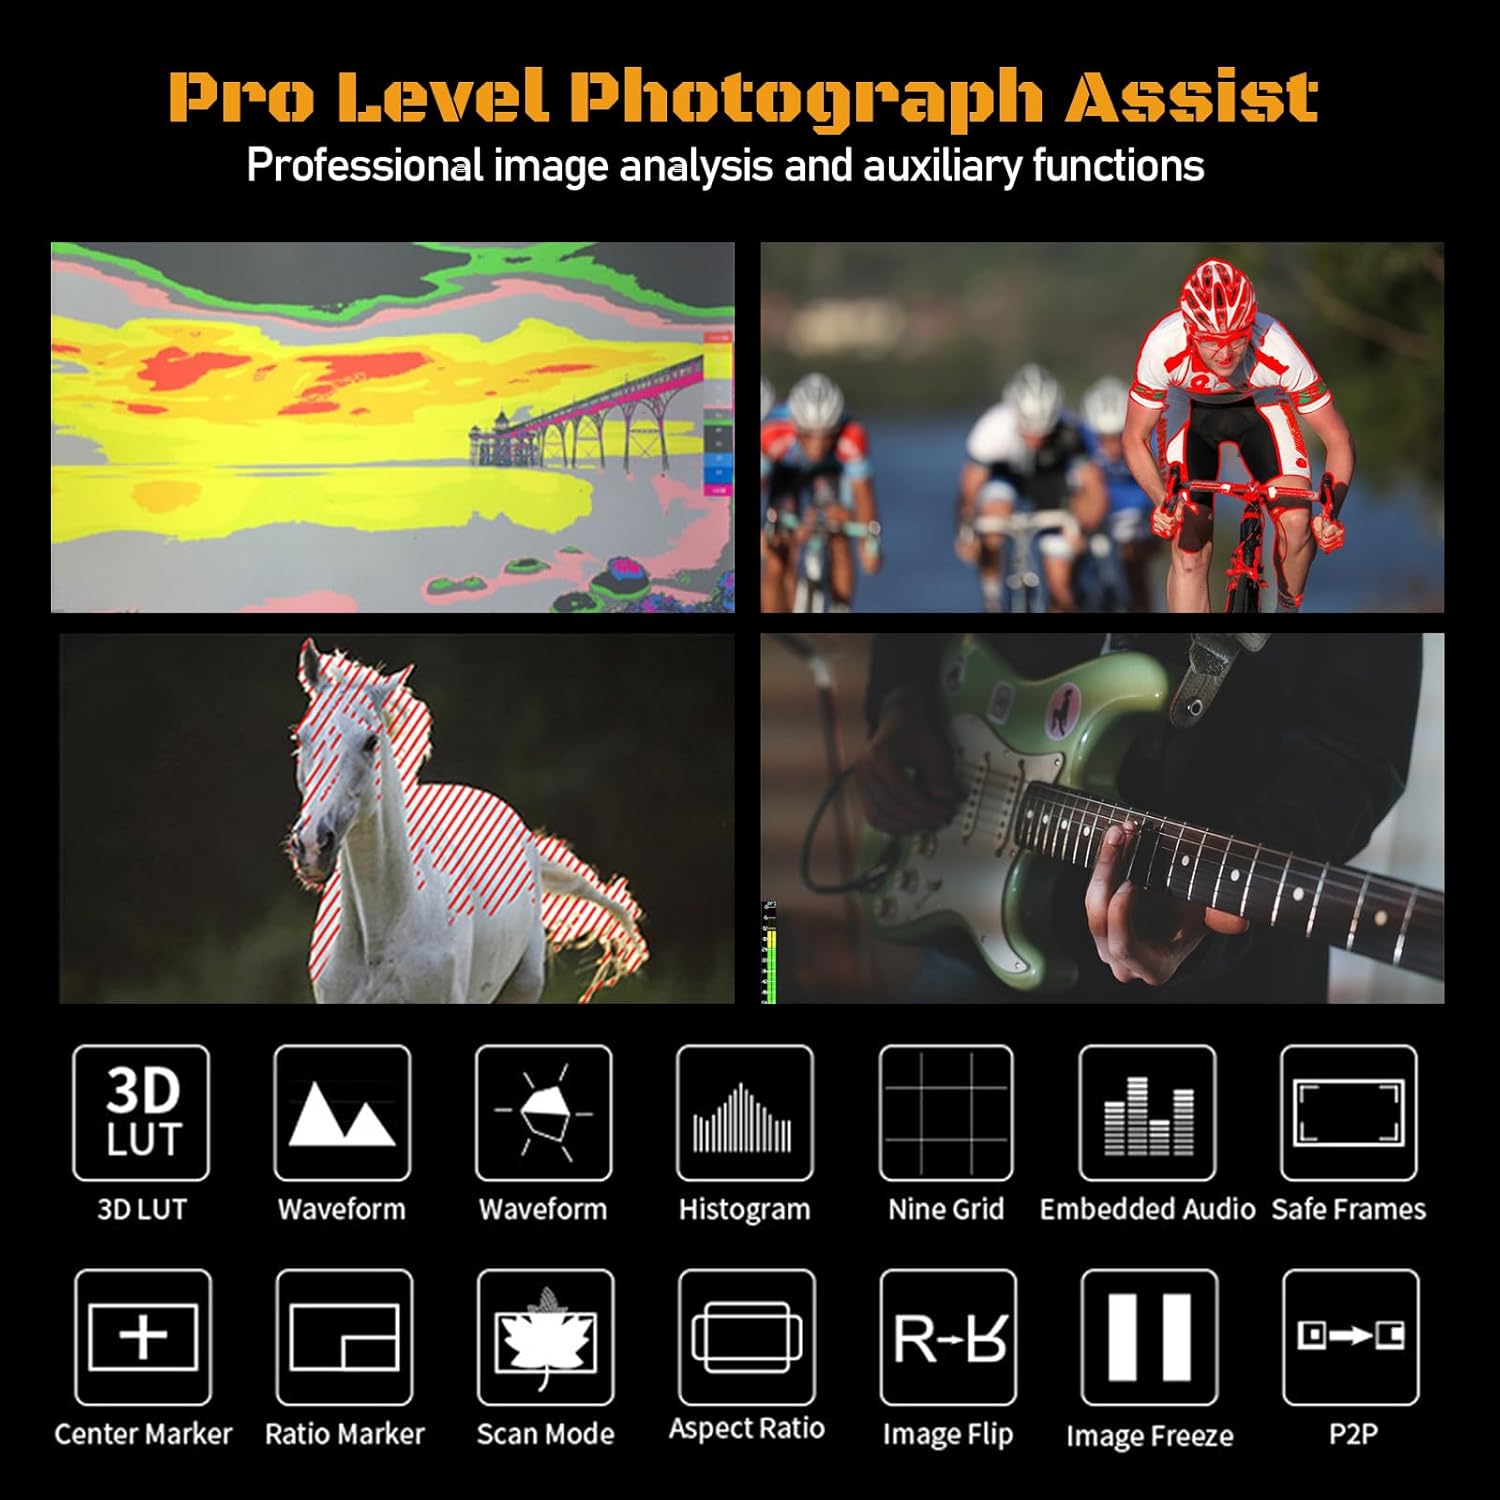
Figure 5.1: An illustration of the professional monitoring features available on the ANDYCINE T6, including 3D LUT, waveform, histogram, and various assist functions.
- ลูท 3D: Load custom 3D Look-Up Tables to preview ฟู่ของคุณtage with specific color grades in real-time.
- รูปแบบของคลื่น: Displays the luminance and chrominance levels of your video signal, helping to ensure proper exposure.
- ฮิสโตแกรม: Shows the distribution of tones in your image, from shadows to highlights.
- ระบบช่วยเพิ่มสมาธิสูงสุด: Highlights in-focus areas with a colored outline, aiding in precise manual focusing.
- สีเท็จ: Uses a spectrum of colors to represent different exposure levels, making it easy to identify over- or under-exposed areas.
- พลิกภาพ: Flips the image horizontally or vertically, useful for various camera setups (e.g., inverted mounting).
- Center Marker & Ratio Marker: ช่วยในการจัดเฟรมและองค์ประกอบภาพ
- โหมดอนามอร์ฟิก: De-squeezes anamorphic footage เพื่อความเหมาะสม viewการไอเอ็นจี
- ซูม: Magnifies a portion of the image for critical focus checks.
Refer to the on-screen menu for specific settings and activation of each feature.
6. ข้อมูลจำเพาะ
Below are the detailed technical specifications for the ANDYCINE T6 Camera Field Monitor.
| คุณสมบัติ | ข้อมูลจำเพาะ |
|---|---|
| ขนาดหน้าจอ | 6 inches IPS Display |
| ปณิธาน | 1920x1080 พิกเซล |
| ความสว่าง | 450 ซีดี/ตรม. |
| อัตราส่วนคอนทราสต์ | 1000:1 น. |
| Viewอิงแองเกิล | 80 ° / 80 ° (L / R) 80 ° / 80 ° (U / D) |
| ความลึกของสี | 16.7M (8 บิต) |
| อินพุต/เอาต์พุต HDMI | HDMI 2.0 (Supports up to 4K 60FPS) |
| Supported HDMI Formats | 480i/576i/480p/576p, 720p (60/59.94/50/30/29.97/25/24/23.98), 1080i (60/59.94/50), 1080p (60/59.94/50/30/29.97/25/24/23.98), 3840×2160p (60/50/30/29.97/25/24/23.98), 4096×2160p (60/50/30/29.97/25/24/23.98) |
| เอาท์พุตเสียง | แจ็คหูฟังสเตอริโอ 3.5 มม. |
| กำลังไฟเข้า | DC IN 12V (Barrel 5.5mm outer, 2.1mm inner), DC IN 5V (Type-C) |
| กำลังขับ | DC OUT 8.4V (Barrel 5.5mm outer, 2.1mm inner) |
| ประเภทแบตเตอรี่ | NP-F series (1 Lithium Ion battery required) |
| วัสดุที่ใช้ทำตัวเรือน | เปลือกอลูมิเนียม |
| น้ำหนักสินค้า | 1.76 ปอนด์ |
| ขนาดแพ็คเกจ | 7.64 x 5.16 x 4.17 นิ้ว |
7. การดูแลรักษา
Proper care will extend the life of your ANDYCINE T6 monitor.
- การทำความสะอาด: Use a soft, lint-free cloth to clean the screen and body. For stubborn smudges, a screen cleaning solution designed for electronics can be used sparingly. Avoid abrasive materials or harsh chemicals.
- พื้นที่จัดเก็บ: When not in use, store the monitor in its included carry case to protect it from dust, scratches, and impacts. Store in a cool, dry place away from direct sunlight.
- การจัดการ: Avoid dropping the monitor or subjecting it to strong vibrations. Do not expose it to extreme temperatures or high humidity.
- การดูแลแบตเตอรี่ If storing for extended periods, remove the battery. Recharge the battery periodically to maintain its health.
8 การแก้ไขปัญหา
If you encounter issues with your ANDYCINE T6 monitor, refer to the following common problems and solutions.
| ปัญหา | สาเหตุที่เป็นไปได้ / วิธีแก้ไข |
|---|---|
| จอภาพไม่เปิดขึ้นมา |
|
| No video signal displayed. |
|
| Image is too dim or difficult to see outdoors. |
|
| Monitor freezes or becomes unresponsive. |
|
9. การรับประกันและการสนับสนุน
ANDYCINE products are manufactured with high-quality standards. For warranty information and technical support, please refer to the warranty card included with your product or visit the official ANDYCINE webไซต์ โปรดเก็บใบเสร็จรับเงินไว้เป็นหลักฐานการซื้อสำหรับการเรียกร้องการรับประกัน
For further assistance, you may contact ANDYCINE customer service through their official channels.


