1. บทนำ
Thank you for choosing the MeesMeek Digital Travel Alarm Clock. This compact and versatile device is designed to provide accurate timekeeping, alarm functions, and temperature display, making it ideal for travel and daily use. This manual will guide you through the setup, operation, and maintenance of your new alarm clock.
2. สินค้าหมดview
2.1 คุณสมบัติหลัก
- 3.54-inch LCD Display: Shows time, alarm time, date, day of the week, and indoor temperature.
- Intuitive Controls: 6 front-facing buttons for easy operation.
- Time Formats: Switchable between 12-hour and 24-hour display.
- Temperature Display: Switchable between Fahrenheit (℉) and Celsius (℃).
- 9-Minute Snooze: Provides additional sleep time after the alarm sounds.
- Weekend Mode: Alarm activates only from Monday to Friday.
- Adjustable Alarm Volume: Two levels (70dB/85dB) to suit user preference.
- 5-Second Backlight: Illuminates the display for visibility in low light conditions.
- Battery Operated: Powered by 2 AAA batteries (included) with a low battery alert.
- Compact and Foldable Design: Ideal for portability and travel.
2.2 ส่วนประกอบ
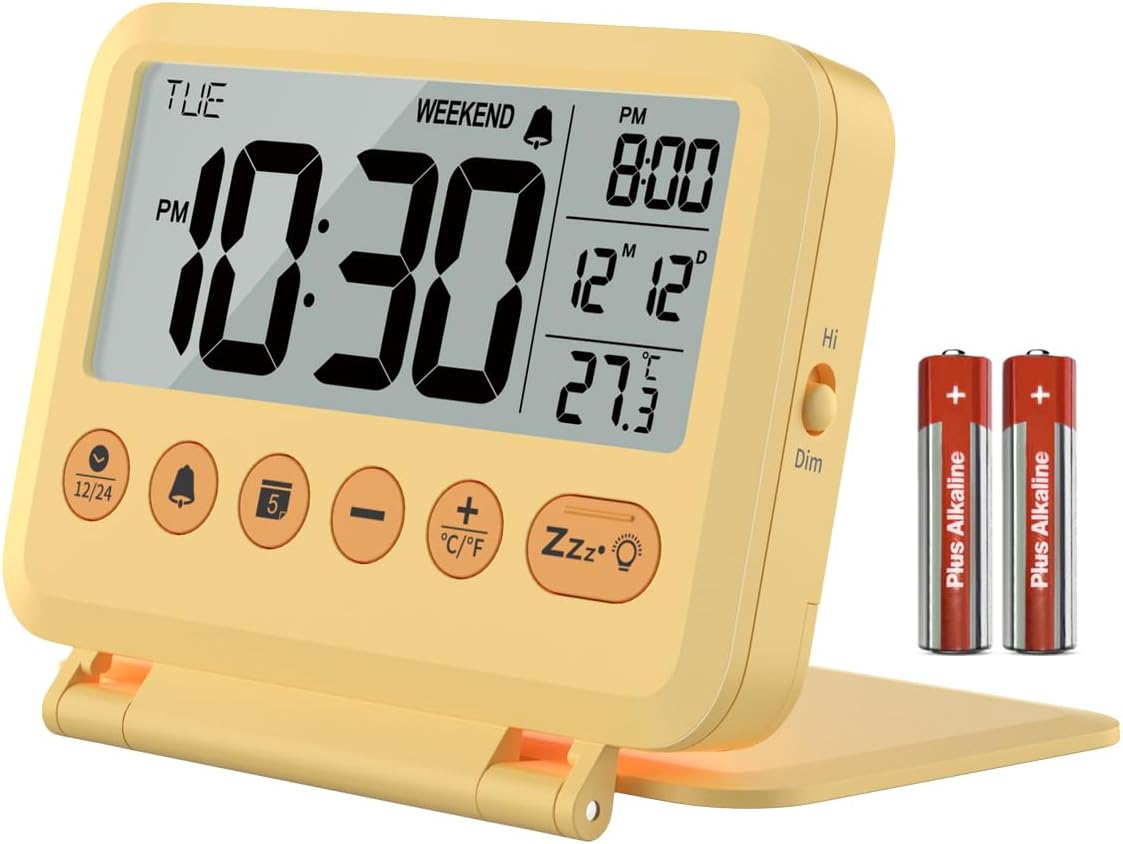
ภาพที่ 2.2.1: ด้านหน้า view of the MeesMeek Digital Travel Alarm Clock, showing the LCD display, control buttons, and included AAA batteries.

Image 2.2.2: Diagram illustrating the compact dimensions (4 inches wide, 3.17 inches high) and key features of the alarm clock, including 12/24 time format, 2 volume levels, 5-second backlight, 9-minute snooze, calendar, temperature, weekend mode, and battery power.
The clock features a foldable cover that also acts as a stand. The front panel includes the LCD display and six control buttons. A toggle switch for backlight brightness is located on the side.
3. การตั้งค่า
3.1 การติดตั้งแบตเตอรี่
- เปิดฝาช่องใส่แบตเตอรี่ที่อยู่ด้านหลังของนาฬิกา
- ใส่แบตเตอรี่ AAA สองก้อน โดยตรวจสอบให้แน่ใจว่าขั้ว (+ และ -) ถูกต้อง
- ปิดฝาช่องใส่แบตเตอรี่ให้แน่น
The clock will power on automatically once batteries are installed. A new pair of AAA batteries can last up to 6 months.

Image 3.1.1: The alarm clock displaying time, date, and temperature, with an inset showing the battery compartment on the back.
3.2 การตั้งค่าเริ่มต้น
Upon first use or after battery replacement, you may need to set the time, date, and other preferences.
4. คู่มือการใช้งาน
4.1 การตั้งเวลาและวันที่
- Press and hold the '12/24' button to enter time setting mode. The hour digit will flash.
- ใช้ปุ่ม '+' หรือ '-' เพื่อปรับเวลา
- Press the '12/24' button again to move to minute setting. Use '+' or '-' to adjust minutes.
- Continue pressing '12/24' to cycle through year, month, and day settings, adjusting each with '+' or '-'.
- Press '12/24' one last time to exit setting mode, or wait for 10 seconds for it to exit automatically.
4.2 12H/24H Time Format
In normal time display mode, press the '12/24' button to switch between 12-hour (with AM/PM indicator) and 24-hour time formats.

Image 4.2.1: The alarm clock displaying time in both 12-hour (AM/PM) and 24-hour formats, illustrating the switchable feature.
4.3 การตั้งปลุก
- Press and hold the 'Alarm' button (bell icon) to enter alarm setting mode. The alarm hour will flash.
- Use the '+' or '-' buttons to adjust the alarm hour.
- Press the 'Alarm' button again to move to alarm minute setting. Use '+' or '-' to adjust minutes.
- Press the 'Alarm' button one last time to confirm and exit, or wait for 10 seconds.
4.4 Activating/Deactivating Alarm and Weekend Mode
- In normal time display mode, press the 'Alarm' button once to turn the alarm ON or OFF. An alarm icon will appear/disappear on the display.
- To activate Weekend Mode (alarm only Mon-Fri), press the 'Weekend' button (sun icon) once. A 'WEEKEND' indicator will appear on the display. Press again to deactivate.

Image 4.4.1: The alarm clock on a bedside table, illustrating the 9-minute snooze function and the weekend mode which prevents the alarm from sounding on weekends.
4.5 ฟังก์ชั่นเลื่อนซ้ำ
When the alarm sounds, press the large 'Snooze/Light' button (Zzz•☼ icon) to activate the snooze function. The alarm will pause for 9 minutes and then sound again. This cycle repeats up to 3 times. If no button is pressed, the alarm will sound for 3 minutes, snooze for 7 minutes, and repeat the cycle 3 times before turning off automatically.
4.6 Alarm Volume Adjustment
The alarm offers two volume levels: 70dB and 85dB. To adjust, locate the volume switch on the side of the clock and slide it to your desired level.

Image 4.6.1: The alarm clock displaying time, temperature, and calendar, with graphics indicating the two alarm volume levels (70dB and 85dB).
4.7 ฟังก์ชันไฟแบ็คไลท์
Press the 'Snooze/Light' button (Zzz•☼ icon) to illuminate the display for 5 seconds. The backlight is not continuously on. A toggle switch on the right side of the alarm clock allows you to select between High Bright and Dim backlight intensity.

Image 4.7.1: A split image showing the alarm clock in a well-lit room and a dark room, with the backlight activated for 5 seconds by pressing the snooze button.
4.8 สวิตช์หน่วยอุณหภูมิ
In normal time display mode, press the '•C/•F' button to switch the temperature display between Celsius (℃) and Fahrenheit (℉).
5. การบำรุงรักษา
- เช็ดนาฬิกาด้วยผ้าแห้งเนื้อนุ่ม ห้ามใช้สารทำความสะอาดที่มีฤทธิ์กัดกร่อนหรือตัวทำละลาย
- ควรหลีกเลี่ยงการวางนาฬิกาไว้ในที่ที่มีอุณหภูมิสูงหรือต่ำเกินไป แสงแดดโดยตรง หรือความชื้นสูง
- หากไม่ได้ใช้งานนาฬิกาเป็นเวลานาน ควรถอดแบตเตอรี่ออกเพื่อป้องกันการรั่วไหล
6 การแก้ไขปัญหา
- จอแสดงผลว่างเปล่าหรือมืดลง: Check battery installation. Replace batteries if they are low. The low battery icon will appear, or the display may flash '8888' and beep when batteries are critically low.
- สัญญาณเตือนไม่ดัง: Ensure the alarm is activated (bell icon visible). Check alarm volume setting. Ensure Weekend Mode is not active if you expect the alarm to sound on a weekend.
- เวลา/วันที่ไม่ถูกต้อง: Re-enter time and date settings as per Section 4.1.
- Backlight not staying on: The backlight is designed to illuminate for 5 seconds only. This is normal operation.
7. ข้อมูลจำเพาะ
| คุณสมบัติ | ข้อมูลจำเพาะ |
|---|---|
| ยี่ห้อ | มีสมีก |
| หมายเลขรุ่น | 6201 |
| ประเภทจอภาพ | จอ LCD ระบบดิจิตอล |
| ขนาด | กว้าง 4 นิ้ว x สูง 3.15 นิ้ว x ลึก 0.75 นิ้ว |
| แหล่งพลังงาน | แบตเตอรี่ AAA 2 ก้อน (รวมอยู่ด้วย) |
| อายุการใช้งานแบตเตอรี่ | โดยทั่วไปไม่เกิน 6 เดือน |
| เลื่อนระยะเวลา | 9 นาที |
| ระดับเสียงเตือนภัย | 70dB/85dB |
| ระยะเวลาแบ็คไลท์ | 5 วินาที |
| วัสดุ | พลาสติก |
| น้ำหนักสินค้า | 4 ออนซ์ (0.25 ปอนด์) |
8. การรับประกันและการสนับสนุน
This MeesMeek product comes with a limited warranty. For specific warranty details or technical support, please refer to the warranty card included with your product or visit the official MeesMeek store online.
หากต้องการความช่วยเหลือเพิ่มเติม คุณสามารถไปที่ MeesMeek Brand Store.


