1. บทนำ
Thank you for choosing the ETA Gratus Kuliner II All-Metal Kitchen Robot. This powerful 1700W appliance is designed to assist with a wide range of kitchen tasks, including kneading, mixing, blending, grinding, grating, vacuum sealing, and juicing. Featuring a robust all-metal construction, an integrated scale, an LED display, and 12 speed settings, this kitchen robot offers versatility and precision for your culinary needs. Please read this manual carefully before first use to ensure safe and optimal operation.
2. คำแนะนำด้านความปลอดภัยที่สำคัญ
ปฏิบัติตามข้อควรระวังด้านความปลอดภัยพื้นฐานอยู่เสมอเมื่อใช้เครื่องใช้ไฟฟ้า เพื่อลดความเสี่ยงต่อการเกิดไฟไหม้ ไฟฟ้าช็อต และการบาดเจ็บ
- อ่านคำแนะนำทั้งหมดก่อนใช้งานเครื่อง
- ห้ามจุ่มชุดมอเตอร์ สายไฟ หรือปลั๊กลงในน้ำหรือของเหลวอื่นๆ
- จำเป็นต้องมีการดูแลอย่างใกล้ชิดเมื่อมีเด็กหรือใช้งานเครื่องใช้ไฟฟ้าใดๆ ใกล้เด็ก
- ถอดปลั๊กออกจากเต้ารับเมื่อไม่ใช้งาน ก่อนประกอบหรือแยกชิ้นส่วน และก่อนทำความสะอาด
- Avoid contact with moving parts. Keep hands, hair, clothing, as well as spatulas and other utensils away from attachments during operation to prevent injury and/or damage to the appliance.
- ห้ามใช้งานอุปกรณ์ใดๆ กับสายไฟหรือปลั๊กที่ชำรุด หรือหลังจากที่เครื่องทำงานผิดปกติ หรือตกหล่นหรือเสียหายในลักษณะใดๆ
- การใช้อุปกรณ์เสริมที่ไม่แนะนำหรือจำหน่ายโดยผู้ผลิตอาจทำให้เกิดไฟไหม้ ไฟฟ้าช็อต หรือบาดเจ็บได้
- ห้ามใช้กลางแจ้ง
- อย่าให้สายไฟห้อยออกจากขอบโต๊ะหรือเคาน์เตอร์ หรือสัมผัสพื้นผิวที่ร้อน
- Always ensure the appliance is properly assembled and secured before operation.
- Exercise caution when handling sharp blades and discs.
3. ส่วนประกอบผลิตภัณฑ์
The ETA Gratus Kuliner II comes with a comprehensive set of accessories to maximize its functionality. Familiarize yourself with all parts before use.
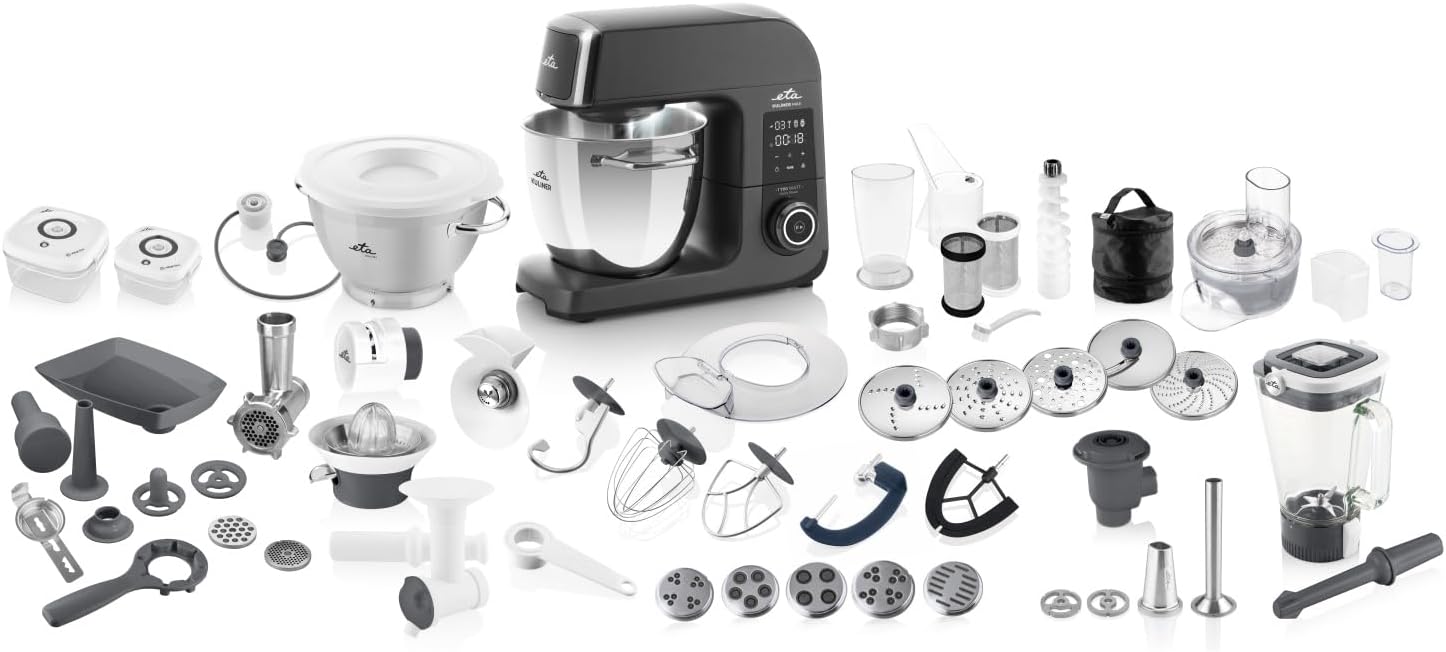
ภาพ: เหนือview of the ETA Gratus Kuliner II kitchen robot and its extensive range of accessories, including bowls, various mixing attachments, grinder, grater, and vacuum sealer components.
Main Unit and Bowls:
- หน่วยมอเตอร์: The main body housing the 1700W motor, control panel, and attachment ports.
- Stainless Steel Bowl (6.7 L): Large capacity bowl for mixing, kneading, and whisking.
- Stainless Steel Bowl (3.5 L): Smaller capacity bowl for various tasks.
Mixing and Kneading Attachments:

Image: A selection of mixing and kneading attachments, including whisks, beaters, and dough hooks, designed for different types of doughs and creams.
- ตะขอสำหรับนวดแป้ง: For heavy doughs like yeast dough and bread dough.
- ปัด: สำหรับตีวิปครีม ไข่ขาว และแป้งเหลว
- ผู้ชนะ: For medium-heavy mixtures, such as cake batters and cookie doughs.
- Flexible Whisk: For light creams and batters, ensuring thorough scraping of the bowl.
- Gluten-Free Hook: Specifically designed for optimal mixing of gluten-free doughs.
สิ่งที่แนบมาอื่น ๆ :
- เครื่องบดเนื้อ: For processing various types of meat.
- Grater/Slicer Attachment: With multiple discs for grating and slicing vegetables, cheese, etc.
- Blender Attachment: For smoothies, soups, and sauces.
- Juicer Attachment: For extracting juice from fruits.
- Vacuum Sealing Attachment: For preserving food.
- ไม้พาย: For scraping and cleaning.
- ตำราอาหาร: For culinary inspiration.
4. การตั้งค่าและการใช้งานเบื้องต้น
4.1 Unpacking and Cleaning
- นำส่วนประกอบทั้งหมดออกจากบรรจุภัณฑ์อย่างระมัดระวัง
- Wash all removable parts (bowls, attachments, lids) in warm soapy water, rinse thoroughly, and dry. The bowls and some attachments are dishwasher safe (refer to 'Maintenance' section).
- เช็ดมอเตอร์ด้วยผ้านุ่มamp ผ้า. ห้ามจุ่มมอเตอร์ลงในน้ำ
4.2 การประกอบตัวเครื่องหลัก
- วางชุดมอเตอร์บนพื้นผิวที่มั่นคง เรียบ และแห้ง
- ตรวจสอบให้แน่ใจว่าได้ถอดปลั๊กเครื่องใช้ไฟฟ้าออกจากเต้าเสียบไฟฟ้า
- Lift the mixing arm by pressing the release button (usually located on the side or back of the motor unit) and tilting it upwards until it locks into place.
- Place the stainless steel bowl into its designated slot on the base and turn it clockwise until it locks securely.
- Select the appropriate attachment for your task (e.g., whisk, kneading hook, beater). Insert the attachment into the shaft on the mixing arm and turn it until it clicks into place.
- Lower the mixing arm by pressing the release button again and gently pushing the arm down until it locks into its operating position.
5. คู่มือการใช้งาน
5.1 General Operation and Control Panel
The ETA Gratus Kuliner II features an intuitive LED display and a rotary knob for speed control.

Image: The control panel showing the LED display, integrated scale function, and the main rotary knob for speed and power control.
- เปิด/ปิดเครื่อง: Plug the appliance into a suitable power outlet. The LED display will illuminate.
- การควบคุมความเร็ว: Use the rotary knob to select one of the 12 available speed settings. Turn clockwise to increase speed, counter-clockwise to decrease.
- ฟังก์ชันพัลส์: A pulse setting is available for short bursts of maximum power.
- มาตราส่วนแบบบูรณาการ: Place the bowl on the base. Press the 'TARE' button on the control panel to zero the scale. Add ingredients directly into the bowl and the weight will be displayed on the LED screen.
- แสงแบบบูรณาการ: The appliance features an integrated light above the bowl to illuminate ingredients during processing.

ภาพ: ภาพระยะใกล้ view highlighting the integrated light positioned to illuminate the contents of the mixing bowl, enhancing visibility during operation.
5.2 Using Mixing and Kneading Attachments
Always ensure the mixing arm is lowered and locked before starting the appliance.

Image: A user adding flour to the stainless steel mixing bowl, with the whisk attachment ready for operation. The integrated scale can be used for precise measurement.
- ตะขอสำหรับนวดแป้ง: Attach the kneading hook. Add ingredients for heavy doughs (e.g., bread, pizza). Start at a low speed and gradually increase as the dough forms.
- ปัด: Attach the whisk. For whipping egg whites, cream, or making light batters. Start at a low speed and increase to high for optimal aeration.
- Beater/Flexible Whisk: Attach the appropriate beater. Ideal for cake batters, cookie doughs, and light creams. Use medium speeds.

Image: The whisk attachment actively mixing ingredients in the stainless steel bowl, demonstrating the planetary mixing system for thorough incorporation.
5.3 Using the Meat Grinder
- Attach the meat grinder assembly to the front port of the motor unit. Secure it by turning the locking ring.
- Place a bowl underneath the grinder outlet.
- Cut meat into appropriate sizes to fit the feeding tube.
- Turn on the appliance to a medium speed and feed the meat into the grinder using the food pusher.

Image: The meat grinder attachment in operation, processing chunks of meat into ground meat, with a collection bowl placed below.
5.4 Using the Grater/Slicer Attachment
- Attach the grater/slicer assembly to the front port. Insert the desired grating or slicing disc.
- วางชามไว้ใต้เต้าเสียบ
- Cut vegetables or cheese to fit the feeding tube.
- Turn on the appliance and feed the ingredients using the food pusher.

Image: The grater/slicer attachment actively slicing a cucumber, demonstrating its capability for preparing fresh ingredients.
5.5 Using the Blender Attachment
- Attach the blender jug to the top port of the motor unit. Ensure it is securely locked.
- Add ingredients to the blender jug, ensuring not to exceed the maximum fill line.
- ปิดฝาให้แน่น
- Select a desired speed or use the pulse function for blending.

Image: The blender attachment mounted on the kitchen robot, filled with fruits and vegetables, ready for blending.
5.6 Using the Vacuum Sealing Attachment
- Connect the vacuum sealing hose to the designated port on the motor unit.
- Connect the other end of the hose to a compatible vacuum container or bag.
- Ensure the container/bag is properly sealed around the vacuum port.
- Activate the vacuum function on the appliance (refer to the control panel for specific settings).
- Once the air is removed, turn off the function and disconnect the hose.

Image: The vacuum sealing attachment in use, connected to the kitchen robot and a food storage container, demonstrating its food preservation capability.
6. การทำความสะอาดและการบำรุงรักษา
Regular cleaning ensures the longevity and optimal performance of your ETA Gratus Kuliner II.
6.1 การทำความสะอาดชุดมอเตอร์
- ควรถอดปลั๊กเครื่องทุกครั้งก่อนทำความสะอาด
- เช็ดภายนอกชุดมอเตอร์ด้วยผ้านุ่มๆamp ผ้า.
- Do not use abrasive cleaners or scourers.
- ห้ามจุ่มมอเตอร์ลงในน้ำหรือของเหลวอื่นๆ
6.2 Cleaning Attachments and Bowls
- All removable parts, including the stainless steel bowls, mixing attachments (kneading hook, whisk, beater, flexible whisk, gluten-free hook), and most parts of the grinder, grater, blender, and juicer attachments, are dishwasher safe.
- For hand washing, use warm soapy water and a soft brush for hard-to-reach areas. Rinse thoroughly and dry immediately to prevent water spots or corrosion.
- Exercise extreme caution when cleaning sharp blades and discs.
6.3 พื้นที่จัดเก็บ
Store the appliance and its accessories in a clean, dry place, away from direct sunlight and out of reach of children.
7 การแก้ไขปัญหา
If you encounter issues with your ETA Gratus Kuliner II, refer to the following common problems and solutions:
| ปัญหา | สาเหตุที่เป็นไปได้ | สารละลาย |
|---|---|---|
| เครื่องไม่เปิดขึ้น | Not plugged in; power outlet faulty; mixing arm not locked down. | Check power connection; try a different outlet; ensure mixing arm is fully lowered and locked. |
| Attachment not rotating. | Attachment not properly installed; mixing arm not locked. | Ensure attachment is clicked into place; verify mixing arm is locked. |
| เสียงรบกวนที่ผิดปกติระหว่างการทำงาน | Overload; improper assembly; foreign object. | Reduce load; check all parts are correctly assembled; inspect for foreign objects. If noise persists, discontinue use and contact support. |
| Integrated scale not working. | Bowl not placed correctly; scale needs re-calibration (tare). | Ensure bowl is seated firmly; press the 'TARE' button to reset the scale. |
หากปัญหายังคงมีอยู่หลังจากพยายามแก้ไขปัญหาเหล่านี้แล้ว โปรดติดต่อฝ่ายสนับสนุนลูกค้า
8. ข้อมูลจำเพาะทางเทคนิค
| คุณสมบัติ | ข้อมูลจำเพาะ |
|---|---|
| ยี่ห้อ | เวลาถึงโดยประมาณ |
| หมายเลขรุ่น | ETA203890010 |
| พลัง | 1700 วัตต์ |
| เล่มที่tage | 230 โวลต์ |
| วัสดุ | พลาสติก, สแตนเลส |
| จำนวนความเร็ว | 12 |
| Large Bowl Capacity | 6.7 ลิตร |
| Small Bowl Capacity | 3.5 ลิตร |
| คุณสมบัติพิเศษ | Integrated Scale, Integrated Vacuum Sealer, LED Display, Integrated Light |
| ขนาด (D x W x H) | 41.5 ซม. x 31 ซม. x 37 ซม. |
| น้ำหนัก | 20 กิโลกรัม |
| คำแนะนำในการดูแล | Dishwasher safe (removable parts) |
9. ข้อมูลการรับประกัน
This ETA Gratus Kuliner II Kitchen Robot is covered by a manufacturer's warranty against defects in materials and workmanship. The warranty period typically begins from the date of purchase. Please retain your proof of purchase for warranty claims. For specific warranty terms and conditions, refer to the warranty card included with your product or contact ETA customer support.
The warranty does not cover damage caused by misuse, neglect, unauthorized repairs, or normal wear and tear.
10. การสนับสนุนลูกค้า
If you have any questions, require assistance, or need to report a problem with your ETA Gratus Kuliner II Kitchen Robot, please contact our customer support team.
- Webเว็บไซต์: Visit the official ETA website for FAQs, product registration, and support contact details.
- อีเมล: โปรดตรวจสอบบรรจุภัณฑ์ของผลิตภัณฑ์หรือบัตรรับประกันเพื่อดูที่อยู่อีเมลฝ่ายบริการลูกค้า
- โทรศัพท์: Contact numbers for customer support can be found on the ETA webไซต์หรือในเอกสารผลิตภัณฑ์ของคุณ
When contacting support, please have your model number (ETA203890010) and proof of purchase ready.


