1. บทนำ
Thank you for choosing the MASTECH MY75 Digital Multimeter. This device is a professional, handheld instrument designed for accurate measurement of AC/DC voltage, AC/DC current, resistance, capacitance, frequency, diode, continuity, and transistor hFE. Please read this manual thoroughly before use to ensure safe and proper operation.
1.1 ข้อมูลด้านความปลอดภัย
ควรปฏิบัติตามข้อควรระวังด้านความปลอดภัยเสมอเมื่อใช้เครื่องมือทดสอบทางไฟฟ้าใดๆ การไม่ปฏิบัติตามอาจส่งผลให้เกิดการบาดเจ็บหรือความเสียหายต่อมิเตอร์หรืออุปกรณ์ที่กำลังทดสอบได้
- อย่าเกินค่าอินพุตสูงสุดที่กำหนดไว้สำหรับแต่ละช่วง
- ใช้ความระมัดระวังอย่างยิ่งเมื่อทำงานกับ voltagสูงกว่า 60V DC หรือ 30V AC RMS
- Ensure the test leads are in good condition and properly connected.
- ห้ามใช้งานมิเตอร์หากพบว่าชำรุดเสียหาย หรือหากฝาครอบเปิดอยู่
- เปลี่ยนแบตเตอรี่เมื่อไฟแสดงสถานะแบตเตอรี่อ่อนปรากฏขึ้นเพื่อให้แน่ใจว่าการอ่านค่าแม่นยำ
- This meter is rated CAT III 600V.
2. สินค้าหมดview
The MASTECH MY75 is a compact and versatile digital multimeter suitable for domestic, industrial, and electronics applications.
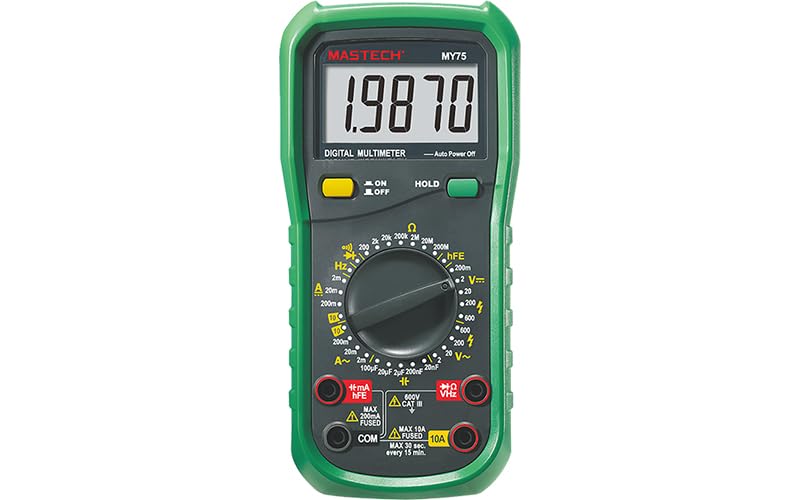
รูปที่ 2.1 : ด้านหน้า view of the MASTECH MY75 Digital Multimeter, showing the LCD display, rotary switch, function buttons, and input jacks.
2.1 ส่วนประกอบหลัก
- จอแสดงผล LCD: 20000 counts display for clear readings.
- สวิตช์โรตารี่: Used to select measurement functions and ranges.
- ปุ่มฟังก์ชั่น: Includes ON/OFF, HOLD, and other specific function buttons.
- แจ็คอินพุต: Terminals for connecting test leads (COM, VΩHz, 10A, mA/µA/hFE).

รูปที่ 2.2: เกินview of MY75 features, main applications (domestic, industrial, electronics), and package contents.
3. การตั้งค่า
3.1 เนื้อหาบรรจุภัณฑ์
ก่อนเริ่มต้น ตรวจสอบว่ามีรายการทั้งหมดอยู่ในแพ็คเกจ:
- MASTECH MY75 ดิจิตอลมัลติมิเตอร์
- สายทดสอบ (สีแดงและสีดำ)
- Multi-function Socket (for hFE testing)
- 2 x LR44 Batteries (pre-installed or included separately)
- คู่มือเริ่มต้นอย่างรวดเร็ว
- ใบรับรองการสอบเทียบ

Figure 3.1: The MASTECH MY75 Multimeter shown with its retail packaging and included accessories.

Figure 3.2: The MASTECH MY75 Multimeter with its essential accessories: test leads, LR44 batteries, and the multi-function hFE socket.
3.2 การติดตั้งแบตเตอรี่
The MASTECH MY75 uses 2 LR44 batteries. If the low battery indicator appears on the display, replace the batteries immediately to maintain measurement accuracy.
- ปิดมัลติมิเตอร์และถอดสายวัดทั้งหมดออก
- ค้นหาฝาครอบช่องใส่แบตเตอรี่ที่ด้านหลังของเครื่อง
- คลายสกรูยึดออก แล้วถอดฝาครอบออก
- Remove the old batteries and insert new LR44 batteries, observing correct polarity.
- ปิดฝาช่องใส่แบตเตอรี่และขันสกรูให้แน่น
3.3 การเชื่อมต่อสายทดสอบ
Always connect the black test lead to the "COM" (Common) jack. Connect the red test lead to the appropriate input jack based on the measurement function:
- VΩเฮิร์ตซ์: สำหรับฉบับที่tagเช่น การวัดค่าความต้านทาน ความถี่ ความจุ ไดโอด และความต่อเนื่อง
- mA/µA/hFE: สำหรับมิลลิampเออร์/ไมโครampere current measurements and transistor hFE testing.
- 10 ก: สำหรับการวัดกระแสไฟฟ้าสูง (สูงสุด 10A)
4. คู่มือการใช้งาน
To operate the multimeter, turn the rotary switch to the desired function. The meter features auto-ranging for most functions, simplifying operation.
4.1 DC ฉบับที่tage การวัด (V=)
- เชื่อมต่อสายวัดสีดำเข้ากับแจ็ค COM และสายวัดสีแดงเข้ากับแจ็ค VΩHz
- Turn the rotary switch to the "V=" position.
- เชื่อมต่อสายทดสอบเข้ากับขั้ว DC vol.tagแหล่งที่มาที่จะวัด
- อ่านเล่มที่tagค่า e บนจอแสดงผล
4.2 AC โวลtage การวัด (V~)
- เชื่อมต่อสายวัดสีดำเข้ากับแจ็ค COM และสายวัดสีแดงเข้ากับแจ็ค VΩHz
- Turn the rotary switch to the "V~" position.
- เชื่อมต่อสายทดสอบเข้ากับขั้วไฟ ACtagแหล่งที่มาที่จะวัด
- อ่านเล่มที่tagค่า e บนจอแสดงผล
4.3 DC Current Measurement (A= / mA= / µA=)
- ปิดไฟเข้าวงจร
- เชื่อมต่อสายวัดทดสอบสีดำเข้ากับแจ็ค COM
- For currents up to 200mA, connect the red test lead to the mA/µA/hFE jack. For currents up to 10A, connect the red test lead to the 10A jack.
- Turn the rotary switch to the appropriate "A=", "mA=", or "µA=" position.
- Break the circuit and connect the meter in series with the load.
- จ่ายไฟให้กับวงจรแล้วอ่านค่ากระแสไฟฟ้า
4.4 AC Current Measurement (A~ / mA~ / µA~)
- Follow the same steps as DC Current Measurement, but select the appropriate "A~", "mA~", or "µA~" position on the rotary switch.
4.5 การวัดค่าความต้านทาน (โอห์ม)
- ตรวจสอบให้แน่ใจว่าวงจรไม่มีพลังงานและตัวเก็บประจุทั้งหมดถูกปล่อยประจุแล้ว
- เชื่อมต่อสายวัดสีดำเข้ากับแจ็ค COM และสายวัดสีแดงเข้ากับแจ็ค VΩHz
- Turn the rotary switch to the "Ω" position.
- เชื่อมต่อสายทดสอบข้ามส่วนประกอบที่ต้องการวัด
- อ่านค่าความต้านทานบนจอแสดงผล
4.6 การวัดค่าความจุ (F)
- ตรวจสอบให้แน่ใจว่าตัวเก็บประจุถูกปล่อยประจุจนหมดก่อนทำการวัด
- เชื่อมต่อสายวัดสีดำเข้ากับแจ็ค COM และสายวัดสีแดงเข้ากับแจ็ค VΩHz
- Turn the rotary switch to the "F" position.
- ต่อสายวัดทดสอบเข้ากับขั้วของตัวเก็บประจุ
- อ่านค่าความจุบนจอแสดงผล
4.7 การวัดความถี่ (เฮิร์ตซ์)
- เชื่อมต่อสายวัดสีดำเข้ากับแจ็ค COM และสายวัดสีแดงเข้ากับแจ็ค VΩHz
- Turn the rotary switch to the "Hz" position.
- ต่อสายทดสอบเข้ากับแหล่งสัญญาณ
- อ่านค่าความถี่บนจอแสดงผล
4.8 Diode Test (→|)
- ตรวจสอบให้แน่ใจว่าวงจรไม่มีพลังงาน
- เชื่อมต่อสายวัดสีดำเข้ากับแจ็ค COM และสายวัดสีแดงเข้ากับแจ็ค VΩHz
- Turn the rotary switch to the Diode symbol position.
- Connect the red lead to the anode and the black lead to the cathode of the diode. A forward voltage drop will be displayed (Diode Open Voltagอี 3.0V)
- Reverse the leads. The display should show "OL" (Open Loop) for a good diode.
4.9 Continuity Test (-)
- ตรวจสอบให้แน่ใจว่าวงจรไม่มีพลังงาน
- เชื่อมต่อสายวัดสีดำเข้ากับแจ็ค COM และสายวัดสีแดงเข้ากับแจ็ค VΩHz
- Turn the rotary switch to the Continuity symbol position.
- เชื่อมต่อสายทดสอบข้ามวงจรหรือส่วนประกอบ
- If the resistance is less than approximately 60Ω, the buzzer will sound, indicating continuity.
4.10 การทดสอบ hFE ของทรานซิสเตอร์
- Connect the multi-function socket to the mA/µA/hFE and COM jacks.
- Turn the rotary switch to the "hFE" position.
- Insert the transistor's emitter, base, and collector leads into the corresponding holes on the multi-function socket (NPN or PNP).
- Read the hFE value (0-1000) on the display.
5. คุณสมบัติ
- Display 20000 Counts: ให้ความละเอียดสูงเพื่อการวัดที่แม่นยำ
- การเก็บข้อมูล: กดปุ่ม "HOLD" เพื่อหยุดการอ่านค่าปัจจุบันบนหน้าจอ กดอีกครั้งเพื่อปล่อย
- ปิดเครื่องอัตโนมัติ: The meter automatically turns off after a period of inactivity to conserve battery life.
- แสดงสถานะแบตเตอรี่เหลือน้อย: An icon on the display indicates when the batteries are low and need replacement.
6. การบำรุงรักษา
6.1 การทำความสะอาด
เช็ดเคสด้วยโฆษณาamp ใช้ผ้าและผงซักฟอกอ่อนๆ เช็ดทำความสะอาด ห้ามใช้สารขัดถูหรือตัวทำละลาย รักษาขั้วต่อให้ปราศจากสิ่งสกปรกและความชื้น
6.2 การเปลี่ยนแบตเตอรี่
Refer to Section 3.2 for detailed instructions on replacing the LR44 batteries.
6.3 พื้นที่จัดเก็บ
If the meter is not used for an extended period, remove the batteries to prevent leakage and damage. Store the meter in a cool, dry place away from direct sunlight.
7 การแก้ไขปัญหา
| ปัญหา | สาเหตุที่เป็นไปได้ | สารละลาย |
|---|---|---|
| ไม่มีการแสดงผลหรือแสดงผลจางมาก | แบตเตอรี่อ่อนหรือหมด; การติดตั้งแบตเตอรี่ไม่ถูกต้อง | เปลี่ยนแบตเตอรี่ ตรวจสอบขั้วแบตเตอรี่ |
| แสดง "OL" (โอเวอร์โหลด) | Input value exceeds selected range; Open circuit | Select a higher range; Check circuit connections |
| การอ่านไม่ถูกต้อง | Low batteries; Incorrect function/range selected; Poor test lead connection | Replace batteries; Verify function/range; Ensure secure connections |
| ไม่มีเสียงบี๊บแสดงความต่อเนื่อง | Resistance too high; Open circuit | Check circuit for breaks; Ensure resistance is below 60Ω |
8. ข้อมูลจำเพาะ
The following table details the technical specifications of the MASTECH MY75 Digital Multimeter.

Figure 8.1: Detailed specifications including range, resolution, and accuracy for various measurement functions of the MY75.
| ประเภทการวัด | พิสัย | ปณิธาน | ความแม่นยำ |
|---|---|---|---|
| DC ฉบับที่tage | 200mV / 2V / 20V / 200V / 600V | 0.01mV / 0.1mV / 1mV / 10mV / 0.1V / 1V | ±(0.05%+3) ถึง ±(0.15%+3) |
| ฉบับ ACtage | 2V / 20V / 200V / 600V | 0.1mV / 1mV / 10mV / 0.1V | ±(0.5%+3) ถึง ±(1.0%+15) |
| กระแสไฟฟ้าตรง | 2mA / 20mA / 200mA / 10A | 0.1µA / 1µA / 10µA / 1mA / 10mA | ±(0.5%+50) ถึง ±(2.0%+10) |
| กระแสไฟ AC | 2mA / 20mA / 200mA / 10A | 0.1µA / 1µA / 10µA / 1mA / 10mA | ±(0.8%+50) ถึง ±(2.5%+10) |
| ความต้านทาน | 200Ω / 2kΩ / 20kΩ / 200kΩ / 2MΩ / 20MΩ / 200MΩ | 0.01Ω / 0.1Ω / 1Ω / 10Ω / 100Ω / 1kΩ / 10kΩ | ±(0.5%+10) ถึง ±(5.0%+10) |
| ความจุ | 2µF / 20µF / 100µF / 20nF / 200nF | 0.1nF / 1nF / 10nF / 1pF / 10pF | ±(4.0%+20) |
| ความถี่ | 20kHz | 1เฮิรตซ์ | ±(1.5%+5) |
| ไดโอดเปิดโวลต์tage | 3.0โวลต์ | ไม่มีข้อมูล | ไม่มีข้อมูล |
| Buzzer ต่อเนื่อง | <60Ω | ไม่มีข้อมูล | ไม่มีข้อมูล |
| ทรานซิสเตอร์ hFE | 0~1000 | ไม่มีข้อมูล | ไม่มีข้อมูล |
| แสดง | 20000 นับ | ไม่มีข้อมูล | ไม่มีข้อมูล |
| แหล่งพลังงาน | 2 x LR44 batteries | ไม่มีข้อมูล | ไม่มีข้อมูล |
| ขนาด (กว้าง x ยาว x สูง) | 16 x 9 x 5 ซม. | ไม่มีข้อมูล | ไม่มีข้อมูล |
| น้ำหนัก | 500 กรัม | ไม่มีข้อมูล | ไม่มีข้อมูล |
| ระดับความปลอดภัย | กสท.600 XNUMXV | ไม่มีข้อมูล | ไม่มีข้อมูล |
| การรับรอง | ซีอี, โรเอชเอส | ไม่มีข้อมูล | ไม่มีข้อมูล |
9. การรับประกันและการสนับสนุน
MASTECH products are designed for reliability and performance. For warranty information or technical support, please refer to the contact details provided with your purchase documentation or visit the official MASTECH webไซต์ โปรดเก็บใบเสร็จรับเงินไว้เป็นหลักฐานการซื้อสำหรับการเรียกร้องการรับประกัน
ระยะเวลาการจัดจำหน่ายอะไหล่ในสหภาพยุโรป: 1 ปี


