1. บทนำ
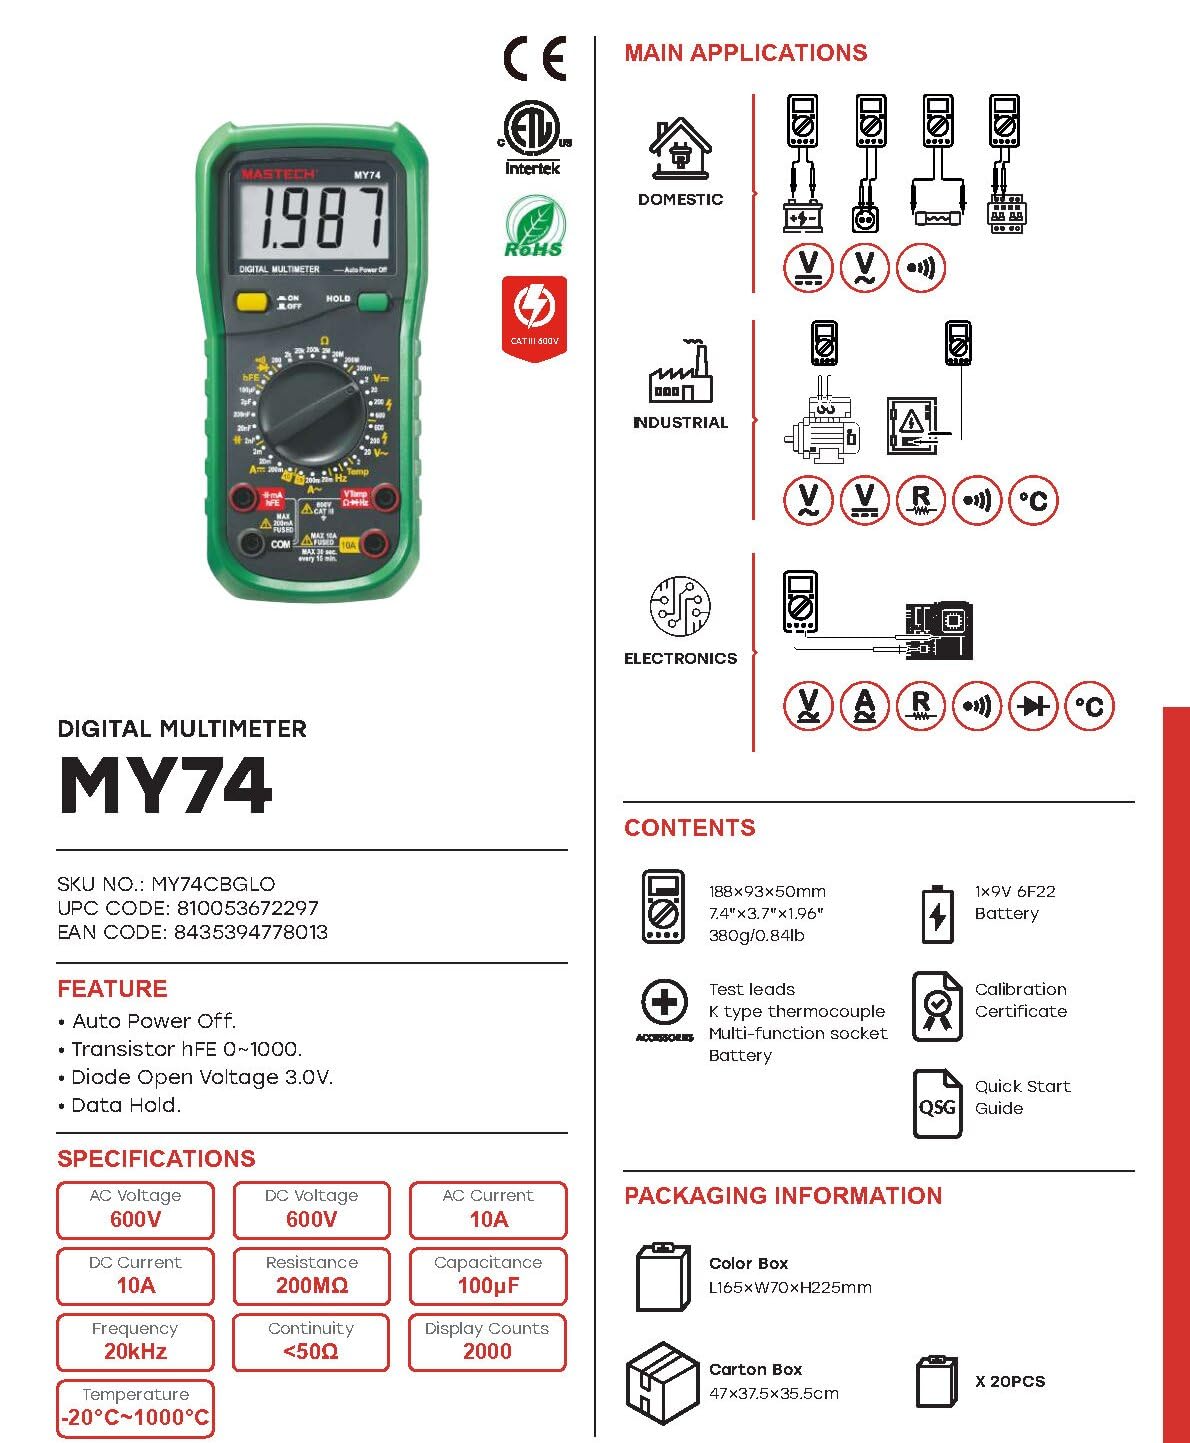
This manual provides detailed instructions for the safe and effective operation of your MASTECH MY74 Digital Multimeter. Please read this manual thoroughly before using the device and retain it for future reference. The MY74 is a compact, handheld digital multimeter designed for measuring AC/DC voltage, AC/DC current, resistance, capacitance, frequency, temperature, diode, continuity, and transistor hFE.
2. ข้อมูลด้านความปลอดภัย
WARNING: To avoid electric shock or personal injury, read and understand all safety information before using this multimeter.
- Always ensure the multimeter is in good working condition and free from damage.
- ห้ามใช้เกินปริมาณที่กำหนดtagจ ตามที่ทำเครื่องหมายไว้บนมาตร ระหว่างขั้วต่อหรือระหว่างขั้วต่อใดๆ กับสายดิน
- ใช้ความระมัดระวังเมื่อทำงานกับ voltages สูงกว่า 30V AC RMS, 42V peak หรือ 60V DC ปริมาตรเหล่านี้tagอาจทำให้เกิดอันตรายจากการช็อตได้
- ควรตัดการเชื่อมต่อสายทดสอบออกจากวงจรทุกครั้งก่อนเปลี่ยนฟังก์ชันการทำงาน
- Do not use the meter if the battery cover is not properly closed.
- เปลี่ยนแบตเตอรี่ทันทีที่สัญลักษณ์แบตเตอรี่อ่อนปรากฏขึ้น
- Adhere to the measurement category (CAT III 600V) for safe operation.
3. สินค้าหมดview
The MASTECH MY74 Digital Multimeter features a clear display, a rotary function switch, and input jacks for test leads. Familiarize yourself with the components shown below.

ส่วนประกอบที่สำคัญ ได้แก่:
- จอแสดงผล LCD: แสดงค่าการวัด หน่วย และตัวบ่งชี้ฟังก์ชัน
- สวิตช์หมุนควบคุมการทำงาน: เลือกฟังก์ชั่นการวัดที่ต้องการ
- ปุ่มเปิด/ปิด: เปิดหรือปิดอุปกรณ์
- ปุ่มถือ: หยุดการแสดงค่าปัจจุบันบนหน้าจอ
- แจ็คอินพุต:
- คอม: ขั้วต่อทั่วไปสำหรับการวัดทั้งหมด
- วีโอห์มเฮิร์ตซ์: อินพุตสำหรับ voltagการวัดค่าต่างๆ ได้แก่ ความต้านทาน ความถี่ ความจุ ไดโอด และความต่อเนื่อง
- mAµA: อินพุตสำหรับมิลลิampเอเร่และไมโครampมีการวัดปัจจุบัน
- 10 ก: Input for 10 Ampมีการวัดปัจจุบัน
4. คุณสมบัติ
The MASTECH MY74 Digital Multimeter offers the following key features:
- จอแสดงผล: นับ 2000
- ฟังก์ชั่นปิดเครื่องอัตโนมัติ
- Transistor hFE measurement (0~1000)
- ไดโอดเปิดโวลต์tagอี: 3.0V
- Continuity Buzzer: Activates below 50Ω
- ฟังก์ชั่น Data Hold
- ไฟแสดงสถานะแบตเตอรี่ต่ำ
5. การตั้งค่า
5.1 การติดตั้งแบตเตอรี่
The MASTECH MY74 requires 2 LR44 batteries (included). To install or replace batteries:
- ตรวจสอบให้แน่ใจว่ามัลติมิเตอร์ปิดอยู่ และถอดสายวัดทั้งหมดออก
- หาช่องใส่แบตเตอรี่ที่ด้านหลังของมิเตอร์
- คลายเกลียวฝาปิดช่องใส่แบตเตอรี่
- Insert the batteries, observing correct polarity (+ and -).
- ใส่ฝาปิดช่องใส่แบตเตอรี่และขันให้แน่นด้วยสกรู
5.2 การเชื่อมต่อสายทดสอบ
Always connect the black test lead to the COM jack. Connect the red test lead to the appropriate input jack based on the measurement function:
- วีโอห์มเฮิร์ตซ์: สำหรับเล่มtage, resistance, frequency, capacitance, diode, and continuity.
- mAµA: สำหรับการวัดกระแสไฟฟ้าปัจจุบันที่ไม่เกิน 200 มิลลิแอมป์
- 10 ก: สำหรับการวัดกระแสไฟฟ้าสูงสุดถึง 10A
6. คู่มือการใช้งาน
Before taking any measurement, ensure the test leads are correctly connected and the rotary switch is set to the desired function.
6.1 DC ฉบับที่tagการวัด (V–)
- Connect the red test lead to the VΩHz jack and the black test lead to the COM jack.
- ตั้งสวิตช์หมุนไปที่ DC Vol ที่ต้องการtagช่วง (เช่น 200mV, 2V, 20V, 200V, 600V)
- ต่อสายทดสอบแบบขนานเข้ากับวงจรหรือชิ้นส่วนที่ต้องการทดสอบ
- อ่านเล่มที่tagค่า e บนจอแสดงผล
6.2 AC โวลtagการวัด (V∼)
- Connect the red test lead to the VΩHz jack and the black test lead to the COM jack.
- ตั้งสวิตช์หมุนไปที่ AC Vol. ที่ต้องการtage range (e.g., 2V, 20V, 200V, 750V).
- Connect the test leads in parallel to the AC circuit or component.
- อ่านเล่มที่tagค่า e บนจอแสดงผล
6.3 การวัดกระแสไฟฟ้ากระแสตรง (แอมป์)
CAUTION: Never connect the multimeter in parallel to a voltage source when measuring current. This can blow the fuse or damage the meter.
- เชื่อมต่อสายวัดทดสอบสีดำเข้ากับแจ็ค COM
- For currents up to 200mA, connect the red test lead to the mAµA jack. For currents up to 10A, connect the red test lead to the 10A jack.
- Set the rotary switch to the appropriate DC Current range (e.g., 2mA, 20mA, 200mA, 10A).
- เปิดวงจรและเชื่อมต่อมัลติมิเตอร์แบบอนุกรมกับโหลด
- อ่านค่าปัจจุบันบนจอแสดงผล
6.4 AC Current Measurement (A∼)
CAUTION: Never connect the multimeter in parallel to a voltage source when measuring current. This can blow the fuse or damage the meter.
- เชื่อมต่อสายวัดทดสอบสีดำเข้ากับแจ็ค COM
- For currents up to 200mA, connect the red test lead to the mAµA jack. For currents up to 10A, connect the red test lead to the 10A jack.
- Set the rotary switch to the appropriate AC Current range (e.g., 2mA, 20mA, 200mA, 10A).
- เปิดวงจรและเชื่อมต่อมัลติมิเตอร์แบบอนุกรมกับโหลด
- อ่านค่าปัจจุบันบนจอแสดงผล
6.5 การวัดค่าความต้านทาน (โอห์ม)
CAUTION: Ensure the circuit is de-energized and all capacitors are discharged before measuring resistance.
- Connect the red test lead to the VΩHz jack and the black test lead to the COM jack.
- Set the rotary switch to the desired Resistance range (e.g., 200Ω, 2kΩ, 20kΩ, 200kΩ, 2MΩ, 200MΩ).
- เชื่อมต่อสายทดสอบข้ามส่วนประกอบที่ต้องการวัด
- อ่านค่าความต้านทานบนจอแสดงผล
6.6 Diode Test (→|–)
- Connect the red test lead to the VΩHz jack and the black test lead to the COM jack.
- Set the rotary switch to the Diode Test position.
- ต่อสายทดสอบสีแดงเข้ากับขั้วบวก และสายทดสอบสีดำเข้ากับขั้วลบของไดโอด
- จอแสดงผลจะแสดงปริมาตรไปข้างหน้าtage drop. Reverse the leads; the display should show "OL" (Open Loop) for a good diode.
6.7 Continuity Test (♫)
- Connect the red test lead to the VΩHz jack and the black test lead to the COM jack.
- Set the rotary switch to the Continuity Test position.
- เชื่อมต่อสายทดสอบข้ามวงจรหรือส่วนประกอบ
- If the resistance is less than approximately 50Ω, the buzzer will sound, indicating continuity.
6.8 การทดสอบ hFE ของทรานซิสเตอร์
- ตั้งสวิตช์หมุนไปที่ตำแหน่ง hFE
- Insert the transistor's Emitter, Base, and Collector leads into the corresponding holes in the multi-function socket (NPN or PNP).
- อ่านค่า hFE บนจอแสดงผล
6.9 การวัดค่าความจุ (F)
CAUTION: Ensure the capacitor is fully discharged before measuring capacitance to avoid damage to the meter.
- Connect the red test lead to the VΩHz jack and the black test lead to the COM jack.
- Set the rotary switch to the Capacitance range (e.g., 2nF, 20nF, 200nF, 2µF, 20µF, 100µF).
- เชื่อมต่อสายทดสอบข้ามตัวเก็บประจุ
- อ่านค่าความจุบนจอแสดงผล
6.10 การวัดความถี่ (เฮิร์ตซ์)
- Connect the red test lead to the VΩHz jack and the black test lead to the COM jack.
- Set the rotary switch to the Frequency range (20kHz).
- Connect the test leads in parallel to the signal source.
- อ่านค่าความถี่บนจอแสดงผล
6.11 การวัดอุณหภูมิ (°C/°F)
- Connect the K-type thermocouple to the VΩHz and COM jacks, observing polarity.
- Set the rotary switch to the Temperature range.
- วางหัววัดเทอร์โมคัปเปิลไว้ ณ จุดที่ต้องการวัดอุณหภูมิ
- อ่านค่าอุณหภูมิบนจอแสดงผล
7. การบำรุงรักษา
7.1 การทำความสะอาด
เช็ดเคสด้วยโฆษณาamp ผ้าและผงซักฟอกอ่อนๆ ห้ามใช้สารกัดกร่อนหรือตัวทำละลาย ตรวจสอบให้แน่ใจว่ามิเตอร์แห้งสนิทก่อนใช้งาน
7.2 การเปลี่ยนแบตเตอรี่
Refer to section 5.1 for battery replacement instructions. Replace batteries promptly when the low battery indicator appears to ensure accurate readings.
7.3 การเปลี่ยนฟิวส์
หากฟังก์ชันการวัดกระแสไฟฟ้าล้มเหลว อาจจำเป็นต้องเปลี่ยนฟิวส์ โปรดดูข้อมูลจำเพาะสำหรับประเภทและพิกัดฟิวส์ที่ถูกต้อง การเปลี่ยนฟิวส์ควรดำเนินการโดยบุคลากรที่มีคุณสมบัติเหมาะสมเท่านั้น
8 การแก้ไขปัญหา
| ปัญหา | สาเหตุที่เป็นไปได้ | สารละลาย |
|---|---|---|
| มิเตอร์ไม่เปิดใช้งาน | แบตเตอรี่เสียหรือติดตั้งไม่ถูกต้อง | ตรวจสอบขั้วแบตเตอรี่หรือเปลี่ยนแบตเตอรี่ |
| แสดงข้อความ "OL" (Overload) | Measurement exceeds selected range or open circuit. | Select a higher range or check for open circuit. |
| Incorrect current reading. | Blown fuse or incorrect input jack. | Check fuse and ensure test lead is in the correct current input jack (mAµA or 10A). |
| ไม่มีเสียงบี๊บแสดงความต่อเนื่อง | Resistance is too high or circuit is open. | Check the circuit for breaks. Ensure resistance is below 50Ω. |
9. ข้อมูลจำเพาะ
The following table details the technical specifications for the MASTECH MY74 Digital Multimeter.

| การทำงาน | พิสัย | ปณิธาน | ความแม่นยำ |
|---|---|---|---|
| DC ฉบับที่tage | 200mV/2V/20V/200V | 0.1mV/1mV/10mV/0.1V | ±(0.5%+2) |
| 600โวลต์ | 1V | ±(0.8%+2) | |
| ฉบับ ACtage | 2โวลต์/20โวลต์/200โวลต์ | 1mV/10mV/100mV | ±(0.8%+3) |
| 750โวลต์ | 1V | ±(1.2%+3) | |
| กระแสไฟฟ้าตรง | 2มิลลิแอมป์ | 1µA | ±(0.8%+1) |
| 20มิลลิแอมป์ | 10µA | ±(1.5%+1) | |
| 200มิลลิแอมป์ | 0.1มิลลิแอมป์ | ±(1.5%+1) | |
| 10เอ | 10มิลลิแอมป์ | ±(2.0%+5) | |
| กระแสไฟ AC | 20มิลลิแอมป์ | 10µA | ±(1.0%+5) |
| 200มิลลิแอมป์ | 0.1มิลลิแอมป์ | ±(1.8%+5) | |
| 10เอ | 0.01เอ | ±(3.0%+7) | |
| ความต้านทาน | 200Ω | 0.1Ω | ±(0.8%+3) |
| 2kΩ/20kΩ/200kΩ/2MΩ | 1Ω/10Ω/100Ω/1kΩ | ±(0.8%+2) | |
| 20 เมกะโอห์ม | 10kΩ | ±(1.0%+2) | |
| 200 เมกะโอห์ม | 0.1 เมกะโอห์ม | ±(6.0%+10) | |
| ไดโอดเปิดโวลต์tage | 3.0โวลต์ | ไม่มีข้อมูล | ไม่มีข้อมูล |
| ความจุ | 2nF/20nF/200nF/2µF | 1pF/10pF/0.1nF/1nF | ±(4.0%+3) |
| 20µF | 10nF | ±(5.0%+3) | |
| 100µF | 0.1µF | ±(6.0%+10) | |
| ความถี่ | 20kHz | 0.01kHz | ±(2.0%+5) |
| อุณหภูมิ | -20°C~0°C | 1 องศาเซลเซียส | ±(5.0%+4) |
| 1°C~400°C | 1 องศาเซลเซียส | ±(2.0%+3) | |
| 401°C~1000°C | 1 องศาเซลเซียส | ±(2.0%+5) | |
| ทรานซิสเตอร์ hFE | 0~1000 | ไม่มีข้อมูล | ไม่มีข้อมูล |
| แสดง | 2000 นับ | ||
| ปิดเครื่องอัตโนมัติ | ใช่ | ||
| Buzzer ต่อเนื่อง | <50Ω | ||
| การเก็บข้อมูล | ใช่ | ||
| จอแสดงผลแบตเตอรี่ต่ำ | ใช่ | ||
| แหล่งพลังงาน | แบตเตอรี่ LR2 44 ก้อน (รวมอยู่ด้วย) | ||
| ขนาดสินค้า | 16 x 9 x 5 ซม. | ||
| น้ำหนักสินค้า | 0.5 กิโลกรัม | ||
| ระดับความปลอดภัย | CAT III 600V, CE, RoHS | ||
Note: Accuracy specifications are given for one year after calibration, at 18°C to 28°C (64°F to 82°F), with relative humidity up to 75%.
10. การรับประกันและการสนับสนุน
MASTECH products are designed for reliability and performance. For warranty information and technical support, please refer to the documentation included with your purchase or visit the official MASTECH website. The EU Spare Part Availability Duration is 1 year.


