1. บทนำ
This manual provides comprehensive instructions for the safe and effective operation of the ZOYI ZT303 Digital Multimeter. The ZT303 is a high-precision, auto-ranging measurement tool designed for professionals and enthusiasts, capable of measuring voltage, current, resistance, capacitance, frequency, and duty cycle. Please read this manual thoroughly before use to ensure proper operation and to prevent potential hazards.
2. ข้อมูลด้านความปลอดภัย
เพื่อให้การทำงานและการบริการของมิเตอร์เป็นไปอย่างปลอดภัย ให้ปฏิบัติตามคำแนะนำเหล่านี้ การไม่ปฏิบัติตามคำเตือนเหล่านี้อาจส่งผลให้ได้รับบาดเจ็บสาหัสหรือเสียชีวิตได้
- ควรตรวจสอบให้แน่ใจเสมอว่ามิเตอร์อยู่ในโหมดการทำงานและช่วงการวัดที่ถูกต้องก่อนทำการวัดทุกครั้ง
- ห้ามใช้มิเตอร์หากพบว่าชำรุด หรือสายวัดชำรุด
- ห้ามใช้เกินปริมาณที่กำหนดtagจ ตามที่ทำเครื่องหมายไว้บนมาตร ระหว่างขั้วต่อหรือระหว่างขั้วต่อใดๆ กับสายดิน
- ใช้ความระมัดระวังอย่างยิ่งเมื่อทำงานกับโวลุ่มtages สูงกว่า 30V AC RMS, 42V peak หรือ 60V DC ปริมาตรเหล่านี้tagอาจทำให้เกิดอันตรายจากการช็อตได้
- Disconnect the test leads from the circuit before changing functions.
- ถอดสายวัดออกจากมิเตอร์ก่อนเปิดฝาครอบแบตเตอรี่
- Do not operate the meter with the battery cover removed.
- ปฏิบัติตามรหัสความปลอดภัยท้องถิ่นและระดับประเทศ
3. สินค้าหมดview
The ZOYI ZT303 Digital Multimeter features a clear display, a rotary switch for function selection, and various input jacks for test leads.

รูปที่ 3.1 : ด้านหน้า view of the ZOYI ZT303 Digital Multimeter, showing the display, rotary switch, and input terminals.
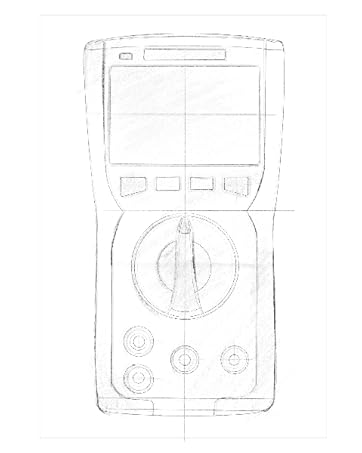
Figure 3.2: Technical drawing illustrating the internal layout or design elements of the ZOYI ZT303 Digital Multimeter.
3.1 ส่วนประกอบ
- จอแสดงผล LCD: แสดงค่าการวัด หน่วย และตัวบ่งชี้ฟังก์ชัน
- ปุ่มฟังก์ชั่น: For selecting specific modes (e.g., RANGE, REL, MAX/MIN, Hz, SELECT, HOLD).
- สวิตช์โรตารี่: Used to select the desired measurement function (e.g., V~, V-, A~, A-, Ω, NCV).
- แจ็คอินพุต:
- COM แจ็ค: ขั้วต่อทั่วไปสำหรับการวัดทั้งหมด ต่อสายวัดสีดำเข้ากับขั้วนี้
- VHzΩCAP Diode Jack: อินพุตสำหรับ voltage, frequency, resistance, capacitance, and diode/continuity tests. Connect the red test lead here for these functions.
- mAµA Jack: อินพุตสำหรับมิลลิampเอเร่และไมโครampere current measurements. Connect the red test lead here for these functions.
- แจ็ค 10A: ป้อนข้อมูลสำหรับ 10 Ampere current measurements. Connect the red test lead here for high current measurements.
4. การตั้งค่า
4.1. การติดตั้งแบตเตอรี่
- ตรวจสอบให้แน่ใจว่ามัลติมิเตอร์ปิดอยู่และถอดสายวัดทั้งหมดออกแล้ว
- ค้นหาฝาครอบช่องใส่แบตเตอรี่ที่ด้านหลังของเครื่อง
- คลายสกรูยึดออก แล้วถอดฝาครอบออก
- Insert new batteries (e.g., 2 x AAA or 9V, refer to the battery compartment for specific type) observing the correct polarity.
- ปิดฝาครอบแบตเตอรี่และขันสกรูให้แน่น
4.2. การเชื่อมต่อสายทดสอบ
ควรต่อสายวัดสีดำเข้ากับแจ็ค COM เสมอ และต่อสายวัดสีแดงเข้ากับแจ็คอินพุตที่เหมาะสมตามฟังก์ชันการวัด:
- สำหรับฉบับที่tage, Resistance, Capacitance, Frequency, Diode, and Continuity: Connect the red lead to the VHzΩCAP Diode แจ็ค.
- For mA/µA Current: Connect the red lead to the มิลลิแอมป์ แจ็ค.
- For 10A Current: Connect the red lead to the 10เอ แจ็ค.
5. คู่มือการใช้งาน
5.1. เปิด/ปิดเครื่อง
Turn the rotary switch from the "OFF" position to any desired measurement function to power on the meter. To power off, turn the rotary switch back to the "OFF" position.
5.2. Auto Ranging
The ZT303 features auto-ranging, which automatically selects the appropriate measurement range. For manual range selection, press the ประเภท ปุ่ม.
5.3. DC/AC โวลต์tagอี การวัด (V)
- ตั้งสวิตช์โรตารี่ไปที่ V~ (AC เล่มtagจ) หรือ V- (DC เล่มtagจ) ตำแหน่ง
- Connect the black test lead to the COM jack and the red test lead to the VHzΩCAP Diode jack.
- เชื่อมต่อโพรบวัดทดสอบเข้ากับวงจรหรือชิ้นส่วนที่ต้องการวัด
- อ่านเล่มที่tagค่า e บนจอ LCD
5.4. DC/AC Current Measurement (A, mA, µA)
คำเตือน: Never connect the meter in parallel to a voltagอย่าใช้แหล่งจ่ายไฟภายนอกขณะวัดกระแสไฟฟ้า การทำเช่นนี้อาจทำให้มิเตอร์และวงจรเสียหายได้
- ตั้งสวิตช์หมุนไปที่ช่วงกระแสไฟฟ้าที่เหมาะสม (A~, A-, mAµA~, mAµA-).
- Connect the black test lead to the COM jack. Connect the red test lead to the มิลลิแอมป์ jack for low current or the 10เอ jack for high current.
- เปิดวงจรที่ต้องการวัดกระแสไฟฟ้า และต่อมิเตอร์อนุกรมกับโหลด
- อ่านค่าปัจจุบันบนจอ LCD
5.5. การวัดค่าความต้านทาน (โอห์ม)
คำเตือน: ตรวจสอบให้แน่ใจว่าวงจรไม่มีกระแสไฟฟ้าและตัวเก็บประจุทั้งหมดคายประจุหมดแล้วก่อนทำการวัดค่าความต้านทาน
- ตั้งสวิตช์โรตารี่ไปที่ โอเมก้า ตำแหน่ง.
- Connect the black test lead to the COM jack and the red test lead to the VHzΩCAP Diode jack.
- เชื่อมต่อหัววัดทดสอบเข้ากับชิ้นส่วนที่ต้องการวัด
- อ่านค่าความต้านทานบนจอ LCD
5.6. Capacitance Measurement (F)
คำเตือน: ตรวจสอบให้แน่ใจว่าได้คายประจุตัวเก็บประจุจนหมดแล้วก่อนทำการวัด เพื่อป้องกันความเสียหายต่อมิเตอร์
- ตั้งสวิตช์โรตารี่ไปที่ หมวก position (often shared with Ω or Diode, use SELECT button if needed).
- Connect the black test lead to the COM jack and the red test lead to the VHzΩCAP Diode jack.
- ต่อสายวัดทดสอบเข้ากับขั้วของตัวเก็บประจุ
- อ่านค่าความจุบนจอ LCD
5.7. Frequency/Duty Cycle Measurement (Hz/%)
- ตั้งสวิตช์โรตารี่ไปที่ เฮิร์ตซ์/% position (often shared with voltage or other functions, use SELECT button if needed).
- Connect the black test lead to the COM jack and the red test lead to the VHzΩCAP Diode jack.
- เชื่อมต่อโพรบทดสอบเข้ากับแหล่งสัญญาณ
- อ่านค่าความถี่หรือรอบการทำงานจากหน้าจอ LCD
5.8. Diode Test and Continuity Test
- ตั้งสวิตช์โรตารี่ไปที่ ไดโอด/ความต่อเนื่อง ตำแหน่ง ใช้ เลือก button to toggle between diode test and continuity test.
- Connect the black test lead to the COM jack and the red test lead to the VHzΩCAP Diode jack.
- การทดสอบไดโอด: เชื่อมต่อหัววัดสีแดงเข้ากับขั้วบวก และเชื่อมต่อหัววัดสีดำเข้ากับขั้วลบของไดโอด ปริมาตรไปข้างหน้าtage drop will be displayed. Reverse the probes; an "OL" (Overload) reading indicates a good diode.
- การทดสอบความต่อเนื่อง: Connect the probes across the circuit or component. A continuous beep and a low resistance reading indicate continuity.
5.9. ไม่สัมผัส Voltagการตรวจจับ e (NCV)
- ตั้งสวิตช์โรตารี่ไปที่ เอ็นซีวี ตำแหน่ง.
- Move the top part of the meter close to the conductor or outlet.
- The meter will emit an audible beep and/or flash an LED indicator when AC voltagอีถูกตรวจพบ
5.10. ฟังก์ชันการเก็บข้อมูล
กดปุ่ม ถือ ปุ่มนี้ใช้สำหรับหยุดการแสดงค่าปัจจุบันบนหน้าจอ กดอีกครั้งเพื่อยกเลิกการหยุดแสดงค่า
5.11. ฟังก์ชันค่าสูงสุด/ค่าต่ำสุด
กดปุ่ม สูงสุด/ต่ำสุด button to enter MAX/MIN recording mode. The meter will display the maximum or minimum reading detected since the mode was activated. Press again to cycle between MAX, MIN, and current reading. Hold to exit.
5.12. Relative Measurement (REL)
กดปุ่ม เรล button to store the current reading as a reference value. Subsequent measurements will be displayed as the difference from this reference value. Press again to exit relative mode.
6. การบำรุงรักษา
6.1. การทำความสะอาด
เช็ดเคสด้วยโฆษณาamp ผ้าและผงซักฟอกอ่อนๆ ห้ามใช้สารกัดกร่อนหรือตัวทำละลาย ตรวจสอบให้แน่ใจว่ามิเตอร์แห้งสนิทก่อนใช้งาน
6.2. การเปลี่ยนแบตเตอรี่
When the low battery indicator appears on the display, replace the batteries as described in Section 4.1. Prompt replacement ensures accurate readings and proper operation.
6.3. การเปลี่ยนฟิวส์
If the current measurement function fails, the fuse may need replacement. Refer to the specific fuse ratings printed near the input jacks or inside the battery compartment. Fuse replacement typically involves opening the back case (after removing batteries) and carefully replacing the blown fuse with one of the identical type and rating. If unsure, consult a qualified technician.
7 การแก้ไขปัญหา
| ปัญหา | สาเหตุที่เป็นไปได้ | สารละลาย |
|---|---|---|
| ไม่มีจอแสดงผลหรือจอแสดงผลมืด | แบตเตอรี่เหลือน้อยหรือหมด | เปลี่ยนแบตเตอรี่ (หัวข้อ 4.1) |
| แสดง "OL" (โอเวอร์โหลด) | การวัดเกินช่วงที่เลือกหรือเกินความจุสูงสุดของมิเตอร์ | Select a higher range (if in manual range) or ensure measurement is within meter's limits. |
| การอ่านไม่ถูกต้อง | Incorrect function selected, poor test lead connection, or damaged test leads | Verify function, check lead connections, inspect and replace damaged leads. |
| การวัดกระแสไฟฟ้าไม่ทำงาน | ฟิวส์ขาด | เปลี่ยนฟิวส์ (หัวข้อ 6.3) |
8. ข้อมูลจำเพาะ
| คุณสมบัติ | รายละเอียด |
|---|---|
| ยี่ห้อ | โซอี้ |
| หมายเลขรุ่น | ZT303 |
| ขนาดสินค้า | 4.53 x 1.97 x 7.68 นิ้ว |
| น้ำหนักสินค้า | 14.11 ออนซ์ (399.98 กรัม) |
| แหล่งพลังงาน | ใช้พลังงานจากแบตเตอรี่ |
| สี | สีฟ้า |
| แสดง | Digital LCD, 19999 Counts (typical for ZT303 series) |
| การกำหนดช่วง | อัตโนมัติ/ปรับด้วยตนเอง |
| คุณสมบัติพิเศษ | True RMS, NCV, Data Hold, Backlight, MAX/MIN, REL |
หมายเหตุ: ข้อมูลจำเพาะทางไฟฟ้าโดยละเอียด (เช่น แรงดันไฟฟ้า)tage/current ranges, accuracy) are typically printed on the device or included in a separate specification sheet.
9. การรับประกันและการสนับสนุน
Warranty information for the ZOYI ZT303 Digital Multimeter is typically provided at the point of purchase or within the product packaging. For specific warranty terms, technical support, or service inquiries, please refer to the official ZOYI webไซต์หรือติดต่อตัวแทนจำหน่ายที่ได้รับอนุญาตของคุณ
หากต้องการความช่วยเหลือเพิ่มเติม โปรดไปที่: ZOYI Official Flagship Store on Amazon