1. บทนำ
This instruction manual provides essential information for the safe installation, operation, and maintenance of your Ledvion GU10 4-Light Adjustable LED Spot Ceiling Light. Please read this manual thoroughly before installation and keep it for future reference. This product is designed for indoor use only and features four adjustable spotlights with GU10 fittings, offering flexible and energy-efficient lighting.
2. ข้อมูลด้านความปลอดภัย
- ความปลอดภัยทางไฟฟ้า: Always disconnect the main power supply at the circuit breaker before attempting any installation, maintenance, or bulb replacement.
- การติดตั้งที่ผ่านการรับรอง: หากคุณไม่แน่ใจเกี่ยวกับการติดตั้งระบบไฟฟ้า ควรปรึกษาช่างไฟฟ้าที่มีคุณสมบัติเหมาะสม
- เล่มที่tage: ตรวจสอบแหล่งจ่ายไฟ voltage ตรงกับปริมาณที่ระบุของผลิตภัณฑ์tagอี (230 โวลต์)
- การใช้ภายในอาคาร: This product is intended for indoor use only. Do not expose it to moisture or outdoor elements.
- ประเภทหลอดไฟ: ใช้เฉพาะหลอดไฟ LED GU10 เท่านั้น ห้ามใช้เกินกำลังไฟสูงสุดtage specified for GU10 fittings.
- ความร้อน: Allow bulbs to cool completely before handling or replacing.
3. อะไรอยู่ในกล่อง
ตรวจสอบว่าส่วนประกอบทั้งหมดมีอยู่ก่อนเริ่มการติดตั้ง

Image: Contents of the product packaging.
- 1x Ledvion GU10 4-Light Adjustable LED Spot Ceiling Light
- พุกยึดผนังแบบเกลียว 2 ชิ้น
- สกรู 2x
- 1x คู่มือการใช้งาน
Note: GU10 LED bulbs are not included and must be purchased separately.
4. ข้อมูลจำเพาะ
| คุณสมบัติ | รายละเอียด |
|---|---|
| ยี่ห้อ | เลดวิออน |
| หมายเลขรุ่น | LV10067 |
| ขนาดสินค้า (กว้าง x ยาว x สูง) | 23L x 23W x 13H centimeters (Fixture: 220 x 220 x 25 mm) |
| น้ำหนักสินค้า | 1200 กรัม |
| สี | สีดำ |
| วัสดุ | โลหะ |
| สไตล์ | ทันสมัย |
| รูปร่างของฟิกซ์เจอร์ | Ceiling Spotlight |
| ประเภทห้อง | Living Room (General Indoor Use) |
| การใช้งานในร่ม/กลางแจ้ง | ในร่ม |
| แหล่งพลังงาน | ไฟฟ้า |
| คุณสมบัติพิเศษ | สามารถหรี่แสงได้ (โดยใช้หลอดไฟ/สวิตช์ที่รองรับ) |
| วิธีการควบคุม | Touch (Implies external dimmer compatibility) |
| ประเภทหลอดไฟ | หลอด LED (ฐาน GU10) |
| จำนวนหลอดไฟ | 4 |
| เล่มที่tage | 230 โวลต์ |
| สีอ่อน | White (Dependent on bulb) |
| ฐานหลอดไฟ | GU10 |
| ประเภทสวิตซ์ | Dimmer switch compatible |
| ระดับความต้านทานต่อน้ำ | ไม่กันน้ำ |
| ประเภทการติดตั้ง | Ceiling Mount, Semi-flush mount |
| จำเป็นต้องประกอบ | ใช่ |
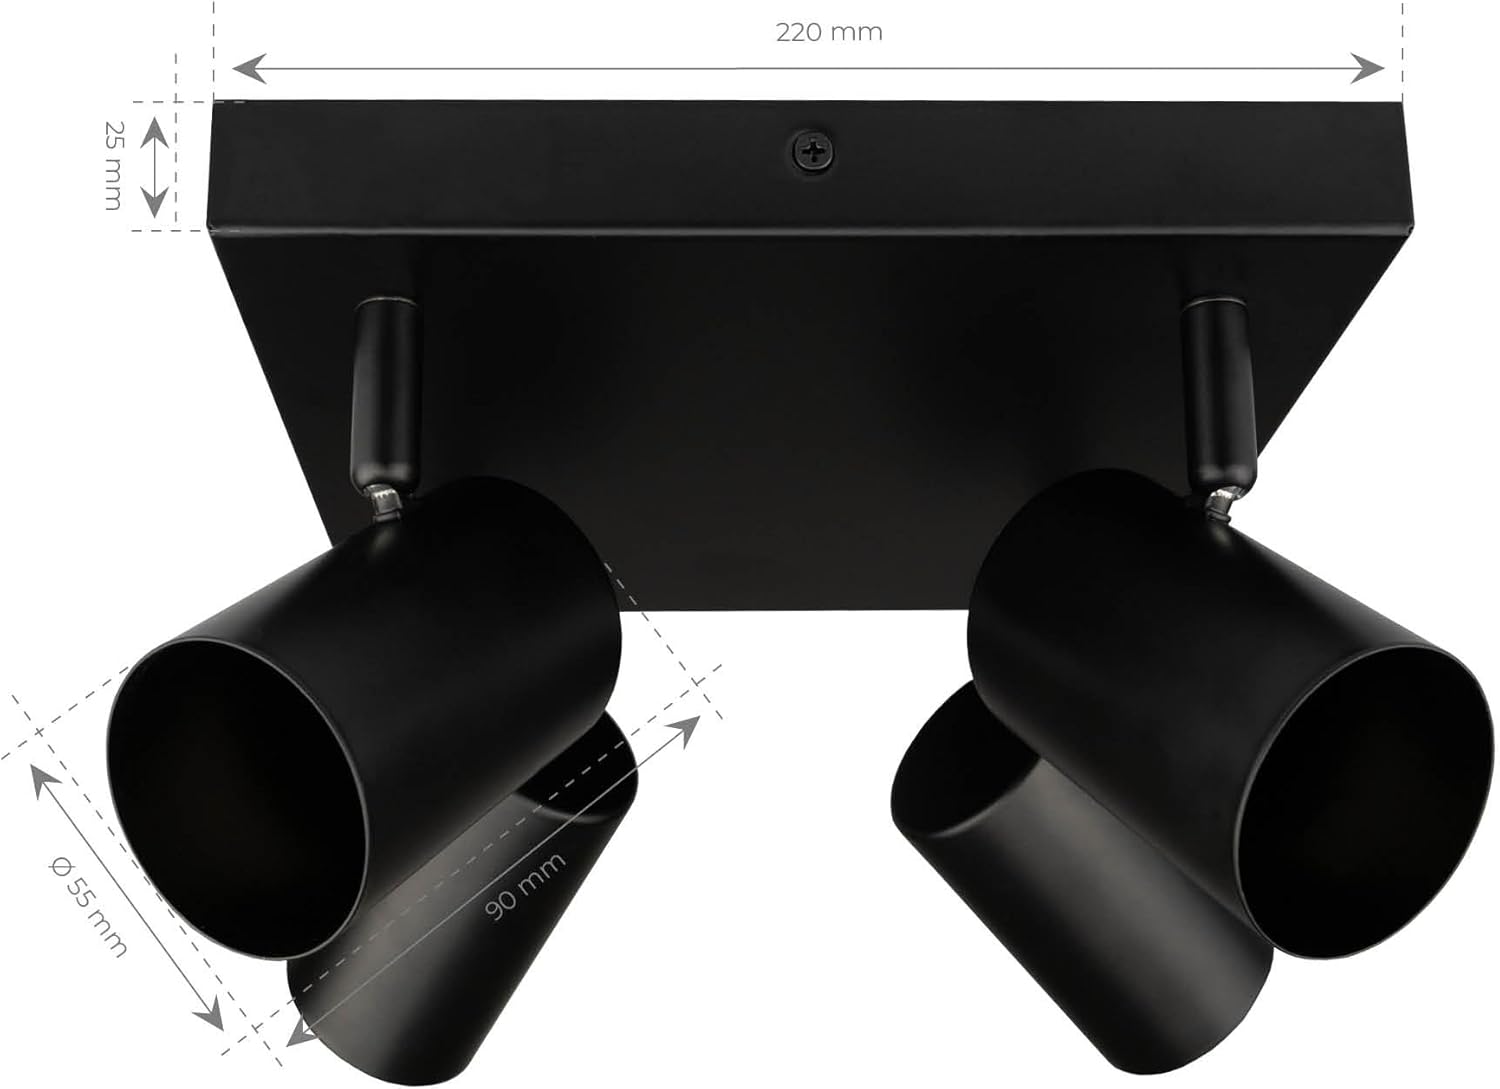
ภาพ: แผนภาพแสดงขนาดของผลิตภัณฑ์

Image: EU Energy Label. For more details, visit ฐานข้อมูล EPREL.
5. การตั้งค่าและการติดตั้ง
The Ledvion ceiling light is designed for easy installation. Follow these steps carefully.

Image: Quick installation bracket and wiring.
- เตรียมความพร้อมสำหรับการติดตั้ง: ตรวจสอบให้แน่ใจว่าได้ปิดสวิตช์ไฟหลักของพื้นที่ติดตั้งที่ตัวตัดวงจรแล้ว
- ติดวงเล็บ: Position the supplied mounting bracket on the ceiling where you intend to install the light. Mark the drilling points. Drill holes and insert the provided wall plugs. Secure the bracket to the ceiling using the supplied screws.
- การต่อสายไฟ: Carefully connect the electrical wires from your ceiling to the terminal block on the light fixture. Ensure correct polarity (Live, Neutral, Ground) and that all connections are secure.
- ติดตั้งอุปกรณ์ยึด: Align the light fixture with the mounted bracket and secure it in place.
- ติดตั้งหลอดไฟ GU10: Insert your GU10 LED bulbs (not included) into each of the four GU10 fittings. Gently push and twist the bulb until it is securely seated.
- คืนค่าพลัง: เมื่อการติดตั้งเสร็จสิ้นและการเชื่อมต่อทั้งหมดปลอดภัยแล้ว ให้จ่ายไฟอีกครั้งที่เบรกเกอร์วงจรหลัก
6. คู่มือการใช้งาน
This Ledvion ceiling light is designed for straightforward operation and flexible lighting control.

Image: Adjustable and rotatable spotlight head.
- การเปิด/ปิด: ใช้สวิตช์ติดผนังมาตรฐานของคุณเพื่อเปิดหรือปิดโคมไฟ
- การปรับไฟสปอตไลท์: Each of the four spotlights can be individually adjusted. They can be tilted up to 90 degrees and rotated up to 350 degrees. Gently move the spotlight heads to direct the light to your desired area.
- การหรี่แสง (ไม่จำเป็น): If you have installed dimmable GU10 LED bulbs and connected the fixture to a compatible dimmer switch, you can adjust the light intensity using the dimmer control.

Image: GU10 fitting compatibility.
7. การบำรุงรักษา
- การทำความสะอาด: Always disconnect power before cleaning. Use a soft, dry cloth to wipe the fixture. Do not use abrasive cleaners, solvents, or harsh chemicals, as these can damage the finish.
- การเปลี่ยนหลอดไฟ: Ensure the power is off and the bulbs have cooled down completely. To remove a GU10 bulb, gently push it in and twist counter-clockwise. To install a new GU10 bulb, align the pins with the slots in the fitting, push gently, and twist clockwise until it is secure.
- การตรวจสอบ: Periodically check the fixture for any signs of damage or loose connections. If any issues are found, disconnect power and address them immediately.
8 การแก้ไขปัญหา
| ปัญหา | สาเหตุที่เป็นไปได้ | สารละลาย |
|---|---|---|
| ไฟไม่ติด | ไม่มีแหล่งจ่ายไฟ การเชื่อมต่อสายไฟหลวม หลอดไฟผิดพลาด หลอดไฟติดตั้งไม่ถูกต้อง | ตรวจสอบเบรกเกอร์วงจร Verify all wire connections are secure (ensure power is off). เปลี่ยนหลอดไฟด้วยหลอดไฟที่ใช้งานได้ปกติ Ensure GU10 bulb is fully pushed in and twisted into the fitting. |
| ไฟกระพริบ | สวิตช์หรี่ไฟ/หลอดไฟไม่เข้ากัน การเชื่อมต่อหลอดไฟหลวม แหล่งจ่ายไฟที่ผันผวน | Ensure dimmable bulbs are used with a compatible LED dimmer. Re-seat the bulb firmly. Consult an electrician if power supply issues persist. |
| การติดตั้งหลอดไฟยาก | Bulb pins not aligned ใช้แรงมากเกินไป | Ensure the bulb pins are correctly aligned with the GU10 fitting slots before pushing and twisting. Apply gentle, firm pressure. Do not force the bulb. |
9. การรับประกันและการสนับสนุน
Ledvion products are manufactured to high-quality standards. For information regarding warranty coverage, technical support, or replacement parts, please contact Ledvion customer service through your retailer or the official Ledvion webเว็บไซต์.
โปรดเก็บหลักฐานการซื้อของคุณไว้เพื่อเรียกร้องการรับประกัน


