1. บทนำ
Thank you for choosing the Voopoo Argus Pro 2 Pod System Kit. This manual provides detailed instructions on how to set up, operate, and maintain your device to ensure optimal performance and a safe vaping experience. The Argus Pro 2 is designed for both Direct Lung (DL) and Restricted Direct Lung (RDL) vaping, featuring a powerful 3000 mAh battery, the intelligent GENE.TT chip, and versatile operating modes. Please read this manual thoroughly before using the device.
2. สินค้าหมดview และส่วนประกอบ
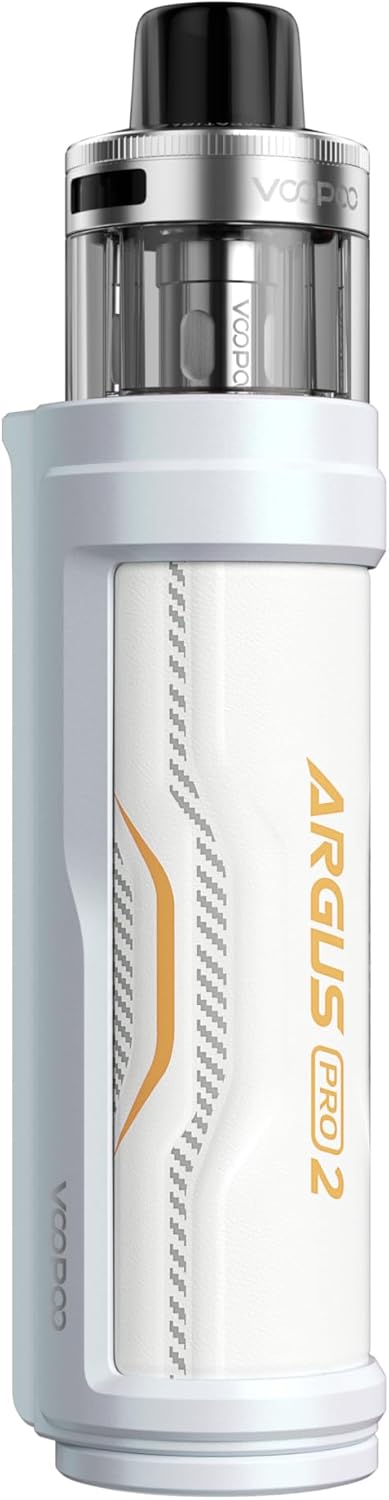
The Voopoo Argus Pro 2 Kit is a compact and ergonomic device, combining a sleek design with advanced functionality. Familiarize yourself with the main components and features:
- ตัวอุปกรณ์: Features a soft leather back for comfortable grip and a durable zinc alloy frame.
- PnP X Pod DTL: 5.0 ml capacity pod for e-liquid.
- 0.96-inch TFT Color Display: Shows vaping data, battery level, and settings.
- ปุ่มฟังก์ชั่น: For power on/off, wattage adjustment, and mode selection.
- ล็อคสวิตช์: ป้องกันการเปิดใช้งานโดยไม่ได้ตั้งใจ
- พอร์ต USB Type-C: สำหรับการชาร์จอุปกรณ์
- Top Airflow Control (AFC): Adjustable airflow for customized vaping experience.

รูปที่ 2.1 : ด้านหน้า view of the Voopoo Argus Pro 2 Kit.
รูปที่ 2.2: ย้อนกลับ view of the Voopoo Argus Pro 2 Kit.

Figure 2.3: Design features of the Argus Pro 2.

รูปที่ 2.4: คุณสมบัติหลักview.
3. คู่มือการติดตั้ง
3.1 การชาร์จเริ่มต้น
Before first use, fully charge the device. Connect the included USB Type-C cable to the charging port on the device and plug the other end into a 5V/2A power adapter. The display will indicate the charging status. A full charge typically takes approximately 90 minutes.
3.2 Coil Installation
The Argus Pro 2 uses PnP X series coils. To install a coil:
- Pull the PnP X Pod DTL out from the device.
- Invert the pod and firmly push the new PnP X coil into the bottom of the pod until it is securely seated.
- Ensure the coil is properly aligned to prevent leaks.
3.3 Filling the Pod
The PnP X Pod DTL features a convenient side-fill system:
- Locate the silicone plug on the side of the pod.
- Gently lift the silicone plug to reveal the filling port.
- Insert the nozzle of your e-liquid bottle into the port and fill the pod. Do not overfill.
- Securely close the silicone plug to prevent leaks.
- After filling, wait 5-10 minutes for the coil to become fully saturated with e-liquid before first use to prevent dry hits.
4. คู่มือการใช้งาน
4.1 เปิด/ปิดเครื่อง
กดปุ่มยิง 5 ครั้งอย่างรวดเร็วเพื่อเปิดหรือปิดอุปกรณ์
4.2 วัตtagการปรับแต่ง
Use the '+' and '-' adjustment buttons below the display to increase or decrease the wattagจ. วัดtage range is 5-80W. The device will automatically suggest an optimal wattage in Smart mode based on the installed coil.
การเลือกโหมด 4.3
The Argus Pro 2 features multiple operating modes:
- โหมดอัจฉริยะ: Automatically detects the coil resistance and sets the optimal wattage, preventing coil burnout. Recommended for beginners.
- โหมด RBA: ช่วยให้สามารถควบคุมน้ำได้ด้วยตนเองอย่างเต็มที่tage settings, suitable for experienced users.
- โหมดเทอร์โบ: Provides a 25% increase in vapor volume in one second for an intensified flavor and vapor experience.
To switch between modes, press the fire button 3 times rapidly to enter the mode selection interface, then use the '+' and '-' buttons to navigate and the fire button to confirm.

Figure 4.1: Advanced Chip Safe Operation modes.

Figure 4.2: Turbo Mode and Dynamic Switch.
4.4 สวิตช์ล็อค
The Argus Pro 2 features a physical lock switch. Slide the switch up or down to lock or unlock the device, preventing accidental firing or setting changes.
4.5 การควบคุมการไหลเวียนของอากาศ
Adjust the top airflow ring on the pod to customize your vaping experience from a more open Direct Lung (DL) draw to a more restricted Restricted Direct Lung (RDL) draw.
5. การบำรุงรักษา
5.1 การทำความสะอาดเครื่อง
Regularly clean your device to ensure optimal performance and longevity:
- เช็ดตัวเครื่องด้วยผ้าแห้งนุ่มๆ
- Clean the pod connection area on the device and the bottom of the pod with a cotton swab to remove any e-liquid condensation.
- อย่าใช้สารเคมีที่รุนแรงหรือวัสดุที่มีฤทธิ์กัดกร่อนในการทำความสะอาด
5.2 การเปลี่ยนคอยล์
Coils are consumable parts and need to be replaced regularly, typically every 1-2 weeks depending on usage and e-liquid. Replace the coil when you notice a burnt taste, reduced vapor production, or diminished flavor. Refer to section 3.2 for coil installation instructions.
6 การแก้ไขปัญหา
If you encounter issues with your Argus Pro 2 Kit, refer to the following common problems and solutions:
| ปัญหา | สาเหตุที่เป็นไปได้ | สารละลาย |
|---|---|---|
| อุปกรณ์ไม่เปิด | แบตเตอรี่เหลือน้อย; อุปกรณ์ปิดอยู่; อุปกรณ์มีปัญหา | Charge the device; Press fire button 5 times rapidly; Contact support if issue persists. |
| ไม่มีการผลิตไอระเหย | No e-liquid; Coil not installed correctly; Coil burnt out; Low battery; Device locked | Refill pod; Reinstall coil; Replace coil; Charge device; Unlock device. |
| รสไหม้ | Coil not saturated; Coil burnt out; Wattage too high; Low e-liquid level | Wait 5-10 mins after filling; Replace coil; Adjust wattage down; Refill pod. |
| รั่วจากฝัก | Coil not installed correctly; Silicone plug not sealed; Overfilling; Worn out coil/seals | Reinstall coil; Ensure plug is sealed; Do not overfill; Replace coil/pod. |
| จอแสดงผลไม่ทำงาน | Device fault; Low battery | Charge device; Contact support if issue persists. |
7. ข้อมูลจำเพาะ
Detailed technical specifications for the Voopoo Argus Pro 2 Kit:
| คุณสมบัติ | ข้อมูลจำเพาะ |
|---|---|
| ขนาด | 127.4 มม. x 29.8 มม. x 35.5 มม. |
| ความจุของแบตเตอรี่ | 3000 มิลลิแอมป์ (ในตัว) |
| กำลังขับ | 5 - 80 วัตต์ |
| การชาร์จไฟ | USB Type-C, 5V / 2A |
| ช่วงความต้านทาน | 0.1 - 3.0 โอห์ม |
| แสดง | จอแสดงผลสี TFT ขนาด 0.96 นิ้ว |
| ความจุพ็อด | 5.0 ml (DTL) |
| Compatible Coils | PnP X Series Coils |
| วัสดุ | Leather, Zinc Alloy |

Figure 7.1: Argus Pro 2 Specifications Diagram.
8. อะไรอยู่ในกล่อง
Your Voopoo Argus Pro 2 Kit package includes the following items:
- 1x Voopoo Argus Pro 2 Mod Battery Carrier
- 1x Voopoo PnP X Pod DTL
- 1x Voopoo PnP X Coil 0.15 Ohm (pre-installed)
- 1x Voopoo PnP X Coil 0.3 Ohm
- 1x Voopoo PnP X Platform Info Card
- สายชาร์จ USB Type-C 1 เส้น
- 1x คู่มือผู้ใช้
รูปที่ 8.1: เนื้อหาบรรจุภัณฑ์
9. Safety Information and Legal Notices
โปรดอ่านข้อมูลด้านความปลอดภัยต่อไปนี้อย่างละเอียดก่อนใช้อุปกรณ์:
- ผลิตภัณฑ์นี้มีไว้สำหรับผู้ใหญ่เท่านั้น
- ผลิตภัณฑ์นี้ไม่มีนิโคติน
- เก็บให้พ้นจากมือเด็กและสัตว์เลี้ยง
- ห้ามให้อุปกรณ์สัมผัสกับอุณหภูมิที่สูงหรือต่ำเกินไป แสงแดดโดยตรง หรือน้ำ
- ใช้เฉพาะสายชาร์จที่ให้มาและอะแดปเตอร์ไฟที่เข้ากันได้เท่านั้น
- ห้ามถอดประกอบหรือดัดแปลงอุปกรณ์
- กำจัดอุปกรณ์และส่วนประกอบอย่างมีความรับผิดชอบตามกฎระเบียบท้องถิ่น
10. การรับประกันและการสนับสนุน
Specific warranty details for the Voopoo Argus Pro 2 Kit may vary by region and retailer. Please refer to the warranty card included in your package or contact your point of purchase for detailed warranty information.
For technical support, troubleshooting assistance, or any other inquiries, please contact VOOPOO customer service or visit their official website. Contact information can typically be found on the product packaging or VOOPOO's official webเว็บไซต์.


