1. บทนำ
This manual provides instructions for the safe operation, maintenance, and troubleshooting of your FLEX 24V Brushless Cordless 1/2-Inch Hammer Drill Turbo Mode Kit, model FX1271T-2B. Please read this manual thoroughly before using the tool to ensure proper and safe operation.
The FLEX FX1271T-2B is a powerful 24V brushless cordless hammer drill designed for demanding drilling and driving applications. It features a 1/2-inch full-metal ratcheting chuck, two-speed settings, a Turbo Mode for increased speed, and an anti-kickback safety feature. This kit includes the drill, a 2.5Ah Lithium-Ion Battery, a 5.0Ah Lithium-Ion Battery, and a 160W Fast Charger.
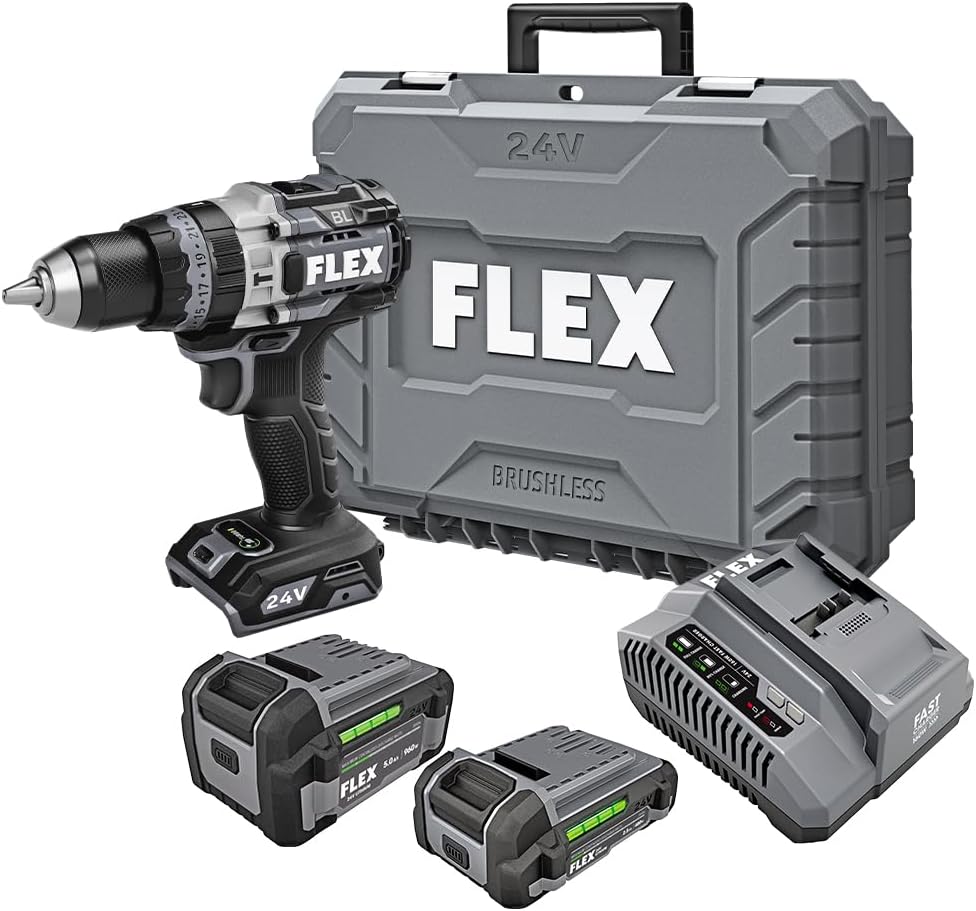
Figure 1: FLEX 24V Brushless Cordless 1/2-Inch Hammer Drill Kit (FX1271T-2B) including drill, two batteries, charger, and carrying case.
2. คำแนะนำด้านความปลอดภัยทั่วไป
คำเตือน: อ่านคำเตือนด้านความปลอดภัย คำแนะนำ ภาพประกอบ และข้อมูลจำเพาะทั้งหมดที่มาพร้อมกับเครื่องมือไฟฟ้านี้ การไม่ปฏิบัติตามคำแนะนำทั้งหมดด้านล่างอาจส่งผลให้เกิดไฟฟ้าช็อต ไฟไหม้ และ/หรือการบาดเจ็บสาหัส
2.1 ความปลอดภัยในพื้นที่ทำงาน
- รักษาพื้นที่ทำงานให้สะอาดและมีแสงสว่างเพียงพอ พื้นที่ที่รกหรือมืดอาจเกิดอุบัติเหตุได้
- ห้ามใช้เครื่องมือไฟฟ้าในบรรยากาศที่อาจเกิดการระเบิดได้ เช่น ในบริเวณที่มีของเหลวไวไฟ ก๊าซ หรือฝุ่น เครื่องมือไฟฟ้าอาจก่อให้เกิดประกายไฟซึ่งอาจทำให้ฝุ่นหรือไอระเหยติดไฟได้
- ระวังเด็กและผู้คนรอบข้างไม่ให้ใช้เครื่องมือไฟฟ้า เพราะสิ่งรบกวนอาจทำให้คุณควบคุมเครื่องไม่ได้
2.2 ความปลอดภัยทางไฟฟ้า
- ปลั๊กไฟของเครื่องมือไฟฟ้าต้องตรงกับเต้าเสียบ ห้ามดัดแปลงปลั๊กโดยเด็ดขาด ห้ามใช้ปลั๊กอะแดปเตอร์กับเครื่องมือไฟฟ้าที่ต่อสายดิน ปลั๊กที่ไม่ได้ดัดแปลงและเต้าเสียบที่ตรงกันจะช่วยลดความเสี่ยงในการเกิดไฟฟ้าช็อต
- หลีกเลี่ยงการสัมผัสร่างกายกับพื้นผิวที่ต่อสายดิน เช่น ท่อ หม้อน้ำ เตา และตู้เย็น หากร่างกายต่อสายดิน มีความเสี่ยงต่อการเกิดไฟฟ้าช็อตเพิ่มขึ้น
- อย่าให้เครื่องมือไฟฟ้าโดนฝนหรือเปียกน้ำ น้ำที่เข้าไปในเครื่องมือไฟฟ้าจะเพิ่มความเสี่ยงต่อการเกิดไฟฟ้าช็อต
2.3 ความปลอดภัยส่วนบุคคล
- สวมอุปกรณ์ป้องกันดวงตาทุกครั้ง สวมแว่นตานิรภัย แว่นตานิรภัย หรือหน้ากากป้องกันใบหน้า
- ควรสวมอุปกรณ์ป้องกันหูเมื่อใช้งานเครื่องมือเป็นเวลานาน
- แต่งกายให้เหมาะสม ไม่สวมเสื้อผ้าหลวมๆ หรือใส่เครื่องประดับ เก็บผมและเสื้อผ้าให้ห่างจากส่วนที่เคลื่อนไหว
- จงตื่นตัว ระวังสิ่งที่คุณกำลังทำ และใช้สามัญสำนึกเมื่อใช้งานเครื่องมือไฟฟ้า
2.4 การใช้เครื่องมือและการดูแล
- อย่าใช้เครื่องมือไฟฟ้าอย่างฝืนๆ ใช้เครื่องมือไฟฟ้าให้เหมาะสมกับการใช้งานของคุณ
- ถอดแบตเตอรี่ออกจากเครื่องมือไฟฟ้าก่อนทำการปรับแต่ง เปลี่ยนอุปกรณ์เสริม หรือจัดเก็บเครื่องมือไฟฟ้า
- เก็บเครื่องมือไฟฟ้าที่ไม่ได้ใช้งานให้พ้นจากมือเด็ก และอย่าให้บุคคลที่ไม่คุ้นเคยกับเครื่องมือไฟฟ้าหรือคำแนะนำเหล่านี้ใช้งานเครื่องมือไฟฟ้า
- บำรุงรักษาเครื่องมือไฟฟ้าและอุปกรณ์เสริม ตรวจสอบการจัดตำแหน่งที่ไม่ถูกต้องหรือการติดขัดของชิ้นส่วนที่เคลื่อนไหว ชิ้นส่วนแตกหัก และสภาพอื่น ๆ ที่อาจส่งผลต่อการทำงานของเครื่องมือไฟฟ้า
2.5 การใช้และการดูแลเครื่องมือแบตเตอรี่
- ชาร์จใหม่ด้วยเครื่องชาร์จที่ผู้ผลิตกำหนดเท่านั้น เครื่องชาร์จที่เหมาะสำหรับแบตเตอรี่ประเภทหนึ่งอาจก่อให้เกิดความเสี่ยงต่อการเกิดไฟไหม้เมื่อใช้ร่วมกับแบตเตอรี่ประเภทอื่น
- ใช้เครื่องมือไฟฟ้าที่มีแบตเตอรี่เฉพาะเท่านั้น การใช้แบตเตอรี่อื่น ๆ อาจก่อให้เกิดความเสี่ยงต่อการบาดเจ็บและไฟไหม้ได้
- เมื่อไม่ได้ใช้งานแบตเตอรี่ ให้เก็บแบตเตอรี่ให้ห่างจากวัตถุโลหะอื่นๆ เช่น คลิปหนีบกระดาษ เหรียญ กุญแจ ตะปู สกรู หรือวัตถุโลหะขนาดเล็กอื่นๆ ที่สามารถเชื่อมต่อจากขั้วหนึ่งไปยังอีกขั้วหนึ่งได้ การลัดวงจรขั้วแบตเตอรี่เข้าด้วยกันอาจทำให้เกิดการไหม้หรือไฟไหม้ได้
- ภายใต้สภาวะการใช้งานที่ไม่เหมาะสม ของเหลวอาจไหลออกมาจากแบตเตอรี่ได้ หลีกเลี่ยงการสัมผัส หากสัมผัสโดยไม่ได้ตั้งใจ ให้ล้างด้วยน้ำ หากของเหลวเข้าตา ให้ไปพบแพทย์ ของเหลวที่ไหลออกมาจากแบตเตอรี่อาจทำให้เกิดการระคายเคืองหรือไหม้ได้
3. ส่วนประกอบที่รวมอยู่
Your FLEX 24V Brushless Cordless 1/2-Inch Hammer Drill Kit (FX1271T-2B) includes the following items:
- FLEX 24V Brushless Cordless 1/2-Inch Hammer Drill
- (1) FLEX 24V 2.5Ah Lithium-Ion Battery (FX0111-1)
- (1) FLEX 24V 5.0Ah Lithium-Ion Battery (FX0121-1)
- เครื่องชาร์จเร็ว FLEX 160W
- ด้ามจับเสริม
- กระเป๋าใส่อุปกรณ์

Figure 2: The FLEX Advantage highlights the included 2.5Ah and 5.0Ah Lithium-Ion batteries, emphasizing their power, runtime, and fast charging capabilities.
4. การตั้งค่าและการใช้งานเบื้องต้น
4.1 การชาร์จแบตเตอรี่
- เชื่อมต่อเครื่องชาร์จเร็ว 160W เข้ากับเต้ารับไฟฟ้ามาตรฐาน
- เลื่อนชุดแบตเตอรี่เข้าไปบนเครื่องชาร์จจนกระทั่งล็อคเข้าที่
- The charger's indicator lights will show the charging status. A fully charged battery will be indicated by a solid green light.
- เมื่อชาร์จเต็มแล้ว ให้ถอดแบตเตอรี่ออกจากเครื่องชาร์จ
4.2 การติดตั้งแบตเตอรี่
- Align the battery pack with the battery port on the base of the drill handle.
- Slide the battery into the port until it locks securely into place. Ensure it is fully seated to prevent accidental dislodgement during operation.
- ในการถอดแบตเตอรี่ ให้กดปุ่มปลดล็อคที่ด้านข้างของชุดแบตเตอรี่แล้วเลื่อนแบตเตอรี่ออกมา
4.3 การติดตั้งที่จับเสริม
For improved control and safety, especially during high-torque applications or hammer drilling, attach the auxiliary handle.
- คลายตัวล็อคด้ามจับเสริมamp โดยการหมุนทวนเข็มนาฬิกา
- Slide the handle over the front of the drill body, positioning it to your preferred angle.
- ขันสกรูให้แน่นamp โดยหมุนตามเข็มนาฬิกาจนกระทั่งด้ามจับยึดแน่นสนิท

Figure 3: The drill with the auxiliary handle attached, providing enhanced control and stability, particularly when the anti-kickback feature engages.
4.4 Installing Drill Bits or Accessories
- เพื่อความปลอดภัย โปรดตรวจสอบให้แน่ใจว่าสว่านปิดอยู่และถอดแบตเตอรี่ออกแล้ว
- Grip the rear collar of the 1/2-inch full-metal ratcheting chuck and rotate the front collar counter-clockwise to open the chuck jaws.
- Insert the drill bit or accessory fully into the chuck jaws.
- Rotate the front collar clockwise to tighten the chuck jaws firmly around the bit. The ratcheting mechanism will provide an audible click when securely tightened.
- Gently pull on the bit to ensure it is properly secured.

Figure 4: Detail of the 1/2-inch full-metal ratcheting chuck, designed for secure bit retention and durability.
5. คู่มือการใช้งาน
5.1 การเปิด/ปิดเครื่องและการควบคุมความเร็ว
- สวิตช์ทริกเกอร์: Squeeze the trigger switch to turn the drill on. Release it to turn the drill off.
- ความเร็วตัวแปร: The trigger switch is pressure-sensitive, allowing for variable speed control. Pressing the trigger further increases the speed.
- ตัวเลือกเดินหน้า/ถอยหลัง: Located above the trigger, push the selector left for forward rotation (drilling/driving) and right for reverse rotation (removing screws). Center position locks the trigger for safety.
5.2 Gear Selection (2-Speed)
The drill features a 2-speed gearbox for optimal performance across various applications.
- เกียร์ 1 (ความเร็วต่ำ แรงบิดสูง): Slide the gear selector switch to position '1'. Ideal for driving screws, drilling large holes, or applications requiring maximum torque.
- เกียร์ 2 (ความเร็วสูง แรงบิดต่ำ): Slide the gear selector switch to position '2'. Suitable for fast drilling of smaller holes in wood or metal.
NOTE: Always ensure the drill is stopped before changing gear settings to prevent damage to the gearbox.
5.3 Mode Selection (Drill, Drive, Hammer Drill)
Rotate the collar behind the chuck to select the desired operating mode:
- โหมดการเจาะ (ไอคอนการเจาะ): สำหรับการเจาะรูในไม้ โลหะ และพลาสติก
- Drive Mode (Screw Icon): For driving screws. The clutch settings (numbered ring) allow you to adjust the torque to prevent over-driving screws or damaging materials.
- โหมดสว่านค้อน (ไอคอนค้อน): For drilling into masonry, brick, and concrete. This mode combines rotary action with a hammering motion.
โหมดเทอร์โบ 5.4
The Turbo Mode button, located on top of the drill, provides an immediate increase in speed for faster results when needed.
- กดปุ่ม เทอร์โบ button during operation to engage maximum speed.
- Release the button to return to the previously selected speed setting.

Figure 5: The Turbo Mode button, when pressed, provides increased speed for rapid task completion.
5.5 Anti-Kickback Feature
The drill is equipped with an advanced anti-kickback braking technology. If the drill bit binds during operation, the system will detect the sudden rotational force and rapidly stop the motor to reduce the risk of kickback and potential injury.
5.6 ไฟ LED แบบบูรณาการ
An LED light is integrated into the drill to illuminate the work area, improving visibility in dimly lit conditions. The light activates when the trigger is pressed.

Figure 6: The integrated LED light provides illumination for improved visibility in dark work environments.
5.7 Drilling into Masonry (Hammer Drill Mode)
When drilling into masonry, brick, or concrete:
- Select Hammer Drill Mode.
- Ensure the auxiliary handle is securely attached and held firmly with both hands.
- ใช้ดอกสว่านเจาะปูนให้เหมาะสม
- Apply steady, firm pressure to the drill, allowing the hammering action to break up the material.

Figure 7: The FLEX hammer drill in action, demonstrating its capability to drill into tough materials with 1,400 in-lbs of torque.
6. การบำรุงรักษา
6.1 การทำความสะอาด
- ถอดสายแบตเตอรี่ออกทุกครั้งก่อนทำการทำความสะอาดหรือบำรุงรักษา
- ใช้แปรงขนนุ่มหรือลมเป่าทำความสะอาดฝุ่นและเศษสิ่งสกปรกออกจากช่องระบายอากาศ
- เช็ดตัวเครื่องด้วยผ้าamp ผ้า. อย่าใช้สารเคมีที่รุนแรงหรือน้ำยาทำความสะอาดที่มีฤทธิ์กัดกร่อน
- รักษาขากรรไกรของหัวจับให้สะอาดและปราศจากเศษสิ่งสกปรกเพื่อให้แน่ใจว่าจับดอกสว่านได้อย่างเหมาะสม
6.2 พื้นที่จัดเก็บ
- เก็บเครื่องมือ แบตเตอรี่ และเครื่องชาร์จไว้ในที่แห้งและเย็น หลีกเลี่ยงแสงแดดโดยตรงและความชื้น
- Ensure batteries are partially charged (not fully depleted or fully charged for long-term storage) before storing.
- Store the tool in its carrying case to protect it from damage.
7 การแก้ไขปัญหา
| ปัญหา | สาเหตุที่เป็นไปได้ | สารละลาย |
|---|---|---|
| สว่านไม่เริ่มทำงาน | แบตเตอรี่ไม่ได้ชาร์จหรือติดตั้งไม่ถูกต้อง Forward/Reverse selector in center (locked) position. | Charge battery and ensure it is securely installed. Move selector to forward or reverse position. |
| การสูญเสียพลังงานระหว่างการดำเนินการ | แบตเตอรี่ชาร์จจนหมด เปิดใช้งานการป้องกันโอเวอร์โหลดแล้ว | ชาร์จแบตเตอรี่ Reduce pressure on the tool; allow it to cool down. |
| บิตลื่นในหัวจับ | ขันหัวจับไม่แน่นพอ Chuck jaws are dirty or worn. | Retighten chuck firmly. Clean chuck jaws. If problem persists, chuck may need replacement. |
| การสั่นสะเทือนหรือเสียงรบกวนมากเกินไป | Damaged or bent drill bit. ส่วนประกอบหลวม | เปลี่ยนดอกสว่าน Check for loose screws or parts. If problem persists, discontinue use and contact service. |
8. ข้อมูลจำเพาะ
| คุณสมบัติ | รายละเอียด |
|---|---|
| หมายเลขรุ่น | FX1271T-2B |
| เล่มที่tage | 24 โวลต์ |
| ขนาดเชย | 1/2 นิ้ว |
| ประเภทเชย | Full-Metal Ratcheting |
| แรงบิดสูงสุด | 1400 นิ้วปอนด์ |
| ความเร็วการหมุนสูงสุด | 2500 รอบต่อนาที |
| จำนวนความเร็ว | 2 |
| Battery Capacity (Included) | 2.5 Ah, 5.0 Ah Lithium-Ion |
| Charger Type (Included) | เครื่องชาร์จเร็ว 160W |
| คุณสมบัติพิเศษ | Turbo Mode, Anti-Kickback, LED Light, Brushless Motor |
| น้ำหนักสินค้า | 15.37 ปอนด์ (ชุด) |
| ขนาดสินค้า | 7.2"L x 4"W x 10"H (Tool) |
| ความสามารถในการเจาะ (ไม้) | 2 นิ้ว |
| ความสามารถในการเจาะ (โลหะ) | 2 นิ้ว |
9. การรับประกันและการสนับสนุน
9.1 การรับประกันตลอดอายุการใช้งานแบบจำกัดของ FLEX
This FLEX tool is protected by the FLEX Limited Lifetime Warranty. To qualify for this warranty, you must register your new FLEX tool, battery, or charger within 30 days of purchase through December 31, 2025. Registration can be completed at registermyFLEX.com.
Please refer to the official FLEX website or your product packaging for full terms and conditions of the warranty.
9.2 การสนับสนุนลูกค้า
For technical assistance, replacement parts, or warranty claims, please contact FLEX customer support. Contact information can typically be found on the FLEX official webไซต์หรือบนบรรจุภัณฑ์ผลิตภัณฑ์ของคุณ
When contacting support, please have your model number (FX1271T-2B) and purchase date available.


