1. บทนำ
This manual provides essential instructions for the safe and efficient operation of your GROVIEW มินิโปรเจคเตอร์บลูทูธ รุ่น Groview-B2D-US. Please read this manual thoroughly before using the projector and retain it for future reference.
เดอะโกรview-B2D-US is a compact and portable projector featuring electric focus, Bluetooth 5.1 connectivity, and a fully sealed optical engine designed for reduced noise and extended lifespan. It supports Full HD 1080P input with a native 720P resolution and offers a digital zoom function.
2. ข้อมูลด้านความปลอดภัย
- อย่ามองตรงเข้าไปในเลนส์โปรเจ็กเตอร์เมื่อลamp อยู่บนแล้ว
- ตรวจสอบให้แน่ใจว่ามีการระบายอากาศที่เหมาะสมรอบๆ โปรเจ็กเตอร์เพื่อป้องกันความร้อนสูงเกินไป อย่าปิดกั้นช่องระบายอากาศ
- ใช้เฉพาะอะแดปเตอร์ไฟฟ้าที่มาพร้อมกับโปรเจ็กเตอร์เท่านั้น
- ห้ามให้โปรเจ็กเตอร์โดนฝน ความชื้น หรืออุณหภูมิที่สูงหรือต่ำเกินไป
- หลีกเลี่ยงการวางโปรเจ็กเตอร์บนพื้นผิวที่ไม่มั่นคง
- อย่าพยายามถอดประกอบหรือซ่อมแซมโปรเจ็กเตอร์ด้วยตนเอง โปรดติดต่อเจ้าหน้าที่บริการที่มีคุณสมบัติเหมาะสมเพื่อขอความช่วยเหลือ
- เก็บโปรเจคเตอร์ให้ห่างจากเด็กและสัตว์เลี้ยง
3. อะไรอยู่ในกล่อง
ตรวจสอบว่ามีสินค้าทั้งหมดอยู่ในบรรจุภัณฑ์:
- 1 x Groview Electric Focus Projector
- สาย HDMI 1 เส้น
- 1 x สายไฟ
- 1 x รีโมทคอนโทรล
- 1 x คู่มือผู้ใช้ (เอกสารนี้)
4. สินค้าหมดview
4.1 ส่วนประกอบของโปรเจ็กเตอร์
The following image illustrates the main components of the Groview Mini Projector.

4.2 พอร์ตอินพุต/เอาต์พุต
The rear panel of the projector features various ports for connecting external devices.
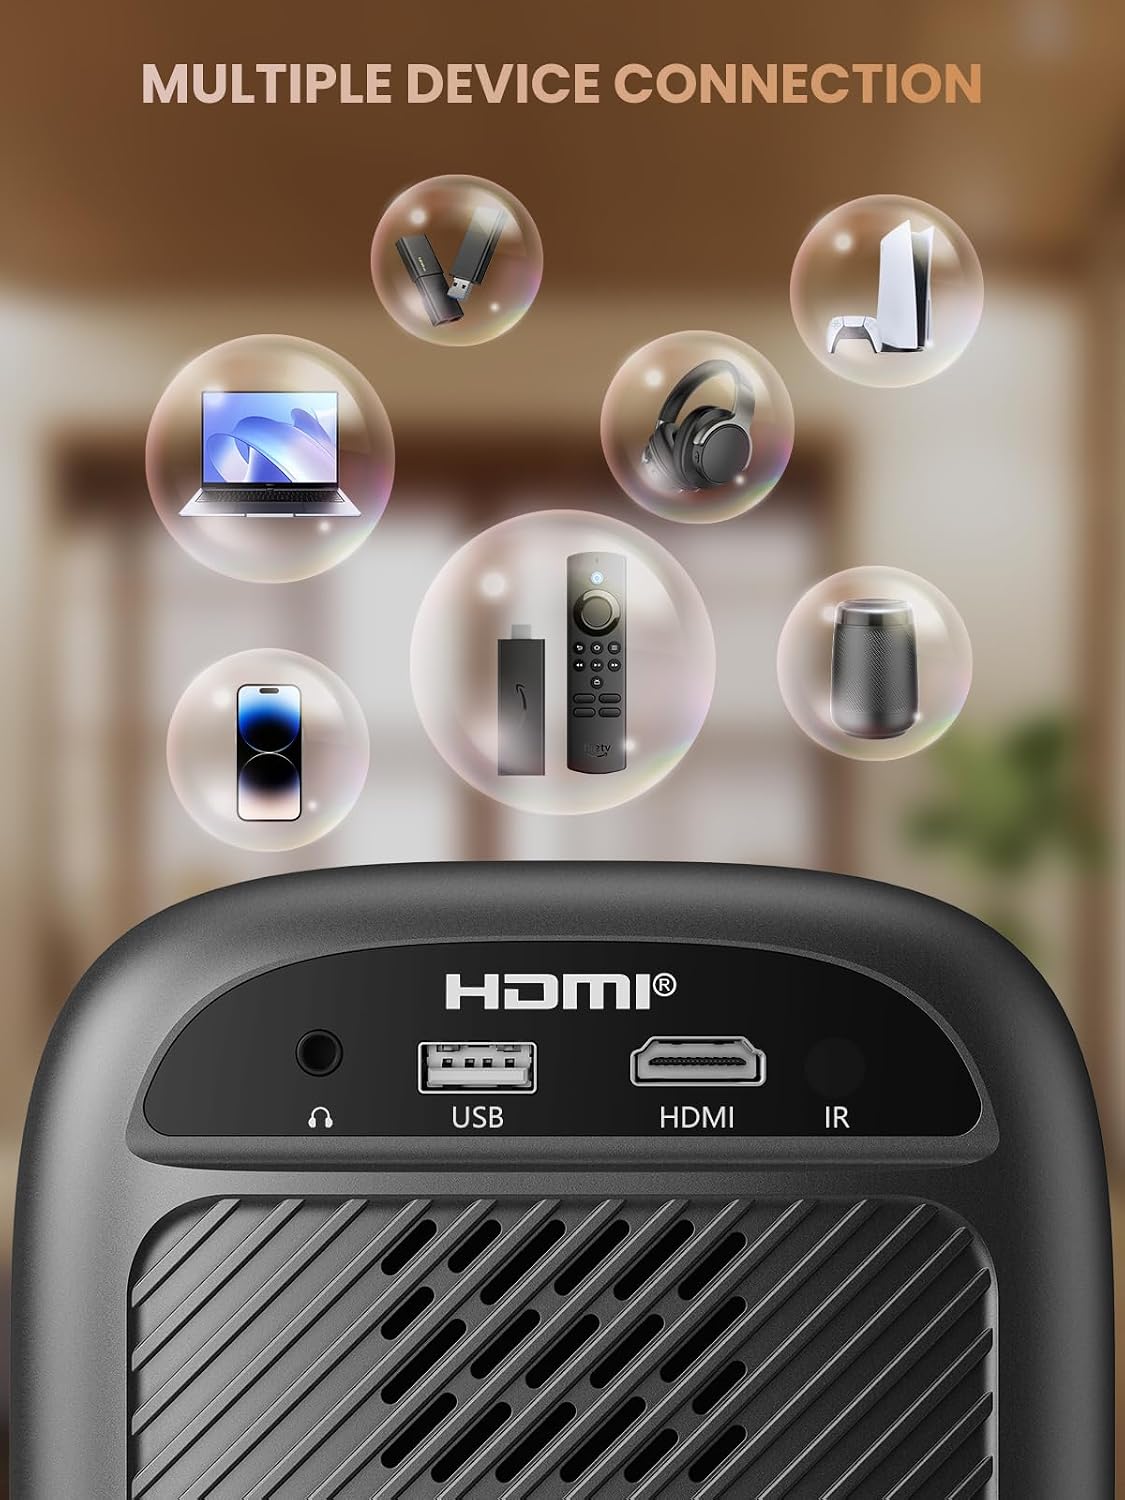
- พอร์ต HDMI: Connects to devices such as TV sticks, laptops, game consoles, and Blu-ray players.
- พอร์ต USB: เชื่อมต่อกับแฟลชไดรฟ์ USB เพื่อเล่นสื่อต่างๆ
- พอร์ตเสียง (แจ็ค 3.5 มม.): เชื่อมต่อกับลำโพงภายนอกหรือหูฟัง
- ตัวรับสัญญาณ IR: สำหรับสัญญาณควบคุมระยะไกล
5. การตั้งค่า
5.1 การเชื่อมต่อสายไฟ
- เชื่อมต่อสายไฟเข้ากับช่องจ่ายไฟของโปรเจ็กเตอร์
- เสียบสายไฟอีกด้านหนึ่งเข้ากับเต้ารับไฟฟ้า
5.2 การจัดวางโปรเจ็กเตอร์
Place the projector on a stable, flat surface. For optimal image quality, position the projector perpendicular to the projection surface (wall or screen). The projector can create a large image from a relatively short distance.
5.3 การปรับโฟกัส
เดอะโกรview-B2D-US features electric focus, allowing for precise image clarity adjustment using the remote control.

- เปิดโปรเจคเตอร์
- Point the remote control at the projector.
- Press the dedicated focus buttons (usually marked with 'F+' and 'F-' or similar icons) on the remote until the projected image is sharp and clear.
5.4 การแก้ไขคีย์สโตน
The projector includes a keystone adjustment slider on the rear panel. This allows you to correct trapezoidal distortion if the projector is not perfectly aligned with the screen. Adjust the slider until the image appears rectangular.
5.5 การเปิดเครื่องครั้งแรก
กดปุ่มเปิด/ปิดบนโปรเจคเตอร์หรือรีโมทคอนโทรลเพื่อเปิดเครื่อง โปรเจคเตอร์จะเริ่มทำงานและแสดงหน้าจอหลัก
6. คู่มือการใช้งาน
6.1 การเชื่อมต่ออุปกรณ์
โปรเจ็กเตอร์นี้มีตัวเลือกการเชื่อมต่อหลากหลายรูปแบบ:
- ช่องต่อ HDMI: Connect an HDMI cable from your source device (e.g., TV Stick, laptop, game console) to the projector's HDMI port. Select the HDMI input source from the projector's menu.
- ยูเอสบี: เสียบแฟลชไดรฟ์ USB เข้ากับพอร์ต USB โดยปกติแล้วโปรแกรมเล่นมีเดียของโปรเจคเตอร์จะตรวจจับแฟลชไดรฟ์โดยอัตโนมัติ ทำให้คุณสามารถเรียกดูและเล่นสื่อที่รองรับได้ files.
- Bluetooth 5.1: เชื่อมต่อกับลำโพงบลูทูธภายนอกหรือหูฟังเพื่อคุณภาพเสียงที่ดีขึ้น

- Enable Bluetooth on your external audio device and set it to pairing mode.
- On the projector, navigate to the Bluetooth settings menu.
- เลือกอุปกรณ์ของคุณจากรายการอุปกรณ์ที่พร้อมใช้งานเพื่อทำการจับคู่
Note: Bluetooth does not support smartphone mirroring.
6.2 Smartphone Connection Methods
To connect a smartphone, an adapter is required:

- อุปกรณ์ iOS: ใช้สายอะแดปเตอร์ Lightning to HDMI
- อุปกรณ์แอนดรอยด์: Use a Micro USB/Type C to HDMI adapter cable or a Google Chromecast.
6.3 การนำทางและเมนู
Use the arrow buttons on the remote control to navigate through the projector's on-screen menu. The 'OK' or 'Enter' button confirms selections, and the 'Back' or 'Return' button goes back to the previous menu.
6.4 Digital Zoom Function
The projector features a digital zoom function, allowing you to adjust the image size from 75% to 100% without moving the projector.

Access the zoom settings through the projector's menu and use the remote control to adjust the desired size.
6.5 การใช้งานรีโมทคอนโทรล
The included remote control operates the projector's functions. Ensure batteries are correctly installed. Note: A coin may be needed to open the battery compartment.
7. การบำรุงรักษา
7.1 การทำความสะอาด
- เลนส์: เช็ดเลนส์เบา ๆ ด้วยผ้าเนื้อนุ่มปราศจากขนที่ออกแบบมาสำหรับพื้นผิวเลนส์โดยเฉพาะ ห้ามใช้สารทำความสะอาดที่มีฤทธิ์กัดกร่อน
- ภายนอก: เช็ดทำความสะอาดภายนอกโปรเจคเตอร์ด้วยผ้าแห้งนุ่มๆ สำหรับคราบฝังแน่น ให้ใช้ผ้าชุบน้ำหมาดๆ เช็ดอีกครั้งamp สามารถใช้ผ้าชุบน้ำเช็ดได้ ตามด้วยผ้าแห้งอีกผืนหนึ่ง
7.2 Dust-proof Design
เดอะโกรview-B2D-US features a fully sealed optical engine, which helps prevent dust and debris from entering the projector and affecting image quality or lifespan.

7.3 พื้นที่จัดเก็บ
เมื่อไม่ใช้งาน ให้เก็บโปรเจคเตอร์ไว้ในที่แห้งและเย็น หลีกเลี่ยงแสงแดดโดยตรงและอุณหภูมิที่สูงหรือต่ำเกินไป ใช้ฝาปิดเลนส์เพื่อป้องกันเลนส์จากฝุ่นและรอยขีดข่วน
8 การแก้ไขปัญหา
- ไม่มีรูป: Check power connection, input source selection, and ensure the lens cap is removed. Verify the connected device is powered on and outputting a signal.
- ภาพเบลอ: Adjust the electric focus using the remote control. Ensure the projector is placed at an appropriate distance from the screen.
- ไม่มีเสียง: Check the volume settings on both the projector and the connected source device. If using Bluetooth, ensure the external audio device is properly paired and its volume is up.
- รีโมทคอนโทรลไม่ทำงาน: Check the batteries in the remote control and ensure there are no obstructions between the remote and the projector's IR receiver.
- คำเตือนความร้อนสูงเกินไป: Ensure ventilation openings are not blocked. Turn off the projector and allow it to cool down before restarting.
For further assistance, please contact Groview การสนับสนุนลูกค้า
9. ข้อมูลจำเพาะ
| คุณสมบัติ | ข้อมูลจำเพาะ |
|---|---|
| ยี่ห้อ | โกรview |
| หมายเลขรุ่น | โกรview-B2D-US |
| ความละเอียดดั้งเดิม | 1280 x 720 พิกเซล |
| ความละเอียดที่รองรับ | 1080P Full HD |
| เทคโนโลยีการเชื่อมต่อ | 3.5mm Jack, Bluetooth 5.1, HDMI, USB |
| คุณสมบัติพิเศษ | Electric Focus, Fully Sealed Optical Engine, Mini size & Lightweight, 150" Display, Digital Zoom (75%-100%) |
| การใช้ที่แนะนำ | ในร่ม/กลางแจ้ง |
| น้ำหนักสินค้า | 2.99 ปอนด์ |
| ขนาดสินค้า | 4.8 x 5.7 x 6.9 นิ้ว |
| สี | สีเทา |
10. การรับประกันและการสนับสนุน
โกรview products are designed for reliability and performance. For information regarding warranty coverage and customer support, please refer to the warranty card included with your purchase or visit the official Groview website. Our service team is available to assist with any product-related inquiries.


