การแนะนำ
Thank you for choosing the hygger HG121-8W 5-in-1 Aquarium Internal Filter. This versatile filter is designed to provide comprehensive water purification and circulation for your aquarium, offering multiple functional modes to suit various aquatic environments. Please read this manual thoroughly before installation and operation to ensure proper use and optimal performance.
คุณสมบัติผลิตภัณฑ์
- 5-in-1 Multiple Functions: Offers ventilation, rain shower, wave making, fountain, and water exchange capabilities.
- 3-S ที่มีประสิทธิภาพtage การกรอง: Utilizes biochemical sponges, activated carbon, and bio-balls for physical, chemical, and biological filtration, effectively removing odors and impurities.
- การทำงานที่เงียบเป็นพิเศษ: Engineered with a super quiet motor, ensuring minimal noise during operation, even at maximum flow.
- Adjustable Flow Design: Allows adjustment of water flow rate, airflow rate, and wave direction to meet specific aquarium needs.
- การใช้งานที่หลากหลาย: Suitable for both freshwater and saltwater aquariums ranging from 2 to 13 gallons (8-50 liters).
- ติดตั้งและบำรุงรักษาง่าย: Equipped with strong suction cups for secure attachment and a removable design for simple cleaning.
เนื้อหาแพ็คเกจ
โปรดตรวจสอบว่าส่วนประกอบทั้งหมดมีอยู่ก่อนดำเนินการติดตั้ง:
- hygger HG121-8W Internal Filter Unit
- Bioceramic Balls (pre-installed or separate)
- Biochemical Sponge (pre-installed or separate)
- Activated Carbon (pre-installed or separate)
- Rain Shower Bar and Connectors
- Aeration Tube
- หัวฉีดน้ำพุ
- Adjustable Flow Knob
- Suction Cups (4x)
- DC 5V Adapter with USB Port
คำแนะนำการตั้งค่า
- แกะกล่องและตรวจสอบ: นำส่วนประกอบทั้งหมดออกจากบรรจุภัณฑ์อย่างระมัดระวัง ตรวจสอบความเสียหายที่อาจเกิดขึ้น
- ประกอบวัสดุกรอง: The filter unit typically comes with pre-installed media. If not, insert the biochemical sponge into the bottom compartment, followed by activated carbon, and then the bioceramic balls into the top compartment. Ensure they are seated correctly.
- Attach Output Accessories:

This image illustrates the various output accessories and how they connect to the filter head for different functional modes.
- ฝักบัวอาบน้ำฝน: Connect the rain shower bar to the filter's output nozzle.
- การเติมอากาศ: Attach the aeration tube to the designated air intake port on the filter head.
- Fountain/Water Exchange: Attach the fountain nozzle or appropriate connector for water exchange.
- Secure Filter in Tank: Attach the four strong suction cups to the back of the filter unit. Submerge the filter completely in your aquarium water and press the suction cups firmly against the inner glass wall to secure it. Ensure the filter is positioned vertically and the water level is above the minimum water level mark indicated on the filter unit.

This image shows the filter unit securely attached to the aquarium wall, with the rain shower output positioned above the water surface.
- เชื่อมต่อพลังงาน: Plug the DC 5V adapter into a standard electrical outlet and connect the USB port to the filter's power cable.
คำแนะนำการใช้งาน
- เปิดเครื่อง: Once the filter is properly installed and submerged, plug in the power adapter. The filter will begin operating immediately.
- ปรับอัตราการไหล: Use the adjustable flow knob located on the filter head to increase or decrease the water flow rate as desired.
- Adjust Airflow (if using aeration): If the aeration tube is connected, you can adjust the amount of air introduced into the water by manipulating the air intake valve on the tube.
- Change Functional Modes: To switch between functions (e.g., from rain shower to fountain), you may need to detach one accessory and attach another. Ensure the filter is unplugged before making any changes to accessories.
การซ่อมบำรุง
Regular cleaning is crucial for maintaining the efficiency and longevity of your filter. It is recommended to clean the filter every 1-2 weeks.
- ตัดการเชื่อมต่อไฟฟ้า: ควรดึงปลั๊กตัวกรองออกจากแหล่งจ่ายไฟทุกครั้งก่อนทำการบำรุงรักษาใดๆ
- นำออกจากถัง: Gently detach the filter from the aquarium wall.
- ถอดชิ้นส่วนตัวกรอง: Carefully separate the filter compartments. Note the order of the filter media for correct reassembly.

This image displays the filter's internal structure and the three types of filter media: bioceramic balls, biochemical sponge, and activated carbon.
- ทำความสะอาดแผ่นกรอง: Rinse the biochemical sponge and bioceramic balls with old aquarium water (from a water change) to preserve beneficial bacteria. Do not use tap water directly, as chlorine can harm these bacteria. Activated carbon should be replaced every 2-4 weeks, or as needed, as its adsorptive capacity diminishes over time.
- ใบพัดและตัวเรือนที่สะอาด: Use a small brush to clean the impeller and the impeller housing to remove any debris or algae buildup.
- ประกอบและติดตั้งใหม่: Reassemble the filter in the reverse order of disassembly, ensuring all parts are securely fitted. Reinstall the filter in the aquarium and reconnect power.
การแก้ไขปัญหา
| ปัญหา | สาเหตุที่เป็นไปได้ | สารละลาย |
|---|---|---|
| ตัวกรองไม่ทำงานหรือไหลอ่อน | Power disconnected; Impeller jammed or dirty; Filter media clogged; Air in pump. | Check power connection; Clean impeller and housing; Clean or replace filter media; Gently shake filter to release air. |
| เสียงดังเกินไป | Impeller dirty or damaged; Air in pump; Filter not securely mounted. | Clean or replace impeller; Gently shake filter to release air; Re-secure filter to tank wall. |
| น้ำไม่ใส | Filter media saturated or dirty; Filter too small for tank size; Insufficient water changes. | Clean or replace filter media; Ensure filter is appropriate for tank volume; Perform regular water changes. |
ข้อมูลจำเพาะ
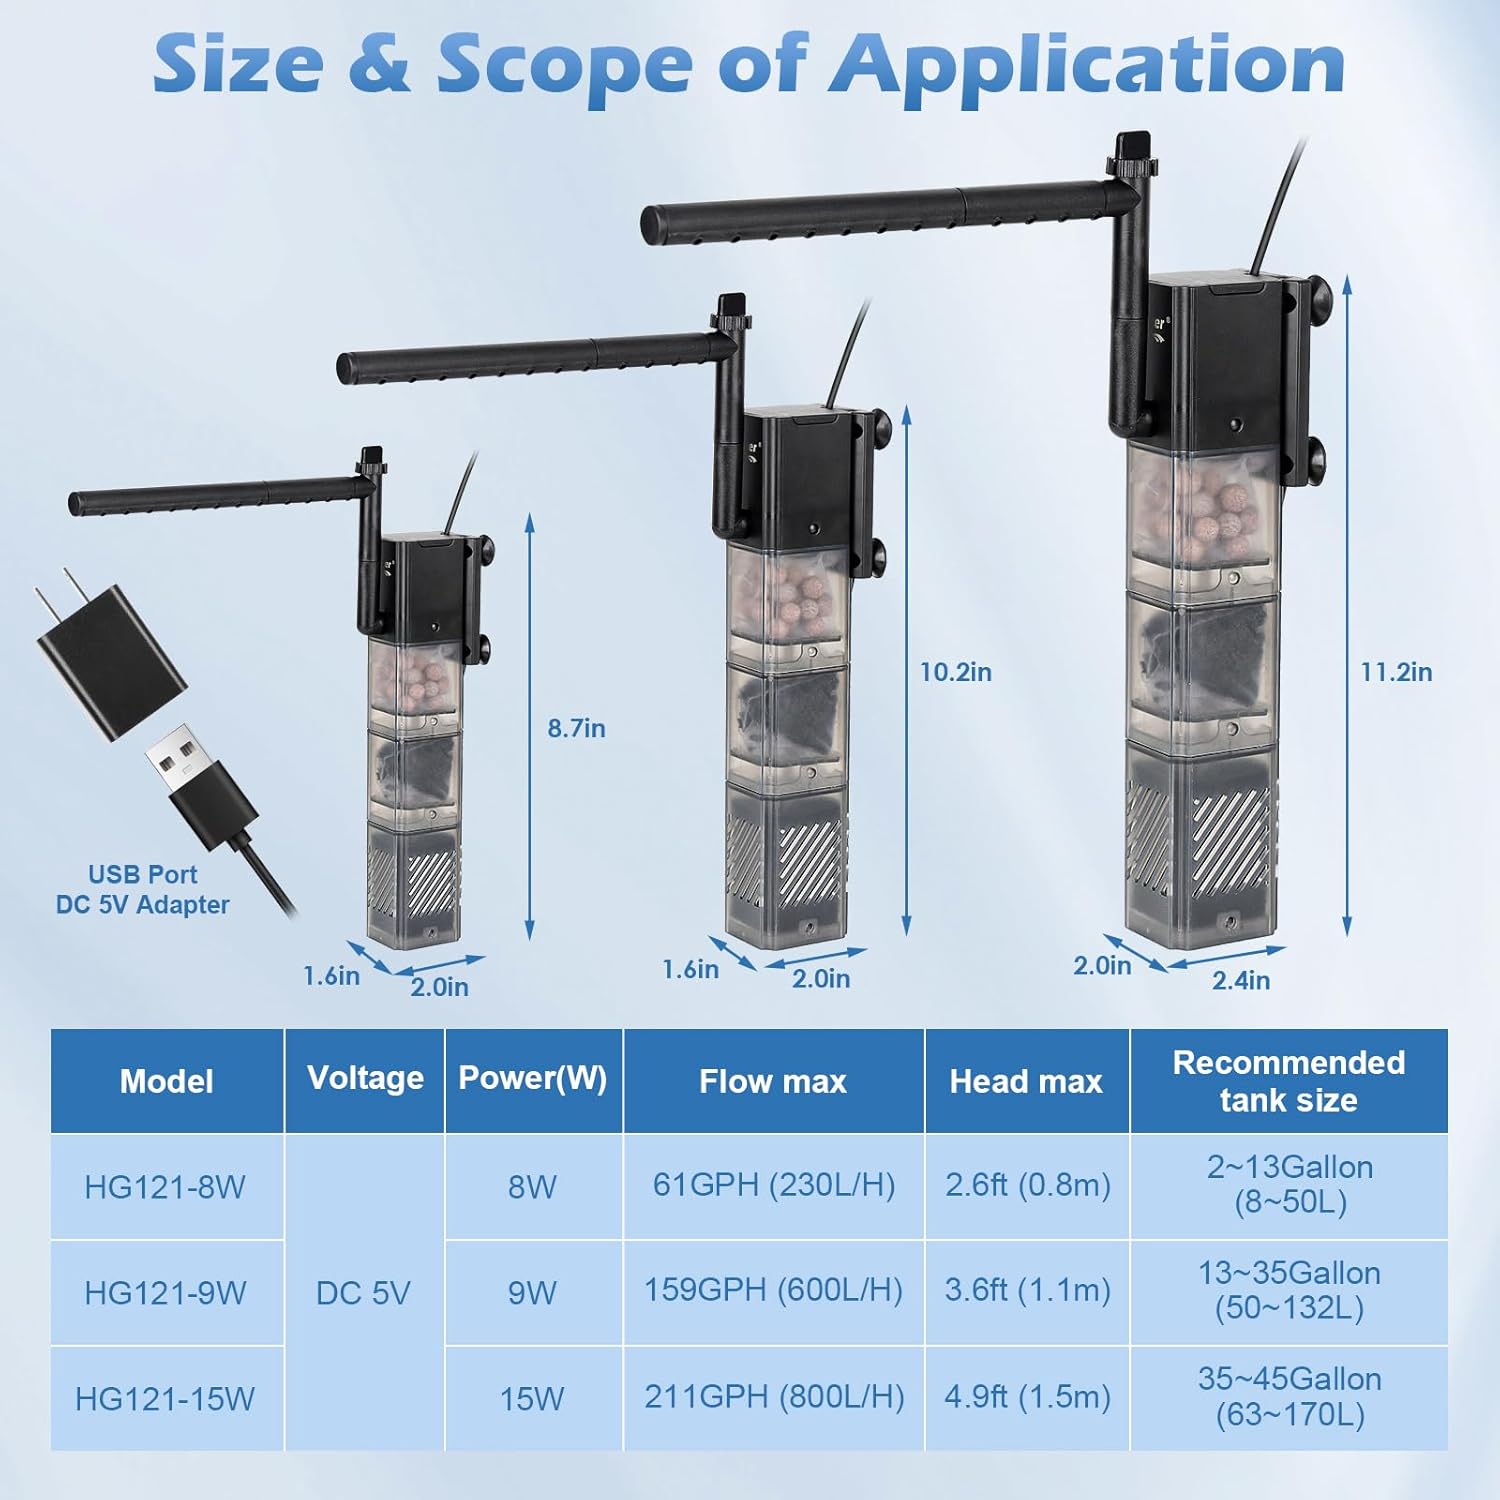
This image provides a detailed specification table for the HG121-8W model, alongside other variants, outlining dimensions, power, flow, and tank suitability.
| คุณลักษณะ | ค่า |
|---|---|
| หมายเลขรุ่น | HG121-8W |
| พลัง | 8W |
| เล่มที่tage อินพุต | ไฟฟ้ากระแสสลับ 110-240 โวลต์ |
| เล่มที่tagอี เอาท์พุต | กระแสตรง 5 โวลต์ |
| อัตราการไหลสูงสุด | 61 แกลลอนต่อชั่วโมง (230 ลิตร/เอช) |
| ความสูงสูงสุด | 2.6 ฟุต (0.8 ม.) |
| ขนาด (กว้าง x ยาว x สูง) | 2.0 นิ้ว x 1.6 นิ้ว x 8.7 นิ้ว |
| ความยาวสายไฟ | 4.92 ฟุต |
| ขนาดถังที่แนะนำ | 2-13 แกลลอน (8-50 ลิตร) |
การรับประกันและการสนับสนุน
For warranty information or technical support, please contact hygger customer service through the retailer where the product was purchased or visit the official hygger webไซต์ โปรดเก็บหลักฐานการซื้อไว้เพื่อใช้ในการเรียกร้องการรับประกัน