1. บทนำ
Thank you for choosing the Geek Smart L7 Robot Vacuum and Mop. This device is designed to provide efficient and thorough cleaning for your home, combining powerful vacuuming with intelligent mopping capabilities. Featuring advanced LDS navigation, Wi-Fi connectivity, and smart app control, the L7 ensures a customized cleaning experience for various floor types, including carpets and hard floors.
This manual provides essential information for the safe operation, setup, maintenance, and troubleshooting of your robot vacuum. Please read it carefully before use and retain it for future reference.
2. คำแนะนำด้านความปลอดภัย
To reduce the risk of injury or damage, read and follow all safety precautions when setting up, using, and maintaining your robot vacuum.
- เด็กอายุตั้งแต่ 8 ปีขึ้นไป รวมไปถึงบุคคลที่มีความบกพร่องทางร่างกาย ประสาทสัมผัส หรือจิตใจ หรือขาดประสบการณ์และความรู้ สามารถใช้เครื่องใช้ไฟฟ้านี้ได้ หากมีการดูแลหรือได้รับคำแนะนำเกี่ยวกับการใช้เครื่องใช้ไฟฟ้าในลักษณะที่ปลอดภัย และเข้าใจถึงอันตรายที่อาจเกิดขึ้น
- ควรมีผู้ดูแลเด็กเพื่อให้แน่ใจว่าไม่ได้เล่นกับเครื่องใช้ไฟฟ้าดังกล่าว
- การทำความสะอาดและการบำรุงรักษาผู้ใช้ไม่ควรทำโดยเด็กโดยไม่มีผู้ดูแล
- ใช้เฉพาะอะแดปเตอร์ไฟฟ้าเดิมที่ผู้ผลิตให้มาเท่านั้น
- ห้ามใช้หุ่นยนต์ในสภาพแวดล้อมที่มีเปลวไฟหรือวัสดุไวไฟ
- เก็บผม เสื้อผ้าที่หลวม นิ้ว และส่วนต่างๆ ของร่างกายให้ห่างจากช่องเปิดและชิ้นส่วนที่เคลื่อนไหว
- ห้ามใช้งานหุ่นยนต์ในห้องที่มีทารกหรือเด็กนอนหลับ
- ห้ามใช้หุ่นยนต์เก็บเศษขยะขนาดใหญ่ ของเหลว หรือวัตถุที่กำลังเผาไหม้
- ตรวจสอบให้แน่ใจว่าหุ่นยนต์วางอยู่บนพื้นผิวที่มั่นคงและไม่สามารถตกลงมาจากที่สูงได้
- Turn off the robot and unplug the charging dock before cleaning or maintenance.
3. เนื้อหาบรรจุภัณฑ์
ตรวจสอบว่าส่วนประกอบทั้งหมดอยู่ครบและอยู่ในสภาพดีเมื่อแกะกล่อง
- Geek Smart L7 Robot Vacuum and Mop
- แท่นชาร์จ
- อะแดปเตอร์แปลงไฟ
- แปรงด้านข้าง (2 คู่)
- แปรงหลัก
- Dust Bin (680ML)
- 2-in-1 Water Tank & Dust Bin (350ML water tank & 260ML dust bin)
- ผ้าถูพื้น (2)
- High-Efficiency Filter (pre-installed in dust bin)
- เครื่องมือทำความสะอาด
- คู่มือการใช้งาน
4. สินค้าหมดview
ส่วนประกอบของหุ่นยนต์ดูดฝุ่น

Image: The Geek Smart L7 Robot Vacuum, showcasing its top view with control buttons, LDS sensor, and accompanying accessories like the charging dock and replacement filters.
- LDS Navigation Sensor: Located on top, for precise mapping and navigation.
- ปุ่มควบคุม: Power/Clean, Home/Recharge.
- กันชนหน้า: ตรวจจับสิ่งกีดขวาง
- แปรงด้านข้าง: กวาดเศษซากต่างๆ ไปรวมไว้ในทางเดินหลักของพุ่มไม้
- แปรงหลัก: ดักจับฝุ่นและเศษสิ่งสกปรก
- ล้อขับเคลื่อน: ช่วยให้สามารถเคลื่อนที่บนพื้นผิวต่างๆ ได้
- หน้าสัมผัสการชาร์จ: เชื่อมต่อกับแท่นชาร์จ
- Dust Bin / Water Tank: Removable compartments for dust collection and water for mopping.
แท่นชาร์จ
The charging dock provides power to recharge the robot's battery. It should be placed in an open area with sufficient clearance.
5. การตั้งค่า
5.1 การวางตำแหน่งแท่นชาร์จ
- วางแท่นชาร์จชิดผนังในบริเวณโล่ง
- ให้แน่ใจว่ามีพื้นที่ว่างอย่างน้อย 0.5 เมตร (1.6 ฟุต) ทั้งสองด้านของท่าเทียบเรือและ 1.5 เมตร (4.9 ฟุต) ด้านหน้า
- เชื่อมต่ออะแดปเตอร์ไฟฟ้าเข้ากับแท่นชาร์จและเสียบเข้ากับเต้ารับที่ผนัง
- ตรวจสอบให้แน่ใจว่าไฟแสดงสถานะพลังงานบนแท่นชาร์จสว่างขึ้น
5.2 การชาร์จเริ่มต้น
- วางหุ่นยนต์ลงบนแท่นชาร์จ ตรวจสอบให้แน่ใจว่าขั้วสัมผัสการชาร์จตรงกัน
- The robot will automatically begin charging. Allow it to fully charge before its first use (approximately 4-5 hours).
5.3 การเชื่อมต่อและการแมปแอปพลิเคชัน

Image: The Geek Smart L7 Robot Vacuum actively scanning its environment using LDS navigation to create a detailed map, with digital map representations floating above it.
- Download the Geek Smart app from your mobile device's app store (available for iOS and Android).
- ลงทะเบียนบัญชีและเข้าสู่ระบบ
- Follow the in-app instructions to add your L7 robot vacuum. This typically involves connecting to the robot's Wi-Fi hotspot and then connecting the robot to your home Wi-Fi network.
- Once connected, initiate a full cleaning cycle. The robot will use its LDS navigation to create an accurate map of your home. This map will be saved in the app for future use, allowing for features like selective room cleaning and setting no-go zones. The robot can save up to 5 different maps.
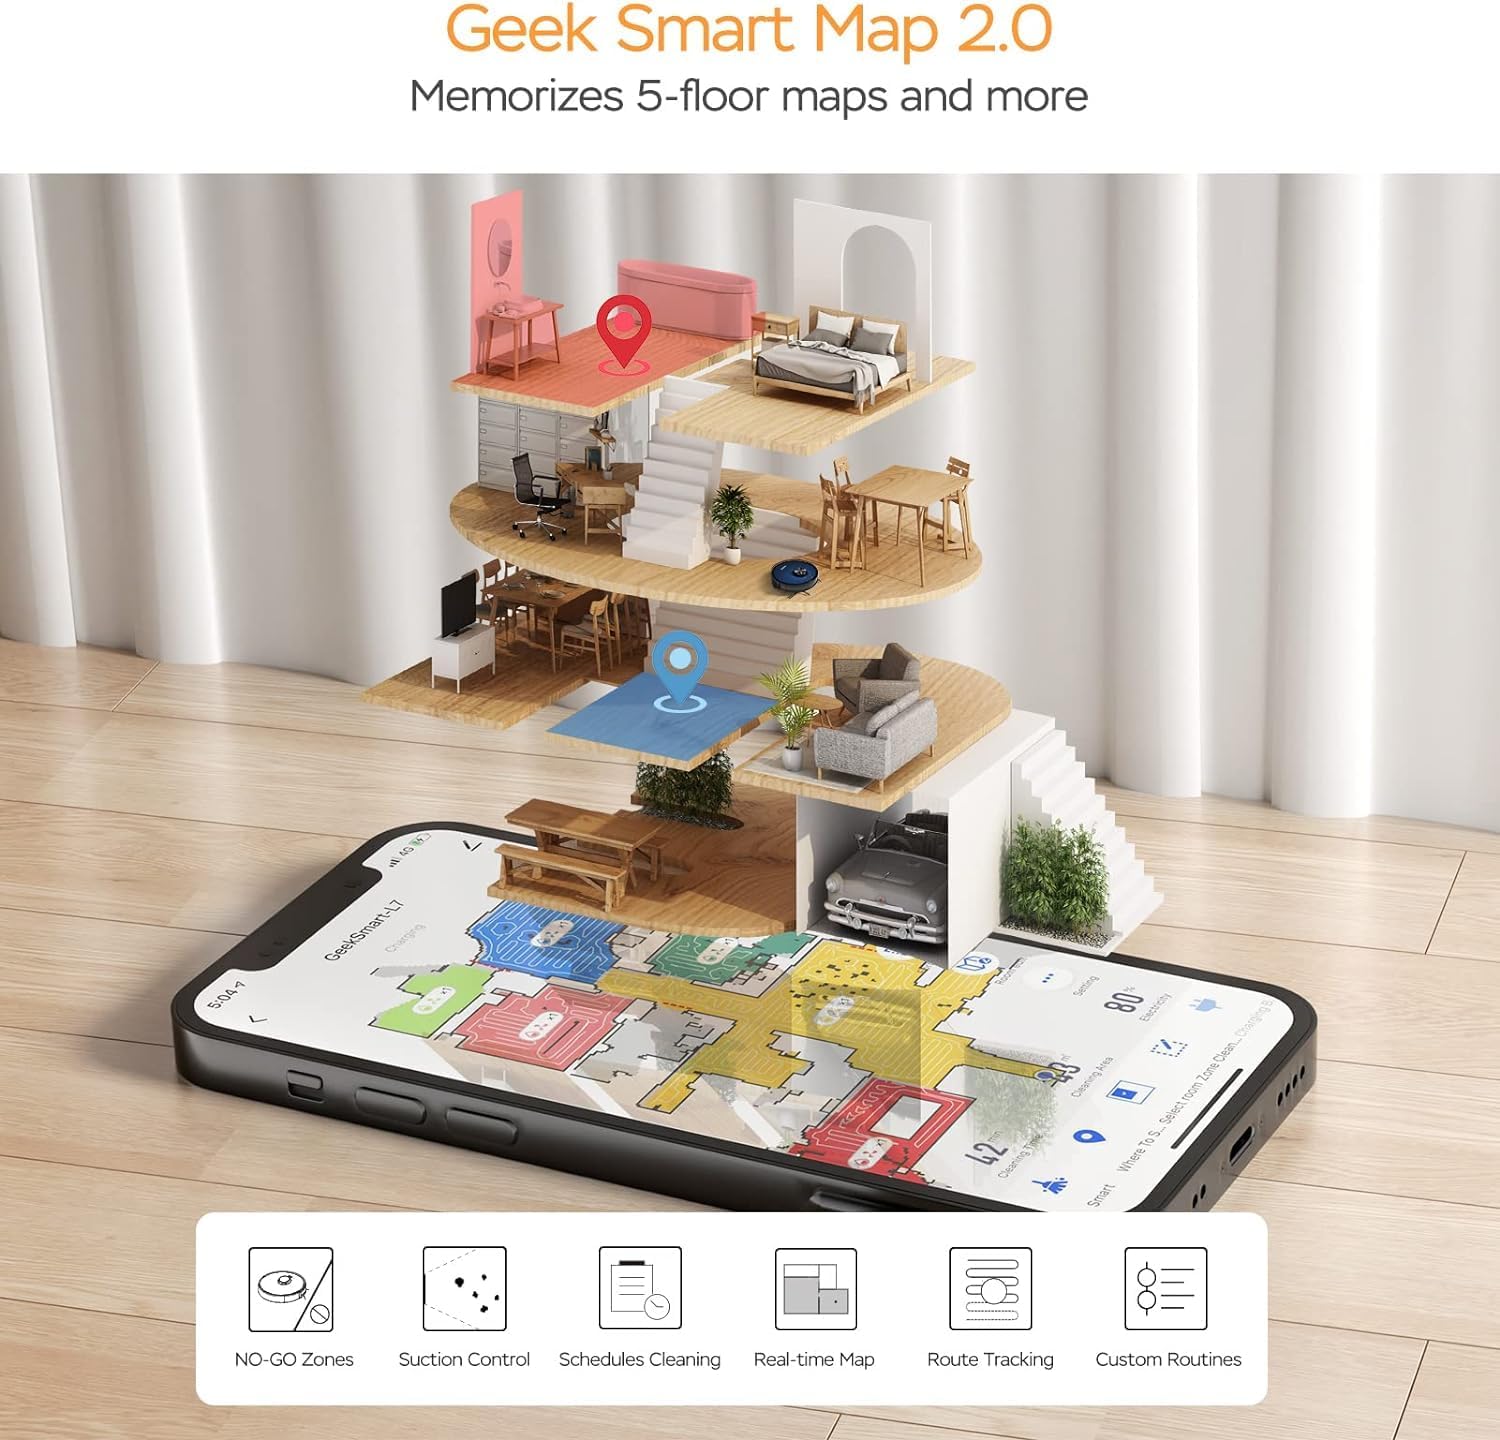
Image: A smartphone screen displaying the Geek Smart app interface, showing a color-coded floor plan map with various cleaning zones and controls.
6. คู่มือการใช้งาน
6.1 การเริ่มและหยุดการทำความสะอาด
- เริ่มทำความสะอาด: Press the Power/Clean button on the robot or tap "Start Cleaning" in the app. The robot will begin a full cleaning cycle.
- หยุดการทำความสะอาด: Press the Power/Clean button during operation or tap "Pause" in the app.
- กลับมาทำความสะอาดอีกครั้ง: Press the Power/Clean button again or tap "Resume" in the app.
- กลับสู่ท่าเรือ: Press the Home/Recharge button on the robot or tap "Recharge" in the app. The robot will return to its charging dock.
โหมดทำความสะอาด 6.2 โหมด
The L7 offers various cleaning modes to suit different needs.

Image: The Geek Smart L7 Robot Vacuum demonstrating its 2-in-1 sweeping and mopping capabilities on a hard floor, with debris being swept and a damp mop trail visible.
- ทำความสะอาดอัตโนมัติ: The robot intelligently plans its cleaning path using LDS navigation.
- การดูดฝุ่น: Utilizes up to 2700Pa suction power to clean dirt and debris from various surfaces.
- ถูพื้น: Attach the mop cloth and fill the 2-in-1 water tank. The electronic water tank allows for adjustable water output.
- ดูดฝุ่นและถูพื้น (พร้อมกัน): The robot can vacuum and mop simultaneously when the 2-in-1 tank is installed.
- โหมดเพิ่มประสิทธิภาพพรม: The robot automatically increases suction power when it detects carpeted areas for deeper cleaning.

Image: The Geek Smart L7 Robot Vacuum actively cleaning a hard floor, with a visual representation of its powerful 2700Pa suction lifting debris.

Image: The Geek Smart L7 Robot Vacuum transitioning from a hard floor to a carpet, illustrating its Carpet Boost Mode with enhanced suction indicated by glowing lines.

Image: The Geek Smart L7 Robot Vacuum positioned on a floor split between marble and wood, illustrating its integrated mopping system and adjustable water output for different surfaces.
6.3 คุณสมบัติการควบคุมแอป
The Geek Smart app unlocks advanced cleaning customization.
- บริการทำความสะอาดห้องเฉพาะส่วน: Choose specific rooms or areas on the map for cleaning.
- No-Go Zones / No-Mop Zones: Draw virtual boundaries on the map to prevent the robot from entering certain areas or mopping carpets.
- Invisible Walls: Create virtual walls to restrict the robot's movement.
- การกำหนดตารางเวลา: Set cleaning schedules for automatic operation at desired times.
- การปรับกำลังดูด: Manually adjust the suction level.
- Water Output Adjustment: Control the water flow for mopping.

Image: The Geek Smart L7 Robot Vacuum operating quietly (65dB) in a living room, demonstrating its low noise level suitable for homes with sleeping individuals or pets.
7. การบำรุงรักษา
Regular maintenance ensures optimal performance and extends the lifespan of your robot vacuum. Always turn off the robot and unplug the charging dock before performing any maintenance.
7.1 การล้างถังขยะ
- กดปุ่มปลดล็อกถังขยะและดึงถังขยะออกมา
- Open the dust bin cover and empty the contents into a trash can.
- Clean the filter and dust bin with the provided cleaning tool or a soft brush.
- ติดตั้งถังเก็บฝุ่นอีกครั้ง
7.2 Cleaning the 2-in-1 Water Tank & Dust Bin
- Remove the 2-in-1 tank from the robot.
- Empty any remaining water from the water tank compartment.
- ล้างช่องเก็บฝุ่นและทำความสะอาดตัวกรอง
- Rinse the water tank compartment with clean water. Do not immerse the entire tank in water, especially the electronic components.
- Allow all parts to air dry completely before reassembling and reinstalling.
7.3 การทำความสะอาดแปรงหลัก
- Flip the robot over and press the release tabs to remove the main brush cover.
- ยกแปรงหลักออก
- ใช้เครื่องมือทำความสะอาดเพื่อกำจัดเส้นผมและเศษสิ่งสกปรกที่พันอยู่รอบแปรงและตลับลูกปืน
- ติดตั้งแปรงหลักและฝาครอบกลับเข้าที่
7.4 การทำความสะอาดแปรงด้านข้าง
- ค่อยๆ ดึงแปรงด้านข้างขึ้นด้านบนเพื่อถอดออก
- กำจัดขนหรือเศษขยะออก หากแปรงงอ ให้แช่ในน้ำอุ่นสักครู่เพื่อปรับรูปทรง
- Press the brushes back into place until they click.
7.5 การทำความสะอาดเซ็นเซอร์และหน้าสัมผัสการชาร์จ
- Use a clean, dry cloth to wipe the cliff sensors (located on the bottom of the robot), wall sensors (on the side), and the charging contacts on both the robot and the charging dock.
- Ensure the LDS sensor on top is also clean and free of obstructions.
8 การแก้ไขปัญหา
If you encounter issues with your robot vacuum, refer to the following table for common problems and solutions.
| ปัญหา | สาเหตุที่เป็นไปได้ | สารละลาย |
|---|---|---|
| หุ่นยนต์ไม่เปิดขึ้น | แบตเตอรี่ต่ำ; ปิดสวิตช์ไฟ | Place robot on charging dock; Ensure power switch is on. |
| หุ่นยนต์ไม่สามารถชาร์จได้ | หน้าสัมผัสการชาร์จสกปรก แท่นชาร์จไม่เปิด | ทำความสะอาดจุดสัมผัสการชาร์จบนหุ่นยนต์และแท่นชาร์จ ตรวจสอบให้แน่ใจว่าเสียบแท่นชาร์จแล้ว |
| หุ่นยนต์ติดขัดบ่อยมาก | สิ่งกีดขวางบนพื้น; เซ็นเซอร์ตรวจจับหน้าผาสกปรก | Clear cables and small objects; Clean cliff sensors. |
| ประสิทธิภาพการทำความสะอาดแย่ | ถังเก็บฝุ่นเต็ม; แปรงพันกัน; ตัวกรองอุดตัน | ล้างถังเก็บฝุ่น ทำความสะอาดแปรงหลักและด้านข้าง ทำความสะอาดหรือเปลี่ยนตัวกรอง |
| ฟังก์ชันถูพื้นใช้งานไม่ได้ | Water tank empty; Mop cloth dry; Water outlet clogged | Fill water tank; Moisten mop cloth; Clean water outlet. |
| ปัญหาการเชื่อมต่อแอพ | รหัสผ่าน Wi-Fi ไม่ถูกต้อง; เราเตอร์อยู่ไกลเกินไป; หุ่นยนต์ออฟไลน์ | Verify Wi-Fi credentials; Move robot closer to router; Restart robot and router. |
9. ข้อมูลจำเพาะ
| คุณสมบัติ | ข้อมูลจำเพาะ |
|---|---|
| ยี่ห้อ | ฉลาดเกินบรรยาย |
| ชื่อรุ่น | L7 |
| ประเภทการนำทาง | 360° LiDAR |
| พลังดูดสูงสุด | 2700 ปา |
| ความจุของแบตเตอรี่ | 2600 มิลลิแอมป์ |
| รันไทม์สูงสุด | 130 นาที |
| ความจุถังเก็บฝุ่น | 680 มล. |
| Water Tank Capacity (2-in-1) | 350 มล. |
| ระดับเสียง | Sub-65 dB |
| ขนาดสินค้า | ยาว 12.59 นิ้ว x กว้าง 12.59 นิ้ว x สูง 3.74 นิ้ว |
| น้ำหนักสินค้า | 13.39 ปอนด์ |
| อุปกรณ์ที่รองรับ | อเมซอน เอคโค่ |
| ยูพีซี | 764773837187 |
10. การรับประกันและการสนับสนุน
Geek Smart products are manufactured to the highest quality standards. For warranty information, technical support, or customer service inquiries, please refer to the contact information provided on the product packaging or visit the official Geek Smart webเว็บไซต์.
โปรดเก็บหลักฐานการซื้อของคุณไว้เพื่อเรียกร้องการรับประกัน


