1. บทนำ
This manual provides essential instructions for the safe and efficient operation of your Tera Level 2 J1772 48A Electric Vehicle (EV) Charger. Please read this manual thoroughly before installation and use, and retain it for future reference.
The Tera EV Charger is designed to provide reliable and fast charging for both J1772 compatible electric vehicles and Tesla vehicles (with the included adapter). It features adjustable current settings, scheduling options, and robust safety protections.
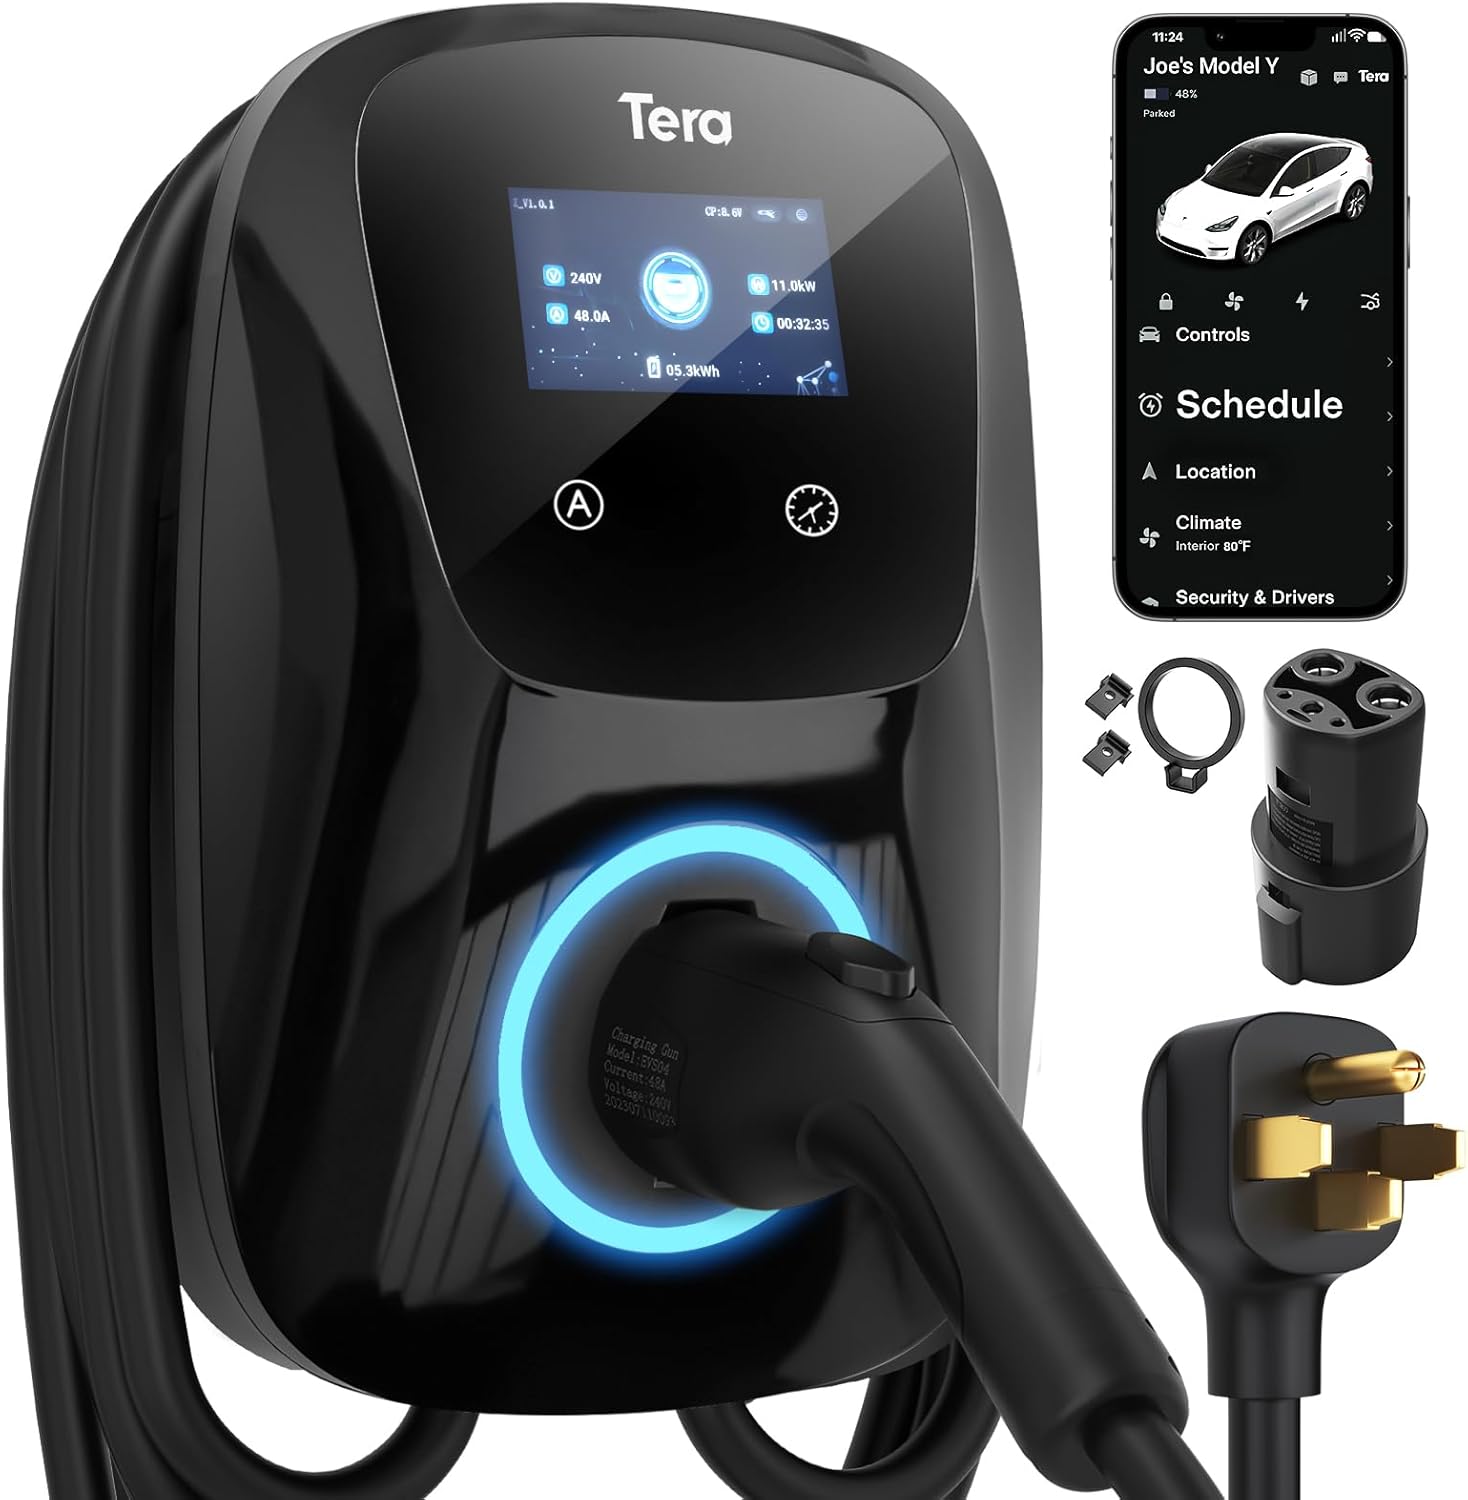
Image 1.1: Tera Level 2 EV Charger with included accessories.
2. ข้อมูลด้านความปลอดภัย
ปฏิบัติตามคำแนะนำด้านความปลอดภัยต่อไปนี้เสมอ เพื่อป้องกันการบาดเจ็บหรือความเสียหาย:
- การติดตั้งโดยมืออาชีพ: การติดตั้งควรดำเนินการโดยช่างไฟฟ้าที่มีคุณสมบัติตามมาตรฐานไฟฟ้าท้องถิ่นและระดับชาติทั้งหมด
- การต่อลงดิน: Ensure the charger is properly grounded to prevent electrical shock.
- น้ำและความชื้น: Do not operate the charger if it is visibly damaged or exposed to excessive moisture. While the unit is IP65 rated for outdoor use, avoid submerging it.
- ความสมบูรณ์ของสายเคเบิล: Regularly inspect the charging cable for any signs of wear, cuts, or damage. Do not use a damaged cable.
- เด็กและสัตว์เลี้ยง: โปรดกันเด็กและสัตว์เลี้ยงให้ออกห่างจากบริเวณชาร์จไฟขณะใช้งาน
- หยุดฉุกเฉิน: Familiarize yourself with the location of your electrical panel's circuit breaker for the charger in case an emergency shutdown is required.
- การระบายอากาศ : ตรวจสอบให้แน่ใจว่ามีการระบายอากาศเพียงพอรอบๆ เครื่องชาร์จระหว่างการใช้งาน
The Tera EV Charger is ETL Certified, indicating compliance with North American safety standards. This certification is equivalent to UL for home insurance requirements, signifying the manufacturer's commitment to high safety standards.

Image 2.1: ETL Certification and integrated safety protections.
3. เนื้อหาบรรจุภัณฑ์
ตรวจสอบว่ามีรายการทั้งหมดอยู่ในแพ็คเกจก่อนดำเนินการติดตั้ง:
- Tera Electric Vehicle Charger Unit
- คู่มือการใช้งาน (เอกสารนี้)
- แผ่นยึด
- ชุดสกรู
- Tools (for installation)
- J1772 to Tesla Adapter with Lock
- Cable Holder for Tesla

Image 3.1: Contents of the Tera EV Charger package.
4. การตั้งค่าและการติดตั้ง
The Tera EV Charger is designed for wall-mounted installation. Follow these general steps:
- เลือกสถานที่: Select a suitable location near your parking area, ensuring it is within reach of your vehicle's charging port and a dedicated 240V outlet (NEMA 14-50). The 25-foot cable provides flexibility.
- แผ่นติดตั้ง: Unscrew the mounting plate from the charger unit. Position the mounting plate on the wall at the desired height and mark the drilling points.
- แผ่นยึดแบบปลอดภัย: Drill pilot holes and securely fasten the mounting plate to the wall using the provided screws and anchors.
- Attach Charger Unit: Carefully align the charger unit with the mounted plate and slide it into place. Secure it with the anti-theft screw.
- เชื่อมต่อพลังงาน: Plug the charger's NEMA 14-50 plug into the dedicated 240V outlet.
- การจัดการสายเคเบิล: Use the provided cable holder to neatly store the charging cable when not in use.
For detailed electrical wiring and circuit breaker requirements, consult a certified electrician. The unit is IP65 rated, making it suitable for both indoor and outdoor installation, capable of withstanding temperatures from -22°F to 122°F.

Image 4.1: Installation steps for the Tera EV Charger.

Image 4.2: The charger's IP65 rating ensures durable performance in various weather conditions.
5. คู่มือการใช้งาน
The Tera EV Charger offers both manual and app-based control for charging sessions.
5.1. การตั้งค่าเริ่มต้นและการชาร์จ
Before plugging the charger into your vehicle, it is recommended to configure the desired current and schedule settings on the unit or via the app. Plugging it in first will activate a plug-and-play mode, which may not utilize scheduled settings.

Image 5.1: Configure settings before connecting to the vehicle.
5.2. Manual Current Adjustment and Scheduling
The charger unit features a touch screen interface for direct control:
- การปรับปัจจุบัน: Use the 'A' button on the unit to cycle through available current settings (e.g., 24A, 32A, 40A, 48A). Select the appropriate amperage for your vehicle and electrical circuit.
- การตั้งค่าตารางเวลา: Use the clock icon button to set a charging schedule, allowing you to define charging start times for up to 12 hours in advance.

Image 5.2: Touch screen controls for current and schedule.
5.3. App-Based Control and Scheduling
For enhanced convenience, the Tera EV Charger can be controlled via a dedicated mobile application. This allows for remote management of charging sessions:
- เริ่ม/หยุดการชาร์จ: Initiate or terminate charging remotely.
- ปรับกระแสไฟ: เปลี่ยนการชาร์จ amperage from your mobile device.
- กำหนดเวลาการเรียกเก็บเงิน: Set detailed charging schedules to optimize for off-peak electricity rates or specific departure times.
- ตรวจสอบการชาร์จ: View real-time charging status and energy consumption.

Image 5.3: App interface for remote charging control.

Image 5.4: Visual representation of scheduled charging for cost efficiency.
5.4 การเชื่อมต่อกับรถยนต์ของคุณ
- Ensure the charger is powered on and any desired settings (current, schedule) are configured.
- For Tesla vehicles, attach the J1772 to Tesla adapter to the charger's J1772 connector.
- Insert the charging connector (or adapter) firmly into your vehicle's charging port.
- The charger will begin the charging process according to your settings or immediately if in plug-and-play mode.
บันทึก: Hybrid vehicles may automatically reduce charging current based on their maximum allowable current, regardless of the charger's setting.
6. คุณสมบัติ
- เข้ากันได้สากล: Fully upgraded for seamless compatibility with all Tesla models (using the included adapter) and J1772 standard electric vehicles.
- ชาร์จเร็ว: Delivers up to 48A output, providing rapid Level 2 charging at approximately 46 miles of range per hour.
- ปรับกระแสไฟได้: Manually select charging current from 24A, 32A, 40A, or 48A to suit your vehicle's needs and home electrical capacity.
- ความยาวสายเคเบิลเพิ่มเติม: A 25-foot premium charging cable offers ample reach for convenient charging in various locations.
- ทนทานและทนต่อสภาพอากาศ: IP65 rated for water and dust resistance, ensuring reliable operation in diverse environmental conditions, from extreme cold (-22°F) to high heat (122°F).
- ความปลอดภัยที่ครอบคลุม: ETL certified with multiple protection features including overvoltage, อันเดอร์โวลtage, overload, overtemperature, ground fault, earth leakage, and short circuit protection.

Image 6.1: High-speed Level 2 charging capabilities.

Image 6.2: The 25-foot cable provides extensive reach for charging.
7. ข้อมูลจำเพาะ
| ข้อมูลจำเพาะ | ค่า |
|---|---|
| ยี่ห้อ | เทระ |
| หมายเลขรุ่น | ZB04-U011K series |
| Ampอีเรจ | 48 Amps (Adjustable) |
| ปริมาณการส่งออกtage | 240 โวลต์ (AC) |
| วัดtage | 11.5 กิโลวัตต์ชั่วโมง |
| ความยาวสายเคเบิล | 25 ฟุต |
| ประเภทขั้วต่อ | J1772 (with Tesla adapter included) |
| ปลั๊กไฟ | เนมา 14-50 |
| ระดับการป้องกันน้ำและฝุ่น (IP) | IP65 |
| อุณหภูมิในการทำงาน | -22°F ถึง 122°F (-30°C ถึง 50°C) |
| การรับรอง | ETL, CE, TÜV, FCC |
| น้ำหนักสินค้า | 20 ปอนด์ (ประมาณ 9.1 กก.) |
| ขนาดสินค้า | 22 x 16 x 12 นิ้ว (ประมาณ 56 x 41 x 30 ซม.) |
8 การแก้ไขปัญหา
If you encounter issues with your Tera EV Charger, consider the following common troubleshooting steps:
- ไม่มีไฟฟ้า: Check the circuit breaker for the outlet. Ensure the NEMA 14-50 plug is fully inserted.
- การชาร์จไม่เริ่มต้น: Verify that the charging connector is securely plugged into the vehicle's port. Check the charger's display for error messages. Ensure the vehicle is ready to accept a charge.
- การชาร์จช้า: Confirm the current setting on the charger or app. Ensure your vehicle is not limiting the charging rate.
- ตัวบ่งชี้ข้อผิดพลาด: The charger features LED indicators to communicate status and errors. Refer to the table below for common indicator meanings.
| สถานะตัวบ่งชี้ | ความหมาย |
|---|---|
| Blue (Always on) | สแตนด์บาย |
| Green (Always on) | Insert the Charger |
| Green (Flashes every 1S) | การชาร์จไฟ |
| Red (Always on) | ซีพีผิดปกติ |
| Red (Flashes every 1S) | สูง/ต่ำ Voltage |
| Red (Flashes every 2S) | ความผิดพลาดของพื้นดิน |
| Red (Flashes 3S ON, 3S OFF) | ระบบป้องกันกระแสไฟเกิน |
| Purple (Flashes every 1S) | การป้องกันการรั่วไหล |
| Purple (Flashes every 2S) | การป้องกันอุณหภูมิเกิน |
| Purple (Flashes every 4S) | การป้องกันการยึดเกาะ |

Image 8.1: LED indicator light meanings for troubleshooting.
หากปัญหายังคงอยู่ โปรดติดต่อฝ่ายสนับสนุนลูกค้า
9. การบำรุงรักษา
Regular maintenance helps ensure the longevity and optimal performance of your EV charger:
- การทำความสะอาด: Periodically wipe the charger unit and cable with a soft, damp ผ้า. หลีกเลี่ยงการใช้สารเคมีที่รุนแรงหรือน้ำยาทำความสะอาดที่มีฤทธิ์กัดกร่อน
- การตรวจสอบสายเคเบิล: Routinely check the charging cable and connector for any signs of damage, fraying, or discoloration. Replace if damaged.
- พื้นที่จัดเก็บ: When not in use, store the charging cable neatly using the provided cable holder to prevent kinks or damage.
- การปกป้องสิ่งแวดล้อม: While the unit is weatherproof, ensure it is not continuously exposed to extreme conditions beyond its operating limits.
10. การรับประกันและการสนับสนุน
The Tera EV Charger comes with a รับประกัน 2 ปี, reflecting the manufacturer's commitment to quality and reliability. For warranty claims or technical assistance, please contact Tera customer support.
ข้อมูลติดต่อ:
- อีเมล: cs@tera-innovation.com
- Webเว็บไซต์: https://www.tera-innovation.com
- โทรศัพท์: +1 (626)438-1404

Image 10.1: Certifications and 2-year warranty information.


